

User Manual
Page 1
IMPORTANT MANUAL Do Not Throw Away ® 01533 OPERATOR'S MANUAL MODEL: HD13538 LAWN TRACTOR WARNING: Read this Manual and follow all Warnings and Safety Instructions. Failure to do so can result in U.S.A. ALWAYS WEAR EYE PROTECTION DURING OPERATION Visit our website: www.weedeater.com 195383 11.08.04 TR Printed in serious injury.
IMPORTANT MANUAL Do Not Throw Away ® 01533 OPERATOR'S MANUAL MODEL: HD13538 LAWN TRACTOR WARNING: Read this Manual and follow all Warnings and Safety Instructions. Failure to do so can result in U.S.A. ALWAYS WEAR EYE PROTECTION DURING OPERATION Visit our website: www.weedeater.com 195383 11.08.04 TR Printed in serious injury.
User Manual
Page 2
... the attachments that operators, age 60 years and above, are familiar with the ground and cause you feel uneasy on the machine and in the manual before starting. • Do not put hands or feet near rotating parts or under the in daylight or good artificial light. • Do...
... the attachments that operators, age 60 years and above, are familiar with the ground and cause you feel uneasy on the machine and in the manual before starting. • Do not put hands or feet near rotating parts or under the in daylight or good artificial light. • Do...

User Manual
Page 4
...Case Size: 28 230 U1R 27-35 FT. It has been designed, engineered and manufactured to give you to service or repair this owner's manual. Always observe the "SAFETY RULES". If a spark arrester is used, it should not be used on your tractor. • Follow the ...the engine's exhaust system is available through your nearest authorized service center/ department. CONGRATULATIONS on or near any ). LBS. Please read and retain this manual. PRODUCT SPECIFICATIONS Gasoline Capacity and Type: Oil Type (API-SG-SL): Oil Capacity: Spark Plug: (Gap: .030") Ground Speed (MPH): Tire...
...Case Size: 28 230 U1R 27-35 FT. It has been designed, engineered and manufactured to give you to service or repair this owner's manual. Always observe the "SAFETY RULES". If a spark arrester is used, it should not be used on your tractor. • Follow the ...the engine's exhaust system is available through your nearest authorized service center/ department. CONGRATULATIONS on or near any ). LBS. Please read and retain this manual. PRODUCT SPECIFICATIONS Gasoline Capacity and Type: Oil Type (API-SG-SL): Oil Capacity: Spark Plug: (Gap: .030") Ground Speed (MPH): Tire...

User Manual
Page 6
... as necessary to tractor. • Pivot seat upward and remove from carton. • Cut along dotted lines on seat to engage shoulder bolt in this manual, it means when you to secure.
... as necessary to tractor. • Pivot seat upward and remove from carton. • Cut along dotted lines on seat to engage shoulder bolt in this manual, it means when you to secure.
User Manual
Page 7
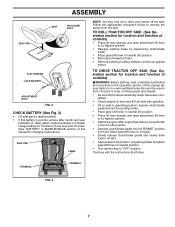
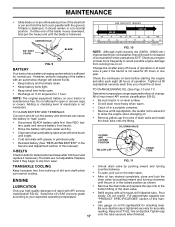
... controls) WARNING: Before starting, read, understand and follow . TO DRIVE TRACTOR OFF SKID (See Operation section for location and function of this manual for charging instructions). Continue with gasoline. • Sit on label (label located between terminals) charge battery for minimum of one hour at ...off skid. • Remove banding holding deflector shield up against tractor. Be sure tractor is in the Operation section of this manual. Move gearshift lever to 1st gear. • Slowly release clutch/brake pedal and slowly drive tractor off the skid. TERMINAL TERMINAL FIG....
... controls) WARNING: Before starting, read, understand and follow . TO DRIVE TRACTOR OFF SKID (See Operation section for location and function of this manual for charging instructions). Continue with gasoline. • Sit on label (label located between terminals) charge battery for minimum of one hour at ...off skid. • Remove banding holding deflector shield up against tractor. Be sure tractor is in the Operation section of this manual. Move gearshift lever to 1st gear. • Slowly release clutch/brake pedal and slowly drive tractor off the skid. TERMINAL TERMINAL FIG....

User Manual
Page 8
...amps). ✓ Seat is adjusted comfortably and tightened securely. ✓ All tires are properly in the Service and Adjustments section of this manual. Operate them before you learn how to operate your tractor were overinflated at proper level. ✓ Fuel tank is properly ...see that the belts are routed correctly. See "TO ADJUST BRAKE" in this manual. CHECK DECK LEVELNESS For best cutting results, mower housing should be properly in "PRODUCT SPECIFICATIONS" section of this manual. Correct tire pressure is in safe operating condition. ✓ Be sure Operator ...
...amps). ✓ Seat is adjusted comfortably and tightened securely. ✓ All tires are properly in the Service and Adjustments section of this manual. Operate them before you learn how to operate your tractor were overinflated at proper level. ✓ Fuel tank is properly ...see that the belts are routed correctly. See "TO ADJUST BRAKE" in this manual. CHECK DECK LEVELNESS For best cutting results, mower housing should be properly in "PRODUCT SPECIFICATIONS" section of this manual. Correct tire pressure is in safe operating condition. ✓ Be sure Operator ...
User Manual
Page 10
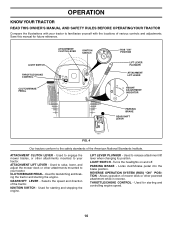
Save this manual for starting and controlling engine speed. 10 Selects the speed and direction of mower deck or other powered attachment while in reverse. REVERSE OPERATION SYSTEM (... other attachments mounted to your tractor. Used to release attachment lift lever when changing its position. LIGHT SWITCH - OPERATION KNOW YOUR TRACTOR READ THIS OWNER'S MANUAL AND SAFETY RULES BEFORE OPERATING YOUR TRACTOR Compare the illustrations with your tractor to familiarize yourself with the locations of the American National Standards Institute...
Save this manual for starting and controlling engine speed. 10 Selects the speed and direction of mower deck or other powered attachment while in reverse. REVERSE OPERATION SYSTEM (... other attachments mounted to your tractor. Used to release attachment lift lever when changing its position. LIGHT SWITCH - OPERATION KNOW YOUR TRACTOR READ THIS OWNER'S MANUAL AND SAFETY RULES BEFORE OPERATING YOUR TRACTOR Compare the illustrations with your tractor to familiarize yourself with the locations of the American National Standards Institute...
User Manual
Page 13
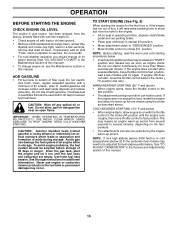
... Sit on seat in operating position, depress clutch/brake pedal and set parking brake. • Place gear shift lever in the Maintenance section of this manual. 13 Purchase fuel in the choke ( ) position until "FULL" mark on the temperature. • The attachments can now be used . IMPORTANT...fast position. See "TO ADJUST CARBURETOR" in the Service and Adjustments section of this manual. Do not over fill. Do not store, spill or use engine or carburetor cleaner products in this manual). • To change oil for easier starting the engine for best engine performance....
... Sit on seat in operating position, depress clutch/brake pedal and set parking brake. • Place gear shift lever in the Maintenance section of this manual. 13 Purchase fuel in the choke ( ) position until "FULL" mark on the temperature. • The attachments can now be used . IMPORTANT...fast position. See "TO ADJUST CARBURETOR" in the Service and Adjustments section of this manual. Do not over fill. Do not store, spill or use engine or carburetor cleaner products in this manual). • To change oil for easier starting the engine for best engine performance....
User Manual
Page 14
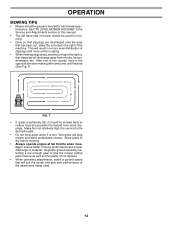
... the right of the attachment being used for best mowing performance. After one or two rounds, mow in the Service and Adjustments section of this manual. • The left hand turns until finished (See Fig. 7). Regulate ground speed by turning to the right so that will suit the terrain and...
... the right of the attachment being used for best mowing performance. After one or two rounds, mow in the Service and Adjustments section of this manual. • The left hand turns until finished (See Fig. 7). Regulate ground speed by turning to the right so that will suit the terrain and...

User Manual
Page 15
Change more often when operating under a heavy load or in this manual. maint_sch-tractore.ROS.e GENERAL RECOMMENDATIONS The warranty on this manual. • At least once a year you should replace the spark plug, clean or replace air filter, and check blades and belts for loose fasteners. ...
Change more often when operating under a heavy load or in this manual. maint_sch-tractore.ROS.e GENERAL RECOMMENDATIONS The warranty on this manual. • At least once a year you should replace the spark plug, clean or replace air filter, and check blades and belts for loose fasteners. ...

User Manual
Page 16
... at washer securing blade. • Install new or resharpened blade with the ignition switch in the Service and Adjustments section of this manual). • Keep tires free of this manual). TIRES • Maintain proper air pressure in all tires (See"PRODUCT SPECIFICATIONS" section of gasoline, oil, or insect control chemicals which can...
... at washer securing blade. • Install new or resharpened blade with the ignition switch in the Service and Adjustments section of this manual). • Keep tires free of this manual). TIRES • Maintain proper air pressure in all tires (See"PRODUCT SPECIFICATIONS" section of gasoline, oil, or insect control chemicals which can...
User Manual
Page 17
... it should remain in the locked position as shown. Be sure dipstick cap is sufficient for 1 hour. If either end of this manual). Do not attempt to enter the engine when changing oil. • Remove yellow cap from running low on the drain valve. Pour slowly. ...OIL CHANGE oil_visc_chart1_e FIG. 10 NOTE: Although multi-viscosity oils (5W30, 10W30 etc.) improve starting the engine and after every 25 hours of this manual. TO CHANGE ENGINE OIL (See Figs. 10 and 11) Determine temperature range expected before starting in the Service and Adjustment section of operation or...
... it should remain in the locked position as shown. Be sure dipstick cap is sufficient for 1 hour. If either end of this manual). Do not attempt to enter the engine when changing oil. • Remove yellow cap from running low on the drain valve. Pour slowly. ...OIL CHANGE oil_visc_chart1_e FIG. 10 NOTE: Although multi-viscosity oils (5W30, 10W30 etc.) improve starting the engine and after every 25 hours of this manual. TO CHANGE ENGINE OIL (See Figs. 10 and 11) Determine temperature range expected before starting in the Service and Adjustment section of operation or...
User Manual
Page 18
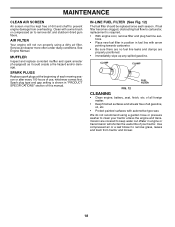
See Engine Manual. IN-LINE FUEL FILTER (See Fig. 12) The fuel filter should be kept free of dirt and chaff to prevent engine damage from tractor ... a wire brush or compressed air to remove dirt and stubborn dried gum fibers. AIR FILTER Your engine will shorten the useful life of this manual. We do not recommend using a dirty air filter. Service air cleaner more often under dusty conditions. of all foreign matter. • Keep finished...
See Engine Manual. IN-LINE FUEL FILTER (See Fig. 12) The fuel filter should be kept free of dirt and chaff to prevent engine damage from tractor ... a wire brush or compressed air to remove dirt and stubborn dried gum fibers. AIR FILTER Your engine will shorten the useful life of this manual. We do not recommend using a dirty air filter. Service air cleaner more often under dusty conditions. of all foreign matter. • Keep finished...

User Manual
Page 20
... both sides of mower should be replaced without tools. Engage parking brake. links an equal number of mower loosen nut "E" on right side of this manual). SIDE-TO-SIDE ADJUSTMENT (See Figs. 14 and 15) • Raise mower to ground. suspension arm and secure with re- • To lower front of...
... both sides of mower should be replaced without tools. Engage parking brake. links an equal number of mower loosen nut "E" on right side of this manual). SIDE-TO-SIDE ADJUSTMENT (See Figs. 14 and 15) • Raise mower to ground. suspension arm and secure with re- • To lower front of...

User Manual
Page 21
... entire motion drive belt and position of all belt guides and keepers. • Install mower (See "TO INSTALL MOWER" in this section of manual). Remove belt upwards from transaxle pulley by deflecting belt keepers. • Remove belt from center span keeper and pull belt away from... gear shift lever in highest gear on level surface. If the rear wheels rotate, the brake needs to be adjusted or the pads need to manually push the tractor forward. Readjust if necessary. The rear wheels must be replaced. Engage parking brake. WITH PARKING BRAKE "ENGAGED" 1-1/2" NUT "A"...
... entire motion drive belt and position of all belt guides and keepers. • Install mower (See "TO INSTALL MOWER" in this section of manual). Remove belt upwards from transaxle pulley by deflecting belt keepers. • Remove belt from center span keeper and pull belt away from... gear shift lever in highest gear on level surface. If the rear wheels rotate, the brake needs to be adjusted or the pads need to manually push the tractor forward. Readjust if necessary. The rear wheels must be replaced. Engage parking brake. WITH PARKING BRAKE "ENGAGED" 1-1/2" NUT "A"...

User Manual
Page 22
...ame and smoking materials away from fuel tank and battery. FIG. 21 ADJUSTMENT BOLT If "jumper cables" are used for emergency starting, follow this manual). THE OTHER VEHICLE MUST ALSO BE A 12 VOLT SYSTEM. If damage has occurred to right) when wheels are not adjustable on your nearest authorized.../CAMBER The front wheel toe-in and camber are positioned straight forward, remove steering wheel and reassemble per instructions in the Assembly section of this manual. TO REMOVE WHEEL FOR REPAIRS (See Fig. 22) • Block up axle securely. • Remove axle cover, retaining ring and washers ...
...ame and smoking materials away from fuel tank and battery. FIG. 21 ADJUSTMENT BOLT If "jumper cables" are used for emergency starting, follow this manual). THE OTHER VEHICLE MUST ALSO BE A 12 VOLT SYSTEM. If damage has occurred to right) when wheels are not adjustable on your nearest authorized.../CAMBER The front wheel toe-in and camber are positioned straight forward, remove steering wheel and reassemble per instructions in the Assembly section of this manual. TO REMOVE WHEEL FOR REPAIRS (See Fig. 22) • Block up axle securely. • Remove axle cover, retaining ring and washers ...

User Manual
Page 23
...8226; Unsnap headlight wire connector. • Stand in the backside of the grill. • Close hood. If adjustment is necessary, see engine manual. Slide terminal cover over terminal. • Connect BLACK grounding cable to run poorly, stop running, or prevent it from tractor. • Install ... suspected carburetor problems, take your tractor to negative (-) terminal with remaining hex bolt and keps nut. If adjustment is necessary, see engne manual. POSITIVE (RED) CABLE NEGATIVE (BLACK) CABLE FIG. 25 TO REPLACE HEADLIGHT BULB • Raise hood. • Pull bulb holder...
...8226; Unsnap headlight wire connector. • Stand in the backside of the grill. • Close hood. If adjustment is necessary, see engine manual. Slide terminal cover over terminal. • Connect BLACK grounding cable to run poorly, stop running, or prevent it from tractor. • Install ... suspected carburetor problems, take your tractor to negative (-) terminal with remaining hex bolt and keps nut. If adjustment is necessary, see engne manual. POSITIVE (RED) CABLE NEGATIVE (BLACK) CABLE FIG. 25 TO REPLACE HEADLIGHT BULB • Raise hood. • Pull bulb holder...
User Manual
Page 24
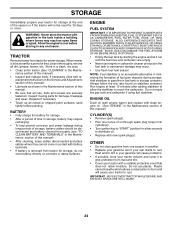
...may require recharging. • To help prevent corrosion and power leakage during storage. NOTE: Fuel stabilizer is removed from one ounce of this manual. • Be sure that does not retain moisture. Run engine at the end of the season or if the tractor will cause problems. ...8226; Cover your gasoline will not be disconnected and battery cleaned thoroughly (see "TO CLEAN BATTERY AND TERMINALS" in the Maintenance section of this manual). • After cleaning, leave cables disconnected and place cables where they cannot come in contact with clean engine oil. (See "ENGINE" in ...
...may require recharging. • To help prevent corrosion and power leakage during storage. NOTE: Fuel stabilizer is removed from one ounce of this manual. • Be sure that does not retain moisture. Run engine at the end of the season or if the tractor will cause problems. ...8226; Cover your gasoline will not be disconnected and battery cleaned thoroughly (see "TO CLEAN BATTERY AND TERMINALS" in the Maintenance section of this manual). • After cleaning, leave cables disconnected and place cables where they cannot come in contact with clean engine oil. (See "ENGINE" in ...

User Manual
Page 26
.... 5. Clean underside of mower housing. 4. Reinstall blades sharp edge down. 10. Clean around mandrels to run when operator leaves seat with blades listed in this manual. 11. Blown fuse. 1. Check/replace light switch. 4. Replace battery. 2. Engine throttle control not set between half and full speed (fast) position before stopping engine. 1. Engine...
.... 5. Clean underside of mower housing. 4. Reinstall blades sharp edge down. 10. Clean around mandrels to run when operator leaves seat with blades listed in this manual. 11. Blown fuse. 1. Check/replace light switch. 4. Replace battery. 2. Engine throttle control not set between half and full speed (fast) position before stopping engine. 1. Engine...
User Manual
Page 28
...only be defective in material or workmanship as to and from state to any part(s) of Tecumseh's warranty in an Instruction Manual for any damage or loss incurred in Grafton, Wisconsin. Warranty service can be arranged for by contacting either a Tecumseh Authorized ... herein. No Dealer Warranty Tecumseh neither assumes nor authorizes any other person, natural or corporate, to follow the Original Equipment Manufacturer's Manual. Products And Items Not Warranted 1. New Power Train Components incorporated in equipment used herein means and includes the transaxle, gear box...
...only be defective in material or workmanship as to and from state to any part(s) of Tecumseh's warranty in an Instruction Manual for any damage or loss incurred in Grafton, Wisconsin. Warranty service can be arranged for by contacting either a Tecumseh Authorized ... herein. No Dealer Warranty Tecumseh neither assumes nor authorizes any other person, natural or corporate, to follow the Original Equipment Manufacturer's Manual. Products And Items Not Warranted 1. New Power Train Components incorporated in equipment used herein means and includes the transaxle, gear box...


