
User Manual
Page 1
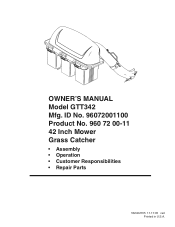
ID No. 96072001100 Product No. 960 72 00-11 42 Inch Mower Grass Catcher • Assembly • Operation • Customer Responsibilities • Repair Parts 532402705 11.17.05 rad Printed in U.S.A. 03021 OWNER'S MANUAL Model GTT342 Mfg.
ID No. 96072001100 Product No. 960 72 00-11 42 Inch Mower Grass Catcher • Assembly • Operation • Customer Responsibilities • Repair Parts 532402705 11.17.05 rad Printed in U.S.A. 03021 OWNER'S MANUAL Model GTT342 Mfg.
User Manual
Page 2
..., transporting, adjusting or making repairs, always disconnect spark plug wire and place wire where it . • Mow up and down for all times. • Only allow the mower deck to occur. Shut off engine and wait for small children. • Never carry children, even with grass catchers or other... the operator. • Be alert and turn off . Clean any oil or fuel spillage before turning. • Never leave a running machine unattended. Uneven terrain could suddenly roll over if a wheel is dangerous. Do no use on the slopes slow and gradual. WARNING: Tow only the attachments that ...
..., transporting, adjusting or making repairs, always disconnect spark plug wire and place wire where it . • Mow up and down for all times. • Only allow the mower deck to occur. Shut off engine and wait for small children. • Never carry children, even with grass catchers or other... the operator. • Be alert and turn off . Clean any oil or fuel spillage before turning. • Never leave a running machine unattended. Uneven terrain could suddenly roll over if a wheel is dangerous. Do no use on the slopes slow and gradual. WARNING: Tow only the attachments that ...
User Manual
Page 3
... CONTENTS 4 STORAGE 9 ASSEMBLY 5-7 REPAIR PARTS 10-11 OPERATION 8 3 tion regularly. • Keep machine free of grass, leaves, or other than from the truck or trailer and refuel it on a water heater or other sources of ignition. • Use only approved gasoline container. • Never remove gas cap or add fuel with the engine running . • Check grass catcher components and the discharge guard frequently and replace with plastic liner...
... CONTENTS 4 STORAGE 9 ASSEMBLY 5-7 REPAIR PARTS 10-11 OPERATION 8 3 tion regularly. • Keep machine free of grass, leaves, or other than from the truck or trailer and refuel it on a water heater or other sources of ignition. • Use only approved gasoline container. • Never remove gas cap or add fuel with the engine running . • Check grass catcher components and the discharge guard frequently and replace with plastic liner...
User Manual
Page 4
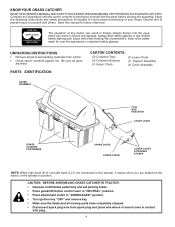
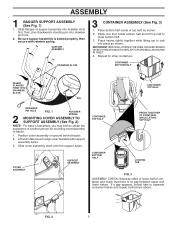
...: BEFORE ASSEMBLING GRASS CATCHER TO TRACTOR: • Depress clutch/brake pedal fully and set parking brake. • Place gearshift/motion control lever in "NEUTRAL" position. • Place attachment clutch in the operator's position. Study the operating instructions and safety precautions thoroughly to familiarize yourself with plug. 4 Be sure all parts are seated on the tractor, in "DISENGAGED" position. • Turn ignition key "OFF" and remove key. • Make sure the blade and all parts and packing...
...: BEFORE ASSEMBLING GRASS CATCHER TO TRACTOR: • Depress clutch/brake pedal fully and set parking brake. • Place gearshift/motion control lever in "NEUTRAL" position. • Place attachment clutch in the operator's position. Study the operating instructions and safety precautions thoroughly to familiarize yourself with plug. 4 Be sure all parts are seated on the tractor, in "DISENGAGED" position. • Turn ignition key "OFF" and remove key. • Make sure the blade and all parts and packing...
User Manual
Page 5
... SHOWN IN INSET. 4. Slide cover assembly down onto the support tubes. If a gap appears, unlock tabs to meet bottom half. 3. SUPPORT ASSEMBLY DRAWBAR SLOTS 3 CONTAINER ASSEMBLY (See Fig. 3) 1. Position cover assembly on ground behind tractor. 2. COVER ASSEMBLY SUPPORT ASSEMBLY CONTAINER TOP HALF 02739 02089 CONTAINER TOP HALF PRESS TOGETHER TO FORM SEAL WHILE LIFTING TOP HALF CONTAINER BOTTOM HALF LOCKING TAB FIG. 3 ASSEMBLY CHECK: Squeeze sides of lower...
... SHOWN IN INSET. 4. Slide cover assembly down onto the support tubes. If a gap appears, unlock tabs to meet bottom half. 3. SUPPORT ASSEMBLY DRAWBAR SLOTS 3 CONTAINER ASSEMBLY (See Fig. 3) 1. Position cover assembly on ground behind tractor. 2. COVER ASSEMBLY SUPPORT ASSEMBLY CONTAINER TOP HALF 02739 02089 CONTAINER TOP HALF PRESS TOGETHER TO FORM SEAL WHILE LIFTING TOP HALF CONTAINER BOTTOM HALF LOCKING TAB FIG. 3 ASSEMBLY CHECK: Squeeze sides of lower...
User Manual
Page 6
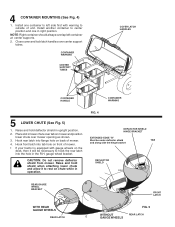
... warning to outside of mower. • If your tractor is equipped with gauge wheels on the deck, then it to hook the rear latch into the hole in right position. Hook front latch into flange hole on mower and position lower chute over center support tubes. CONTAINER WARNING COVER LATCH HANDLES CENTER SUPPORT TUBES 03022 CONTAINER HANDLE csDWruoabcAnjekoecRttdotNooprewIdrNaeatameGr amagnoedwdde. gauge wheel bracket. erUtuisenerlieoosrnaslytcioaonnr.etaCcihonemecrmkisebpnardgoepfdreerrqelyupiselannctsleytma. is...
... warning to outside of mower. • If your tractor is equipped with gauge wheels on the deck, then it to hook the rear latch into the hole in right position. Hook front latch into flange hole on mower and position lower chute over center support tubes. CONTAINER WARNING COVER LATCH HANDLES CENTER SUPPORT TUBES 03022 CONTAINER HANDLE csDWruoabcAnjekoecRttdotNooprewIdrNaeatameGr amagnoedwdde. gauge wheel bracket. erUtuisenerlieoosrnaslytcioaonnr.etaCcihonemecrmkisebpnardgoepfdreerrqelyupiselannctsleytma. is...
User Manual
Page 7
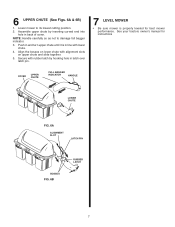
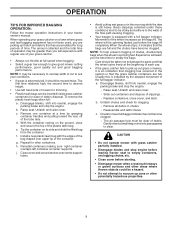
Push in and turn upper chute until it is properly leveled for instructions COVER UPPER CHUTE FULL BAGGER INDICATOR HANDLE LOWER CHUTE 03029 FIG. 6A ALIGNMENT SLOT LATCH PIN 03023 RUBBER LATCH BOSSES FIG. 6B 7 Secure with lower chute. 4. 6 UPPER CHUTE (See Figs. 6A & 6B) 1. NOTE: Handle carefully so as not to its lowest cutting position. 2. See your tractors owner's manual for best mower performance. Align the bosses on...
Push in and turn upper chute until it is properly leveled for instructions COVER UPPER CHUTE FULL BAGGER INDICATOR HANDLE LOWER CHUTE 03029 FIG. 6A ALIGNMENT SLOT LATCH PIN 03023 RUBBER LATCH BOSSES FIG. 6B 7 Secure with lower chute. 4. 6 UPPER CHUTE (See Figs. 6A & 6B) 1. NOTE: Handle carefully so as not to its lowest cutting position. 2. See your tractors owner's manual for best mower performance. Align the bosses on...
User Manual
Page 8
... is equipped with grass catcher partially installed. • Disengage blades and stop the engine. - When the wheel stops, it is spinning fast. Unlatch and raise cover. - Replace containers, close and secure the top of clippings . - Remove all debris in your grass catcher on a lawn where grass and leaf bagging equipment has not been used, you the best time to give good mower cutting performance, good quality cut grass or leaves...
... is equipped with grass catcher partially installed. • Disengage blades and stop the engine. - When the wheel stops, it is spinning fast. Unlatch and raise cover. - Replace containers, close and secure the top of clippings . - Remove all debris in your grass catcher on a lawn where grass and leaf bagging equipment has not been used, you the best time to give good mower cutting performance, good quality cut grass or leaves...
User Manual
Page 9
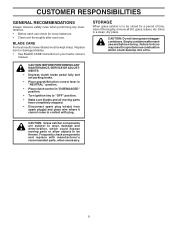
... tractor owner's manual. Failure to "OFF" position. • Make sure blades and all dirt, grass, leaves, etc. CAUTION: BEFORE PERFORMING ANY MAINTENANCE,SERVICE OR ADJUSTMENTS: • Depress clutch brake pedal fully and set parking brake. • Place gearshift/motion control lever in "NEUTRAL" position. • Place clutch control in "DISENGAGED" position. • Turn ignition key to do so may result in bagger containers. Frequently check components and replace with plug. Empty containers after each use . Replace...
... tractor owner's manual. Failure to "OFF" position. • Make sure blades and all dirt, grass, leaves, etc. CAUTION: BEFORE PERFORMING ANY MAINTENANCE,SERVICE OR ADJUSTMENTS: • Depress clutch brake pedal fully and set parking brake. • Place gearshift/motion control lever in "NEUTRAL" position. • Place clutch control in "DISENGAGED" position. • Turn ignition key to do so may result in bagger containers. Frequently check components and replace with plug. Empty containers after each use . Replace...


