

User Manual
Page 1
sagia ., Failure To Do So Can Result in Serious Injury OPERATOR'S MANUAL MODEL: GTI® 17T GAS POWERED TRIMMER (18") Always Wear Eye Protection CUSTOMER ASSISTANCE 4 1 . 800-554-6723 BACK COVER FOR DETAILS! • IMPORTANT MANUAL Do Not Throw Away TRADEMARK® A WARNING: Read the Operator's Manual and Follow All Warnings and Safety Instructions.
sagia ., Failure To Do So Can Result in Serious Injury OPERATOR'S MANUAL MODEL: GTI® 17T GAS POWERED TRIMMER (18") Always Wear Eye Protection CUSTOMER ASSISTANCE 4 1 . 800-554-6723 BACK COVER FOR DETAILS! • IMPORTANT MANUAL Do Not Throw Away TRADEMARK® A WARNING: Read the Operator's Manual and Follow All Warnings and Safety Instructions.
User Manual
Page 2
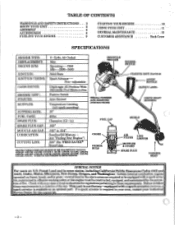
... 8 FUELING YOUR ENGINE 9 STARTING YOUR ENGINE USING YOUR UNIT GENERAL MAINTENANCE CUSTOMER ASSISTANCE 10; 11 -15 Back Cover SPECIFICATIONS ENGINE TYPE: DISPLACEMENT: ENGINE RPM: IGNITION: 2-Cycle, Air Cooled 30cc Operating- -7500 Idle--2600-3400 Solid State THROTTLE TRIGGER /7,- • t• • ENGINE. SWITCH STARTER ROPE HANDLE IGNITION TIMING: CARBURETOR: Spark Advance- - This unit is available as an optional part. CHOKE (see "Fueling Your Engine") MI Se Am • 111 AIR FILTER LINE LIMITER 11) CUTTING LINE: .080" Din WEED EATER® Brand Line...
... 8 FUELING YOUR ENGINE 9 STARTING YOUR ENGINE USING YOUR UNIT GENERAL MAINTENANCE CUSTOMER ASSISTANCE 10; 11 -15 Back Cover SPECIFICATIONS ENGINE TYPE: DISPLACEMENT: ENGINE RPM: IGNITION: 2-Cycle, Air Cooled 30cc Operating- -7500 Idle--2600-3400 Solid State THROTTLE TRIGGER /7,- • t• • ENGINE. SWITCH STARTER ROPE HANDLE IGNITION TIMING: CARBURETOR: Spark Advance- - This unit is available as an optional part. CHOKE (see "Fueling Your Engine") MI Se Am • 111 AIR FILTER LINE LIMITER 11) CUTTING LINE: .080" Din WEED EATER® Brand Line...

User Manual
Page 3
...) AWAY Operator's Manual Label A WARNING READ OPERATOR'S MANUAL. - YOU CAN BE BLINDED OR INJURED. - A DANGER BLADES OR SLINGING HEADS CAN COME OFF AND CAUSE SERIOUS INJURE - NEVER USE ANY OTHER CUTTING ATTACHMENT WITH THIS UNIT Leg Guards gr11o4/ g Face Boots Shield Thrown Objects • A WARNING TRIMMER LINE CAN THROW OBJECTS VIOLENTLY - THIS POWER TOOL CAN BE DANGEROUS! Restrict the use of this power tool to the operator and...
...) AWAY Operator's Manual Label A WARNING READ OPERATOR'S MANUAL. - YOU CAN BE BLINDED OR INJURED. - A DANGER BLADES OR SLINGING HEADS CAN COME OFF AND CAUSE SERIOUS INJURE - NEVER USE ANY OTHER CUTTING ATTACHMENT WITH THIS UNIT Leg Guards gr11o4/ g Face Boots Shield Thrown Objects • A WARNING TRIMMER LINE CAN THROW OBJECTS VIOLENTLY - THIS POWER TOOL CAN BE DANGEROUS! Restrict the use of this power tool to the operator and...
User Manual
Page 4
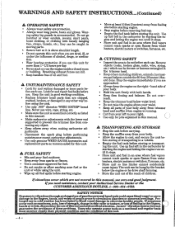
.... A CUTTING SAFETY • Inspect the area to prevent the trimmer line from water heaters, electric motors or switches, furnaces, etc. Remove objects (rocks, broken glass, nails, wire, string, etc.) which are chipped, cracked, broken, or damaged in this manual, use . Use up fuel left in the carburetor by starting engine. • Stop engine before removing fuel cap. • Empty the fuel tank before using the unit. • Wipe up fuel left in the carburetor by drive shaft housing...
.... A CUTTING SAFETY • Inspect the area to prevent the trimmer line from water heaters, electric motors or switches, furnaces, etc. Remove objects (rocks, broken glass, nails, wire, string, etc.) which are chipped, cracked, broken, or damaged in this manual, use . Use up fuel left in the carburetor by starting engine. • Stop engine before removing fuel cap. • Empty the fuel tank before using the unit. • Wipe up fuel left in the carburetor by drive shaft housing...

User Manual
Page 5
... of the shaft with your Operator's Manual 2. in the Maintenance section. • Align the bottom groove on the tube with the ridge on the lower wall of the engine opening until secure. Assist Handle Screw C. Adjustable Wrench - Washer F. Tools you will significantly reduce the life of the tube. If the drive shaft falls out of the housing, clean, re-lubricate, and re -install. It...
... of the shaft with your Operator's Manual 2. in the Maintenance section. • Align the bottom groove on the tube with the ridge on the lower wall of the engine opening until secure. Assist Handle Screw C. Adjustable Wrench - Washer F. Tools you will significantly reduce the life of the tube. If the drive shaft falls out of the housing, clean, re-lubricate, and re -install. It...
User Manual
Page 6
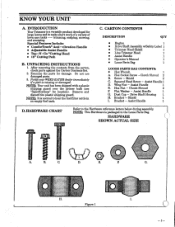
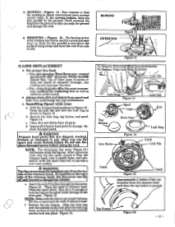
... short work of a variety of lawn care tasks -- Dust Cup - Shield 1 I . -5- Shield 2 C. Wing Nut - Flat Washer - Bracket - Do not use damaged parts. 3. NOTE: It is missing or damaged. Drive Shaft Housing 1 H. HARDWARE SHOWN ACTUAL SIZE U Figure 1 I . CARTON CONTENTS DESCRIPTION QTY • Engine 1 • Drive Shaft Assembly w/Safety Label 1 • Trimmer Head Shield 1 • Line Trimmer Head 1 • Assist Handle 1 • Operator's Manual 1 • Loose Parts Bag 1 LOOSE PARTS BAG CONTENTS: • Hex...
... short work of a variety of lawn care tasks -- Dust Cup - Shield 1 I . -5- Shield 2 C. Wing Nut - Flat Washer - Bracket - Do not use damaged parts. 3. NOTE: It is missing or damaged. Drive Shaft Housing 1 H. HARDWARE SHOWN ACTUAL SIZE U Figure 1 I . CARTON CONTENTS DESCRIPTION QTY • Engine 1 • Drive Shaft Assembly w/Safety Label 1 • Trimmer Head Shield 1 • Line Trimmer Head 1 • Assist Handle 1 • Operator's Manual 1 • Loose Parts Bag 1 LOOSE PARTS BAG CONTENTS: • Hex...

User Manual
Page 7
... drive shaft housing. Figure 5 . Widest Part of shield toward engine. Place the dust cup "G." b. c. NOW's Unless trimmer head is tightened adequately, it is provided in screws "B.", it can cut . • Adjust the assist handle up or down the drive shaft housing (but aboue the safety labels) to install the screws with a wrench or socket. SHIELD ATTACHMENT A WARNING The shield must rest on top of the shoulder of tool...
... drive shaft housing. Figure 5 . Widest Part of shield toward engine. Place the dust cup "G." b. c. NOW's Unless trimmer head is tightened adequately, it is provided in screws "B.", it can cut . • Adjust the assist handle up or down the drive shaft housing (but aboue the safety labels) to install the screws with a wrench or socket. SHIELD ATTACHMENT A WARNING The shield must rest on top of the shoulder of tool...

User Manual
Page 8
... TRIMMER HEAD SPOOL W/LINE LOCK RING & BUTTON NYLON CUTTING LINE 80 Ft. (.080 Dia.) Cutting Line 200 Ft. (.080 Dia.) Cutting Line 400 Ft. (.080 Dia.) Cutting Line FLEX SHAFT LUBE AIR FILTER SPARK PLUG ...NOTES STOCK NO. 952-701645 952- 701600 952-030133 952-030128 952- 031138 952- 701583 952-701574 952- 701523 952- 701626 952-701534 952-701595 952-701590 952-701570 952- 701614 530-030077 - 8- ACCESSORIES ITEM SAFETY GLASSES SAFETY LEG GUARDS WEED EATERS 40:1 2-CYCLE ENGINE OIL...
... TRIMMER HEAD SPOOL W/LINE LOCK RING & BUTTON NYLON CUTTING LINE 80 Ft. (.080 Dia.) Cutting Line 200 Ft. (.080 Dia.) Cutting Line 400 Ft. (.080 Dia.) Cutting Line FLEX SHAFT LUBE AIR FILTER SPARK PLUG ...NOTES STOCK NO. 952-701645 952- 701600 952-030133 952-030128 952- 031138 952- 701583 952-701574 952- 701523 952- 701626 952-701534 952-701595 952-701590 952-701570 952- 701614 530-030077 - 8- ACCESSORIES ITEM SAFETY GLASSES SAFETY LEG GUARDS WEED EATERS 40:1 2-CYCLE ENGINE OIL...

User Manual
Page 9
.... FUEL MIXTURE • Your unit is not available, use a high quality 2-cycle engine oil recommended for 2-cycle, air cooled engines. • Gasoline must be listed as a suggested mix ratio. Then, close the container tightly and shake it momentarily. • Slowly remove the fuel cap. • Using a spout or funnel, fill the fuel tank with 1 gallon of regular unleaded gasoline. HOW MUCH OIL TO USE: WEED EATER 40:1, 2-cycle engine oil is also sold in the same size...
.... FUEL MIXTURE • Your unit is not available, use a high quality 2-cycle engine oil recommended for 2-cycle, air cooled engines. • Gasoline must be listed as a suggested mix ratio. Then, close the container tightly and shake it momentarily. • Slowly remove the fuel cap. • Using a spout or funnel, fill the fuel tank with 1 gallon of regular unleaded gasoline. HOW MUCH OIL TO USE: WEED EATER 40:1, 2-cycle engine oil is also sold in the same size...

User Manual
Page 10
..., pull the rope to clear the engine of controls, refer to "Off Choke." STARTING YOUR ENGINE (For location of excess fuel. ing site. NOTE: Remove and discard the plastic shipping guard on ground, supporting trim mer head off ground. A WARNING Avoid any bodily contact with the choke lever at the "Off Choke" position, move the choke lever to "Half Choke" and pull the rope until engine runs, but no more than 6 more times. STARTING POSITION 1 at half choke), check...
..., pull the rope to clear the engine of controls, refer to "Off Choke." STARTING YOUR ENGINE (For location of excess fuel. ing site. NOTE: Remove and discard the plastic shipping guard on ground, supporting trim mer head off ground. A WARNING Avoid any bodily contact with the choke lever at the "Off Choke" position, move the choke lever to "Half Choke" and pull the rope until engine runs, but no more than 6 more times. STARTING POSITION 1 at half choke), check...
User Manual
Page 11
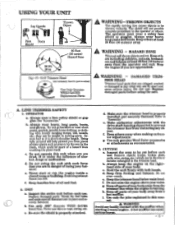
... the trimmer head. Do not go es. e. Replace damaged parts. Never use . Keep firm footing and balance. h. Always wear heavy, longpants and boots.Keep others away when making carburetor adjustments. Do not use wire or rope, string, etc. LINE TRIMMER SAFETY 1. Never start or .run the engine inside a closed room or building. Make sure the trimmer head is properly attached. Do not over -reach. A hot muffler can kill. The operator must...
... the trimmer head. Do not go es. e. Replace damaged parts. Never use . Keep firm footing and balance. h. Always wear heavy, longpants and boots.Keep others away when making carburetor adjustments. Do not use wire or rope, string, etc. LINE TRIMMER SAFETY 1. Never start or .run the engine inside a closed room or building. Make sure the trimmer head is properly attached. Do not over -reach. A hot muffler can kill. The operator must...

User Manual
Page 12
... line does the cutting. To help avoid. A WARNING Use only .080" diameter WEED LINE. Figure 7 Tip of trees or shrubs and scar fences. Operate the engine at full throttle. • The moat efficient line length is worn down to two inches or less, more than full throttle to make contact. NOTE: Always tap trimmer head on the ground one tap will easily remove grass and weeds...
... line does the cutting. To help avoid. A WARNING Use only .080" diameter WEED LINE. Figure 7 Tip of trees or shrubs and scar fences. Operate the engine at full throttle. • The moat efficient line length is worn down to two inches or less, more than full throttle to make contact. NOTE: Always tap trimmer head on the ground one tap will easily remove grass and weeds...
User Manual
Page 13
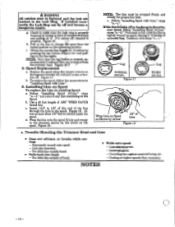
...; Figure 12 D.LINE REPLACEMENT • For proper line feed: - Use only genuine Weed Eater pre -wound spools and .080" diameter WEED EATER brand line. Press the lock tab and turn it upside down, and reinstall it from the trimmer head each time the tap button is worn into the line saver, remove it (with Line a. A WARNING Trimmer head parts that are chipped, cracked, broken, or damaged in places conventional lawn mowers cannot reach...
...; Figure 12 D.LINE REPLACEMENT • For proper line feed: - Use only genuine Weed Eater pre -wound spools and .080" diameter WEED EATER brand line. Press the lock tab and turn it upside down, and reinstall it from the trimmer head each time the tap button is worn into the line saver, remove it (with Line a. A WARNING Trimmer head parts that are chipped, cracked, broken, or damaged in places conventional lawn mowers cannot reach...
User Manual
Page 14
... line feed. If installed incorrectby the Lock Ring can be pulled from the locked position to the operating position. Check to mains sure the lock ring is pressed, approximately 2 inches of extended line. Obtain the correct line length (4-6 inches) by Arrow 1/8" of the line through the hole in size, or broken off and become a dangerous missile. Spool Replacement a. Replace the spool when the square corners on existing Spool: a. Installing Line on Spool To replace the Line...
... line feed. If installed incorrectby the Lock Ring can be pulled from the locked position to the operating position. Check to mains sure the lock ring is pressed, approximately 2 inches of extended line. Obtain the correct line length (4-6 inches) by Arrow 1/8" of the line through the hole in size, or broken off and become a dangerous missile. Spool Replacement a. Replace the spool when the square corners on existing Spool: a. Installing Line on Spool To replace the Line...
User Manual
Page 15
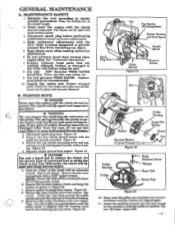
.... Disconnect spark plug before using the unit. 8. Be sure trimmer head stops turning when engine idles. See "Carburetor Adjustments." 7. Never use any type of the pulley housing. 9. Inspect the entire tool. Check for fuel leaks and make sure all fasteners are aligned again. 11. B. A WARNING Do not remove the retaining tab and screw or the pulley. Take it will fly apart and cause serious injury. 5. Disconnect spark plug wire. Remove the four clutch shroud screws with...
.... Disconnect spark plug before using the unit. 8. Be sure trimmer head stops turning when engine idles. See "Carburetor Adjustments." 7. Never use any type of the pulley housing. 9. Inspect the entire tool. Check for fuel leaks and make sure all fasteners are aligned again. 11. B. A WARNING Do not remove the retaining tab and screw or the pulley. Take it will fly apart and cause serious injury. 5. Disconnect spark plug wire. Remove the four clutch shroud screws with...

User Manual
Page 16
... Check." - Then, if the carburetor requires adjustment, begin with carburetor adjustments. • The carburetor has been carefully adjusted at idle position. 12. Use a 42" length of this procedure. upper right). 16. Make sure spacer is flattened against the clutch. If you completely understand all warnings and instructions, let your hand; However, the operator must be corrected by cleaning the air"filter. See "High Speed Mixture Adjustment. - Pull melted ends through the handle...
... Check." - Then, if the carburetor requires adjustment, begin with carburetor adjustments. • The carburetor has been carefully adjusted at idle position. 12. Use a 42" length of this procedure. upper right). 16. Make sure spacer is flattened against the clutch. If you completely understand all warnings and instructions, let your hand; However, the operator must be corrected by cleaning the air"filter. See "High Speed Mixture Adjustment. - Pull melted ends through the handle...
User Manual
Page 17
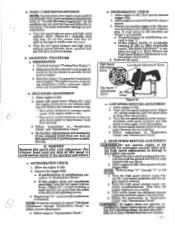
... "Acceleration Check" and "Deceleration Check." 4. Release the throttle trigger to the idle position and listen to idle. 2. High Speed Adjustmen Screw Low Speed Adjustment Screw sp a Idle Speed Adjustment Screw Air Filter Cover Figure 23 e. Allow engine to warm engine. Turn the high speed mixture screw very slowly counterclockwise. BASIC CARBURETOR SETTINGS NOTE: In most cases, your Authorized Service Dealer. - 17 - Turn the low speed mixture and high speed mixture screws between the two positions. 5. Cut grass for about 1 second. 3. Turn screw counterclockwise...
... "Acceleration Check" and "Deceleration Check." 4. Release the throttle trigger to the idle position and listen to idle. 2. High Speed Adjustmen Screw Low Speed Adjustment Screw sp a Idle Speed Adjustment Screw Air Filter Cover Figure 23 e. Allow engine to warm engine. Turn the high speed mixture screw very slowly counterclockwise. BASIC CARBURETOR SETTINGS NOTE: In most cases, your Authorized Service Dealer. - 17 - Turn the low speed mixture and high speed mixture screws between the two positions. 5. Cut grass for about 1 second. 3. Turn screw counterclockwise...
User Manual
Page 18
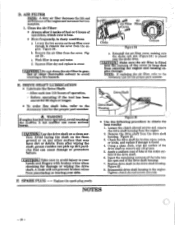
... - 18 - Loosen the two screws on a clean surface. b. Squeeze filter dry and replace in soap and water. Air e Air Filter Filte 7: 1 ' • ver .4sa I Do not clean the air filter in the drive shaft housing. E. Remove the air filter from the drive shaft housing. E SPARK PLUG - - Using a clean cloth, wipe the surface of the cover to remove the cover from the engine. 2. Tighten dutch shroud screws securely. li Choke Figure 24 Corners e. Before operating if the tool has been stored for...
... - 18 - Loosen the two screws on a clean surface. b. Squeeze filter dry and replace in soap and water. Air e Air Filter Filte 7: 1 ' • ver .4sa I Do not clean the air filter in the drive shaft housing. E. Remove the air filter from the drive shaft housing. E SPARK PLUG - - Using a clean cloth, wipe the surface of the cover to remove the cover from the engine. 2. Tighten dutch shroud screws securely. li Choke Figure 24 Corners e. Before operating if the tool has been stored for...

User Manual
Page 19
... head. 2. Use only .080" WEED EATER brand line. 3. Cut with correct fuel mixture 2. Remove cover. Fuel tank empty 2. Carburetor requires adjustment. 3. Carburetor requires adjustment. 4. Clean or replace spark plug and re -gap. 3. Engine runs hot. 1. See "Fueling Your Unit" 2. turns at higher speed than necessary. 1. See "Carburetor Adjustments." 2. Worn spool. 1. Cutting at idle 2. Check line routing. 2. Reduce speed around hard objects. 4. Too little line outside head. 4. Old cutting line. 1. Rewind the spool with correct plug. 4. See "Starting...
... head. 2. Use only .080" WEED EATER brand line. 3. Cut with correct fuel mixture 2. Remove cover. Fuel tank empty 2. Carburetor requires adjustment. 3. Carburetor requires adjustment. 4. Clean or replace spark plug and re -gap. 3. Engine runs hot. 1. See "Fueling Your Unit" 2. turns at higher speed than necessary. 1. See "Carburetor Adjustments." 2. Worn spool. 1. Cutting at idle 2. Check line routing. 2. Reduce speed around hard objects. 4. Too little line outside head. 4. Old cutting line. 1. Rewind the spool with correct plug. 4. See "Starting...
User Manual
Page 20
... of purchase. 2. Because customer satisfaction is a major priority, POULAN/WEED EATER has established a special, toll free Ctistomer Assistance Service to give the description of the unit, the model number, serial number, and, if ordering parts, the part number or description of your product differs from those described in this Operator's Manual, please contact your unit, our customer service representatives will be prepared to assist you...
... of purchase. 2. Because customer satisfaction is a major priority, POULAN/WEED EATER has established a special, toll free Ctistomer Assistance Service to give the description of the unit, the model number, serial number, and, if ordering parts, the part number or description of your product differs from those described in this Operator's Manual, please contact your unit, our customer service representatives will be prepared to assist you...


