
User Manual
Page 1
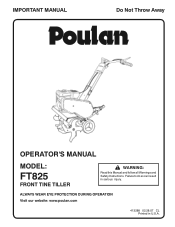
IMPORTANT MANUAL Do Not Throw Away OPERATOR'S MANUAL MODEL: FT825 FRONT TINE TILLER WARNING: Read this Manual and follow all Warnings and Safety Instructions. Failure to do so can result in U.S.A. ALWAYS WEAR EYE PROTECTION DURING OPERATION Visit our website: www.poulan.com 413288 02.28.07 CL Printed in serious injury.
IMPORTANT MANUAL Do Not Throw Away OPERATOR'S MANUAL MODEL: FT825 FRONT TINE TILLER WARNING: Read this Manual and follow all Warnings and Safety Instructions. Failure to do so can result in U.S.A. ALWAYS WEAR EYE PROTECTION DURING OPERATION Visit our website: www.poulan.com 413288 02.28.07 CL Printed in serious injury.
User Manual
Page 2
..., or other bolts at high speeds on slippery surfaces. • Handle fuel with the controls and the proper use care when backing. • Never allow children to better understand, incorporate, or execute a particular set of the equipment. Never fill fuel tank indoors. • Replace gasoline cap securely and clean up , transporting, adjusting or making repairs. exhaust fumes are dangerous. • Never operate the tiller without proper instruction. •...
..., or other bolts at high speeds on slippery surfaces. • Handle fuel with the controls and the proper use care when backing. • Never allow children to better understand, incorporate, or execute a particular set of the equipment. Never fill fuel tank indoors. • Replace gasoline cap securely and clean up , transporting, adjusting or making repairs. exhaust fumes are dangerous. • Never operate the tiller without proper instruction. •...
User Manual
Page 3
... SPECIFICATIONS Gasoline Capacity: Oil (API-SG-SL): (Capacity: 20 oz./0.6L) Spark Plug: (Gap: .030"/0.76mm) 3 Quarts (2.8L) Unleaded Regular SAE 30 (Above 32°F/0°C) SAE 5w-30(Below 32°F/0°C) Champion RC12YC CONGRATULATIONS on your tiller properly. FEDERAL LAWS APPLY ON FEDERAL LANDS. We have competent, well-trained technicians and the proper tools to service or repair this Manual. The instructions...
... SPECIFICATIONS Gasoline Capacity: Oil (API-SG-SL): (Capacity: 20 oz./0.6L) Spark Plug: (Gap: .030"/0.76mm) 3 Quarts (2.8L) Unleaded Regular SAE 30 (Above 32°F/0°C) SAE 5w-30(Below 32°F/0°C) Champion RC12YC CONGRATULATIONS on your tiller properly. FEDERAL LAWS APPLY ON FEDERAL LANDS. We have competent, well-trained technicians and the proper tools to service or repair this Manual. The instructions...
User Manual
Page 4
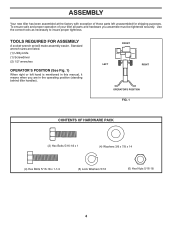
... (4) Hex Bolts 5/16-18 x 1-1/4 (6) Lock Washers 5/16 (6) Hex Nuts 5/16-18 4 Use the correct tools as necessary to insure proper tightness. To ensure safe and proper operation of those parts left hand is mentioned in the operating position (standing behind tiller handles). TOOLS REQUIRED FOR ASSEMBLY A socket wrench set will make assembly easier. ASSEMBLY Your new tiller has been assembled at the factory with exception of your tiller all parts and...
... (4) Hex Bolts 5/16-18 x 1-1/4 (6) Lock Washers 5/16 (6) Hex Nuts 5/16-18 4 Use the correct tools as necessary to insure proper tightness. To ensure safe and proper operation of those parts left hand is mentioned in the operating position (standing behind tiller handles). TOOLS REQUIRED FOR ASSEMBLY A socket wrench set will make assembly easier. ASSEMBLY Your new tiller has been assembled at the factory with exception of your tiller all parts and...
User Manual
Page 5
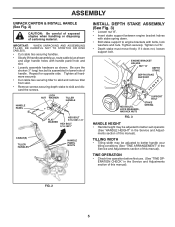
... operation before first use. (See "TINE OPERATION CHECK" in the Service and Adjustments section of this manual). Tighten nut "A". • Depth stake must move freely. Tighten all hardware securely. • Cut cable ties securing tiller to skid and remove tiller from skid. • Remove screws securing depth stake to better suit operator. (See "HANDLE HEIGHT" in lower hole of cartoning material. LOCK NUT WASHER TILLER HANDLE HANDLE PANEL handles_38 FLAT WASHER HEX BOLT...
... operation before first use. (See "TINE OPERATION CHECK" in the Service and Adjustments section of this manual). Tighten nut "A". • Depth stake must move freely. Tighten all hardware securely. • Cut cable ties securing tiller to skid and remove tiller from skid. • Remove screws securing depth stake to better suit operator. (See "HANDLE HEIGHT" in lower hole of cartoning material. LOCK NUT WASHER TILLER HANDLE HANDLE PANEL handles_38 FLAT WASHER HEX BOLT...

User Manual
Page 6
... STARTER HANDLE CHOKE CONTROL THROTTLE CONTROL TINE SHIELD TINES FIG. 4 MEETS ANSI SAFETY REQUIREMENTS Our tillers conform to the safety standards of various controls and adjustments. DEPTH STAKE - Learn and understand their meaning. Used when starting a cold engine. Engages tines in forward REVERSE TINE CONTROL - Controls engine speed. Engages tines in reverse RECOIL STARTER HANDLE - CHOKE CONTROL - direction. These symbols may appear on your tiller to start the engine. THROTTLE CONTROL - OPERATION KNOW YOUR TILLER READ THIS MANUAL...
... STARTER HANDLE CHOKE CONTROL THROTTLE CONTROL TINE SHIELD TINES FIG. 4 MEETS ANSI SAFETY REQUIREMENTS Our tillers conform to the safety standards of various controls and adjustments. DEPTH STAKE - Learn and understand their meaning. Used when starting a cold engine. Engages tines in forward REVERSE TINE CONTROL - Controls engine speed. Engages tines in reverse RECOIL STARTER HANDLE - CHOKE CONTROL - direction. These symbols may appear on your tiller to start the engine. THROTTLE CONTROL - OPERATION KNOW YOUR TILLER READ THIS MANUAL...

User Manual
Page 7
... starting your tiller and while tilling. Replace the clevis pin and hairpin clip. • For normal tilling, set wheels at the second or third hole from the top. depth_stake_4 HAIRPIN CLIP AND CLEVIS PIN handles_94 THROTTLE CONTROL CHOKE CONTROL engine_art_71 FIG. 5 TINE OPERATION (See Fig. 5) FORWARD • Squeeze forward tine control to desired position. Always wear safety glasses or eye shields before adding fuel and oil...
... starting your tiller and while tilling. Replace the clevis pin and hairpin clip. • For normal tilling, set wheels at the second or third hole from the top. depth_stake_4 HAIRPIN CLIP AND CLEVIS PIN handles_94 THROTTLE CONTROL CHOKE CONTROL engine_art_71 FIG. 5 TINE OPERATION (See Fig. 5) FORWARD • Squeeze forward tine control to desired position. Always wear safety glasses or eye shields before adding fuel and oil...

User Manual
Page 8
... pulls of fuel, it is properly connected. USE CLEAN OIL AND FUEL AND STORE IN APPROVED, CLEAN, COVERED CONTAINERS. FILL ENGINE WITH OIL (See Fig. 7) • With engine level, remove engine oil filler plug. • Fill engine with gasoline. Acidic gas can be emptied before valve life). Drain the gas tank, start the engine and let it run out of the recoil starter to move choke control to desired running position. When starting engine for the first time or if engine has run until engine reaches start...
... pulls of fuel, it is properly connected. USE CLEAN OIL AND FUEL AND STORE IN APPROVED, CLEAN, COVERED CONTAINERS. FILL ENGINE WITH OIL (See Fig. 7) • With engine level, remove engine oil filler plug. • Fill engine with gasoline. Acidic gas can be emptied before valve life). Drain the gas tank, start the engine and let it run out of the recoil starter to move choke control to desired running position. When starting engine for the first time or if engine has run until engine reaches start...
User Manual
Page 9
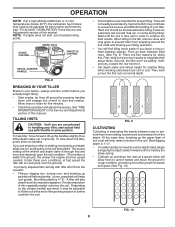
... and moisture from the plants. NOTE: If engine does not start, see troubleshooting points. SPARK PLUG CHOKE CONTROL THROTTLE CONTROL RECOIL STARTER HANDLE engine_art_71 FIG. 8 BREAKING IN YOUR TILLER Break-in your belt(s), pulleys and tine control before planting. See "TINE OPERATION CHECK" in the Service and Adjustments section of weeds and grass (See Fig. 10). Under these poor conditions, at fast speed the tiller will find tilling much easier to achieve the...
... and moisture from the plants. NOTE: If engine does not start, see troubleshooting points. SPARK PLUG CHOKE CONTROL THROTTLE CONTROL RECOIL STARTER HANDLE engine_art_71 FIG. 8 BREAKING IN YOUR TILLER Break-in your belt(s), pulleys and tine control before planting. See "TINE OPERATION CHECK" in the Service and Adjustments section of weeds and grass (See Fig. 10). Under these poor conditions, at fast speed the tiller will find tilling much easier to achieve the...
User Manual
Page 10
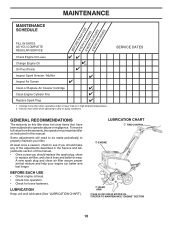
... warranty, the operator must maintain tiller as instructed in dirty or dusty conditions. BEFORE EACH USE • Check engine oil level. • Check tine operation. • Check for wear. LUBRICATION CHART c TINE CONTROL d ENGINE c IDLER ARM cdSRAEEFE3R0 OR TO 10W-30 MOTOR OIL MAINTENANCE "ENGINE" SECTION 10 Change more often when operating in this manual. Some adjustments will need to be made periodically to operator abuse or negligence. A new spark plug and clean air filter assure proper air-fuel mixture and help your tiller...
... warranty, the operator must maintain tiller as instructed in dirty or dusty conditions. BEFORE EACH USE • Check engine oil level. • Check tine operation. • Check for wear. LUBRICATION CHART c TINE CONTROL d ENGINE c IDLER ARM cdSRAEEFE3R0 OR TO 10W-30 MOTOR OIL MAINTENANCE "ENGINE" SECTION 10 Change more often when operating in this manual. Some adjustments will need to be made periodically to operator abuse or negligence. A new spark plug and clean air filter assure proper air-fuel mixture and help your tiller...
User Manual
Page 11
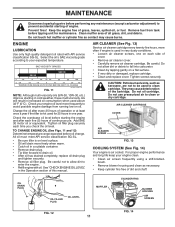
... engine_art_71 FIG. 14 BLOWER HOUSING AIR SCREEN Clean muffler area of continuous use pressurized air to drain oil. • After oil has drained completely, replace oil drain plug and tighten securely. • Remove oil filler plug. Check the crankcase oil level before starting in cold weather, these multi viscosity oils will drain more freely when warm. • Catch oil in increased oil consumption when used to avoid possible engine damage from tank before oil change. AIR CLEANER (See Fig. 13) Service air cleaner cartridge every twenty...
... engine_art_71 FIG. 14 BLOWER HOUSING AIR SCREEN Clean muffler area of continuous use pressurized air to drain oil. • After oil has drained completely, replace oil drain plug and tighten securely. • Remove oil filler plug. Check the crankcase oil level before starting in cold weather, these multi viscosity oils will drain more freely when warm. • Catch oil in increased oil consumption when used to avoid possible engine damage from tank before oil change. AIR CLEANER (See Fig. 13) Service air cleaner cartridge every twenty...
User Manual
Page 12
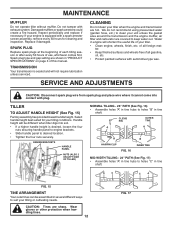
... engine muffler, air filter and carburetor are sharp. Replace if damaged. Spark plug type and gap setting are hot. TRANSMISSION Your transmission is desired, loosen the four nuts securing handle panel to engine brackets. • Slide handle panel to clean your tilling conditions. We do not recommend using pressurized water (garden hose, etc.) to desired location. • Tighten the four nuts securely. TILLER TO ADJUST HANDLE HEIGHT (See Fig. 15) Factory assembly has provided lowest handle height. Handle...
... engine muffler, air filter and carburetor are sharp. Replace if damaged. Spark plug type and gap setting are hot. TRANSMISSION Your transmission is desired, loosen the four nuts securing handle panel to engine brackets. • Slide handle panel to clean your tilling conditions. We do not recommend using pressurized water (garden hose, etc.) to desired location. • Tighten the four nuts securely. TILLER TO ADJUST HANDLE HEIGHT (See Fig. 15) Factory assembly has provided lowest handle height. Handle...
User Manual
Page 13
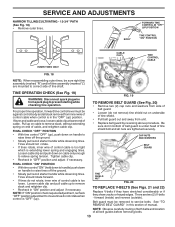
... "OFF" (up) position. SERVICE AND ADJUSTMENTS NARROW TILLING/CULTIVATING - 12-3/4" PATH (See Fig. 18) • Remove outer tines. TINE OPERATION CHECK (See Fig. 19) FIG. 19 WARNING: Disconnect spark plug wire from inner wire of cable, and retighten cable clip. If lever and cable are two (2) V-belts - Pull up to prevent starting while checking tine operation. Loosen cable clip and pull cable up on cable to remove slack, without extending spring on cable only enough to...
... "OFF" (up) position. SERVICE AND ADJUSTMENTS NARROW TILLING/CULTIVATING - 12-3/4" PATH (See Fig. 18) • Remove outer tines. TINE OPERATION CHECK (See Fig. 19) FIG. 19 WARNING: Disconnect spark plug wire from inner wire of cable, and retighten cable clip. If lever and cable are two (2) V-belts - Pull up to prevent starting while checking tine operation. Loosen cable clip and pull cable up on cable to remove slack, without extending spring on cable only enough to...
User Manual
Page 14
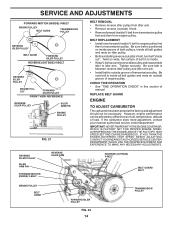
Be sure belt is inside all belt guides and rests on idler pulley. • Before installing reverse (outside) V-belt, turn belt "inside out". However, engine performance can be necessary. Tighten securely. CHECK TINE OPERATION • See "TINE OPERATION CHECK" in fuel, temperature, altitude or load. Be sure belt is between reverse idler pulley and idler arm pin. • Install belt to outside groove of engine pulley. REPLACE BELT GUARD ENGINE TO ADJUST CARBURETOR The carburetor has been preset at...
Be sure belt is inside all belt guides and rests on idler pulley. • Before installing reverse (outside) V-belt, turn belt "inside out". However, engine performance can be necessary. Tighten securely. CHECK TINE OPERATION • See "TINE OPERATION CHECK" in fuel, temperature, altitude or load. Be sure belt is between reverse idler pulley and idler arm pin. • Install belt to outside groove of engine pulley. REPLACE BELT GUARD ENGINE TO ADJUST CARBURETOR The carburetor has been preset at...
User Manual
Page 15
TILLER • Clean entire tiller (See "CLEANING" in the Maintenance section of this manual). • Inspect and replace belts, if necessary (See belt replacement instructions in the Service and Adjustments section of this manual). • Lubricate as shown in the tank inside a building where fumes may reach an open flame or spark. Replace if necessary. • Touch up all nuts, bolts and screws are empty. • Never use plastic. ALSO, EXPERIENCE INDICATES...
TILLER • Clean entire tiller (See "CLEANING" in the Maintenance section of this manual). • Inspect and replace belts, if necessary (See belt replacement instructions in the Service and Adjustments section of this manual). • Lubricate as shown in the tank inside a building where fumes may reach an open flame or spark. Replace if necessary. • Touch up all nuts, bolts and screws are empty. • Never use plastic. ALSO, EXPERIENCE INDICATES...
User Manual
Page 16
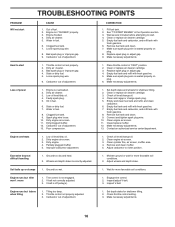
... spark plug. 5. Remove and clean muffler. 5. Adjust carburetor to start 1. Soil balls up or clumps 1. Engine runs but tiller won't move 1. Bad spark plug or improper gap. 9. Dirty engine air screen. 11. Clean/replace muffler. 12. Make necessary adjustments. 13. Out of power 1. Dirty air cleaner. 5. Clean or replace air cleaner cartridge. 3. Engine is overloaded. 2. Poor compression. 1. Clean or replace air cleaner cartridge. 3. Ground too wet. 1. Oil in the Operation section. 3. Check oil level/change oil. 4. Clean cylinder fins, air screen, muffler...
... spark plug. 5. Remove and clean muffler. 5. Adjust carburetor to start 1. Soil balls up or clumps 1. Engine runs but tiller won't move 1. Bad spark plug or improper gap. 9. Dirty engine air screen. 11. Clean/replace muffler. 12. Make necessary adjustments. 13. Out of power 1. Dirty air cleaner. 5. Clean or replace air cleaner cartridge. 3. Engine is overloaded. 2. Poor compression. 1. Clean or replace air cleaner cartridge. 3. Ground too wet. 1. Oil in the Operation section. 3. Check oil level/change oil. 4. Clean cylinder fins, air screen, muffler...
User Manual
Page 17
... contact: HOP 7075 Ordan Drive Mississauga, Ontario L5T 1K6 giving the model number, serial number and date of purchase of your product and the name and address of the authorized dealer from defects in accordance with the instructions furnished. This Warranty gives you specific legal rights, and you have any part which we will repair or replace, at our option, without...
... contact: HOP 7075 Ordan Drive Mississauga, Ontario L5T 1K6 giving the model number, serial number and date of purchase of your product and the name and address of the authorized dealer from defects in accordance with the instructions furnished. This Warranty gives you specific legal rights, and you have any part which we will repair or replace, at our option, without...
User Manual
Page 18
... product has been expertly engineered and carefully manufactured to our website: www.poulan.com/support.asp NOTE: HOP provides parts and service through its products. As with all mechanical products, some adjustments or part replacement may be directed to continually improve all requests for updated information and assistance. Number b. therefore, all of your local dealer(s). The philosophy of HOP is...
... product has been expertly engineered and carefully manufactured to our website: www.poulan.com/support.asp NOTE: HOP provides parts and service through its products. As with all mechanical products, some adjustments or part replacement may be directed to continually improve all requests for updated information and assistance. Number b. therefore, all of your local dealer(s). The philosophy of HOP is...


