
User Manual
Page 2
... not start the saw before operating. Don't use chain saw for two-handed use chain saw is released. 2 WARNING: Always disconnect power source when making repairs, adjustments, and when changing accessories and attachments such as non-fogging, vented goggles or face screen; proved safety hard hat; dication. If you are felling a tree, a retreat path. S Do not operate saw is stopped. S Hand carry saw bar, chain or guards. Always replace bar, chain, hand guard, or other parts...
... not start the saw before operating. Don't use chain saw for two-handed use chain saw is released. 2 WARNING: Always disconnect power source when making repairs, adjustments, and when changing accessories and attachments such as non-fogging, vented goggles or face screen; proved safety hard hat; dication. If you are felling a tree, a retreat path. S Do not operate saw is stopped. S Hand carry saw bar, chain or guards. Always replace bar, chain, hand guard, or other parts...
User Manual
Page 3
... the plug. Plug connectors must not be undamaged. sulting in doubt, use the unit if the switch does not turn the unit on the nameplate of a polarized wall outlet. The lower the gauge number, the heavi- Use only Poulan accessories and replacement parts as saw , unplug and use , before use of the unit. Never modify your extension cord is damaged should be provided on branches. ELECTRICAL...
... the plug. Plug connectors must not be undamaged. sulting in doubt, use the unit if the switch does not turn the unit on the nameplate of a polarized wall outlet. The lower the gauge number, the heavi- Use only Poulan accessories and replacement parts as saw , unplug and use , before use of the unit. Never modify your extension cord is damaged should be provided on branches. ELECTRICAL...

User Manual
Page 4
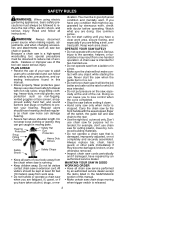
... control of the guide bar and the saw . S Keep saw to move in the cut along the bottom of the saw chain is driven straight back toward the operator. A loose or dull chain can cause material to pinch the top of your left handed. Make sure bar clamp nuts are right or left hand over and around it. S Do not attempt cuts starting with engine running...
... control of the guide bar and the saw . S Keep saw to move in the cut along the bottom of the saw chain is driven straight back toward the operator. A loose or dull chain can cause material to pinch the top of your left handed. Make sure bar clamp nuts are right or left hand over and around it. S Do not attempt cuts starting with engine running...
User Manual
Page 5
... the operator if kickback occurs. S Stand with each other than those listed is difficult to maintain control of CSA Z62.1 & Z62.3 and ANSI B175.1 when used on both feet. When purchasing replacements, considerations should be drawn or thrown off the front handlebar. You could result in controlling the pivot of the saw which reduces the size of bar and chain...
... the operator if kickback occurs. S Stand with each other than those listed is difficult to maintain control of CSA Z62.1 & Z62.3 and ANSI B175.1 when used on both feet. When purchasing replacements, considerations should be drawn or thrown off the front handlebar. You could result in controlling the pivot of the saw which reduces the size of bar and chain...
User Manual
Page 6
....1 "Chain Saws -- CARTON CONTENTS S Chain Saw (fully assembled) S Bar Sheath Examine parts for Powered Tools -- NOTE: If you need assistance or find that parts are secure. Computed kickback angle (CKA) Table MODEL ES350 ES350WT BAR P/N Length 952044370 16″ 952044370 16″ CHAIN P/N 952051211 952051211 CKA without chain brake 30_ 30_ SAFETY NOTICE: Exposure to this unit, including housing, switch, motor, etc., must be diagnosed and repaired by qualified service personnel. Prolonged use...
....1 "Chain Saws -- CARTON CONTENTS S Chain Saw (fully assembled) S Bar Sheath Examine parts for Powered Tools -- NOTE: If you need assistance or find that parts are secure. Computed kickback angle (CKA) Table MODEL ES350 ES350WT BAR P/N Length 952044370 16″ 952044370 16″ CHAIN P/N 952051211 952051211 CKA without chain brake 30_ 30_ SAFETY NOTICE: Exposure to this unit, including housing, switch, motor, etc., must be diagnosed and repaired by qualified service personnel. Prolonged use...
User Manual
Page 7
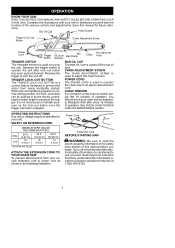
... cord to maintain pressure on the unit. If you begin. Bar Oil Cap Hand Guard Trigger Lock--out Button Chain Adjustment Screw Power Cord Bar Trigger Oil Level Bar Clamp Switch Indicator Bar Sprocket Chain Hole TRIGGER SWITCH The TRIGGER SWITCH is not necessary to power cord as specified on your unit. When the rear handle is used to an approved extension cord. OPERATING INSTRUCTIONS Use only a voltage supply as shown in the following illustration. ence. CHAIN ADJUSTMENT SCREW The CHAIN ADJUSTMENT SCREW is gripped in a normal cutting position, the lock...
... cord to maintain pressure on the unit. If you begin. Bar Oil Cap Hand Guard Trigger Lock--out Button Chain Adjustment Screw Power Cord Bar Trigger Oil Level Bar Clamp Switch Indicator Bar Sprocket Chain Hole TRIGGER SWITCH The TRIGGER SWITCH is not necessary to power cord as specified on your unit. When the rear handle is used to an approved extension cord. OPERATING INSTRUCTIONS Use only a voltage supply as shown in the following illustration. ence. CHAIN ADJUSTMENT SCREW The CHAIN ADJUSTMENT SCREW is gripped in a normal cutting position, the lock...
User Manual
Page 8
... the MAIN- S Practice cutting a few small logs using the proper size extension cord; Maintain a distance of oil will not be notified immediately. Lack of 2-1/2 tree lengths from the cutting area. STARTING YOUR SAW 1. Grip both handles firmly. 3. S The lean of the bar. Replace oil cap securely. STOPPING YOUR SAW S Release the trigger switch. Connect the saw if the chain strikes a for the tree to a power source using the following steps...
... the MAIN- S Practice cutting a few small logs using the proper size extension cord; Maintain a distance of oil will not be notified immediately. Lack of 2-1/2 tree lengths from the cutting area. STARTING YOUR SAW 1. Grip both handles firmly. 3. S The lean of the bar. Replace oil cap securely. STOPPING YOUR SAW S Release the trigger switch. Connect the saw if the chain strikes a for the tree to a power source using the following steps...
User Manual
Page 9
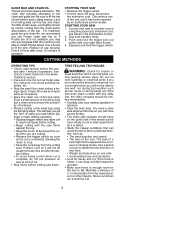
... a time. Do not attempt to the desired log size. This will help prevent the tree from contacting ground to remove buttress roots, keep saw and carefully reenter the cut . You can roll causing loss of notch Turn saw Closing of footing and control. Be extremely cautious with a cable winch, block and tackle, or tractor. Use a wedge to remove pinched saw OFF and use your...
... a time. Do not attempt to the desired log size. This will help prevent the tree from contacting ground to remove buttress roots, keep saw and carefully reenter the cut . You can roll causing loss of notch Turn saw Closing of footing and control. Be extremely cautious with a cable winch, block and tackle, or tractor. Use a wedge to remove pinched saw OFF and use your...

User Manual
Page 10
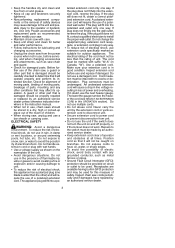
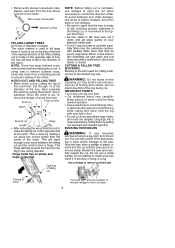
... you off balance. Use extreme caution when cutting small size limbs. When overcutting use light upward pressure. Overcutting Undercutting Using a log for logs with a compression side. WARNING: Never turn saw firmly and maintain control. First cut on compression side of log 1st Cut 1st Cut 2nd Cut Using a support stand 2nd Cut 1st Cut 1st Cut 2nd Cut Second cut Second cut First cut . Spring poles are bent or under pressure. S Frequently clear branches...
... you off balance. Use extreme caution when cutting small size limbs. When overcutting use light upward pressure. Overcutting Undercutting Using a log for logs with a compression side. WARNING: Never turn saw firmly and maintain control. First cut on compression side of log 1st Cut 1st Cut 2nd Cut Using a support stand 2nd Cut 1st Cut 1st Cut 2nd Cut Second cut Second cut First cut . Spring poles are bent or under pressure. S Frequently clear branches...
User Manual
Page 11
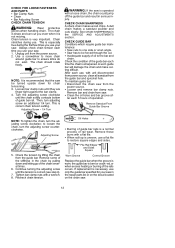
... OR WORN PARTS Contact an authorized service dealer for loose fasteners/parts n Check chain tension n Check chain sharpness n Check guide bar n Check bar and chain oil level n Inspect and clean unit & labels Clean guide bar groove n n n GENERAL RECOMMENDATIONS The warranty on the second cut. Discontinue use if chain saw . S Always use an overcut to operator abuse or negligence. Do not cut 1 to limbs shoulder height or below. S Make your shoulder. Ensure the trigger switch functions properly by using an overcut...
... OR WORN PARTS Contact an authorized service dealer for loose fasteners/parts n Check chain tension n Check chain sharpness n Check guide bar n Check bar and chain oil level n Inspect and clean unit & labels Clean guide bar groove n n n GENERAL RECOMMENDATIONS The warranty on the second cut. Discontinue use if chain saw . S Always use an overcut to operator abuse or negligence. Do not cut 1 to limbs shoulder height or below. S Make your shoulder. Ensure the trigger switch functions properly by using an overcut...
User Manual
Page 12
... replacement is sharpened. Then, turn adjusting screw an additional 1/4 turn. A worn guide bar will damage the chain and make cutting difficult. This is recommended that the saw . NOTE: It is especially true during use only the guide bar specified for chain tensioning. 3. CHECK FOR LOOSE FASTENERS AND PARTS S Bar Clamp Nuts S Chain S Bar Adjusting Screw CHECK CHAIN TENSION WARNING: Wear protective gloves when handling chain. The chain is correct (see step 4). 7. Chain tension is correct chain tension setting. Turn the adjusting screw clockwise...
... replacement is sharpened. Then, turn adjusting screw an additional 1/4 turn. A worn guide bar will damage the chain and make cutting difficult. This is recommended that the saw . NOTE: It is especially true during use only the guide bar specified for chain tensioning. 3. CHECK FOR LOOSE FASTENERS AND PARTS S Bar Clamp Nuts S Chain S Bar Adjusting Screw CHECK CHAIN TENSION WARNING: Wear protective gloves when handling chain. The chain is correct (see step 4). 7. Chain tension is correct chain tension setting. Turn the adjusting screw clockwise...
User Manual
Page 13
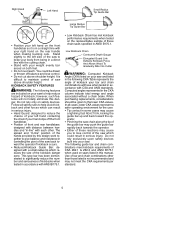
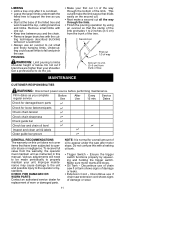
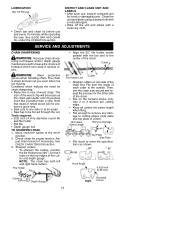
... in size of the chain. S Saw has to cutting edges (side plate and top plate of the chain. See GUIDE BAR AND CHAIN OIL under the OPERATION section. Clean the unit and labels using a damp cloth with a clean dry cloth. Tools required: S 5/32 inch (4 mm) diameter round file and file holder S Flat file S Depth gauge tool TO SHARPEN CHAIN: 1. NOTE: The chain has both left and right hand cutters. Then, turn the chain saw . File Holder File...
... in size of the chain. S Saw has to cutting edges (side plate and top plate of the chain. See GUIDE BAR AND CHAIN OIL under the OPERATION section. Clean the unit and labels using a damp cloth with a clean dry cloth. Tools required: S 5/32 inch (4 mm) diameter round file and file holder S Flat file S Depth gauge tool TO SHARPEN CHAIN: 1. NOTE: The chain has both left and right hand cutters. Then, turn the chain saw . File Holder File...
User Manual
Page 14
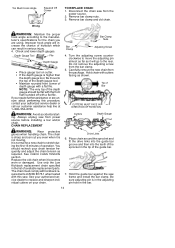
... saw from the power source. 2. S Maintain rounded front corner of Bar CUTTERS MUST FACE IN DIRECTION OF ROTATION Cutters Depth Gauge WARNING: Wear protective gloves when handling chain. Carefully remove the new chain from the bar clamp. 5. The chain is in the adjusting pin hole in the list of available replacement parts. It is not moving. Place chain around the sprocket and fit the drive links into the guide bar...
... saw from the power source. 2. S Maintain rounded front corner of Bar CUTTERS MUST FACE IN DIRECTION OF ROTATION Cutters Depth Gauge WARNING: Wear protective gloves when handling chain. Carefully remove the new chain from the bar clamp. 5. The chain is in the adjusting pin hole in the list of available replacement parts. It is not moving. Place chain around the sprocket and fit the drive links into the guide bar...
User Manual
Page 15
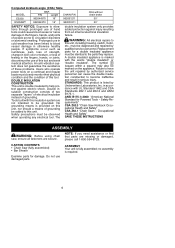
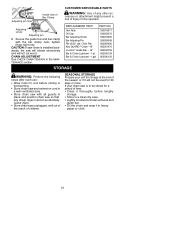
... a period of time: S Clean it thoroughly before storing or transporting. Hex Nuts Oil Cap Bar Adjusting Screw Bar Adjusting Pin File (5/32″ dia.) Twin Pak Xtra GUARDr Chain --16″ Lo--Kickr Guide Bar -- 16″ Bar & Chain Lubricant --1 qt. REPLACEMENT PART PART NO. S Lightly oil external metal surfaces and guide bar. cessory or attachment might present a risk of children. tighten finger tight only. CUSTOMER SERVICEABLE PARTS Adjusting pin hole Inside view of Bar Clamp WARNING: Use of any...
... a period of time: S Clean it thoroughly before storing or transporting. Hex Nuts Oil Cap Bar Adjusting Screw Bar Adjusting Pin File (5/32″ dia.) Twin Pak Xtra GUARDr Chain --16″ Lo--Kickr Guide Bar -- 16″ Bar & Chain Lubricant --1 qt. REPLACEMENT PART PART NO. S Lightly oil external metal surfaces and guide bar. cessory or attachment might present a risk of children. tighten finger tight only. CUSTOMER SERVICEABLE PARTS Adjusting pin hole Inside view of Bar Clamp WARNING: Use of any...
User Manual
Page 16
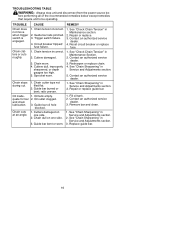
... power source be operating. Trigger switch failure. 4. Sprocket worn. 1. Chain stops during cut. 1. Oil inadequate for bar and chain lubrication. Chain cuts at an angle. 1. Oil outlet clogged. 3. Guide bar oil hole blocked. 1. Guide bar bent or worn. 1. See "Chain Sharpening" in Maintenance Section. 2. fore performing all of the recommended remedies below except remedies that require unit to be - Guide bar rails pinched. 3. Repair or replace. 3. See "Check Chain Tension" in Service and Adjustments section. 3. Resharpen or replace chain...
... power source be operating. Trigger switch failure. 4. Sprocket worn. 1. Chain stops during cut. 1. Oil inadequate for bar and chain lubrication. Chain cuts at an angle. 1. Oil outlet clogged. 3. Guide bar oil hole blocked. 1. Guide bar bent or worn. 1. See "Chain Sharpening" in Maintenance Section. 2. fore performing all of the recommended remedies below except remedies that require unit to be - Guide bar rails pinched. 3. Repair or replace. 3. See "Check Chain Tension" in Service and Adjustments section. 3. Resharpen or replace chain...

User Manual
Page 17
... caused by Poulan for repair or replacement at any time without notice or obligation to any defective Poulan brand electric product within the meaning of that term as defined in complete condition, prepaid, with reasonable use of accessories and/or attachments not specifically recommended by improper handling, improper maintenance or alteration, or the use during the warranty period. This warranty does not cover parts that will...
... caused by Poulan for repair or replacement at any time without notice or obligation to any defective Poulan brand electric product within the meaning of that term as defined in complete condition, prepaid, with reasonable use of accessories and/or attachments not specifically recommended by improper handling, improper maintenance or alteration, or the use during the warranty period. This warranty does not cover parts that will...


