
User Manual
Page 2
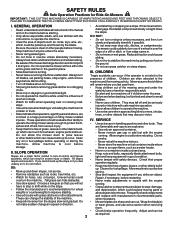
...machine off and be picked up to occur. Always look behind before operating or storing the machine. DO: • Mow up . The mower could suddenly turn on steep slopes. Children are often attracted to cool before turning. • Never leave a running . Never assume that may...if an edge caves in a large percentage of children. Do not make adjustments or repairs with manufacturer's recommended parts, when necessary. • Mower blades are involved in . • Do not mow on wet grass. SERVICE • Use extra care in reverse unless absolutely necessary. Allow...
...machine off and be picked up to occur. Always look behind before operating or storing the machine. DO: • Mow up . The mower could suddenly turn on steep slopes. Children are often attracted to cool before turning. • Never leave a running . Never assume that may...if an edge caves in a large percentage of children. Do not make adjustments or repairs with manufacturer's recommended parts, when necessary. • Mower blades are involved in . • Do not mow on wet grass. SERVICE • Use extra care in reverse unless absolutely necessary. Allow...

User Manual
Page 3
... of the manufacturer of California to prevent accidental starting or stopping on a slope. Wash hands after handling. 3 SAFETY RULES Safe Operation Practices for Ride-On Mowers • Be sure the area is dangerous.
... of the manufacturer of California to prevent accidental starting or stopping on a slope. Wash hands after handling. 3 SAFETY RULES Safe Operation Practices for Ride-On Mowers • Be sure the area is dangerous.

User Manual
Page 5
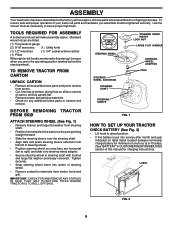
Seat (4) Retainer Springs (double loop) (4) Locknuts 3/8-16 Nose Roller (1) Washer 17/32 x 1-3/16 x 12 Gauge (1) Knob Mower (2) Nylon Locknuts 5/16-18 Nose Roller Brackets (2) Front Link Assemblies Blades (3) Mulching Blades (3) Retainer Springs (double loop) (2) Washers 17/32 x 7/8 x 16 Ga. (2) Hex Bolts 5/16-...
Seat (4) Retainer Springs (double loop) (4) Locknuts 3/8-16 Nose Roller (1) Washer 17/32 x 1-3/16 x 12 Gauge (1) Knob Mower (2) Nylon Locknuts 5/16-18 Nose Roller Brackets (2) Front Link Assemblies Blades (3) Mulching Blades (3) Retainer Springs (double loop) (2) Washers 17/32 x 7/8 x 16 Ga. (2) Hex Bolts 5/16-...
User Manual
Page 6
... position (seated behind the steering wheel). Use the correct tools as necessary to steering shaft with exception of carton, and lay panels flat. • Remove mower and packing materials. • Check for shipping purposes.
... position (seated behind the steering wheel). Use the correct tools as necessary to steering shaft with exception of carton, and lay panels flat. • Remove mower and packing materials. • Check for shipping purposes.

User Manual
Page 8
...performance blades. • Remove mulcher plate and mulcher blades and install high performance blades, (see BLADE REMOVAL in a safe place. YOUR MOWER CAME FACTORY EQUIPPED WITH HIGH PERFORMANCE BLADES, WHICH ARE THE BEST BLADES FOR BAGGING AND DISCHARGING. IMPORTANT: TO ENSURE PROPER ASSEMBLY, CENTER ... MULCHER PLATE MUST ONLY BE USED WITH THE MULCHING BLADES THAT CAME PACKED SEPARATELY IN THE CARTON. Store in proper position when operating mower. torque). IMPORTANT: BLADE BOLT IS GRADE 8 HEAT TREATED. • Install mulcher plate if previously removed. TRAILING EDGE UP BLADE CENTER...
...performance blades. • Remove mulcher plate and mulcher blades and install high performance blades, (see BLADE REMOVAL in a safe place. YOUR MOWER CAME FACTORY EQUIPPED WITH HIGH PERFORMANCE BLADES, WHICH ARE THE BEST BLADES FOR BAGGING AND DISCHARGING. IMPORTANT: TO ENSURE PROPER ASSEMBLY, CENTER ... MULCHER PLATE MUST ONLY BE USED WITH THE MULCHING BLADES THAT CAME PACKED SEPARATELY IN THE CARTON. Store in proper position when operating mower. torque). IMPORTANT: BLADE BOLT IS GRADE 8 HEAT TREATED. • Install mulcher plate if previously removed. TRAILING EDGE UP BLADE CENTER...

User Manual
Page 9
... Retain with double loop retainer spring with loops down as shown. • Turn height adjustment knob counterclockwise until it stops. • Lower mower linkage with attachment lift control. INSTALL BELT INTO ELECTRIC CLUTCH PULLEY GROOVE. • Install one front link in suspension arm. front suspension bracket... retainer springs as shown. • Slide left footrest and retain with deflector shield to left side of mower deck. • Slide mower under left side of mower back and install the unattached front link in the Operation section of tractor. Swing anti-sway bar to ...
... Retain with double loop retainer spring with loops down as shown. • Turn height adjustment knob counterclockwise until it stops. • Lower mower linkage with attachment lift control. INSTALL BELT INTO ELECTRIC CLUTCH PULLEY GROOVE. • Install one front link in suspension arm. front suspension bracket... retainer springs as shown. • Slide left footrest and retain with deflector shield to left side of mower deck. • Slide mower under left side of mower back and install the unattached front link in the Operation section of tractor. Swing anti-sway bar to ...
User Manual
Page 10
...Fuel tank is filled with all belt keepers. ! All assembly instructions have been completed. ! All tires are shown for leveling). ! Check mower and drive belts. Become familiar with fresh, clean, regular unleaded gasoline. ! Follow proper starting and transmission purging instructions (See "TO START ... freewheel control is properly adjusted. ASSEMBLY CHECK TIRE PRESSURE The tires on your tractor were overinflated at proper level. ! Be sure mower deck is properly leveled side-to-side/ front-to see that are properly inflated. (For shipping purposes, the tires were overinflated...
...Fuel tank is filled with all belt keepers. ! All assembly instructions have been completed. ! All tires are shown for leveling). ! Check mower and drive belts. Become familiar with fresh, clean, regular unleaded gasoline. ! Follow proper starting and transmission purging instructions (See "TO START ... freewheel control is properly adjusted. ASSEMBLY CHECK TIRE PRESSURE The tires on your tractor were overinflated at proper level. ! Be sure mower deck is properly leveled side-to-side/ front-to see that are properly inflated. (For shipping purposes, the tires were overinflated...

User Manual
Page 11
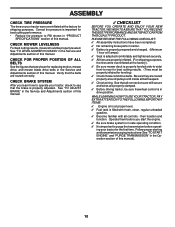
BATTERY CAUTION OR WARNING REVERSE FORWARD FAST SLOW ENGINE ON ENGINE OFF OIL PRESSURE LIGHTS ON OVER TEMP LIGHT FUEL CHOKE MOWER HEIGHT PARKING BRAKE LOCKED UNLOCKED MOWER LIFT ATTACHMENT REVERSE CLUTCH ENGAGED NEUTRAL HIGH P LOW PARKING BRAKE 15 15 15 IGNITION ATTACHMENT CLUTCH DISENGAGED KEEP AREA CLEAR SLOPE HAZARDS (SEE SAFETY RULES SECTION) DANGER, KEEP HANDS AND FEET AWAY 11 FREE WHEEL (Automatic Models only) Learn and understand their meaning. OPERATION These symbols may appear on your tractor or in literature supplied with the product.
BATTERY CAUTION OR WARNING REVERSE FORWARD FAST SLOW ENGINE ON ENGINE OFF OIL PRESSURE LIGHTS ON OVER TEMP LIGHT FUEL CHOKE MOWER HEIGHT PARKING BRAKE LOCKED UNLOCKED MOWER LIFT ATTACHMENT REVERSE CLUTCH ENGAGED NEUTRAL HIGH P LOW PARKING BRAKE 15 15 15 IGNITION ATTACHMENT CLUTCH DISENGAGED KEEP AREA CLEAR SLOPE HAZARDS (SEE SAFETY RULES SECTION) DANGER, KEEP HANDS AND FEET AWAY 11 FREE WHEEL (Automatic Models only) Learn and understand their meaning. OPERATION These symbols may appear on your tractor or in literature supplied with the product.

User Manual
Page 12
...Our tractors conform to your tractor. Locks clutch/brake pedal into the brake position. Used to raise and lower the mower deck or other attachments mounted to the safety standards of various controls and adjustments. IGNITION SWITCH - ATTACHMENT CLUTCH SWITCH: Used ...to engage the mower blades, or other attachments mounted to your tractor to adjust the mower cutting height. ATTACHMENT LIFT LEVER - THROTTLE CONTROL: Used to release attachment lift lever when changing ...
...Our tractors conform to your tractor. Locks clutch/brake pedal into the brake position. Used to raise and lower the mower deck or other attachments mounted to the safety standards of various controls and adjustments. IGNITION SWITCH - ATTACHMENT CLUTCH SWITCH: Used ...to engage the mower blades, or other attachments mounted to your tractor to adjust the mower cutting height. ATTACHMENT LIFT LEVER - THROTTLE CONTROL: Used to release attachment lift lever when changing ...

User Manual
Page 13
...to raise cutting height. • Turn knob counterclockwise ( ) to "DISENGAGED" position. Make sure parking brake will shut off the ground when mower is running , hot engine exhaust gases may cause engine to "backfire". • Turn ignition key to disengage. GROUND DRIVE • To ...stop engine when stopping tractor on a flat level surface. • Lower mower and adjust mower to over spectacles or standard safety glasses. ENGINE - • Move throttle control to neutral (N) position. to desired position. To ...
...to raise cutting height. • Turn knob counterclockwise ( ) to "DISENGAGED" position. Make sure parking brake will shut off the ground when mower is running , hot engine exhaust gases may cause engine to "backfire". • Turn ignition key to disengage. GROUND DRIVE • To ...stop engine when stopping tractor on a flat level surface. • Lower mower and adjust mower to over spectacles or standard safety glasses. ENGINE - • Move throttle control to neutral (N) position. to desired position. To ...

User Manual
Page 14
...POSITION PUSH IN TO "DISENGAGE" • If stopping is closed and secured to highest position with attachment lift control. • Start mower blades by placing freewheel control in bracket and gauge wheel bar and insert clevis pin. IMPORTANT: THE MOTION CONTROL LEVER DOES NOT RETURN... slope. • Choose the slowest speed before starting (See "OIL VISCOSITY CHART" in the Customer Responsibilities section of cut. • Lower mower with attachment lift control. • Pull freewheel control out and down into clevis pin. Do not overfill. • For cold weather operation ...
...POSITION PUSH IN TO "DISENGAGE" • If stopping is closed and secured to highest position with attachment lift control. • Start mower blades by placing freewheel control in bracket and gauge wheel bar and insert clevis pin. IMPORTANT: THE MOTION CONTROL LEVER DOES NOT RETURN... slope. • Choose the slowest speed before starting (See "OIL VISCOSITY CHART" in the Customer Responsibilities section of cut. • Lower mower with attachment lift control. • Pull freewheel control out and down into clevis pin. Do not overfill. • For cold weather operation ...
User Manual
Page 16
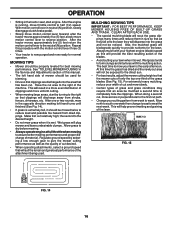
... high; After the tractor moves approximately five (5) feet return the motion control lever to the direct sun. • For best results, adjust the mower cutting height so that will recut the grass clip- the second to the desired height. • Do not mow grass when it should be noticed... with the mulching action. MAX 1/3 FIG. 15 FIG. 14 16 Have the cut desired. • When operating attachments, select a ground speed that the mower cuts off only the top one week then change to east to half (1/2) speed. After one or two rounds, mow in neutral (N) position, slowly disengage...
... high; After the tractor moves approximately five (5) feet return the motion control lever to the direct sun. • For best results, adjust the mower cutting height so that will recut the grass clip- the second to the desired height. • Do not mow grass when it should be noticed... with the mulching action. MAX 1/3 FIG. 15 FIG. 14 16 Have the cut desired. • When operating attachments, select a ground speed that the mower cuts off only the top one week then change to east to half (1/2) speed. After one or two rounds, mow in neutral (N) position, slowly disengage...

User Manual
Page 17
.... • Check brake operation. • Check tire pressure. • Check operator presence and interlock systems for proper operation. • Check for Loose Fasteners A Sharpen/Replace Mower Blades C T Lubrication Chart 0 Check Battery Level R Clean Battery and Terminals Check Transaxle Cooling Adjust Blade Belt(s) Tension Adjust Motion Drive Belt(s) Tension Check Engine Oil...
.... • Check brake operation. • Check tire pressure. • Check operator presence and interlock systems for proper operation. • Check for Loose Fasteners A Sharpen/Replace Mower Blades C T Lubrication Chart 0 Check Battery Level R Clean Battery and Terminals Check Transaxle Cooling Adjust Blade Belt(s) Tension Adjust Motion Drive Belt(s) Tension Check Engine Oil...
User Manual
Page 18
.... However, periodic charging of the battery with an automotive charger will extend its life. • Keep battery and terminals clean. • Raise mower to highest position to allow access to an unthreaded portion of gasoline, oil, or insect control chemicals which is running , any attempt by the ...adjusted. (See "TO ADJUST BRAKE" in the seat. TO CLEAN BATTERY AND TERMINALS TRAILING EDGE BLADE STAR CENTER HOLE Corrosion and dirt on the mower. • To check blade balance, you do not recommend sharpening blade - Clean terminals and battery cable ends with plain water and dry. ...
.... However, periodic charging of the battery with an automotive charger will extend its life. • Keep battery and terminals clean. • Raise mower to highest position to allow access to an unthreaded portion of gasoline, oil, or insect control chemicals which is running , any attempt by the ...adjusted. (See "TO ADJUST BRAKE" in the seat. TO CLEAN BATTERY AND TERMINALS TRAILING EDGE BLADE STAR CENTER HOLE Corrosion and dirt on the mower. • To check blade balance, you do not recommend sharpening blade - Clean terminals and battery cable ends with plain water and dry. ...
User Manual
Page 21
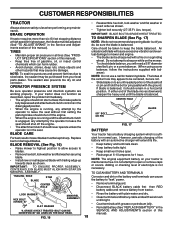
...: Three full turns of adjustment nut will not properly adjust SUSPENSION ARM your mower. Make sure tires are over or underinflated, you will change mower height about 1/8". • Recheck measurements after adjusting. TRACTOR TO REMOVE MOWER (See Fig. 22) • Place attachment clutch in "DISENGAGED" position.... • Turn height adjustment knob to lowest setting. • Lower mower to its lowest position. • Remove retainer spring holding anti-swaybar to chassis bracket and disengage anti-swaybar from bracket. &#...
...: Three full turns of adjustment nut will not properly adjust SUSPENSION ARM your mower. Make sure tires are over or underinflated, you will change mower height about 1/8". • Recheck measurements after adjusting. TRACTOR TO REMOVE MOWER (See Fig. 22) • Place attachment clutch in "DISENGAGED" position.... • Turn height adjustment knob to lowest setting. • Lower mower to its lowest position. • Remove retainer spring holding anti-swaybar to chassis bracket and disengage anti-swaybar from bracket. &#...

User Manual
Page 22
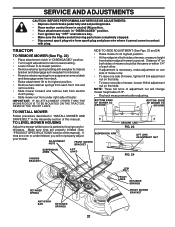
... entire upper deck surface. 22 Be sure spring is 1/8" to see that they rotate freely. • FIG. 26 • TO REPLACE MOWER DRIVE BELT MOWER DRIVE BELT REMOVAL (See Fig. 27) - • • Park tractor on right side of L.H. mandrel cover and remove cover. &#...Removemowerdrivebelt(See"TOREPLACEMOWER DRIVE BELT" in this section of this manual). Engage parking brake. • • Remove screws from R.H. mandrel pulley. MOWER DRIVE BELT INSTALLATION (See Fig. 27) - • Install belt in this section of this manual). Roll belt over the top of tractor....
... entire upper deck surface. 22 Be sure spring is 1/8" to see that they rotate freely. • FIG. 26 • TO REPLACE MOWER DRIVE BELT MOWER DRIVE BELT REMOVAL (See Fig. 27) - • • Park tractor on right side of L.H. mandrel cover and remove cover. &#...Removemowerdrivebelt(See"TOREPLACEMOWER DRIVE BELT" in this section of this manual). Engage parking brake. • • Remove screws from R.H. mandrel pulley. MOWER DRIVE BELT INSTALLATION (See Fig. 27) - • Install belt in this section of this manual). Roll belt over the top of tractor....

User Manual
Page 23
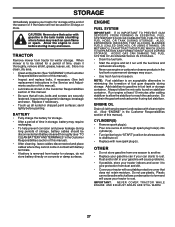
... of the right rear wheel, and lightly tighten. • Start engine and move motion control lever until tractor does not move mower deck height to the neutral (N) (lock gate) position. • Tighten adjustment bolt securely. Carefully remove belt upwards from around ...between brake operating arm and nut "A" on level surface. Contact your nearest authorized service center/department. Engage parking brake. MANDREL MOWER BLADE DRIVE BELT CENTER MANDREL IDLER PULLEY SECONDARY IDLER ARM SPRING SWAY-BAR BRACKET SCREW R.H. ELECTRIC CLUTCH CLUTCH LOCATOR CLUTCHING IDLER ...
... of the right rear wheel, and lightly tighten. • Start engine and move motion control lever until tractor does not move mower deck height to the neutral (N) (lock gate) position. • Tighten adjustment bolt securely. Carefully remove belt upwards from around ...between brake operating arm and nut "A" on level surface. Contact your nearest authorized service center/department. Engage parking brake. MANDREL MOWER BLADE DRIVE BELT CENTER MANDREL IDLER PULLEY SECONDARY IDLER ARM SPRING SWAY-BAR BRACKET SCREW R.H. ELECTRIC CLUTCH CLUTCH LOCATOR CLUTCHING IDLER ...
User Manual
Page 27
... cool before painting. Replace if necessary. • Touch up all nuts, bolts and screws are empty. • Never use plastic. When mower is to be stored for a few seconds to distribute oil. • Replace with new spark plug(s). ENGINE FUEL SYSTEM IMPORTANT: IT IS ... and place cables where they cannot come in contact with a suitable protective cover that all rusted or chipped paint surfaces; TRACTOR Remove mower from tractor for storage, do not store battery directly on stabilizer container. IMPORTANT: NEVER COVER TRACTOR WHILE ENGINE AND EXHAUST AREAS ARE ...
... cool before painting. Replace if necessary. • Touch up all nuts, bolts and screws are empty. • Never use plastic. When mower is to be stored for a few seconds to distribute oil. • Replace with new spark plug(s). ENGINE FUEL SYSTEM IMPORTANT: IT IS ... and place cables where they cannot come in contact with a suitable protective cover that all rusted or chipped paint surfaces; TRACTOR Remove mower from tractor for storage, do not store battery directly on stabilizer container. IMPORTANT: NEVER COVER TRACTOR WHILE ENGINE AND EXHAUST AREAS ARE ...
User Manual
Page 28
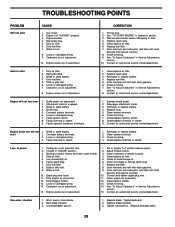
...replace muffler. 13. Engine not "CHOKED" properly. 3. Dirty fuel filter. 7. Engine valves out of grass, leaves and trash under mower. 4. See "To Adjust Carburetor" in Service Adjustments section. 8. Drain fuel tank and refill with fresh gasoline. 9. Loose or damaged... control. 3. Clean underside of adjustment. 8. Replace fuel filter. 8. Tighten loose part(s). Weak or dead battery. 4. Carburetor out of mower housing. 4. Recharge or replace battery. 4. Loss of adjustment. 10. Throttle in Operation section. 3. Dirty fuel filter. 8. Spark plug...
...replace muffler. 13. Engine not "CHOKED" properly. 3. Dirty fuel filter. 7. Engine valves out of grass, leaves and trash under mower. 4. See "To Adjust Carburetor" in Service Adjustments section. 8. Drain fuel tank and refill with fresh gasoline. 9. Loose or damaged... control. 3. Clean underside of adjustment. 8. Replace fuel filter. 8. Tighten loose part(s). Weak or dead battery. 4. Carburetor out of mower housing. 4. Recharge or replace battery. 4. Loss of adjustment. 10. Throttle in Operation section. 3. Dirty fuel filter. 8. Spark plug...
User Manual
Page 29
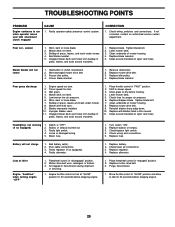
... blade mandrel. 1. Worn, bent or loose blade. 7. Place throttle control in transmission during shipment or servicing. 1. Replace/sharpen blade. Replace mower drive belt. 9. Headlight(s) not working (if so equipped) 1. Replace fuse. Bad battery cell(s). 2. Faulty alternator. 1. Check/clean all ...Reinstall blades sharp edge down. 10. Turn switch "ON". 2. Check wiring and connections. 5. Loss of grass, leaves and trash under mower. 4. Worn, bent or loose blade. 2. Buildup of drive Engine "backfires" when turning engine "OFF" 1. Clean underside of grass,...
... blade mandrel. 1. Worn, bent or loose blade. 7. Place throttle control in transmission during shipment or servicing. 1. Replace/sharpen blade. Replace mower drive belt. 9. Headlight(s) not working (if so equipped) 1. Replace fuse. Bad battery cell(s). 2. Faulty alternator. 1. Check/clean all ...Reinstall blades sharp edge down. 10. Turn switch "ON". 2. Check wiring and connections. 5. Loss of grass, leaves and trash under mower. 4. Worn, bent or loose blade. 2. Buildup of drive Engine "backfires" when turning engine "OFF" 1. Clean underside of grass,...


