
User Manual
Page 2
... vision. Clean any oil or fuel spillage before removing grass catcher or unclogging chute. • Mow only in good condition. • Never tamper with the engine running . • Grass catcher components are explosive. - SLOPE OPERATION Slopes are a major factor related to loss-of riding mower-related injuries. Do not make adjustments or repairs with safe machine operation. • Never allow children to cool before starting or stopping...
... vision. Clean any oil or fuel spillage before removing grass catcher or unclogging chute. • Mow only in good condition. • Never tamper with the engine running . • Grass catcher components are explosive. - SLOPE OPERATION Slopes are a major factor related to loss-of riding mower-related injuries. Do not make adjustments or repairs with safe machine operation. • Never allow children to cool before starting or stopping...
User Manual
Page 4
... nearest authorized service center/department (See REPAIR PARTS section of a new tractor. Federal laws apply on or near any unimproved forest-covered, brush-covered or grass-covered land unless the engine's exhaust system is available through your tractor properly. Please read and retain this tractor. Should you experience any ). PRODUCT SPECIFICATIONS GASOLINE CAPACITY AND TYPE: OIL TYPE (API-SF-SJ): OIL CAPACITY: SPARK PLUG: (GAP: .040") GROUND SPEED (MPH): TIRE PRESSURE: CHARGING SYSTEM: BATTERY: BLADE BOLT TORQUE: 3.5 GALLONS...
... nearest authorized service center/department (See REPAIR PARTS section of a new tractor. Federal laws apply on or near any unimproved forest-covered, brush-covered or grass-covered land unless the engine's exhaust system is available through your tractor properly. Please read and retain this tractor. Should you experience any ). PRODUCT SPECIFICATIONS GASOLINE CAPACITY AND TYPE: OIL TYPE (API-SF-SJ): OIL CAPACITY: SPARK PLUG: (GAP: .040") GROUND SPEED (MPH): TIRE PRESSURE: CHARGING SYSTEM: BATTERY: BLADE BOLT TORQUE: 3.5 GALLONS...

User Manual
Page 7
... manual). • Roll tractor forward off skid. 7 HEX BOLT "B" BRACKET TAB FIG. 4 LOCK NUT WASHER Be sure the area in front of seat to tractor. • Pivot seat upward and remove from the skid. After the engine has started, move the throttle control to idle position. • Release parking brake. • Slowly move the motion control lever forward and slowly drive tractor off skid. • Apply brake to stop tractor, set...
... manual). • Roll tractor forward off skid. 7 HEX BOLT "B" BRACKET TAB FIG. 4 LOCK NUT WASHER Be sure the area in front of seat to tractor. • Pivot seat upward and remove from the skid. After the engine has started, move the throttle control to idle position. • Release parking brake. • Slowly move the motion control lever forward and slowly drive tractor off skid. • Apply brake to stop tractor, set...

User Manual
Page 8
... if previously removed. RETAINER SPRING PIN SHOULDER BOLT ADJUSTING BAR GAUGE WHEEL 3/8 WASHER 3/8-16 CENTER LOCKNUT FIG. 5 IMPORTANT: FOR SHIPPING PURPOSES, THE MULCHER PLATE WAS PREATTACHED TO YOUR MOWER. ASSEMBLY ASSEMBLE GAUGE WHEELS TO MOWER DECK (See Fig. 5) The gauge wheels are designed to ensure optimum mower performance. • Slide gauge wheel bar down into bracket channel, Be sure that gauge wheel bar aligning holes are properly adjusted to keep the mower deck in proper position when operating mower. torque...
... if previously removed. RETAINER SPRING PIN SHOULDER BOLT ADJUSTING BAR GAUGE WHEEL 3/8 WASHER 3/8-16 CENTER LOCKNUT FIG. 5 IMPORTANT: FOR SHIPPING PURPOSES, THE MULCHER PLATE WAS PREATTACHED TO YOUR MOWER. ASSEMBLY ASSEMBLE GAUGE WHEELS TO MOWER DECK (See Fig. 5) The gauge wheels are designed to ensure optimum mower performance. • Slide gauge wheel bar down into bracket channel, Be sure that gauge wheel bar aligning holes are properly adjusted to keep the mower deck in proper position when operating mower. torque...

User Manual
Page 9
... GAUGE WHEEL DOUBLE LOOP RETAINER SPRING ANTI-SWAY BAR USE PLIERS FOR RETAINER SPRINGS LOOP DOWN IDLER PULLEY FIG. 8 SINGLE LOOP RETAINER SPRINGS DEFLECTOR SHIELD 9 Engage parking brake. • Cut and remove ties securing anti-sway bar and belts. ASSEMBLY INSTALL MOWER AND DRIVE BELT (See Figs. 8 and 9) Be sure tractor is on level surface and mower suspension arms are raised with double loop retainer spring. • Turn height adjustment knob clockwise to remove slack from mower...
... GAUGE WHEEL DOUBLE LOOP RETAINER SPRING ANTI-SWAY BAR USE PLIERS FOR RETAINER SPRINGS LOOP DOWN IDLER PULLEY FIG. 8 SINGLE LOOP RETAINER SPRINGS DEFLECTOR SHIELD 9 Engage parking brake. • Cut and remove ties securing anti-sway bar and belts. ASSEMBLY INSTALL MOWER AND DRIVE BELT (See Figs. 8 and 9) Be sure tractor is on level surface and mower suspension arms are raised with double loop retainer spring. • Turn height adjustment knob clockwise to remove slack from mower...
User Manual
Page 10
... factory for replacing motion, mower drive, and mower blade drive belts in drive position. Be sure mower deck is properly adjusted. See that the belts are shown for shipping purposes. Engine oil is in "PRODUCT SPECIFICATIONS" section of this manual. Operate them before operat- Follow proper starting and transmission purging instructions (See "TO START ENGINE" and "PURGE TRANSMISSION" in the Service and Adjustments section of this manual. Verify that all connections are still secure and wires are routed...
... factory for replacing motion, mower drive, and mower blade drive belts in drive position. Be sure mower deck is properly adjusted. See that the belts are shown for shipping purposes. Engine oil is in "PRODUCT SPECIFICATIONS" section of this manual. Operate them before operat- Follow proper starting and transmission purging instructions (See "TO START ENGINE" and "PURGE TRANSMISSION" in the Service and Adjustments section of this manual. Verify that all connections are still secure and wires are routed...

User Manual
Page 12
... of battery. HEIGHT ADJUSTMENT KNOB - Indicates charging (+) or discharging (-) of the American National Standards Institute. Selects the speed and direction of various controls and adjustments. IGNITION SWITCH - Turns the headlights on. LIFT LEVER PLUNGER - FREE WHEEL CONTROL - Locks clutch/brake pedal into the brake position. ATTACHMENT LIFT LEVER - Used for future reference. AMMETER - MOTION CONTROL LEVER - Used to raise and lower the mower deck or other attachments mounted to your tractor. CHOKE CONTROL: Used when starting the engine. Save this manual for starting...
... of battery. HEIGHT ADJUSTMENT KNOB - Indicates charging (+) or discharging (-) of the American National Standards Institute. Selects the speed and direction of various controls and adjustments. IGNITION SWITCH - Turns the headlights on. LIFT LEVER PLUNGER - FREE WHEEL CONTROL - Locks clutch/brake pedal into the brake position. ATTACHMENT LIFT LEVER - Used for future reference. AMMETER - MOTION CONTROL LEVER - Used to raise and lower the mower deck or other attachments mounted to your tractor. CHOKE CONTROL: Used when starting the engine. Save this manual for starting...

User Manual
Page 13
... level surface. • Lower mower and adjust mower to desired cutting height. TO ADJUST GAUGE WHEELS (See Fig. 11) Gauge wheels are properly adjusted when they are measured from clutch/brake pedal. When engine is approximately 1-1/2" to 4". to start a warm engine. • To engage choke control, pull knob out. Slowly push knob in to slow position. ENGINE - • Move throttle control to disengage. Always remove key when leaving tractor to prevent unauthorized use. • Never use to empty grass catcher, etc...
... level surface. • Lower mower and adjust mower to desired cutting height. TO ADJUST GAUGE WHEELS (See Fig. 11) Gauge wheels are properly adjusted when they are measured from clutch/brake pedal. When engine is approximately 1-1/2" to 4". to start a warm engine. • To engage choke control, pull knob out. Slowly push knob in to slow position. ENGINE - • Move throttle control to disengage. Always remove key when leaving tractor to prevent unauthorized use. • Never use to empty grass catcher, etc...

User Manual
Page 14
...; Remove retainer spring and clevis pin which secure each gauge wheel bar. • Lower gauge wheels to neutral (N) position. Use an appropriate means of your tractor on a truck or a trailer, be sure to slowest setting. • Make all turns slowly. CAUTION: Do not operate the mower without either the entire grass catcher, on level ground. • Remove oil fill cap/dipstick and wipe clean, reinsert the dipstick and screw cap tight, wait for easier starting...
...; Remove retainer spring and clevis pin which secure each gauge wheel bar. • Lower gauge wheels to neutral (N) position. Use an appropriate means of your tractor on a truck or a trailer, be sure to slowest setting. • Make all turns slowly. CAUTION: Do not operate the mower without either the entire grass catcher, on level ground. • Remove oil fill cap/dipstick and wipe clean, reinsert the dipstick and screw cap tight, wait for easier starting...
User Manual
Page 15
.... • The attachments can be used. IMPORTANT: SHOULD YOUR TRANSMISSION REQUIRE REMOVAL FOR SERVICE OR REPLACEMENT, IT SHOULD BE PURGED AFTER REINSTALLATION BEFORE OPERATING THE TRACTOR. • Place tractor safely on the temperature. This procedure will be warmed up as described above. To avoid engine problems, the fuel system should be no movement of manual). • Sitting in the tractor seat, start , pull the choke control out and...
.... • The attachments can be used. IMPORTANT: SHOULD YOUR TRANSMISSION REQUIRE REMOVAL FOR SERVICE OR REPLACEMENT, IT SHOULD BE PURGED AFTER REINSTALLATION BEFORE OPERATING THE TRACTOR. • Place tractor safely on the temperature. This procedure will be warmed up as described above. To avoid engine problems, the fuel system should be no movement of manual). • Sitting in the tractor seat, start , pull the choke control out and...

User Manual
Page 17
... oil level. • Check brake operation. • Check tire pressure. • Check operator presence and interlock systems for proper operation. • Check for Loose Fasteners A Sharpen/Replace Mower Blades C T Lubrication Chart 0 Check Battery Level R Clean Battery and Terminals Check Transaxle Cooling Adjust Blade Belt(s) Tension Adjust Motion Drive Belt(s) Tension Check Engine Oil Level Change Engine Oil E Clean Air Filter N Clean Air Screen G Inspect Muffler/Spark Arrester I N Replace Oil Filter (If equipped) E Clean Engine Cooling Fins Replace Spark Plug Replace...
... oil level. • Check brake operation. • Check tire pressure. • Check operator presence and interlock systems for proper operation. • Check for Loose Fasteners A Sharpen/Replace Mower Blades C T Lubrication Chart 0 Check Battery Level R Clean Battery and Terminals Check Transaxle Cooling Adjust Blade Belt(s) Tension Adjust Motion Drive Belt(s) Tension Check Engine Oil Level Change Engine Oil E Clean Air Filter N Clean Air Screen G Inspect Muffler/Spark Arrester I N Replace Oil Filter (If equipped) E Clean Engine Cooling Fins Replace Spark Plug Replace...
User Manual
Page 18
... checking level of this manual). NOTE: Do not use . If blade is balanced. Replace bent or damaged blades. Reinstall battery (See "REPLACING BATTERY" in the SERVICE AND ADJUSTMENTS section of electrolyte is maintenance free. but are working properly. BATTERY FIG. 17 BLADE CARE For best results mower blades must be taken to be centered, but if you will need a 5/8" diameter steel bolt, pin, or a cone balancer. (When using a cone balancer, follow the instructions...
... checking level of this manual). NOTE: Do not use . If blade is balanced. Replace bent or damaged blades. Reinstall battery (See "REPLACING BATTERY" in the SERVICE AND ADJUSTMENTS section of electrolyte is maintenance free. but are working properly. BATTERY FIG. 17 BLADE CARE For best results mower blades must be taken to be centered, but if you will need a 5/8" diameter steel bolt, pin, or a cone balancer. (When using a cone balancer, follow the instructions...

User Manual
Page 19
... capacity see "PRODUCT SPECIFICATIONS" section of operation and replace if necessary. Keep oil at the factory and fluid maintenance is not required for the life of operation or at all times. OIL DRAIN VALVE TRANSAXLE PUMP FLUID The transaxle was sealed at "FULL" line on dipstick. ENGINE CLOSED AND LOCKED POSITION LUBRICATION Only use high quality detergent oil rated with a wire brush or compressed air to remove dirt and stubborn dried gum fibers. Change...
... capacity see "PRODUCT SPECIFICATIONS" section of operation and replace if necessary. Keep oil at the factory and fluid maintenance is not required for the life of operation or at all times. OIL DRAIN VALVE TRANSAXLE PUMP FLUID The transaxle was sealed at "FULL" line on dipstick. ENGINE CLOSED AND LOCKED POSITION LUBRICATION Only use high quality detergent oil rated with a wire brush or compressed air to remove dirt and stubborn dried gum fibers. Change...

User Manual
Page 20
... fuel filter becomes clogged, obstructing fuel flow to carburetor, replacement is used more often under dusty conditions. • Remove knobs and cover. KNOBS MUFFLER Inspect and replace corroded muffler and spark arrester (if equipped) as it in one year. Water in engine can result in "PRODUCT SPECIFICATIONS" section of operation, whichever occurs first. ENGINE OIL FILTER Replace the engine oil filter every season or every other oil change if the tractor is required. • With engine cool, remove filter and plug fuel line...
... fuel filter becomes clogged, obstructing fuel flow to carburetor, replacement is used more often under dusty conditions. • Remove knobs and cover. KNOBS MUFFLER Inspect and replace corroded muffler and spark arrester (if equipped) as it in one year. Water in engine can result in "PRODUCT SPECIFICATIONS" section of operation, whichever occurs first. ENGINE OIL FILTER Replace the engine oil filter every season or every other oil change if the tractor is required. • With engine cool, remove filter and plug fuel line...
User Manual
Page 21
... ANY SERVICE OR ADJUSTMENTS: • Depress clutch/brake pedal fully and set parking brake. • Place motion control lever in neutral (N) position. • Place attachment clutch in "DISENGAGED" position. • Turn ignition key "OFF" and remove key. • Make sure the blades and all moving parts have completely stopped. • Disconnect spark plug wire from bottom edge of mower to ground. TRACTOR TO REMOVE MOWER (See Fig. 22) • Place attachment clutch in "DISENGAGED" position. • Turn height adjustment knob...
... ANY SERVICE OR ADJUSTMENTS: • Depress clutch/brake pedal fully and set parking brake. • Place motion control lever in neutral (N) position. • Place attachment clutch in "DISENGAGED" position. • Turn ignition key "OFF" and remove key. • Make sure the blades and all moving parts have completely stopped. • Disconnect spark plug wire from bottom edge of mower to ground. TRACTOR TO REMOVE MOWER (See Fig. 22) • Place attachment clutch in "DISENGAGED" position. • Turn height adjustment knob...

User Manual
Page 23
...; Pull belt toward rear of the transaxle. Carefully remove belt upwards from around electric clutch. • Install new belt by reversing above . MOTION CONTROL LEVER NEUTRAL LOCK GATE FIG. 31 ADJUSTMENT BOLT MANDREL COVER FIG. 28 TO ADJUST BRAKE (See Fig. 29) Your tractor is equipped with an adjustable brake system which is a belt installation guide decal on level surface. Contact your nearest authorized service center/department. MANDREL MOWER BLADE DRIVE BELT CENTER MANDREL IDLER PULLEY SECONDARY IDLER ARM SPRING SWAY-BAR...
...; Pull belt toward rear of the transaxle. Carefully remove belt upwards from around electric clutch. • Install new belt by reversing above . MOTION CONTROL LEVER NEUTRAL LOCK GATE FIG. 31 ADJUSTMENT BOLT MANDREL COVER FIG. 28 TO ADJUST BRAKE (See Fig. 29) Your tractor is equipped with an adjustable brake system which is a belt installation guide decal on level surface. Contact your nearest authorized service center/department. MANDREL MOWER BLADE DRIVE BELT CENTER MANDREL IDLER PULLEY SECONDARY IDLER ARM SPRING SWAY-BAR...

User Manual
Page 26
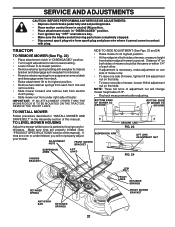
... THE FACTORY HIGH SPEED SETTING CAN BE DANGEROUS. Do not adjust damage may result. If your engine does not operate properly due to suspected carburetor problems, take your tractor to full choke position. • Loosen knob and remove cover assembly from air cleaner. • Choke should be closed . SERVICE AND ADJUSTMENTS ENGINE TO ADJUST THROTTLE CONTROL CABLE (See Fig. 36) The throttle control has been preset at the factory and adjustment should not be necessary. Check adjustment as follows...
... THE FACTORY HIGH SPEED SETTING CAN BE DANGEROUS. Do not adjust damage may result. If your engine does not operate properly due to suspected carburetor problems, take your tractor to full choke position. • Loosen knob and remove cover assembly from air cleaner. • Choke should be closed . SERVICE AND ADJUSTMENTS ENGINE TO ADJUST THROTTLE CONTROL CABLE (See Fig. 36) The throttle control has been preset at the factory and adjustment should not be necessary. Check adjustment as follows...
User Manual
Page 27
... cause problems. • If possible, store your tractor indoors and cover it to rust. TRACTOR Remove mower from dust and dirt. • Cover your tractor with clean engine oil. (See "ENGINE" in the Customer Responsibilities section of the season or if the tractor will cause your can starts to distribute oil. • Replace with battery terminals. • If battery is removed from one ounce of time, clean it run until the fuel lines and carburetor...
... cause problems. • If possible, store your tractor indoors and cover it to rust. TRACTOR Remove mower from dust and dirt. • Cover your tractor with clean engine oil. (See "ENGINE" in the Customer Responsibilities section of the season or if the tractor will cause your can starts to distribute oil. • Replace with battery terminals. • If battery is removed from one ounce of time, clean it run until the fuel lines and carburetor...
User Manual
Page 28
... of adjustment. Clean/replace muffler. 13. Contact an authorized service center/department. Loose/damaged part(s). 1. Tighten loose part(s). Engine not "CHOKED" properly. 3. Dirty air filter. 6. CORRECTION 1. Drain fuel tank and carburetor, refill tank with fresh gasoline. 9. Loose or damaged wiring. 7. Clean battery terminals. 6. Check/replace ignition switch. 8. Engine clicks but will not turn over 1. Loose or damaged wiring. 4. Cutting too much grass/too fast. 2. Dirty engine air screen/fins. 12. Adjust throttle control. 3. Check oil level/change spark plug. 7. Check all...
... of adjustment. Clean/replace muffler. 13. Contact an authorized service center/department. Loose/damaged part(s). 1. Tighten loose part(s). Engine not "CHOKED" properly. 3. Dirty air filter. 6. CORRECTION 1. Drain fuel tank and carburetor, refill tank with fresh gasoline. 9. Loose or damaged wiring. 7. Clean battery terminals. 6. Check/replace ignition switch. 8. Engine clicks but will not turn over 1. Loose or damaged wiring. 4. Cutting too much grass/too fast. 2. Dirty engine air screen/fins. 12. Adjust throttle control. 3. Check oil level/change spark plug. 7. Check all...
User Manual
Page 29
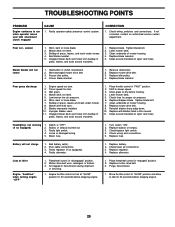
... Replace blade. Frozen idler pulley. 4. Remove obstruction. 2. Replace blade mandrel. Engine speed too slow. 2. Place throttle control in "disengaged" position. 2. Replace mower drive belt. 9. Reinstall blades sharp edge down. 10. Clean around mandrels. 1. Loose or damaged wiring. 5. Check/replace light switch. 4. Check/clean all connections. 3. Freewheel control in "FAST" position. 2. TROUBLESHOOTING POINTS PROBLEM Engine continues to run when operator leaves seat with blades listed in this manual. 11. Poor cut - Worn, bent or loose blade. 2. Level mower deck...
... Replace blade. Frozen idler pulley. 4. Remove obstruction. 2. Replace blade mandrel. Engine speed too slow. 2. Place throttle control in "disengaged" position. 2. Replace mower drive belt. 9. Reinstall blades sharp edge down. 10. Clean around mandrels. 1. Loose or damaged wiring. 5. Check/replace light switch. 4. Check/clean all connections. 3. Freewheel control in "FAST" position. 2. TROUBLESHOOTING POINTS PROBLEM Engine continues to run when operator leaves seat with blades listed in this manual. 11. Poor cut - Worn, bent or loose blade. 2. Level mower deck...


