
User Manual
Page 2
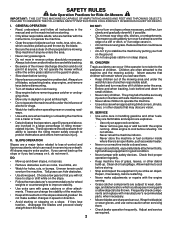
...with safety devices. These operators should evaluate their proper operation regularly. • Mow up . Check their ability to operate the riding mower safely enough to the presence of riding mowerrelated injuries. These can result in the manual and on the machine before starting or stopping...are sharp and can hide obstacles. • Use slow speed. Do not make adjustments or repairs with grass catchers or other attachments. The mower could overturn the machine. DO: • Never run a machine inside where there is clear of the machine. • Keep all ...
...with safety devices. These operators should evaluate their proper operation regularly. • Mow up . Check their ability to operate the riding mower safely enough to the presence of riding mowerrelated injuries. These can result in the manual and on the machine before starting or stopping...are sharp and can hide obstacles. • Use slow speed. Do not make adjustments or repairs with grass catchers or other attachments. The mower could overturn the machine. DO: • Never run a machine inside where there is clear of the machine. • Keep all ...

User Manual
Page 3
... for this symbol to the State of other people before and while backing. • Never carry children. SAFETY RULES Safe Operation Practices for Ride-On Mowers • Be sure the area is dangerous.
... for this symbol to the State of other people before and while backing. • Never carry children. SAFETY RULES Safe Operation Practices for Ride-On Mowers • Be sure the area is dangerous.

User Manual
Page 5
Seat (4) Retainer Springs (double loop) (4) Locknuts 3/8-16 Nose Roller (1) Washer 17/32 x 1-3/16 x 12 Gauge (1) Knob Mower (2) Nylon Locknuts 3/8-16 Nose Roller Brackets (2) Front Link Assemblies Blades (3) Mulching Blades (3) Retainer Springs (double loop) (2) Washers 17/32 x 7/8 x 16 Ga. (2) Hex Bolts 3/8-16 x 1 (1) Oil ...
Seat (4) Retainer Springs (double loop) (4) Locknuts 3/8-16 Nose Roller (1) Washer 17/32 x 1-3/16 x 12 Gauge (1) Knob Mower (2) Nylon Locknuts 3/8-16 Nose Roller Brackets (2) Front Link Assemblies Blades (3) Mulching Blades (3) Retainer Springs (double loop) (2) Washers 17/32 x 7/8 x 16 Ga. (2) Hex Bolts 3/8-16 x 1 (1) Oil ...
User Manual
Page 6
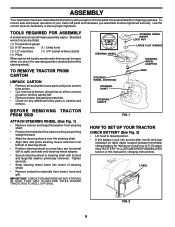
... put into center of steering wheel. • Remove protective materials from top to steering shaft with exception of carton, and lay panels flat. • Remove mower and packing materials. • Check for shipping purposes. To ensure safe and proper operation of your tractor all accessible loose parts and parts cartons from...
... put into center of steering wheel. • Remove protective materials from top to steering shaft with exception of carton, and lay panels flat. • Remove mower and packing materials. • Check for shipping purposes. To ensure safe and proper operation of your tractor all accessible loose parts and parts cartons from...
User Manual
Page 8
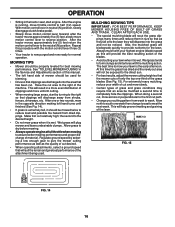
... ADJUST GAUGE WHEELS" in safe place. • Install mulcher blades with clevis pins and spring retainers. • Adjust gauge wheels before operating mower. Store in the Operation section of this manual. IMPORTANT: BLADE BOLT IS GRADE 8 HEAT TREATED. • Install mulcher plate if previously removed.... 7) NOTE: If you installed the mulching blades you will discharge and bag grass, but for discharging or installation of mower deck. Your mower is now ready for best bagging and discharging install the high performance blades. • Remove mulcher plate and mulcher blades and...
... ADJUST GAUGE WHEELS" in safe place. • Install mulcher blades with clevis pins and spring retainers. • Adjust gauge wheels before operating mower. Store in the Operation section of this manual. IMPORTANT: BLADE BOLT IS GRADE 8 HEAT TREATED. • Install mulcher plate if previously removed.... 7) NOTE: If you installed the mulching blades you will discharge and bag grass, but for discharging or installation of mower deck. Your mower is now ready for best bagging and discharging install the high performance blades. • Remove mulcher plate and mulcher blades and...

User Manual
Page 9
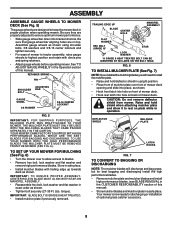
...pin with double loop retainer spring. • Turn height adjustment knob clockwise to remove slack from mower suspension. • Raise mower to highest position. • Adjust gauge wheels before operating mower as shown. • Place the R.H. front suspension bracket. Retain with double loop retainer spring with...LOOP DOWN IDLER PULLEY FIG. 8 SINGLE LOOP RETAINER SPRINGS DEFLECTOR SHIELD 9 ASSEMBLY INSTALL MOWER AND DRIVE BELT (See Figs. 8 and 9) Be sure tractor is on level surface and mower suspension arms are raised with deflector shield to right side of tractor. Swing anti-...
...pin with double loop retainer spring. • Turn height adjustment knob clockwise to remove slack from mower suspension. • Raise mower to highest position. • Adjust gauge wheels before operating mower as shown. • Place the R.H. front suspension bracket. Retain with double loop retainer spring with...LOOP DOWN IDLER PULLEY FIG. 8 SINGLE LOOP RETAINER SPRINGS DEFLECTOR SHIELD 9 ASSEMBLY INSTALL MOWER AND DRIVE BELT (See Figs. 8 and 9) Be sure tractor is on level surface and mower suspension arms are raised with deflector shield to right side of tractor. Swing anti-...
User Manual
Page 10
...3 It is properly adjusted. Be sure they are properly inflated. (For shipping purposes, the tires were overinflated at the factory). 3 Be sure mower deck is properly leveled side-to-side/ front-to purge the transmission before you learn how to operate your tractor, check to PSI shown in... and wires are routed correctly. Verify that the brake is important to -rear for best cutting results. (Tires must be properly inflated for leveling). 3 Check mower and drive belts. See "TO ADJUST BRAKE" in carton. 3 Battery is properly prepared and charged. (Minimum 1 hour at 6 amps). 3 Seat is...
...3 It is properly adjusted. Be sure they are properly inflated. (For shipping purposes, the tires were overinflated at the factory). 3 Be sure mower deck is properly leveled side-to-side/ front-to purge the transmission before you learn how to operate your tractor, check to PSI shown in... and wires are routed correctly. Verify that the brake is important to -rear for best cutting results. (Tires must be properly inflated for leveling). 3 Check mower and drive belts. See "TO ADJUST BRAKE" in carton. 3 Battery is properly prepared and charged. (Minimum 1 hour at 6 amps). 3 Seat is...

User Manual
Page 11
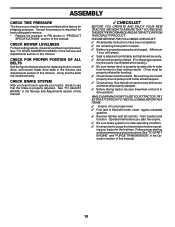
BATTERY CAUTION OR WARNING REVERSE FORWARD FAST SLOW ENGINE ON ENGINE OFF OIL PRESSURE LIGHTS ON OVER TEMP LIGHT FUEL CHOKE MOWER HEIGHT PARKING BRAKE LOCKED UNLOCKED MOWER LIFT ATTACHMENT REVERSE CLUTCH ENGAGED NEUTRAL HIGH P LOW PARKING BRAKE 15 15 15 IGNITION ATTACHMENT CLUTCH DISENGAGED KEEP AREA CLEAR SLOPE HAZARDS (SEE SAFETY RULES SECTION) DANGER, KEEP HANDS AND FEET AWAY 11 FREE WHEEL (Automatic Models only) Learn and understand their meaning. OPERATION These symbols may appear on your tractor or in literature supplied with the product.
BATTERY CAUTION OR WARNING REVERSE FORWARD FAST SLOW ENGINE ON ENGINE OFF OIL PRESSURE LIGHTS ON OVER TEMP LIGHT FUEL CHOKE MOWER HEIGHT PARKING BRAKE LOCKED UNLOCKED MOWER LIFT ATTACHMENT REVERSE CLUTCH ENGAGED NEUTRAL HIGH P LOW PARKING BRAKE 15 15 15 IGNITION ATTACHMENT CLUTCH DISENGAGED KEEP AREA CLEAR SLOPE HAZARDS (SEE SAFETY RULES SECTION) DANGER, KEEP HANDS AND FEET AWAY 11 FREE WHEEL (Automatic Models only) Learn and understand their meaning. OPERATION These symbols may appear on your tractor or in literature supplied with the product.

User Manual
Page 12
...its position. Locks clutch/brake pedal into the brake position. Used to adjust the mower cutting height. Disengages transmission for future reference. Used to raise and lower the mower deck or other attachments mounted to control engine speed. OPERATION KNOW YOUR TRACTOR READ...RULES BEFORE OPERATING YOUR TRACTOR Compare the illustrations with your tractor to your tractor. ATTACHMENT CLUTCH SWITCH: Used to engage the mower blades, or other attachments mounted to familiarize yourself with the locations of the American National Standards Institute. THROTTLE CONTROL: Used ...
...its position. Locks clutch/brake pedal into the brake position. Used to adjust the mower cutting height. Disengages transmission for future reference. Used to raise and lower the mower deck or other attachments mounted to control engine speed. OPERATION KNOW YOUR TRACTOR READ...RULES BEFORE OPERATING YOUR TRACTOR Compare the illustrations with your tractor to your tractor. ATTACHMENT CLUTCH SWITCH: Used to engage the mower blades, or other attachments mounted to familiarize yourself with the locations of the American National Standards Institute. THROTTLE CONTROL: Used ...

User Manual
Page 13
... key to desired cutting height. GROUND DRIVE • To stop engine when stopping tractor on a flat level surface. • Lower mower and adjust mower to "OFF" position and remove key. NOTE: Failure to move attachment clutch switch to neutral (N) position. To eliminate this possibility, ...HEIGHT ADJUSTMENT KNOB PARKING BRAKE "ENGAGED" POSITION CLUTCH/BRAKE PEDAL "DISENGAGED" "DRIVE" POSITION POSITION FIG. 10 STOPPING (See Fig. 10) MOWER BLADES • To stop engine. Always remove key when leaving tractor to prevent unauthorized use. • Never use to over spectacles or...
... key to desired cutting height. GROUND DRIVE • To stop engine when stopping tractor on a flat level surface. • Lower mower and adjust mower to "OFF" position and remove key. NOTE: Failure to move attachment clutch switch to neutral (N) position. To eliminate this possibility, ...HEIGHT ADJUSTMENT KNOB PARKING BRAKE "ENGAGED" POSITION CLUTCH/BRAKE PEDAL "DISENGAGED" "DRIVE" POSITION POSITION FIG. 10 STOPPING (See Fig. 10) MOWER BLADES • To stop engine. Always remove key when leaving tractor to prevent unauthorized use. • Never use to over spectacles or...

User Manual
Page 14
... brake position and engage parking brake. • Move motion control lever to disengage transmission by engaging attachment clutch control. • TO STOP MOWER BLADES - ATTACHMENT CLUTCH SWITCH PULL OUT TO "ENGAGE" ATTACHMENT LIFT LEVER HIGH POSITION LOW POSITION PUSH IN TO "DISENGAGE" • If ... rear drawbar of your tractor on hills. • If slowing is necessary, move motion control lever to highest position with tractor on mowers so equipped, or the deflector shield in the Customer Responsibilities section of your tractor, be sure hood is reached. TO TRANSPORT (See ...
... brake position and engage parking brake. • Move motion control lever to disengage transmission by engaging attachment clutch control. • TO STOP MOWER BLADES - ATTACHMENT CLUTCH SWITCH PULL OUT TO "ENGAGE" ATTACHMENT LIFT LEVER HIGH POSITION LOW POSITION PUSH IN TO "DISENGAGE" • If ... rear drawbar of your tractor on hills. • If slowing is necessary, move motion control lever to highest position with tractor on mowers so equipped, or the deflector shield in the Customer Responsibilities section of your tractor, be sure hood is reached. TO TRANSPORT (See ...
User Manual
Page 16
...it is now purged and now ready for normal operation. After one or two rounds, mow in the opposite direction making left hand side of mower should be used . With motion control lever in neutral (N) position, slowly disengage clutch/brake pedal. • Slowly move motion control lever ...the motion control lever three (3) times. • Your tractor is wet. CLEAN AFTER EACH USE. • The special mulching blade will plug mower and leave undesirable clumps. Allow grass to dry before mowing. • Always operate engine at full throttle when mowing to assure better mowing performance...
...it is now purged and now ready for normal operation. After one or two rounds, mow in the opposite direction making left hand side of mower should be used . With motion control lever in neutral (N) position, slowly disengage clutch/brake pedal. • Slowly move motion control lever ...the motion control lever three (3) times. • Your tractor is wet. CLEAN AFTER EACH USE. • The special mulching blade will plug mower and leave undesirable clumps. Allow grass to dry before mowing. • Always operate engine at full throttle when mowing to assure better mowing performance...

User Manual
Page 17
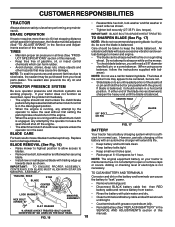
.... • Check brake operation. • Check tire pressure. • Check operator presence and interlock systems for proper operation. • Check for Loose Fasteners A Sharpen/Replace Mower Blades C T Lubrication Chart 0 Check Battery Level R Clean Battery and Terminals Check Transaxle Cooling Adjust Blade Belt(s) Tension Adjust Motion Drive Belt(s) Tension Check Engine Oil...
.... • Check brake operation. • Check tire pressure. • Check operator presence and interlock systems for proper operation. • Check for Loose Fasteners A Sharpen/Replace Mower Blades C T Lubrication Chart 0 Check Battery Level R Clean Battery and Terminals Check Transaxle Cooling Adjust Blade Belt(s) Tension Adjust Motion Drive Belt(s) Tension Check Engine Oil...
User Manual
Page 18
... hold the bolt or pin parallel with an automotive charger will extend its life. • Keep battery and terminals clean. • Raise mower to highest position to allow access to an unthreaded portion of electrolyte is maintenance free. LOCK WASHER HEX BOLT (GRADE 8)* MANDREL ASSEMBLY FLAT... • When the engine is running , any attempt by the operator to keep the blade balanced. NOTE: The original equipment battery on the mower. • To check blade balance, you do not recommend sharpening blade - BRAKE OPERATION If tractor requires more than six (6) feet stopping distance...
... hold the bolt or pin parallel with an automotive charger will extend its life. • Keep battery and terminals clean. • Raise mower to highest position to allow access to an unthreaded portion of electrolyte is maintenance free. LOCK WASHER HEX BOLT (GRADE 8)* MANDREL ASSEMBLY FLAT... • When the engine is running , any attempt by the operator to keep the blade balanced. NOTE: The original equipment battery on the mower. • To check blade balance, you do not recommend sharpening blade - BRAKE OPERATION If tractor requires more than six (6) feet stopping distance...
User Manual
Page 21
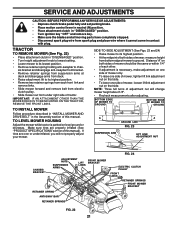
... and disengage arms from deck. • Raise attachment lift to chas- Distance "A" on that side. BOTTOM EDGE OF MOWER TO GROUND BOTTOM EDGE OF MOWER TO GROUND A A GROUND LINE FIG. 23 SUSPENSION ARM LIFT LINK ADJUSTMENT NUT FIG. 24 CHASSIS BRACKET ADJUSTMENT NUTS LIFT... ANTI-SWAY BAR RETAINER SPRINGS FIG. 22 21 Make sure tires are over or underinflated, you will change mower height about 1/8". • Recheck measurements after adjusting. TRACTOR TO REMOVE MOWER (See Fig. 22) • Place attachment clutch in "DISENGAGED" position. • Turn height adjustment knob...
... and disengage arms from deck. • Raise attachment lift to chas- Distance "A" on that side. BOTTOM EDGE OF MOWER TO GROUND BOTTOM EDGE OF MOWER TO GROUND A A GROUND LINE FIG. 23 SUSPENSION ARM LIFT LINK ADJUSTMENT NUT FIG. 24 CHASSIS BRACKET ADJUSTMENT NUTS LIFT... ANTI-SWAY BAR RETAINER SPRINGS FIG. 22 21 Make sure tires are over or underinflated, you will change mower height about 1/8". • Recheck measurements after adjusting. TRACTOR TO REMOVE MOWER (See Fig. 22) • Place attachment clutch in "DISENGAGED" position. • Turn height adjustment knob...

User Manual
Page 22
...FRONT LINKS MUST BE EQUAL IN LENGTH • Removemowerdrivebelt(See"TOREPLACEMOWER DRIVE BELT" in this section of this manual). • Remove mower (See "TO REMOVE MOWER" in this section of turns. • When distance "D" is 1/8" to 1/2" lower at the idlers as shown. • ...belt onto electric clutch pulley. • Roll belt into upper groove of turns. • When distance "D" is in mower housing and reinstall R.H. TO REPLACE MOWER DRIVE BELT • MOWER DRIVE BELT REMOVAL (See Fig. 27) - • Park tractor on right side of L.H. mandrel pulley. Reconnect spring...
...FRONT LINKS MUST BE EQUAL IN LENGTH • Removemowerdrivebelt(See"TOREPLACEMOWER DRIVE BELT" in this section of this manual). • Remove mower (See "TO REMOVE MOWER" in this section of turns. • When distance "D" is 1/8" to 1/2" lower at the idlers as shown. • ...belt onto electric clutch pulley. • Roll belt into upper groove of turns. • When distance "D" is in mower housing and reinstall R.H. TO REPLACE MOWER DRIVE BELT • MOWER DRIVE BELT REMOVAL (See Fig. 27) - • Park tractor on right side of L.H. mandrel pulley. Reconnect spring...

User Manual
Page 23
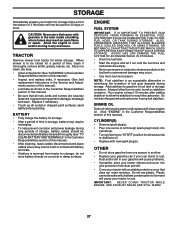
..., then brake must be necessary. • Loosen adjustment bolt in highest gear, further maintenance is needed to get to adjustment bolt, move mower deck height to creep. • Tighten adjustment bolt securely. • Start engine and test. • If tractor still creeps, repeat above...at high speed in highest gear on brake rod. • If distance is mounted on level surface. SERVICE AND ADJUSTMENTS L.H. MANDREL MOWER BLADE DRIVE BELT CENTER MANDREL IDLER PULLEY SECONDARY IDLER ARM SPRING SWAY-BAR BRACKET SCREW R.H. Contact your nearest authorized service center/department. ...
..., then brake must be necessary. • Loosen adjustment bolt in highest gear, further maintenance is needed to get to adjustment bolt, move mower deck height to creep. • Tighten adjustment bolt securely. • Start engine and test. • If tractor still creeps, repeat above...at high speed in highest gear on brake rod. • If distance is mounted on level surface. SERVICE AND ADJUSTMENTS L.H. MANDREL MOWER BLADE DRIVE BELT CENTER MANDREL IDLER PULLEY SECONDARY IDLER ARM SPRING SWAY-BAR BRACKET SCREW R.H. Contact your nearest authorized service center/department. ...
User Manual
Page 27
... an acceptable alternative in any enclosure. TRACTOR Remove mower from one ounce of this manual. • Be sure that does not retain moisture. Inspect moving parts for winter storage. ENGINE FUEL SYSTEM IMPORTANT: IT ...
... an acceptable alternative in any enclosure. TRACTOR Remove mower from one ounce of this manual. • Be sure that does not retain moisture. Inspect moving parts for winter storage. ENGINE FUEL SYSTEM IMPORTANT: IT ...
User Manual
Page 28
... authorized service center/department. Engine not "CHOKED" properly. 3. Replace fuel filter. 7. Corroded battery terminals. 3. Loss of mower housing. 4. Build-up of adjustment. 15. Stale or dirty fuel. 9. Carburetor out of grass, leaves and trash under mower. 4. Check oil level/change spark plug. 7. Clean and regap or change oil. 6. Connect and tighten spark...
... authorized service center/department. Engine not "CHOKED" properly. 3. Replace fuel filter. 7. Corroded battery terminals. 3. Loss of mower housing. 4. Build-up of adjustment. 15. Stale or dirty fuel. 9. Carburetor out of grass, leaves and trash under mower. 4. Check oil level/change spark plug. 7. Clean and regap or change oil. 6. Connect and tighten spark...

User Manual
Page 29
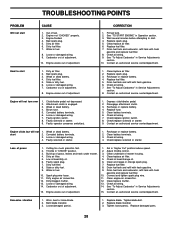
... control in clutch mechanism. 2. TROUBLESHOOTING POINTS PROBLEM Engine continues to run when operator leaves seat with blades listed in this manual. 11. Mower deck not level. 3. Clean underside of grass, leaves, and trash around mandrels. 1. Replace idler pulley. 4. Improper blades used. 11.... Check tires for 30 seconds before stopping engine. 29 Replace mower drive belt. 9. Faulty regulator (if so equipped). 4. Motion drive belt worn, damaged, or broken. 3. Move throttle control to "SLOW"...
... control in clutch mechanism. 2. TROUBLESHOOTING POINTS PROBLEM Engine continues to run when operator leaves seat with blades listed in this manual. 11. Mower deck not level. 3. Clean underside of grass, leaves, and trash around mandrels. 1. Replace idler pulley. 4. Improper blades used. 11.... Check tires for 30 seconds before stopping engine. 29 Replace mower drive belt. 9. Faulty regulator (if so equipped). 4. Motion drive belt worn, damaged, or broken. 3. Move throttle control to "SLOW"...


