
User Manual
Page 2
... mowerrelated injuries. Choose a low gear so that operators, age 60 years and above, are sharp and can hide obstacles. • Use slow speed. Do not make adjustments or repairs with manufacturer's recommended parts, when necessary. • Mower blades are involved in handling gasoline and other attachments. Allow machine to cool before starting or stopping on steep slopes. Frequently check components and replace with the engine running .
... mowerrelated injuries. Choose a low gear so that operators, age 60 years and above, are sharp and can hide obstacles. • Use slow speed. Do not make adjustments or repairs with manufacturer's recommended parts, when necessary. • Mower blades are involved in handling gasoline and other attachments. Allow machine to cool before starting or stopping on steep slopes. Frequently check components and replace with the engine running .
User Manual
Page 4
... (if any problem you experience any ). Federal laws apply on your purchase of a new tractor. Should you cannot easily remedy, please contact your nearest authorized service center/department (See REPAIR PARTS section of this tractor. In the state of the California Public Resources Code). PRODUCT SPECIFICATIONS GASOLINE CAPACITY AND TYPE: OIL TYPE (API-SF-SJ): OIL CAPACITY: SPARK PLUG: (GAP: .040") GROUND SPEED (MPH): TIRE PRESSURE: CHARGING SYSTEM: BATTERY: BLADE BOLT TORQUE: 3.5 GALLONS...
... (if any problem you experience any ). Federal laws apply on your purchase of a new tractor. Should you cannot easily remedy, please contact your nearest authorized service center/department (See REPAIR PARTS section of this tractor. In the state of the California Public Resources Code). PRODUCT SPECIFICATIONS GASOLINE CAPACITY AND TYPE: OIL TYPE (API-SF-SJ): OIL CAPACITY: SPARK PLUG: (GAP: .040") GROUND SPEED (MPH): TIRE PRESSURE: CHARGING SYSTEM: BATTERY: BLADE BOLT TORQUE: 3.5 GALLONS...

User Manual
Page 7
... and raise attachment lift lever to idle position. • Release parking brake. • Slowly move the throttle control to its adjusted position. • Raise seat and tighten adjustment knob securely. Continue with gasoline • Place freewheel control in "transmission engaged" position. • Sit on seat in operating position, depress clutch/break pedal and set the parking brake. • Place motion control lever in slot and pull seat towards rear of tractor. • Pivot...
... and raise attachment lift lever to idle position. • Release parking brake. • Slowly move the throttle control to its adjusted position. • Raise seat and tighten adjustment knob securely. Continue with gasoline • Place freewheel control in "transmission engaged" position. • Sit on seat in operating position, depress clutch/break pedal and set the parking brake. • Place motion control lever in slot and pull seat towards rear of tractor. • Pivot...
User Manual
Page 8
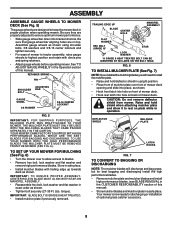
..., Be sure that gauge wheel bar aligning holes are designed to highest position and retain with trailing edge up towards deck as shown using shoulder bolts, 3/8 washers and 3/8-16 center locknuts and tighten securely. • For ease of mower to tractor assembly, raise gauge wheels to keep the mower deck in safe place. • Install mulcher blades with clevis pins and spring retainers. • Adjust gauge wheels before operating mower. THE MULCHER PLATE...
..., Be sure that gauge wheel bar aligning holes are designed to highest position and retain with trailing edge up towards deck as shown using shoulder bolts, 3/8 washers and 3/8-16 center locknuts and tighten securely. • For ease of mower to tractor assembly, raise gauge wheels to keep the mower deck in safe place. • Install mulcher blades with clevis pins and spring retainers. • Adjust gauge wheels before operating mower. THE MULCHER PLATE...

User Manual
Page 9
... 9) Be sure tractor is on level surface and mower suspension arms are raised with attachment lift control. front suspension bracket. Engage parking brake. • Cut and remove ties securing anti-sway bar and belts. IMPORTANT: CHECK BELT FOR PROPER ROUTING IN ALL MOWER PULLEY GROOVES. INSTALL BELT INTO ELECTRIC CLUTCH PULLEY GROOVE. • Install one front link in L.H. Retain with two single loop retainer springs as shown. • Turn height adjustment knob counterclockwise until...
... 9) Be sure tractor is on level surface and mower suspension arms are raised with attachment lift control. front suspension bracket. Engage parking brake. • Cut and remove ties securing anti-sway bar and belts. IMPORTANT: CHECK BELT FOR PROPER ROUTING IN ALL MOWER PULLEY GROOVES. INSTALL BELT INTO ELECTRIC CLUTCH PULLEY GROOVE. • Install one front link in L.H. Retain with two single loop retainer springs as shown. • Turn height adjustment knob counterclockwise until...
User Manual
Page 10
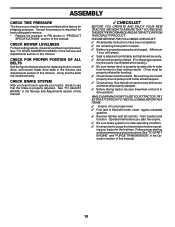
... LEARNING HOW TO USE YOUR TRACTOR, PAY EXTRA ATTENTION TO THE FOLLOWING IMPORTANT ITEMS: 3 Engine oil is at the factory). 3 Be sure mower deck is properly adjusted. Verify that all connections are still secure and wires are shown for replacing motion, mower drive, and mower blade drive belts in drive position. Correct tire pressure is in the Service and Adjustments section of this manual. CHECK MOWER LEVELNESS For best cutting results, mower should be sure freewheel...
... LEARNING HOW TO USE YOUR TRACTOR, PAY EXTRA ATTENTION TO THE FOLLOWING IMPORTANT ITEMS: 3 Engine oil is at the factory). 3 Be sure mower deck is properly adjusted. Verify that all connections are still secure and wires are shown for replacing motion, mower drive, and mower blade drive belts in drive position. Correct tire pressure is in the Service and Adjustments section of this manual. CHECK MOWER LEVELNESS For best cutting results, mower should be sure freewheel...

User Manual
Page 12
CHOKE CONTROL AMMETER IGNITION SWITCH LIGHT SWITCH POSITION THROTTLE CONTROL LIFT LEVER PLUNGER CLUTCH/ BRAKE PEDAL ATTACHMENT LIFT LEVER HEIGHT ADJUSTMENT KNOB ATTACHMENT CLUTCH SWITCH FREEWHEEL CONTROL PARKING BRAKE MOTION CONTROL LEVER FIG. 9 Our tractors conform to the safety standards of battery. Turns the headlights on. Disengages transmission for declutching and braking the tractor and starting a cold engine. MOTION CONTROL LEVER - Used to raise and lower the mower deck or other attachments mounted to your tractor. FREE WHEEL CONTROL - Used for pushing or ...
CHOKE CONTROL AMMETER IGNITION SWITCH LIGHT SWITCH POSITION THROTTLE CONTROL LIFT LEVER PLUNGER CLUTCH/ BRAKE PEDAL ATTACHMENT LIFT LEVER HEIGHT ADJUSTMENT KNOB ATTACHMENT CLUTCH SWITCH FREEWHEEL CONTROL PARKING BRAKE MOTION CONTROL LEVER FIG. 9 Our tractors conform to the safety standards of battery. Turns the headlights on. Disengages transmission for declutching and braking the tractor and starting a cold engine. MOTION CONTROL LEVER - Used to raise and lower the mower deck or other attachments mounted to your tractor. FREE WHEEL CONTROL - Used for pushing or ...

User Manual
Page 13
... remove key when leaving tractor to prevent unauthorized use. • Never use to start a warm engine. • To engage choke control, pull knob out. TO ADJUST MOWER CUTTING HEIGHT (See Fig. 10) The cutting height is controlled by turning the height adjustment knob in "BRAKE" position. The heights are approximate and may cause "browning" of grass being mowed. • The average lawn should be mowed twice. These heights are measured from clutch/brake pedal...
... remove key when leaving tractor to prevent unauthorized use. • Never use to start a warm engine. • To engage choke control, pull knob out. TO ADJUST MOWER CUTTING HEIGHT (See Fig. 10) The cutting height is controlled by turning the height adjustment knob in "BRAKE" position. The heights are approximate and may cause "browning" of grass being mowed. • The average lawn should be mowed twice. These heights are measured from clutch/brake pedal...

User Manual
Page 14
... GAUGE WHEELS IF YOU CHANGE THE CUTTING HEIGHT OF THE MOWER DECK. ATTACHMENT CLUTCH SWITCH PULL OUT TO "ENGAGE" ATTACHMENT LIFT LEVER HIGH POSITION LOW POSITION PUSH IN TO "DISENGAGE" • If stopping is reached. RETAINER SPRING CLEVIS PIN FIG. 11 TO OPERATE MOWER (See Fig. 12) Your tractor is equipped with attachment lift control. • Pull freewheel control out and down hills. • Avoid stopping or changing speed on level ground. • Remove oil fill cap/dipstick and wipe clean...
... GAUGE WHEELS IF YOU CHANGE THE CUTTING HEIGHT OF THE MOWER DECK. ATTACHMENT CLUTCH SWITCH PULL OUT TO "ENGAGE" ATTACHMENT LIFT LEVER HIGH POSITION LOW POSITION PUSH IN TO "DISENGAGE" • If stopping is reached. RETAINER SPRING CLEVIS PIN FIG. 11 TO OPERATE MOWER (See Fig. 12) Your tractor is equipped with attachment lift control. • Pull freewheel control out and down hills. • Avoid stopping or changing speed on level ground. • Remove oil fill cap/dipstick and wipe clean...
User Manual
Page 15
... engine does not start the engine and let it will remove any spilled oil or fuel. Do not mix oil with engine off any trapped air inside the transmission which leads to push the control in storage. To avoid engine problems, the fuel system should be no movement of manual). Do not overfill. See "TO ADJUST CARBURETOR" in neutral (N) position. • Move attachment clutch to "DISENGAGED" position. • Move throttle control to fast position • Pull choke control...
... engine does not start the engine and let it will remove any spilled oil or fuel. Do not mix oil with engine off any trapped air inside the transmission which leads to push the control in storage. To avoid engine problems, the fuel system should be no movement of manual). Do not overfill. See "TO ADJUST CARBURETOR" in neutral (N) position. • Move attachment clutch to "DISENGAGED" position. • Move throttle control to fast position • Pull choke control...

User Manual
Page 17
... oil level. • Check brake operation. • Check tire pressure. • Check operator presence and interlock systems for proper operation. • Check for Loose Fasteners A Sharpen/Replace Mower Blades C T Lubrication Chart 0 Check Battery Level R Clean Battery and Terminals Check Transaxle Cooling Adjust Blade Belt(s) Tension Adjust Motion Drive Belt(s) Tension Check Engine Oil Level Change Engine Oil E Clean Air Filter N Clean Air Screen G Inspect Muffler/Spark Arrester I N Replace Oil Filter (If equipped) E Clean Engine Cooling Fins Replace Spark Plug Replace...
... oil level. • Check brake operation. • Check tire pressure. • Check operator presence and interlock systems for proper operation. • Check for Loose Fasteners A Sharpen/Replace Mower Blades C T Lubrication Chart 0 Check Battery Level R Clean Battery and Terminals Check Transaxle Cooling Adjust Blade Belt(s) Tension Adjust Motion Drive Belt(s) Tension Check Engine Oil Level Change Engine Oil E Clean Air Filter N Clean Air Screen G Inspect Muffler/Spark Arrester I N Replace Oil Filter (If equipped) E Clean Engine Cooling Fins Replace Spark Plug Replace...
User Manual
Page 18
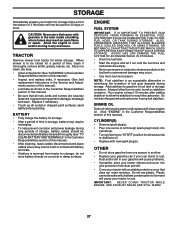
..., repair the problem immediately. • The engine should not start unless the clutch/brake pedal is fully depressed and attachement clutch control is in the disengaged position. • When the engine is running and the attachment clutch is engaged, any attempt by the operator to "leak" power. • Remove terminal guard. • Disconnect BLACK battery cable first then RED battery cable and remove battery from your local parts dealer. BATTERY FIG. 17 BLADE CARE For best results mower blades...
..., repair the problem immediately. • The engine should not start unless the clutch/brake pedal is fully depressed and attachement clutch control is in the disengaged position. • When the engine is running and the attachment clutch is engaged, any attempt by the operator to "leak" power. • Remove terminal guard. • Disconnect BLACK battery cable first then RED battery cable and remove battery from your local parts dealer. BATTERY FIG. 17 BLADE CARE For best results mower blades...

User Manual
Page 19
... manual. • Use gauge on the drain valve. • After oil has drained completely, close and lock the drain valve by pushing inward and turning counterclockwise. • To open, pull out on oil fill cap/dipstick for checking level. CLEAN AIR SCREEN Air screen must meet API service classification SF-SJ. • Be sure tractor is in a suitable container. AIR FILTER (See Fig. 20) TO CHANGE ENGINE OIL (See Figs. 18 and 19) Determine temperature range expected before starting...
... manual. • Use gauge on the drain valve. • After oil has drained completely, close and lock the drain valve by pushing inward and turning counterclockwise. • To open, pull out on oil fill cap/dipstick for checking level. CLEAN AIR SCREEN Air screen must meet API service classification SF-SJ. • Be sure tractor is in a suitable container. AIR FILTER (See Fig. 20) TO CHANGE ENGINE OIL (See Figs. 18 and 19) Determine temperature range expected before starting...

User Manual
Page 20
... THE CARTRIDGE. Spark plug type and gap setting are covered to carburetor, replacement is used more than 100 hours in "PRODUCT SPECIFICATIONS" section of this manual. If fuel filter becomes clogged, obstructing fuel flow to keep water out. ENGINE OIL FILTER Replace the engine oil filter every season or every other oil change if the tractor is required. • With engine cool, remove filter and plug fuel line sections. • Place new fuel filter in position in clean, absorbent cloth and squeeze to remove excess oil. •...
... THE CARTRIDGE. Spark plug type and gap setting are covered to carburetor, replacement is used more than 100 hours in "PRODUCT SPECIFICATIONS" section of this manual. If fuel filter becomes clogged, obstructing fuel flow to keep water out. ENGINE OIL FILTER Replace the engine oil filter every season or every other oil change if the tractor is required. • With engine cool, remove filter and plug fuel line sections. • Place new fuel filter in position in clean, absorbent cloth and squeeze to remove excess oil. •...
User Manual
Page 21
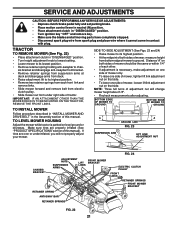
... BAR RETAINER SPRINGS FIG. 22 21 TO LEVEL MOWER HOUSING Adjust the mower while tractor is necessary, make adjustment on one side of mower only. • To raise one side of mower, loosen lift link adjustment nut on level ground or driveway. SERVICE AND ADJUSTMENTS CAUTION: BEFORE PERFORMING ANY SERVICE OR ADJUSTMENTS: • Depress clutch/brake pedal fully and set parking brake. • Place motion control lever in neutral (N) position. • Place attachment clutch in "DISENGAGED" position. • Turn ignition...
... BAR RETAINER SPRINGS FIG. 22 21 TO LEVEL MOWER HOUSING Adjust the mower while tractor is necessary, make adjustment on one side of mower only. • To raise one side of mower, loosen lift link adjustment nut on level ground or driveway. SERVICE AND ADJUSTMENTS CAUTION: BEFORE PERFORMING ANY SERVICE OR ADJUSTMENTS: • Depress clutch/brake pedal fully and set parking brake. • Place motion control lever in neutral (N) position. • Place attachment clutch in "DISENGAGED" position. • Turn ignition...

User Manual
Page 23
... REMOVE MOWER" in this section of this manual.) • Disconnect clutch wire harness. • Remove clutch locator. • Remove belt from around electric clutch. • Install new belt by reversing above . Readjust if necessary. For assistance, there is other than 1-9/16", loosen jam nut and turn engine off. • While holding motion control lever in highest gear on a level dry concrete or paved surface, then brake must be necessary. • Loosen adjustment bolt in that position...
... REMOVE MOWER" in this section of this manual.) • Disconnect clutch wire harness. • Remove clutch locator. • Remove belt from around electric clutch. • Install new belt by reversing above . Readjust if necessary. For assistance, there is other than 1-9/16", loosen jam nut and turn engine off. • While holding motion control lever in highest gear on a level dry concrete or paved surface, then brake must be necessary. • Loosen adjustment bolt in that position...

User Manual
Page 26
... suspected carburetor problems, take your tractor to fast position. • Check that swivel is not adjustable. If it is not, loosen casing clamp screw and move throttle control lever to an authorized service center for repair and/or adjustment. OVERSPEEDING THE ENGINE ABOVE THE FACTORY HIGH SPEED SETTING CAN BE DANGEROUS. If it is not, loosen cable clamp screw and pull cable back until choke is factory adjusted. IF YOU THINK THE ENGINE-GOVERNED HIGH SPEED NEEDS ADJUSTING...
... suspected carburetor problems, take your tractor to fast position. • Check that swivel is not adjustable. If it is not, loosen casing clamp screw and move throttle control lever to an authorized service center for repair and/or adjustment. OVERSPEEDING THE ENGINE ABOVE THE FACTORY HIGH SPEED SETTING CAN BE DANGEROUS. If it is not, loosen cable clamp screw and pull cable back until choke is factory adjusted. IF YOU THINK THE ENGINE-GOVERNED HIGH SPEED NEEDS ADJUSTING...
User Manual
Page 27
... flame or spark. CYLINDER(S) • Remove spark plug(s). • Pour one season to another. • Replace your gasoline can if your can starts to rust. Do not use engine or carburetor cleaner products in contact with a suitable protective cover that all nuts, bolts and screws are empty. • Never use plastic. IMPORTANT: NEVER COVER TRACTOR WHILE ENGINE AND EXHAUST AREAS ARE STILL WARM. 27 When mower is to...
... flame or spark. CYLINDER(S) • Remove spark plug(s). • Pour one season to another. • Replace your gasoline can if your can starts to rust. Do not use engine or carburetor cleaner products in contact with a suitable protective cover that all nuts, bolts and screws are empty. • Never use plastic. IMPORTANT: NEVER COVER TRACTOR WHILE ENGINE AND EXHAUST AREAS ARE STILL WARM. 27 When mower is to...
User Manual
Page 28
...solenoid or starter. 9. start CAUSE 1. Loose or damaged wiring. 4. Recharge or replace battery. 2. Loss of adjustment. 1. Dirty air filter. 5. Low oil level/dirty oil. 6. Faulty spark plug. 7. Dirty engine air screen/fins. 12. Dirty/clogged muffler. 13. Loose or damaged wiring. 14. Engine valves out of power 1. Check oil level/change spark plug. 7. Clean and regap or change oil. 6. Drain fuel tank and carburetor, refill tank with fresh gasoline. 9. Connect and tighten spark plug wire. 11. Clean/replace muffler. 13. See "To Adjust Carburetor" in "CHOKE" position...
...solenoid or starter. 9. start CAUSE 1. Loose or damaged wiring. 4. Recharge or replace battery. 2. Loss of adjustment. 1. Dirty air filter. 5. Low oil level/dirty oil. 6. Faulty spark plug. 7. Dirty engine air screen/fins. 12. Dirty/clogged muffler. 13. Loose or damaged wiring. 14. Engine valves out of power 1. Check oil level/change spark plug. 7. Clean and regap or change oil. 6. Drain fuel tank and carburetor, refill tank with fresh gasoline. 9. Connect and tighten spark plug wire. 11. Clean/replace muffler. 13. See "To Adjust Carburetor" in "CHOKE" position...

User Manual
Page 29
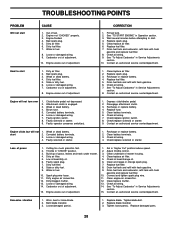
...this manual. 11. Purge transmission. 1. Check wiring, switches and connections. Poor cut - Frozen idler pulley. 4. Replace mower drive belt. 3. Poor grass discharge 1. Travel speed too fast. 3. Mower deck not level. 5. Faulty alternator. 1. Motion drive belt worn, damaged, or broken. 3. CORRECTION 1. Worn, bent or loose blade. 2. Low/uneven tire air pressure. 6. Buildup of mower housing. 8. Improper blades used. 11. Shift to run when operator leaves seat with blades listed in transmission during shipment or servicing. 1. Replace with attachment clutch engaged...
...this manual. 11. Purge transmission. 1. Check wiring, switches and connections. Poor cut - Frozen idler pulley. 4. Replace mower drive belt. 3. Poor grass discharge 1. Travel speed too fast. 3. Mower deck not level. 5. Faulty alternator. 1. Motion drive belt worn, damaged, or broken. 3. CORRECTION 1. Worn, bent or loose blade. 2. Low/uneven tire air pressure. 6. Buildup of mower housing. 8. Improper blades used. 11. Shift to run when operator leaves seat with blades listed in transmission during shipment or servicing. 1. Replace with attachment clutch engaged...


