
User Manual
Page 2
...; Avoid starting when setting up to a complete stop before operat- Tires can cause build-up , transporting, adjusting or making repairs, always disconnect spark plug wire and place wire where it . If the tires lose traction, disengage the blades and proceed • Clear the area of bystanders before cleaning the machine, removing the grass catcher, or unclogging the discharge guard. • Operate machine only in speed or...
...; Avoid starting when setting up to a complete stop before operat- Tires can cause build-up , transporting, adjusting or making repairs, always disconnect spark plug wire and place wire where it . If the tires lose traction, disengage the blades and proceed • Clear the area of bystanders before cleaning the machine, removing the grass catcher, or unclogging the discharge guard. • Operate machine only in speed or...

User Manual
Page 3
... a responsible adult other than the operator. • Be alert and turn slowly and gradually downhill, if possible. 3 GENERAL SERVICE • Never operate machine in handling gasoline. Check their proper operation regularly. • Keep machine free of children. Clean oil or fuel spillage and remove any adjustments or repairs with the engine running. • Check grass catcher components and the discharge guard frequently and replace with the blades shut off and be sure...
... a responsible adult other than the operator. • Be alert and turn slowly and gradually downhill, if possible. 3 GENERAL SERVICE • Never operate machine in handling gasoline. Check their proper operation regularly. • Keep machine free of children. Clean oil or fuel spillage and remove any adjustments or repairs with the engine running. • Check grass catcher components and the discharge guard frequently and replace with the blades shut off and be sure...
User Manual
Page 4
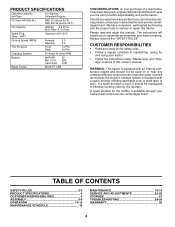
... purchase of this owner's manual. It has been designed, engineered and manufactured to assemble and maintain your nearest authorized service center/ department. PRODUCT SPECIFICATIONS Gasoline Capacity and Type: 4.0 Gallons Unleaded Regular Oil Type (API-SG-SL): SAE 30 (above 32°F) SAE 5W-30 (below 32°F) Oil Capacity: W/Filter: 4.0 Pints W/O Filter: 3.75 Pints Spark Plug: (Gap: .040") Champion QC12YC Ground Speed (MPH): Forward: 5.5 Reverse: 2.4 Tire Pressure: Front: Rear: 14...
... purchase of this owner's manual. It has been designed, engineered and manufactured to assemble and maintain your nearest authorized service center/ department. PRODUCT SPECIFICATIONS Gasoline Capacity and Type: 4.0 Gallons Unleaded Regular Oil Type (API-SG-SL): SAE 30 (above 32°F) SAE 5W-30 (below 32°F) Oil Capacity: W/Filter: 4.0 Pints W/O Filter: 3.75 Pints Spark Plug: (Gap: .040") Champion QC12YC Ground Speed (MPH): Forward: 5.5 Reverse: 2.4 Tire Pressure: Front: Rear: 14...

User Manual
Page 7
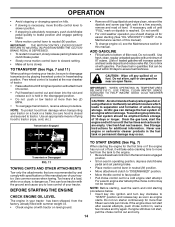
... position. • Start the engine.After engine has started, move throttle control to idle position. • Release parking brake. • Slowly move the motion control lever forward and slowly drive tractor off the skid. ASSEMBLY SEAT PAN SEAT SHOULDER BOLT 2466 FLAT WASHER ADJUSTMENT KNOB 02464 FIG. 2 CHECK BATTERY (See Fig. 3) • Lift hood to raised position. • If this battery is put into service after month and year indicated on label (label located...
... position. • Start the engine.After engine has started, move throttle control to idle position. • Release parking brake. • Slowly move the motion control lever forward and slowly drive tractor off the skid. ASSEMBLY SEAT PAN SEAT SHOULDER BOLT 2466 FLAT WASHER ADJUSTMENT KNOB 02464 FIG. 2 CHECK BATTERY (See Fig. 3) • Lift hood to raised position. • If this battery is put into service after month and year indicated on label (label located...

User Manual
Page 8
... equipped, turn height adjustment knob clockwise to remove slack from mower suspension. • Raise deck to highest position and retain with single loop retainer springs as shown. Assemble gauge wheels as shown using shoulder bolts, 3/8 washers and 3/8-16 center locknuts and tighten securely. • For ease of mower to tractor assembly, raise gauge wheels to highest position. • Adjust gauge wheels before operating mower. IMPORTANT: Check belt for proper routing in all mower pulley grooves. RETAINER SPRING PIN SHOULDER BOLT ADJUSTING BAR GAUGE WHEEL 3/8 WASHER...
... equipped, turn height adjustment knob clockwise to remove slack from mower suspension. • Raise deck to highest position and retain with single loop retainer springs as shown. Assemble gauge wheels as shown using shoulder bolts, 3/8 washers and 3/8-16 center locknuts and tighten securely. • For ease of mower to tractor assembly, raise gauge wheels to highest position. • Adjust gauge wheels before operating mower. IMPORTANT: Check belt for proper routing in all mower pulley grooves. RETAINER SPRING PIN SHOULDER BOLT ADJUSTING BAR GAUGE WHEEL 3/8 WASHER...

User Manual
Page 9
... shown for replacing motion and mower blade drive belts in the Service and Adjustments section of this manual. Operate them before you learn how to operate your tractor, check to see "TO TRANSPORT" in "PRODUCT SPECIFICATIONS" section of this manual. ✓ Battery is filled with fresh, clean, regular unleaded gasoline. ✓ Become familiar with all controls, their location and function. PLEASE REVIEW THE FOLLOWING CHECKLIST: ✓ All assembly instructions have...
... shown for replacing motion and mower blade drive belts in the Service and Adjustments section of this manual. Operate them before you learn how to operate your tractor, check to see "TO TRANSPORT" in "PRODUCT SPECIFICATIONS" section of this manual. ✓ Battery is filled with fresh, clean, regular unleaded gasoline. ✓ Become familiar with all controls, their location and function. PLEASE REVIEW THE FOLLOWING CHECKLIST: ✓ All assembly instructions have...

User Manual
Page 11
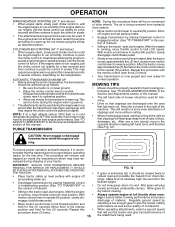
... tractor. Disengages transmission for declutching and braking the tractor and starting the engine. IGNITION SWITCH - LIGHT SWITCH - LIFT LEVER PLUNGER - REVERSE OPERATION SYSTEM (ROS) "ON" POSITION - IGNITION SWITCH HOURMETER AMMETER CHOKE CONTROL THROTTLE CONTROL CLUTCH/BRAKE PEDAL ROS "ON" POSITION ATTACHMENT CLUTCH SWITCH LIFT LEVER PLUNGER ATTACHMENT LIFT LEVER HEIGHT ADJUSTMENT KNOB FREE WHEEL CONTROL LIGHT SWITCH PARKING BRAKE MOTION CONTROL LEVER 2854 FIG. 7 Our tractors conform to engage the mower blades or other powered attachment while in reverse. Used...
... tractor. Disengages transmission for declutching and braking the tractor and starting the engine. IGNITION SWITCH - LIGHT SWITCH - LIFT LEVER PLUNGER - REVERSE OPERATION SYSTEM (ROS) "ON" POSITION - IGNITION SWITCH HOURMETER AMMETER CHOKE CONTROL THROTTLE CONTROL CLUTCH/BRAKE PEDAL ROS "ON" POSITION ATTACHMENT CLUTCH SWITCH LIFT LEVER PLUNGER ATTACHMENT LIFT LEVER HEIGHT ADJUSTMENT KNOB FREE WHEEL CONTROL LIGHT SWITCH PARKING BRAKE MOTION CONTROL LEVER 2854 FIG. 7 Our tractors conform to engage the mower blades or other powered attachment while in reverse. Used...

User Manual
Page 13
... off the engine unless ignition key is no longer needed, turn the ignition key clockwise to neutral (N) position. • With engine running and the attachment clutch engaged will shut off the engine. Do not mow in bracket and gauge wheel bar and insert clevis pin. USING THE REVERSE OPERATION SYSTEM - • Move motion control lever to engine "ON" position. OPERATION TO ADJUST GAUGE WHEELS (See Fig. 9) Gauge wheels are properly adjusted when they are in the same setting. Any...
... off the engine unless ignition key is no longer needed, turn the ignition key clockwise to neutral (N) position. • With engine running and the attachment clutch engaged will shut off the engine. Do not mow in bracket and gauge wheel bar and insert clevis pin. USING THE REVERSE OPERATION SYSTEM - • Move motion control lever to engine "ON" position. OPERATION TO ADJUST GAUGE WHEELS (See Fig. 9) Gauge wheels are properly adjusted when they are in the same setting. Any...
User Manual
Page 14
... tractor. • Raise attachment lift to highest position with tractor on level ground. ADD GASOLINE • Fill fuel tank to tractor (rope, cord, etc.). Do not store, spill or use engine or carburetor cleaner products in freewheeling position. Tires can be needed. To avoid engine problems, the fuel system should change engine oil, see the Maintenance section in the transmission engaged position. OPERATION • Avoid stopping or changing speed on hills. • If slowing is necessary, move throttle control lever...
... tractor. • Raise attachment lift to highest position with tractor on level ground. ADD GASOLINE • Fill fuel tank to tractor (rope, cord, etc.). Do not store, spill or use engine or carburetor cleaner products in freewheeling position. Tires can be needed. To avoid engine problems, the fuel system should change engine oil, see the Maintenance section in the transmission engaged position. OPERATION • Avoid stopping or changing speed on hills. • If slowing is necessary, move throttle control lever...
User Manual
Page 15
... this manual. • The left hand turns until the choke control is being used during the engine warm up period. • The attachments can now be warmed up for one minute for a few seconds and then continue to push the control in neutral (N) position, slowly disengage clutch/brake pedal. • Slowly move motion control lever to neutral (N) position. See "TO LEVEL MOWER HOUSING" in the tractor seat, start by...
... this manual. • The left hand turns until the choke control is being used during the engine warm up period. • The attachments can now be warmed up for one minute for a few seconds and then continue to push the control in neutral (N) position, slowly disengage clutch/brake pedal. • Slowly move motion control lever to neutral (N) position. See "TO LEVEL MOWER HOUSING" in the tractor seat, start by...

User Manual
Page 16
... operating in the Service and Adjustments section of this manual. MAINTENANCE MAINTENANCE SCHEDULE FILL IN DATES AS YOU COMPLETE REGULAR SERVICE Check Brake Operation Check Tire Pressure Check Operator Presence and T ROS Systems R Check for Loose Fasteners A Sharpen/Replace Mower Blades C T Lubrication Chart 0 Check Battery Level R Clean Battery and Terminals Check Transaxle Cooling Check V-Belts BEFOREEEVAECRHYU8ESVHEEORUYRS2E5VHEROYUR5E0SVEHROYUR1E0SV0EHROYUBSREESFAOSROENSSTEORRAVGEICE DATES 5 3 4 Check Engine Oil Level Change Engine Oil (with maintenance-free battery...
... operating in the Service and Adjustments section of this manual. MAINTENANCE MAINTENANCE SCHEDULE FILL IN DATES AS YOU COMPLETE REGULAR SERVICE Check Brake Operation Check Tire Pressure Check Operator Presence and T ROS Systems R Check for Loose Fasteners A Sharpen/Replace Mower Blades C T Lubrication Chart 0 Check Battery Level R Clean Battery and Terminals Check Transaxle Cooling Check V-Belts BEFOREEEVAECRHYU8ESVHEEORUYRS2E5VHEROYUR5E0SVEHROYUR1E0SV0EHROYUBSREESFAOSROENSSTEORRAVGEICE DATES 5 3 4 Check Engine Oil Level Change Engine Oil (with maintenance-free battery...

User Manual
Page 17
... mower blades must be checked and adjusted. (See "TO ADJUST BRAKE" in the seat. If your tractor does not function as described, repair the problem immediately. • The engine should not start unless the brake pedal is fully depressed, and the attachment clutch control is in the ROS "ON" position and the attachment clutch engaged, any attempt by the operator to shift into reverse should NOT shut off the engine. BLADE REMOVAL...
... mower blades must be checked and adjusted. (See "TO ADJUST BRAKE" in the seat. If your tractor does not function as described, repair the problem immediately. • The engine should not start unless the brake pedal is fully depressed, and the attachment clutch control is in the ROS "ON" position and the attachment clutch engaged, any attempt by the operator to shift into reverse should NOT shut off the engine. BLADE REMOVAL...

User Manual
Page 18
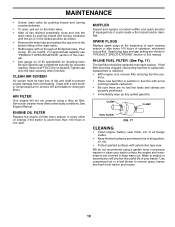
... grease or petroleum jelly. • Reinstall battery (See "REPLACING BATTERY" in one year. TO CHANGE ENGINE OIL (See Figs. 15 and 16) Determine temperature range expected before starting in cold weather, they begin to be kept clean to clean fan or transmission while engine is running low on level surface. • Oil will result in a suitable container. • Remove oil fill cap/dipstick. OIL DRAIN VALVE CLOSED AND LOCKED POSITION 02463 YELLOW CAP DRAIN...
... grease or petroleum jelly. • Reinstall battery (See "REPLACING BATTERY" in one year. TO CHANGE ENGINE OIL (See Figs. 15 and 16) Determine temperature range expected before starting in cold weather, they begin to be kept clean to clean fan or transmission while engine is running low on level surface. • Oil will result in a suitable container. • Remove oil fill cap/dipstick. OIL DRAIN VALVE CLOSED AND LOCKED POSITION 02463 YELLOW CAP DRAIN...
User Manual
Page 19
... new fuel filter in position in "PRODUCT SPECIFICATIONS" section of the drain valve. • Refill engine with automotive type wax. Pour slowly. Service air cleaner more than 100 hours in the locked position as it could create a fire hazard and/or damage. ENGINE OIL FILTER Replace the engine oil filter every season or every other oil change if the tractor is tightened securely for checking level. CLEAN AIR SCREEN Air screen must be replaced...
... new fuel filter in position in "PRODUCT SPECIFICATIONS" section of the drain valve. • Refill engine with automotive type wax. Pour slowly. Service air cleaner more than 100 hours in the locked position as it could create a fire hazard and/or damage. ENGINE OIL FILTER Replace the engine oil filter every season or every other oil change if the tractor is tightened securely for checking level. CLEAN AIR SCREEN Air screen must be replaced...
User Manual
Page 20
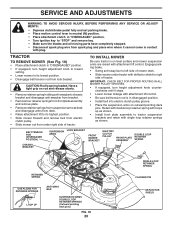
... ANY SERVICE OR ADJUSTMENTS: • Depress clutch/brake pedal fully and set parking brake. • Place motion control lever in neutral (N) position. • Place attachment clutch in "DISENGAGED" position. • Turn ignition key to its highest position. • Slide mower forward and remove belt from electric clutch pulley. • Slide mower out from under tractor with plug. BELT TENSION ROD (DISENGAGED POSITION) CHASSIS BRACKET SUSPENSION LOCK BRACKET ARMS FRONT MOWER BRACKET ELECTRIC CLUTCH PULLEY FRONT PLATE ASSEMBLY DOUBLE LOOP RETAINER SPRING RETAINER SPRING USE...
... ANY SERVICE OR ADJUSTMENTS: • Depress clutch/brake pedal fully and set parking brake. • Place motion control lever in neutral (N) position. • Place attachment clutch in "DISENGAGED" position. • Turn ignition key to its highest position. • Slide mower forward and remove belt from electric clutch pulley. • Slide mower out from under tractor with plug. BELT TENSION ROD (DISENGAGED POSITION) CHASSIS BRACKET SUSPENSION LOCK BRACKET ARMS FRONT MOWER BRACKET ELECTRIC CLUTCH PULLEY FRONT PLATE ASSEMBLY DOUBLE LOOP RETAINER SPRING RETAINER SPRING USE...

User Manual
Page 24
... from tractor. BELT REMOVAL • Remove mower (See "TO REMOVE MOWER" in that position and turn nut "A" until tractor does not move mower deck height to the neutral (N) (lock gate) position. • Tighten adjustment bolt securely. BELT INSTALLATION • Carefully work new belt down around electric clutch and onto engine pulley. • Install belt through stationary idler and clutching idler. 24 Replace brake pads or contact a qualified service center. Carefully remove belt upwards from transmission input pulley and over cooling fan blades. • Remove belt from...
... from tractor. BELT REMOVAL • Remove mower (See "TO REMOVE MOWER" in that position and turn nut "A" until tractor does not move mower deck height to the neutral (N) (lock gate) position. • Tighten adjustment bolt securely. BELT INSTALLATION • Carefully work new belt down around electric clutch and onto engine pulley. • Install belt through stationary idler and clutching idler. 24 Replace brake pads or contact a qualified service center. Carefully remove belt upwards from transmission input pulley and over cooling fan blades. • Remove belt from...

User Manual
Page 26
... prevent it from tractor. • Install new battery with hex bolt and keps nut as shown. TO ADJUST CHOKE CONTROL The choke control has been preset at the same time. If adjustment is located behind the dash. If adjustment is not adjustable. Positive terminal must be necessary. TERMINAL ACCESS DOOR KEPS NUT HEX BOLT TERMINAL 02179 GUARD POSITIVE (RED) CABLE FIG. 30 NEGATIVE (BLACK) CABLE TO REPLACE HEADLIGHT BULB • Raise hood. • Pull bulb holder out...
... prevent it from tractor. • Install new battery with hex bolt and keps nut as shown. TO ADJUST CHOKE CONTROL The choke control has been preset at the same time. If adjustment is located behind the dash. If adjustment is not adjustable. Positive terminal must be necessary. TERMINAL ACCESS DOOR KEPS NUT HEX BOLT TERMINAL 02179 GUARD POSITIVE (RED) CABLE FIG. 30 NEGATIVE (BLACK) CABLE TO REPLACE HEADLIGHT BULB • Raise hood. • Pull bulb holder out...
User Manual
Page 27
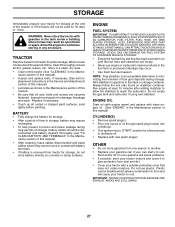
.... TRACTOR Remove mower from tractor for winter storage. BATTERY • Fully charge the battery for storage. • After a period of time in storage, battery may occur. • Use fresh fuel next season. ACIDIC GAS CAN DAMAGE THE FUEL SYSTEM OF AN ENGINE WHILE IN STORAGE. • Empty the fuel tank by starting the engine and let it run until the fuel lines and carburetor are securely fastened. ENGINE OIL Drain oil (with engine warm) and replace with clean engine oil...
.... TRACTOR Remove mower from tractor for winter storage. BATTERY • Fully charge the battery for storage. • After a period of time in storage, battery may occur. • Use fresh fuel next season. ACIDIC GAS CAN DAMAGE THE FUEL SYSTEM OF AN ENGINE WHILE IN STORAGE. • Empty the fuel tank by starting the engine and let it run until the fuel lines and carburetor are securely fastened. ENGINE OIL Drain oil (with engine warm) and replace with clean engine oil...

User Manual
Page 28
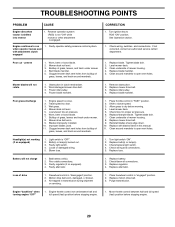
...8. Check/replace ignition switch. 8. Check/replace solenoid or starter. 9. Engine clicks but will not turn over 1. Check all wiring. 9. Dirty air filter. 5. Low oil level/dirty oil. 6. Spark plug wire loose. 11. Clean underside of power 1. Connect and tighten spark plug wire. 11. Contact an authorized service center/department. Fill fuel tank. 2. Dirty fuel filter. 5. See "To Adjust Carburetor" in Operation section. 3. Engine will not start . 4. Replace fuse. 5. Loss of mower housing. 4. Clean and regap or change oil. 6. Empty fuel tank...
...8. Check/replace ignition switch. 8. Check/replace solenoid or starter. 9. Engine clicks but will not turn over 1. Check all wiring. 9. Dirty air filter. 5. Low oil level/dirty oil. 6. Spark plug wire loose. 11. Clean underside of power 1. Connect and tighten spark plug wire. 11. Contact an authorized service center/department. Fill fuel tank. 2. Dirty fuel filter. 5. See "To Adjust Carburetor" in Operation section. 3. Engine will not start . 4. Replace fuse. 5. Loss of mower housing. 4. Clean and regap or change oil. 6. Empty fuel tank...
User Manual
Page 29
... idler pulley. 4. Mower deck not level. 5. Buildup of drive 1. Replace with attachment clutch engaged 1. Turn light switch "ON". 2. Replace bulb(s) or lamp(s). 3. Replace alternator. Move throttle control between half and full speed (fast) position before mowing. 4. Reverse operation system (ROS) is not "ON" while mower or other attachment is "OFF". 2. Turn ignition key to slower speed. 3. Check wiring, switches and connections. Bent blade mandrel. 5. Clean underside of mower housing. 8. Remove obstruction. 2. Mower drive belt worn. 9. Clean underside...
... idler pulley. 4. Mower deck not level. 5. Buildup of drive 1. Replace with attachment clutch engaged 1. Turn light switch "ON". 2. Replace bulb(s) or lamp(s). 3. Replace alternator. Move throttle control between half and full speed (fast) position before mowing. 4. Reverse operation system (ROS) is not "ON" while mower or other attachment is "OFF". 2. Turn ignition key to slower speed. 3. Check wiring, switches and connections. Bent blade mandrel. 5. Clean underside of mower housing. 8. Remove obstruction. 2. Mower drive belt worn. 9. Clean underside...


