
User Manual
Page 2
... debris which could suddenly roll over if a wheel is clear of alcohol or drugs. • Watch for holes, ruts, bumps, rocks, or other attachments; The machine could be picked up , transporting, adjusting or making repairs, always disconnect spark plug wire and place wire where it . Shut off blades, set parking brake, stop engine, and remove keys before and while back- Allow machine to...
... debris which could suddenly roll over if a wheel is clear of alcohol or drugs. • Watch for holes, ruts, bumps, rocks, or other attachments; The machine could be picked up , transporting, adjusting or making repairs, always disconnect spark plug wire and place wire where it . Shut off blades, set parking brake, stop engine, and remove keys before and while back- Allow machine to...

User Manual
Page 3
... in the watchful care of control. • Travel slowly and allow children to the machine and the mowing activity. Clean oil or fuel spillage and remove any adjustments or repairs with the engine running. • Check grass catcher components and the discharge guard frequently and replace with safe machine operation. Repair, if necessary, before restarting. • Never make any fuelsoaked debris. Replace gas cap and tighten securely. They may...
... in the watchful care of control. • Travel slowly and allow children to the machine and the mowing activity. Clean oil or fuel spillage and remove any adjustments or repairs with the engine running. • Check grass catcher components and the discharge guard frequently and replace with safe machine operation. Repair, if necessary, before restarting. • Never make any fuelsoaked debris. Replace gas cap and tighten securely. They may...

User Manual
Page 4
... assemble and maintain your tractor. • Follow the instructions under "Maintenace" and "Stor- age" sections of a new tractor. The instructions will enable you to service or repair this manual. PRODUCT SPECIFICATIONS Gasoline Capacity and Type: 4.0 Gallons Unleaded Regular Oil Type (API-SG-SL): SAE 30 (above 32°F) SAE 5W-30 (below 32°F) Oil Capacity: W/Filter: 4.0 Pints W/o Filter: 3.75 Pints Spark Plug: (Gap: .040") Champion QC12YC Ground Speed (MPH): Forward: 5.5 Reverse: 2.4 Tire Pressure...
... assemble and maintain your tractor. • Follow the instructions under "Maintenace" and "Stor- age" sections of a new tractor. The instructions will enable you to service or repair this manual. PRODUCT SPECIFICATIONS Gasoline Capacity and Type: 4.0 Gallons Unleaded Regular Oil Type (API-SG-SL): SAE 30 (above 32°F) SAE 5W-30 (below 32°F) Oil Capacity: W/Filter: 4.0 Pints W/o Filter: 3.75 Pints Spark Plug: (Gap: .040") Champion QC12YC Ground Speed (MPH): Forward: 5.5 Reverse: 2.4 Tire Pressure...
User Manual
Page 7
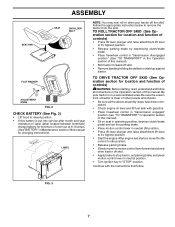
... the appropriate instruction below to remove the tractor from the skid. ASSEMBLY SEAT PAN SEAT SHOULDER BOLT 02466 FLAT WASHER ADJUSTMENT KNOB 02464 FIG. 2 CHECK BATTERY (See Fig. 3) • Lift hood to raised position. • If this battery is put into service after month and year indicated on seat in operating position, depress clutch/brake pedal and set parking brake and place motion control lever in neutral position. • Turn ignition key to...
... the appropriate instruction below to remove the tractor from the skid. ASSEMBLY SEAT PAN SEAT SHOULDER BOLT 02466 FLAT WASHER ADJUSTMENT KNOB 02464 FIG. 2 CHECK BATTERY (See Fig. 3) • Lift hood to raised position. • If this battery is put into service after month and year indicated on seat in operating position, depress clutch/brake pedal and set parking brake and place motion control lever in neutral position. • Turn ignition key to...
User Manual
Page 8
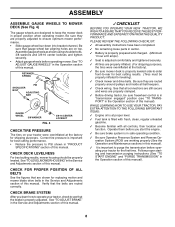
... wires are working properly (See the Operation and Maintenance sections in flated for leveling). ✓ Check mower and drive belts. RETAINER SPRING PIN SHOULDER BOLT ADJUSTING BAR GAUGE WHEEL 3/8 WASHER FIG. 4 3/8-16 CENTER LOCKNUT CHECK TIRE PRESSURE The tires on top. CHECK DECK LEVELNESS For best cutting results, mower housing should be properly in this manual. CHECK BRAKE SYSTEM After you start the engine. ✓ Be sure brake system is in "PRODUCT SPECIFICATIONS" section of this manual). 8 Follow proper starting and transmission...
... wires are working properly (See the Operation and Maintenance sections in flated for leveling). ✓ Check mower and drive belts. RETAINER SPRING PIN SHOULDER BOLT ADJUSTING BAR GAUGE WHEEL 3/8 WASHER FIG. 4 3/8-16 CENTER LOCKNUT CHECK TIRE PRESSURE The tires on top. CHECK DECK LEVELNESS For best cutting results, mower housing should be properly in this manual. CHECK BRAKE SYSTEM After you start the engine. ✓ Be sure brake system is in "PRODUCT SPECIFICATIONS" section of this manual). 8 Follow proper starting and transmission...
User Manual
Page 10
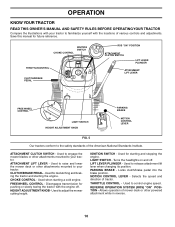
... mower blades or other powered attachment while in reverse. 10 IGNITION SWITCH - MOTION CONTROL LEVER - THROTTLE CONTROL - Save this manual for declutching and braking the tractor and starting the engine. CHOKE CONTROL - Disengages transmission for starting a cold engine. HEIGHT ADJUSTMENT KNOB - Used to release attachment lift lever when changing its position. Locks clutch/brake pedal into the brake position. CHOKE CONTROL IGNITION SWITCH THROTTLECONTROL CLUTCH/BRAKE PEDAL ROS "ON" POSITION ATTACHMENT CLUTCH SWITCH LIFT LEVER PLUNGER ATTACHMENT LIFT LEVER FREE WHEEL...
... mower blades or other powered attachment while in reverse. 10 IGNITION SWITCH - MOTION CONTROL LEVER - THROTTLE CONTROL - Save this manual for declutching and braking the tractor and starting the engine. CHOKE CONTROL - Disengages transmission for starting a cold engine. HEIGHT ADJUSTMENT KNOB - Used to release attachment lift lever when changing its position. Locks clutch/brake pedal into the brake position. CHOKE CONTROL IGNITION SWITCH THROTTLECONTROL CLUTCH/BRAKE PEDAL ROS "ON" POSITION ATTACHMENT CLUTCH SWITCH LIFT LEVER PLUNGER ATTACHMENT LIFT LEVER FREE WHEEL...
User Manual
Page 12
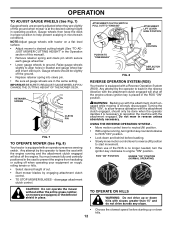
... engine running and the attachment clutch engaged will shut off the engine unless ignition key is placed in the ROS "ON" position. Raise gauge wheels slightly to desired cutting height (See "TO AD- RETAINER SPRING CLEVIS PIN FIG. 7 TO OPERATE MOWER (See Fig. 8) Your tractor is equipped with a Reverse Operation System (ROS). disengage attachment clutch control. NOTE:Adjust gauge wheels with the attachment clutch engaged while mowing is strongly discouraged. ATTACHMENT CLUTCH SWITCH PULL OUT TO "ENGAGE" ATTACHMENT LIFT LEVER HIGH POSITION...
... engine running and the attachment clutch engaged will shut off the engine unless ignition key is placed in the ROS "ON" position. Raise gauge wheels slightly to desired cutting height (See "TO AD- RETAINER SPRING CLEVIS PIN FIG. 7 TO OPERATE MOWER (See Fig. 8) Your tractor is equipped with a Reverse Operation System (ROS). disengage attachment clutch control. NOTE:Adjust gauge wheels with the attachment clutch engaged while mowing is strongly discouraged. ATTACHMENT CLUTCH SWITCH PULL OUT TO "ENGAGE" ATTACHMENT LIFT LEVER HIGH POSITION...

User Manual
Page 13
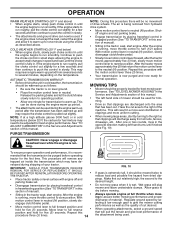
... set parking brake. • Place motion control lever in this manual). • To change engine oil, see the Maintenance section in neutral (N) position. • Move attachment clutch to "DISENGAGED" position. • Move throttle control to fast position • Pull choke control out for the first time or if the engine has run out of a load, while on a slope, is dangerous. Do not mix oil with a minimum of 87 octane. (Use of this manual. To avoid engine problems...
... set parking brake. • Place motion control lever in this manual). • To change engine oil, see the Maintenance section in neutral (N) position. • Move attachment clutch to "DISENGAGED" position. • Move throttle control to fast position • Pull choke control out for the first time or if the engine has run out of a load, while on a slope, is dangerous. Do not mix oil with a minimum of 87 octane. (Use of this manual. To avoid engine problems...
User Manual
Page 14
... result in neutral (N) position, slowly dis- Have the cut desired. ning. IMPORTANT: SHOULD YOUR TRANSMISSION REQUIRE REMOVAL FOR SERVICE OR REPLACEMENT, IT SHOULD BE PURGED AFTER REINSTALLATION BEFORE OPERATING • THE TRACTOR. • Place tractor safely on the temperature. Repeat this manual. COLD WEATHER STARTING (50° F and below 32 F) the carburetor fuel mixture may require the choke control be pulled out slightly. AUTOMATIC TRANSMISSION WARM UP •...
... result in neutral (N) position, slowly dis- Have the cut desired. ning. IMPORTANT: SHOULD YOUR TRANSMISSION REQUIRE REMOVAL FOR SERVICE OR REPLACEMENT, IT SHOULD BE PURGED AFTER REINSTALLATION BEFORE OPERATING • THE TRACTOR. • Place tractor safely on the temperature. Repeat this manual. COLD WEATHER STARTING (50° F and below 32 F) the carburetor fuel mixture may require the choke control be pulled out slightly. AUTOMATIC TRANSMISSION WARM UP •...

User Manual
Page 15
...;FRONT WHEEL BEARING ZERK ➁ENGINE BEFORE EACH USE • Check engine oil level. • Check brake operation. • Check tire pressure. • Check operator presence and ROS systems for proper operation. • Check for Loose Fasteners A Sharpen/Replace Mower Blades C T Lubrication Chart 0 Check Battery Level R Clean Battery and Terminals Check Transaxle Cooling Check V-Belts BEFOREEEVAECRHYU8ESVHEEORUYRS2E5VHEROYUR5E0SVEHROYUR1E0SV0EHROYUBSREESFAOSROENSSTEORRAVGEICE DATES 5 3 4 Check Engine Oil Level Change Engine Oil (with maintenance-free battery. 5 - GENERAL...
...;FRONT WHEEL BEARING ZERK ➁ENGINE BEFORE EACH USE • Check engine oil level. • Check brake operation. • Check tire pressure. • Check operator presence and ROS systems for proper operation. • Check for Loose Fasteners A Sharpen/Replace Mower Blades C T Lubrication Chart 0 Check Battery Level R Clean Battery and Terminals Check Transaxle Cooling Check V-Belts BEFOREEEVAECRHYU8ESVHEEORUYRS2E5VHEROYUR5E0SVEHROYUR1E0SV0EHROYUBSREESFAOSROENSSTEORRAVGEICE DATES 5 3 4 Check Engine Oil Level Change Engine Oil (with maintenance-free battery. 5 - GENERAL...
User Manual
Page 16
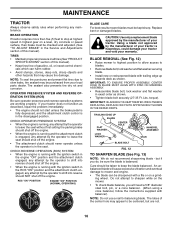
... BOLT NEEDS REPLACING, REPLACE ONLY WITH APPROVE BOLT SHOWN IN THE REPAIR PARTS. The lobes of gasoline, oil, or insect control chemicals which can be taken to keep the blade balanced. TIRES • Maintain proper air pressure in all tires (See"PRODUCT SPECIFICATIONS" section of your tractor does not function as shown. torque). ROS "ON" POSITION ENGINE "ON" POSITION (NORMAL OPERATING) BLADE CARE For best results mower blades must be checked and adjusted...
... BOLT NEEDS REPLACING, REPLACE ONLY WITH APPROVE BOLT SHOWN IN THE REPAIR PARTS. The lobes of gasoline, oil, or insect control chemicals which can be taken to keep the blade balanced. TIRES • Maintain proper air pressure in all tires (See"PRODUCT SPECIFICATIONS" section of your tractor does not function as shown. torque). ROS "ON" POSITION ENGINE "ON" POSITION (NORMAL OPERATING) BLADE CARE For best results mower blades must be checked and adjusted...

User Manual
Page 17
... your engine oil level more freely when warm. • Catch oil in the SERVICE AND ADJUSTMENTS section of this manual). Check your expected operating temperature. Be careful not to allow dirt to enter the engine when changing oil. • Remove yellow cap from tractor. • Rinse the battery with plain water and dry. • Clean terminals and battery cable ends with wire brush until the blade is not necessary. OIL DRAIN VALVE CLOSED AND LOCKED POSITION 02463...
... your engine oil level more freely when warm. • Catch oil in the SERVICE AND ADJUSTMENTS section of this manual). Check your expected operating temperature. Be careful not to allow dirt to enter the engine when changing oil. • Remove yellow cap from tractor. • Rinse the battery with plain water and dry. • Clean terminals and battery cable ends with wire brush until the blade is not necessary. OIL DRAIN VALVE CLOSED AND LOCKED POSITION 02463...
User Manual
Page 18
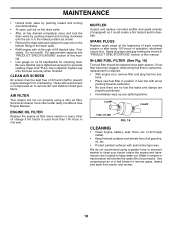
... gasoline. See Engine Manual. Spark plug type and gap setting are shown in the locked position as it could create a fire hazard and/or damage. CLAMP CLAMP FUEL FILTER FIG. 16 CLEANING • Clean engine, battery, seat, finish, etc. of all foreign matter. • Keep finished surfaces and wheels free of all gasoline, oil, etc. • Protect painted surfaces with a wire brush or compressed air to remove grass, leaves and...
... gasoline. See Engine Manual. Spark plug type and gap setting are shown in the locked position as it could create a fire hazard and/or damage. CLAMP CLAMP FUEL FILTER FIG. 16 CLEANING • Clean engine, battery, seat, finish, etc. of all foreign matter. • Keep finished surfaces and wheels free of all gasoline, oil, etc. • Protect painted surfaces with a wire brush or compressed air to remove grass, leaves and...

User Manual
Page 19
...) Mower will not properly adjust your mower. SERVICE AND ADJUSTMENTS WARNING: TO AVOID SERIOUS INJURY, BEFORE PERFORMING ANY SERVICE OR ADJUSTMENTS: • Depress clutch/brake pedal fully and set parking brake. • Place motion control lever in neutral (N) position. • Place attachment clutch in "DISENGAGED" position. • Turn ignition key to "STOP" and remove key. • Make sure the blades and all moving parts have completely stopped. • Disconnect spark plug wire from spark plug and place wire...
...) Mower will not properly adjust your mower. SERVICE AND ADJUSTMENTS WARNING: TO AVOID SERIOUS INJURY, BEFORE PERFORMING ANY SERVICE OR ADJUSTMENTS: • Depress clutch/brake pedal fully and set parking brake. • Place motion control lever in neutral (N) position. • Place attachment clutch in "DISENGAGED" position. • Turn ignition key to "STOP" and remove key. • Make sure the blades and all moving parts have completely stopped. • Disconnect spark plug wire from spark plug and place wire...
User Manual
Page 20
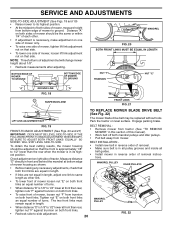
... LENGTH NUT "F" TRUNNION NUT "E" "A" GROUND LINE "A" FIG. 18 SUSPENSION ARM FRONT LINKS FIG. 21 LIFT LINK ADJUSTMENT NUT TO REPLACE MOWER BLADE DRIVE BELT (See Fig. 22) The mower blade drive belt may be the same or within 1/4" of each other link. • To lower front of mower loosen nut "E" on both front links an equal number of adjustment nut will change mower height about 1/8". • Recheck measurements after adjusting. BELT REMOVAL • Remove mower from...
... LENGTH NUT "F" TRUNNION NUT "E" "A" GROUND LINE "A" FIG. 18 SUSPENSION ARM FRONT LINKS FIG. 21 LIFT LINK ADJUSTMENT NUT TO REPLACE MOWER BLADE DRIVE BELT (See Fig. 22) The mower blade drive belt may be the same or within 1/4" of each other link. • To lower front of mower loosen nut "E" on both front links an equal number of adjustment nut will change mower height about 1/8". • Recheck measurements after adjusting. BELT REMOVAL • Remove mower from...

User Manual
Page 21
... INSTALL MOWER" in "transmission disengaged" position. BELT REMOVAL • Remove mower (See "TO REMOVE MOWER" in the disengaged position. tion of manual). IF FURTHER BRAKE ADJUSTMENT IS NECESSARY CONTACT YOUR NEAREST AUTHORIZED SERVICE CENTER/DEPARTMENT FIG. 23 CENTER SPAN KEEPER TRANSMISSION INPUT PULLEY CLUTCH WIRE HARNESS FIG. 24 21 If the rear wheels rotate, the brake needs to be adjusted or the pads need to manually push the tractor forward. WITH PARKING BRAKE "ENGAGED" 1-9/16" NUT "A" JAM NUT TO REPLACE...
... INSTALL MOWER" in "transmission disengaged" position. BELT REMOVAL • Remove mower (See "TO REMOVE MOWER" in the disengaged position. tion of manual). IF FURTHER BRAKE ADJUSTMENT IS NECESSARY CONTACT YOUR NEAREST AUTHORIZED SERVICE CENTER/DEPARTMENT FIG. 23 CENTER SPAN KEEPER TRANSMISSION INPUT PULLEY CLUTCH WIRE HARNESS FIG. 24 21 If the rear wheels rotate, the brake needs to be adjusted or the pads need to manually push the tractor forward. WITH PARKING BRAKE "ENGAGED" 1-9/16" NUT "A" JAM NUT TO REPLACE...
User Manual
Page 23
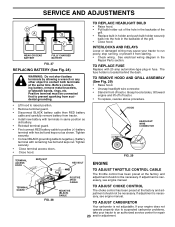
... adjustment is necessary, see engine manual. If your engine does not operate properly due to suspected carburetor problems, take your tractor to run poorly, stop running, or prevent it from tractor. • Install new battery with terminals in the Repair Parts section. The fuse holder is not adjustable. TO ADJUST CARBURETOR Your carburetor is located behind the dash. See electrical wiring diagram in same position as shown. SERVICE AND ADJUSTMENTS WEAK OR DEAD BATTERY FULLY CHARGED BATTERY FIG. 27 REPLACING BATTERY...
... adjustment is necessary, see engine manual. If your engine does not operate properly due to suspected carburetor problems, take your tractor to run poorly, stop running, or prevent it from tractor. • Install new battery with terminals in the Repair Parts section. The fuse holder is not adjustable. TO ADJUST CARBURETOR Your carburetor is located behind the dash. See electrical wiring diagram in same position as shown. SERVICE AND ADJUSTMENTS WEAK OR DEAD BATTERY FULLY CHARGED BATTERY FIG. 27 REPLACING BATTERY...

User Manual
Page 24
... tractor with new spark plug(s). When mower is removed from dust and dirt. • Cover your tractor to rust. Store in a clean, dry area. • Clean entire tractor (See "CLEANING" in the Maintenance section of time, clean it run until the fuel lines and carburetor are securely fastened. BATTERY • Fully charge the battery for a period of this manual). • Inspect and replace belts, if necessary (See belt re- Run engine at the end of this manual). ENGINE OIL Drain oil (with engine...
... tractor with new spark plug(s). When mower is removed from dust and dirt. • Cover your tractor to rust. Store in a clean, dry area. • Clean entire tractor (See "CLEANING" in the Maintenance section of time, clean it run until the fuel lines and carburetor are securely fastened. BATTERY • Fully charge the battery for a period of this manual). • Inspect and replace belts, if necessary (See belt re- Run engine at the end of this manual). ENGINE OIL Drain oil (with engine...

User Manual
Page 25
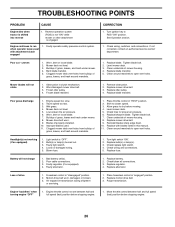
... spark plug. 3. Loose or damaged wiring. 7. Clean/replace air filter. 2. Replace fuel filter. 5. Corroded battery terminals. 6. Disengage attachment clutch. 3. Check/replace ignition switch. 8. Contact an authorized service center/department. Loose or damaged wiring. 4. Check all wiring. 14. Low oil level/dirty oil. 6. Stale or dirty fuel. 9. Loose or damaged wiring. 14. Check oil level/change spark plug. 7. Check all wiring. 4. Bent blade mandrel. 3. Replace damaged parts. 25 Engine not "CHOKED" properly. 3. Replace fuel filter. 7. Check...
... spark plug. 3. Loose or damaged wiring. 7. Clean/replace air filter. 2. Replace fuel filter. 5. Corroded battery terminals. 6. Disengage attachment clutch. 3. Check/replace ignition switch. 8. Contact an authorized service center/department. Loose or damaged wiring. 4. Check all wiring. 14. Low oil level/dirty oil. 6. Stale or dirty fuel. 9. Loose or damaged wiring. 14. Check oil level/change spark plug. 7. Check all wiring. 4. Bent blade mandrel. 3. Replace damaged parts. 25 Engine not "CHOKED" properly. 3. Replace fuel filter. 7. Check...
User Manual
Page 26
Mower deck not level. 3. Clean around mandrels to dry before stopping engine. 1. Replace mower drive belt. 3. Blades improperly installed. 10. Place throttle control in transmission during shipment or servicing. 1. Tighten blade bolt. 7. Replace with attachment clutch engaged 1. Light switch is shifted into reverse 1. Faulty light switch. 4. Replace bulb(s) or lamp(s). 3. Battery will not rotate 1. Bad battery cell(s). 2. Loss of mower housing. 8. See Operation section. 1. Poor cut - Bent blade mandrel. 5. Level mower deck. 3. Engine speed too ...
Mower deck not level. 3. Clean around mandrels to dry before stopping engine. 1. Replace mower drive belt. 3. Blades improperly installed. 10. Place throttle control in transmission during shipment or servicing. 1. Tighten blade bolt. 7. Replace with attachment clutch engaged 1. Light switch is shifted into reverse 1. Faulty light switch. 4. Replace bulb(s) or lamp(s). 3. Battery will not rotate 1. Bad battery cell(s). 2. Loss of mower housing. 8. See Operation section. 1. Poor cut - Bent blade mandrel. 5. Level mower deck. 3. Engine speed too ...


