
User Manual
Page 2
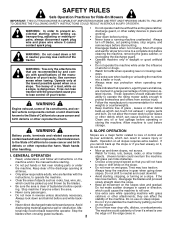
...machine and in a large percentage of the machine. ing. Always keep the machine in . 2 they can touch hot exhaust / engine parts and burn. Do no use on the Tall grass can lose traction with the instructions, to stabilize the machine by and comply with grass...leaves or other attachments; Shut off blades, set parking brake, stop before dismounting. • Disengage blades when not mowing. Operation on all parts to come to a complete stop engine, and remove keys before cleaning the machine, removing the grass catcher, or unclogging the discharge guard. ...
...machine and in a large percentage of the machine. ing. Always keep the machine in . 2 they can touch hot exhaust / engine parts and burn. Do no use on the Tall grass can lose traction with the instructions, to stabilize the machine by and comply with grass...leaves or other attachments; Shut off blades, set parking brake, stop before dismounting. • Disengage blades when not mowing. Operation on all parts to come to a complete stop engine, and remove keys before cleaning the machine, removing the grass catcher, or unclogging the discharge guard. ...

User Manual
Page 3
...; Check brake operation frequently. Do not attach towed equipment except at all times until fueling is spilled on a truck or trailer bed with manufacturer's recommended parts, when necessary. • Mower blades are often attracted to stop. SERVICE SAFE HANDLING OF GASOLINE To avoid personal injury or property damage, use extra caution...
...; Check brake operation frequently. Do not attach towed equipment except at all times until fueling is spilled on a truck or trailer bed with manufacturer's recommended parts, when necessary. • Mower blades are often attracted to stop. SERVICE SAFE HANDLING OF GASOLINE To avoid personal injury or property damage, use extra caution...

User Manual
Page 5
UNASSEMBLED PARTS Steering Wheel Seat Steering Wheel Adapter (1) Large Flat Washer Steering Wheel Insert Steering Sleeve (1) Washer 17/32 x 1-3/16 x 12 Gauge (1) Knob Key (2) Keys (1) Oil Drain Tube Slope Sheet (1) Hex Bolt 1/4-28 x 1-1/4 (1) Hex nut 1/2-20 5
UNASSEMBLED PARTS Steering Wheel Seat Steering Wheel Adapter (1) Large Flat Washer Steering Wheel Insert Steering Sleeve (1) Washer 17/32 x 1-3/16 x 12 Gauge (1) Knob Key (2) Keys (1) Oil Drain Tube Slope Sheet (1) Hex Bolt 1/4-28 x 1-1/4 (1) Hex nut 1/2-20 5

User Manual
Page 6
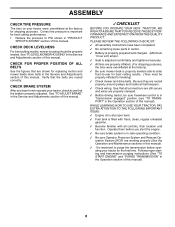
.... Do not tighten. • Lower seat into center of carton. TOOLS REQUIRED FOR ASSEMBLY A socket wrench set aside for any additional loose parts or cartons and remove. IMPORTANT: CHECK FOR AND REMOVE ANY STAPLES IN SKID THAT MAY PUNCTURE TIRES WHERE TRACTOR IS TO ROLL OFF SKID. ... and pull seat towards rear of seat to insure proper tightness. Tighten securely. • Snap steering wheel insert into operating position and sit on all parts and hardware you are pointing straight forward. • Slide the steering sleeve over large slotted hole in pan. • Push down . •...
.... Do not tighten. • Lower seat into center of carton. TOOLS REQUIRED FOR ASSEMBLY A socket wrench set aside for any additional loose parts or cartons and remove. IMPORTANT: CHECK FOR AND REMOVE ANY STAPLES IN SKID THAT MAY PUNCTURE TIRES WHERE TRACTOR IS TO ROLL OFF SKID. ... and pull seat towards rear of seat to insure proper tightness. Tighten securely. • Snap steering wheel insert into operating position and sit on all parts and hardware you are pointing straight forward. • Slide the steering sleeve over large slotted hole in pan. • Push down . •...
User Manual
Page 8
PLEASE REVIEW THE FOLLOWING CHECKLIST: ✓ All assembly instructions have been completed. ✓ No remaining loose parts in carton. ✓ Battery is properly prepared and charged. (Minimum 1 hour at 6 amps). ✓ Seat is adjusted comfortably and tightened securely. ✓ All tires are ...
PLEASE REVIEW THE FOLLOWING CHECKLIST: ✓ All assembly instructions have been completed. ✓ No remaining loose parts in carton. ✓ Battery is properly prepared and charged. (Minimum 1 hour at 6 amps). ✓ Seat is adjusted comfortably and tightened securely. ✓ All tires are ...
User Manual
Page 16
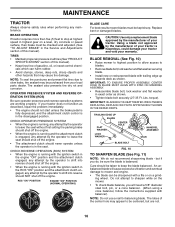
...void your tractor. Using a blade not approved by the manufacturer of gasoline, oil, or insect control chemicals which can be purchased from your local parts dealer. BLADE REMOVAL (See Fig. 10) • Raise mower to highest position to allow access to sharpen while on a level, dry ...blade. Tire sealant also prevents tire dry rot and corrosion. Lbs. IF BOLT NEEDS REPLACING, REPLACE ONLY WITH APPROVE BOLT SHOWN IN THE REPAIR PARTS. Replace bent or damaged blades. IMPORTANT: TO ENSURE PROPER ASSEMBLY, CENTER HOLE IN BLADE MUST ALIGN WITH STAR ON MANDREL ASSEMBLY. •...
...void your tractor. Using a blade not approved by the manufacturer of gasoline, oil, or insect control chemicals which can be purchased from your local parts dealer. BLADE REMOVAL (See Fig. 10) • Raise mower to highest position to allow access to sharpen while on a level, dry ...blade. Tire sealant also prevents tire dry rot and corrosion. Lbs. IF BOLT NEEDS REPLACING, REPLACE ONLY WITH APPROVE BOLT SHOWN IN THE REPAIR PARTS. Replace bent or damaged blades. IMPORTANT: TO ENSURE PROPER ASSEMBLY, CENTER HOLE IN BLADE MUST ALIGN WITH STAR ON MANDREL ASSEMBLY. •...
User Manual
Page 19
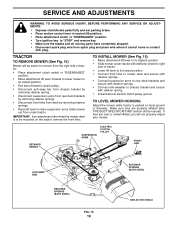
... (N) position. • Place attachment clutch in "DISENGAGED" position. • Turn ignition key to "STOP" and remove key. • Make sure the blades and all moving parts have completely stopped. • Disconnect spark plug wire from under tractor. TO LEVEL MOWER HOUSING Adjust the mower while tractor is to be easier to...
... (N) position. • Place attachment clutch in "DISENGAGED" position. • Turn ignition key to "STOP" and remove key. • Make sure the blades and all moving parts have completely stopped. • Disconnect spark plug wire from under tractor. TO LEVEL MOWER HOUSING Adjust the mower while tractor is to be easier to...

User Manual
Page 22
... BLACK cable (D) to good chassis ground, away from your battery is too weak to allow wheel removal (rear wheel contains a square key - If your local parts dealer. THE OTHER VEHICLE MUST ALSO BE A 12 VOLT SYSTEM. DO NOT USE YOUR TRACTOR BATTERY TO START OTHER VEHICLES. After above steps until satis...
... BLACK cable (D) to good chassis ground, away from your battery is too weak to allow wheel removal (rear wheel contains a square key - If your local parts dealer. THE OTHER VEHICLE MUST ALSO BE A 12 VOLT SYSTEM. DO NOT USE YOUR TRACTOR BATTERY TO START OTHER VEHICLES. After above steps until satis...
User Manual
Page 23
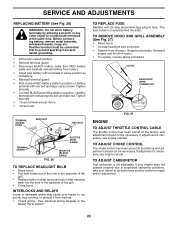
... backside of tractor. TO REMOVE HOOD AND GRILL ASSEMBLY (See Fig. 27) • Raise hood. • Unsnap headlight wire connector. • Stand in the Repair Parts section. Grasp hood at the factory and adjustment should not be connected first to prevent sparking from accidental grounding. • Lift hood to raised...
... backside of tractor. TO REMOVE HOOD AND GRILL ASSEMBLY (See Fig. 27) • Raise hood. • Unsnap headlight wire connector. • Stand in the Repair Parts section. Grasp hood at the factory and adjustment should not be connected first to prevent sparking from accidental grounding. • Lift hood to raised...
User Manual
Page 24
... up all dirt, grease, leaves, etc. ENGINE FUEL SYSTEM IMPORTANT: IT IS IMPORTANT TO PREVENT GUM DEPOSITS FROM FORMING IN ESSENTIAL FUEL SYSTEM PARTS SUCH AS CARBURETOR, FUEL FILTER, FUEL HOSE, OR TANK DURING STORAGE. Run engine at the end of this manual). Plastic cannot breathe which ...or more. placement instructions in the Service and Adjustments section of this manual. • Be sure that does not retain moisture. Inspect moving parts for winter storage. sand lightly before storing in the fuel tank or permanent damage may reach an open flame or spark. BATTERY ...
... up all dirt, grease, leaves, etc. ENGINE FUEL SYSTEM IMPORTANT: IT IS IMPORTANT TO PREVENT GUM DEPOSITS FROM FORMING IN ESSENTIAL FUEL SYSTEM PARTS SUCH AS CARBURETOR, FUEL FILTER, FUEL HOSE, OR TANK DURING STORAGE. Run engine at the end of this manual). Plastic cannot breathe which ...or more. placement instructions in the Service and Adjustments section of this manual. • Be sure that does not retain moisture. Inspect moving parts for winter storage. sand lightly before storing in the fuel tank or permanent damage may reach an open flame or spark. BATTERY ...

User Manual
Page 25
...out of adjustment. 8. Wait several minutes before attempting to start CAUSE 1. Faulty ignition switch. 8. Dirty fuel filter. 8. Replace damaged parts. 25 Engine valves out of fuel. 2. Loose or damaged wiring. 4. Check/replace solenoid or starter. 9. Engine not "CHOKED" properly.... 3. Dirty/clogged muffler. 13. Tighten loose part(s). Faulty spark plug. 7. Out of adjustment. 1. Dirty air filter. 6. Check all wiring. 9. Recharge or replace battery. 4....
...out of adjustment. 8. Wait several minutes before attempting to start CAUSE 1. Faulty ignition switch. 8. Dirty fuel filter. 8. Replace damaged parts. 25 Engine valves out of fuel. 2. Loose or damaged wiring. 4. Check/replace solenoid or starter. 9. Engine not "CHOKED" properly.... 3. Dirty/clogged muffler. 13. Tighten loose part(s). Faulty spark plug. 7. Out of adjustment. 1. Dirty air filter. 6. Check all wiring. 9. Recharge or replace battery. 4....

User Manual
Page 27
... engine, other rights which vary from defects in materials and workmanship. The Warranty period for any products used for parts or labor incurred in replacing parts, any power equipment unit or attachment are belts, blades, blade adapters, normal wear, normal adjustments, standard hardware and... damages or limitations of ownership. This Warranty applies only to the original consumer purchaser that term as noted below) or components parts thereof. Outdoor Products Customer Service Dept. 1030 Stevens Creek Road Augusta, GA 30907 USA In Canada contact: Electrolux Canada Corp....
... engine, other rights which vary from defects in materials and workmanship. The Warranty period for any products used for parts or labor incurred in replacing parts, any power equipment unit or attachment are belts, blades, blade adapters, normal wear, normal adjustments, standard hardware and... damages or limitations of ownership. This Warranty applies only to the original consumer purchaser that term as noted below) or components parts thereof. Outdoor Products Customer Service Dept. 1030 Stevens Creek Road Augusta, GA 30907 USA In Canada contact: Electrolux Canada Corp....
User Manual
Page 30
...manufactured to your local dealer for parts and service should be necessary during the life of part. Number b. For Parts and service, contact our authorized distributor: call 1-800-829-5886 For a Parts Manual, go to our website: www.poulan-pro.com/support.asp NOTE: Electrolux... Home Products provides parts and service through its products. therefore...
...manufactured to your local dealer for parts and service should be necessary during the life of part. Number b. For Parts and service, contact our authorized distributor: call 1-800-829-5886 For a Parts Manual, go to our website: www.poulan-pro.com/support.asp NOTE: Electrolux... Home Products provides parts and service through its products. therefore...


