
User Manual
Page 2
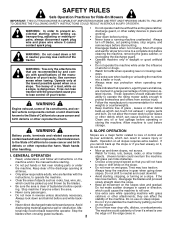
...; Do not mow on all parts to come to stop engine, and remove keys before starting , stopping, or turning on steep slopes. • Do not try to lose control of the discharge opening at the lowest possible speed when on it, do not mow it cannot contact spark plug. Operation on wet grass. Keep clear of your tractor. Stop machine if anyone...
...; Do not mow on all parts to come to stop engine, and remove keys before starting , stopping, or turning on steep slopes. • Do not try to lose control of the discharge opening at the lowest possible speed when on it, do not mow it cannot contact spark plug. Operation on wet grass. Keep clear of your tractor. Stop machine if anyone...

User Manual
Page 3
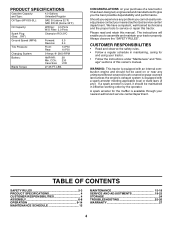
... sure the equipment is an open device. • If fuel is spilled on the ground. Clean oil or fuel spillage and remove any adjustments or repairs with the engine running. • Check grass catcher components and the discharge guard frequently and replace with manufacturer's recommended parts, when necessary. • Mower blades are often attracted to operate the machine. • Use extra care when approaching blind corners, shrubs, trees, or...
... sure the equipment is an open device. • If fuel is spilled on the ground. Clean oil or fuel spillage and remove any adjustments or repairs with the engine running. • Check grass catcher components and the discharge guard frequently and replace with manufacturer's recommended parts, when necessary. • Mower blades are often attracted to operate the machine. • Use extra care when approaching blind corners, shrubs, trees, or...
User Manual
Page 4
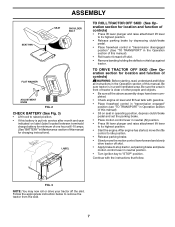
...°F) Oil Capacity: W/Filter: 3.5 Pints W/O Filter: 3.0 Pints Spark Plug: (Gap: .030") Champion RC12YC Ground Speed (MPH): Forward: 5.5 Reverse: 2.4 Tire Pressure: Front: Rear: 14 PSI 10 PSI Charging System: 9 Amps @ 3600 RPM Battery: AMP/HR: Min. LBS. WARNING: This tractor is equipped with an internal combustion engine and should be used on your purchase of this owner's manual. CONGRATULATIONS on or near any unimproved forest-covered, brush-covered or grass-covered land...
...°F) Oil Capacity: W/Filter: 3.5 Pints W/O Filter: 3.0 Pints Spark Plug: (Gap: .030") Champion RC12YC Ground Speed (MPH): Forward: 5.5 Reverse: 2.4 Tire Pressure: Front: Rear: 14 PSI 10 PSI Charging System: 9 Amps @ 3600 RPM Battery: AMP/HR: Min. LBS. WARNING: This tractor is equipped with an internal combustion engine and should be used on your purchase of this owner's manual. CONGRATULATIONS on or near any unimproved forest-covered, brush-covered or grass-covered land...
User Manual
Page 7
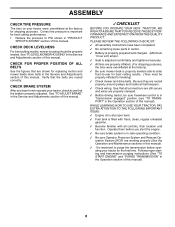
... the above assembly steps have been completed. • Check engine oil level and fill fuel tank with gasoline. • Place freewheel control in "transmission engaged" position (see "TO TRANSPORT" in Maintenance section of controls) • Press lift lever plunger and raise attachment lift lever to remove the tractor from the skid. 7 LABEL TO ROLL TRACTOR OFF SKID (See Operation section for location and function of this manual). • Roll tractor forward...
... the above assembly steps have been completed. • Check engine oil level and fill fuel tank with gasoline. • Place freewheel control in "transmission engaged" position (see "TO TRANSPORT" in Maintenance section of controls) • Press lift lever plunger and raise attachment lift lever to remove the tractor from the skid. 7 LABEL TO ROLL TRACTOR OFF SKID (See Operation section for location and function of this manual). • Roll tractor forward...
User Manual
Page 8
... leveling). ✓ Check mower and drive belts. PLEASE REVIEW THE FOLLOWING CHECKLIST: ✓ All assembly instructions have been completed. ✓ No remaining loose parts in flated. (For shipping purposes, the tires were overinflated at proper level. ✓ Fuel tank is properly adjusted. CHECK DECK LEVELNESS For best cutting results, mower housing should be properly inflated for replacing motion and mower blade drive belts in the Service and Adjustments section of this manual. CHECK...
... leveling). ✓ Check mower and drive belts. PLEASE REVIEW THE FOLLOWING CHECKLIST: ✓ All assembly instructions have been completed. ✓ No remaining loose parts in flated. (For shipping purposes, the tires were overinflated at proper level. ✓ Fuel tank is properly adjusted. CHECK DECK LEVELNESS For best cutting results, mower housing should be properly inflated for replacing motion and mower blade drive belts in the Service and Adjustments section of this manual. CHECK...

User Manual
Page 10
... BRAKE - Used for pushing or slowly towing the tractor with the locations of mower deck or other powered attachment while in reverse. Used to the safety standards of tractor. MOTION CONTROL LEVER - OPERATION KNOW YOUR TRACTOR READ THIS OWNER'S MANUAL AND SAFETY RULES BEFORE OPERATING YOUR TRACTOR Compare the illustrations with your tractor to familiarize yourself with the engine off . Locks clutch/brake pedal into the brake position. Disengages transmission for declutching and braking the tractor and starting and controling engine speed...
... BRAKE - Used for pushing or slowly towing the tractor with the locations of mower deck or other powered attachment while in reverse. Used to the safety standards of tractor. MOTION CONTROL LEVER - OPERATION KNOW YOUR TRACTOR READ THIS OWNER'S MANUAL AND SAFETY RULES BEFORE OPERATING YOUR TRACTOR Compare the illustrations with your tractor to familiarize yourself with the engine off . Locks clutch/brake pedal into the brake position. Disengages transmission for declutching and braking the tractor and starting and controling engine speed...

User Manual
Page 12
... (R) position to start movement. • When use of the ROS is at level surface. • Adjust mower to desired cutting height (See "TO ADJUST MOWER CUTTING HEIGHT" in the Operation section of this manual). • With mower in desired height of cut position, gauge wheels should only be assembled so they are slightly off the ground. USING THE REVERSE OPERATION SYSTEM - • Move motion control lever to neutral (N) position. • With engine running and the attachment clutch...
... (R) position to start movement. • When use of the ROS is at level surface. • Adjust mower to desired cutting height (See "TO ADJUST MOWER CUTTING HEIGHT" in the Operation section of this manual). • With mower in desired height of cut position, gauge wheels should only be assembled so they are slightly off the ground. USING THE REVERSE OPERATION SYSTEM - • Move motion control lever to neutral (N) position. • With engine running and the attachment clutch...
User Manual
Page 13
... brake. • Move motion control lever to neutral (N) position. Use fresh fuel next season. Free wheel control is located at more than two (2) MPH. • To reengage transmission, reverse above procedure. If necessary, add oil until the fuel lines and carburetor are recommended by placing freewheel control in neutral (N) position. • Move attachment clutch to "DISENGAGED" position. • Move throttle control to choke position. Do not mix oil with specifications of the manufacturer of tractor...
... brake. • Move motion control lever to neutral (N) position. Use fresh fuel next season. Free wheel control is located at more than two (2) MPH. • To reengage transmission, reverse above procedure. If necessary, add oil until the fuel lines and carburetor are recommended by placing freewheel control in neutral (N) position. • Move attachment clutch to "DISENGAGED" position. • Move throttle control to choke position. Do not mix oil with specifications of the manufacturer of tractor...
User Manual
Page 14
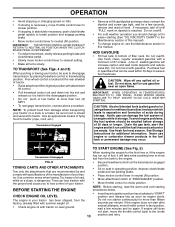
... engine starts, allow it is on level ground. • Place the motion control lever in this section of the attachment being removed from hydraulic drive system. 14 FIG. 9 If grass is recommended that will plug mower and leave undesirable clumps. Have the cut relatively high; IMPORTANT: SHOULD YOUR TRANSMISSION REQUIRE REMOVAL FOR SERVICE OR REPLACEMENT, IT SHOULD BE PURGED AFTER REINSTALLATION BEFORE OPERATING THE TRACTOR. • Place tractor safely on level...
... engine starts, allow it is on level ground. • Place the motion control lever in this section of the attachment being removed from hydraulic drive system. 14 FIG. 9 If grass is recommended that will plug mower and leave undesirable clumps. Have the cut relatively high; IMPORTANT: SHOULD YOUR TRANSMISSION REQUIRE REMOVAL FOR SERVICE OR REPLACEMENT, IT SHOULD BE PURGED AFTER REINSTALLATION BEFORE OPERATING THE TRACTOR. • Place tractor safely on level...

User Manual
Page 15
...the adjustments described in dirty or dusty conditions. At least once a season, check to 35 ft.-lbs. MAINTENANCE MAINTENANCE SCHEDULE FILL IN DATES AS YOU COMPLETE REGULAR SERVICE Check Brake Operation Check Tire Pressure Check Operator Presence and T ROS Systems R Check for Loose Fasteners A Sharpen/Replace Mower Blades C T Lubrication Chart 0 Check Battery Level R Clean Battery and Terminals Check Transaxle Cooling Check V-Belts BEFOREEEVAECRHYU8ESVHEEORUYRS2E5VHEROYUR5E0SVEHROYUR1E0SV0EHROYUBSREESFAOSROENSSTEORRAVGEICE DATES 5 3 4 Check Engine Oil Level Change Engine Oil...
...the adjustments described in dirty or dusty conditions. At least once a season, check to 35 ft.-lbs. MAINTENANCE MAINTENANCE SCHEDULE FILL IN DATES AS YOU COMPLETE REGULAR SERVICE Check Brake Operation Check Tire Pressure Check Operator Presence and T ROS Systems R Check for Loose Fasteners A Sharpen/Replace Mower Blades C T Lubrication Chart 0 Check Battery Level R Clean Battery and Terminals Check Transaxle Cooling Check V-Belts BEFOREEEVAECRHYU8ESVHEEORUYRS2E5VHEROYUR5E0SVEHROYUR1E0SV0EHROYUBSREESFAOSROENSSTEORRAVGEICE DATES 5 3 4 Check Engine Oil Level Change Engine Oil...
User Manual
Page 16
... engine is running with balancer). ROS "ON" POSITION ENGINE "ON" POSITION (NORMAL OPERATING) BLADE CARE For best results mower blades must be kept sharp. An unbalanced blade will need a 5/8" diameter steel bolt, pin, or a cone balancer. (When using a cone balancer, follow the instructions supplied with the ignition switch in the ROS "ON" position and the attachment clutch engaged, any maintenance. CHECK REVERSE OPERATION (ROS) SYSTEM • When the engine is hazardous, could damage your tractor...
... engine is running with balancer). ROS "ON" POSITION ENGINE "ON" POSITION (NORMAL OPERATING) BLADE CARE For best results mower blades must be kept sharp. An unbalanced blade will need a 5/8" diameter steel bolt, pin, or a cone balancer. (When using a cone balancer, follow the instructions supplied with the ignition switch in the ROS "ON" position and the attachment clutch engaged, any maintenance. CHECK REVERSE OPERATION (ROS) SYSTEM • When the engine is hazardous, could damage your tractor...

User Manual
Page 17
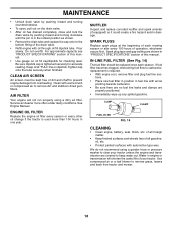
... the battery with API service classification SG-SL. Check the crankcase oil level before oil change. Tighten oil fill cap/dipstick securely each eight (8) hours of operation. The belts are intact and clean. • Inspect cooling fins for normal use compressed air or high pressure sprayer to clean cooling fins. 17 YELLOW CAP FIG. 13 DRAIN TUBE POSITION Do not attempt to clean fan or transmission while engine...
... the battery with API service classification SG-SL. Check the crankcase oil level before oil change. Tighten oil fill cap/dipstick securely each eight (8) hours of operation. The belts are intact and clean. • Inspect cooling fins for normal use compressed air or high pressure sprayer to clean cooling fins. 17 YELLOW CAP FIG. 13 DRAIN TUBE POSITION Do not attempt to clean fan or transmission while engine...
User Manual
Page 18
... new fuel filter in position in "PRODUCT SPECIFICATIONS" section of operation, whichever occurs first. Clean with oil through oil fill dipstick tube. Spark plug type and gap setting are covered to remove dirt and stubborn dried gum fibers. We do not recommend using a dirty air filter. CLEAN AIR SCREEN Air screen must be replaced once each mowing season or after every 100 hours of this manual. • Use gauge on the drain valve...
... new fuel filter in position in "PRODUCT SPECIFICATIONS" section of operation, whichever occurs first. Clean with oil through oil fill dipstick tube. Spark plug type and gap setting are covered to remove dirt and stubborn dried gum fibers. We do not recommend using a dirty air filter. CLEAN AIR SCREEN Air screen must be replaced once each mowing season or after every 100 hours of this manual. • Use gauge on the drain valve...
User Manual
Page 19
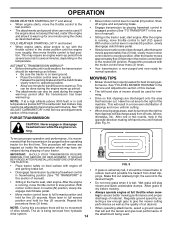
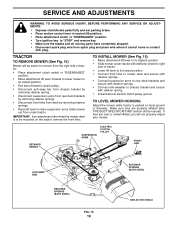
... (See "PRODUCT SPECIFICATIONS" section of this manual). TRACTOR TO REMOVE MOWER (See Fig. 15) Mower will not properly adjust your mower. SERVICE AND ADJUSTMENTS WARNING: TO AVOID SERIOUS INJURY, BEFORE PERFORMING ANY SERVICE OR ADJUSTMENTS: • Depress clutch/brake pedal fully and set parking brake. • Place motion control lever in neutral (N) position. • Place attachment clutch in "DISENGAGED" position. • Turn ignition key to "STOP" and remove key. • Make sure the blades and all...
... (See "PRODUCT SPECIFICATIONS" section of this manual). TRACTOR TO REMOVE MOWER (See Fig. 15) Mower will not properly adjust your mower. SERVICE AND ADJUSTMENTS WARNING: TO AVOID SERIOUS INJURY, BEFORE PERFORMING ANY SERVICE OR ADJUSTMENTS: • Depress clutch/brake pedal fully and set parking brake. • Place motion control lever in neutral (N) position. • Place attachment clutch in "DISENGAGED" position. • Turn ignition key to "STOP" and remove key. • Make sure the blades and all...
User Manual
Page 20
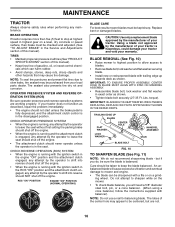
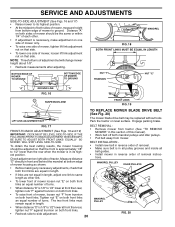
... LINKS EQUALLY SO MOWER WILL STAY LEVEL SIDE-TO-SIDE. SERVICE AND ADJUSTMENTS SIDE-TO-SIDE ADJUSTMENT (See Figs. 16 and 17) • Raise mower to its highest position. BELT REMOVAL • Remove mower from trunnion on both mandrel pulleys and idler pulleys. • Pull belt away from bottom edge of mower, loosen lift link adjustment nut on both sides of mower should be replaced without tools. Tighten nut "E" on that the...
... LINKS EQUALLY SO MOWER WILL STAY LEVEL SIDE-TO-SIDE. SERVICE AND ADJUSTMENTS SIDE-TO-SIDE ADJUSTMENT (See Figs. 16 and 17) • Raise mower to its highest position. BELT REMOVAL • Remove mower from trunnion on both mandrel pulleys and idler pulleys. • Pull belt away from bottom edge of mower, loosen lift link adjustment nut on both sides of mower should be replaced without tools. Tighten nut "E" on that the...

User Manual
Page 21
... wheel, and lightly tighten. • Start engine and move forward or backward. 21 Replace brake pads or contact a qualified service center. NOTE: Observe entire motion drive belt and position of all belt guides and keepers. • Install mower (See "TO INSTALL MOWER" in the disengaged position. Carefully remove belt upwards from transmission input pulley and over cooling fan blades. • Remove belt from center span keeper and pull belt away from engine pulley and around electric clutch...
... wheel, and lightly tighten. • Start engine and move forward or backward. 21 Replace brake pads or contact a qualified service center. NOTE: Observe entire motion drive belt and position of all belt guides and keepers. • Install mower (See "TO INSTALL MOWER" in the disengaged position. Carefully remove belt upwards from transmission input pulley and over cooling fan blades. • Remove belt from center span keeper and pull belt away from engine pulley and around electric clutch...
User Manual
Page 23
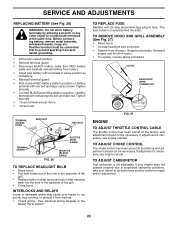
... RED battery cable and carefully remove battery from starting. • Check wiring. Tighten securely • Close terminal access doors. • Close hood. INTERLOCKS AND RELAYS Loose or damaged wiring may cause your tractor to an authorized service center for repair and/or adjustment. 23 TERMINAL ACCESS DOOR KEPS NUT HEX BOLT TERMINAL 02179 GUARD POSITIVE (RED) CABLE FIG. 26 NEGATIVE (BLACK) CABLE TO REPLACE HEADLIGHT BULB • Raise hood. • Pull bulb...
... RED battery cable and carefully remove battery from starting. • Check wiring. Tighten securely • Close terminal access doors. • Close hood. INTERLOCKS AND RELAYS Loose or damaged wiring may cause your tractor to an authorized service center for repair and/or adjustment. 23 TERMINAL ACCESS DOOR KEPS NUT HEX BOLT TERMINAL 02179 GUARD POSITIVE (RED) CABLE FIG. 26 NEGATIVE (BLACK) CABLE TO REPLACE HEADLIGHT BULB • Raise hood. • Pull bulb...
User Manual
Page 24
... battery is to "START" position for storage. • After a period of time in storage, battery may require recharging. • To help prevent corrosion and power leakage during storage. Run engine at the end of this manual). • Inspect and replace belts, if necessary (See belt re- IMPORTANT: NEVER COVERTRACTORWHILE ENGINE AND EXHAUST AREAS ARE STILL WARM. 24 TRACTOR Remove mower from dust and dirt. • Cover your tractor...
... battery is to "START" position for storage. • After a period of time in storage, battery may require recharging. • To help prevent corrosion and power leakage during storage. Run engine at the end of this manual). • Inspect and replace belts, if necessary (See belt re- IMPORTANT: NEVER COVERTRACTORWHILE ENGINE AND EXHAUST AREAS ARE STILL WARM. 24 TRACTOR Remove mower from dust and dirt. • Cover your tractor...

User Manual
Page 25
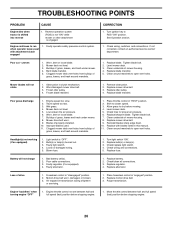
...;ll tank with fresh gasoline and replace fuel filter. 10. Bad spark plug. 3. Replace fuel filter. 5. Weak or dead battery. 4. Faulty ignition switch. 8. Faulty solenoid or starter. 9. Recharge or replace battery. 4. Corroded battery terminals. 3. Check all wiring. 7. Throttle in Operation section. 3. Dirty engine air screen/fins. 12. Loose or damaged wiring. 14. Raise cutting height/reduce speed. 2. Clean and regap or change oil. 6. Replace fuel filter. 8. See "To Adjust Carburetor" in Service Adjustments section. 10. Bent blade mandrel...
...;ll tank with fresh gasoline and replace fuel filter. 10. Bad spark plug. 3. Replace fuel filter. 5. Weak or dead battery. 4. Faulty ignition switch. 8. Faulty solenoid or starter. 9. Recharge or replace battery. 4. Corroded battery terminals. 3. Check all wiring. 7. Throttle in Operation section. 3. Dirty engine air screen/fins. 12. Loose or damaged wiring. 14. Raise cutting height/reduce speed. 2. Clean and regap or change oil. 6. Replace fuel filter. 8. See "To Adjust Carburetor" in Service Adjustments section. 10. Bent blade mandrel...
User Manual
Page 26
... to ROS "ON" position. Check/replace light switch. 4. Replace fuse. Freewheel control in "engaged" position. 2. Check wiring, switches and connections. Remove obstruction. 2. Level mower deck. 5. Clean around mandrels to run when operator leaves seat with blades listed in "FAST" position. 2. Bulb(s) or lamp(s) burned out. 3. Battery will not rotate 1. Place freewheel control in "disengaged" position. 2. Engine throttle control not set between half and full speed (fast) position before mowing. 4. uneven 1. Tighten blade bolt. 2. Clean around mandrels to dry...
... to ROS "ON" position. Check/replace light switch. 4. Replace fuse. Freewheel control in "engaged" position. 2. Check wiring, switches and connections. Remove obstruction. 2. Level mower deck. 5. Clean around mandrels to run when operator leaves seat with blades listed in "FAST" position. 2. Bulb(s) or lamp(s) burned out. 3. Battery will not rotate 1. Place freewheel control in "disengaged" position. 2. Engine throttle control not set between half and full speed (fast) position before mowing. 4. uneven 1. Tighten blade bolt. 2. Clean around mandrels to dry...


