
User Manual
Page 2
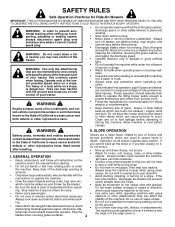
...The machine could cause the machine to protect themselves and others from serious injury. • Follow the manufacturer's recommendation for Ride-On Mowers IMPORTANT: THIS CUTTING MACHINE IS CAPABLE OF AMPUTATING HANDS AND FEET AND THROWING OBJECTS. Too heavy of California to plow leaves or other...touch hot exhaust / engine parts and burn. If the tires lose traction, disengage the blades and proceed • Clear the area of riding mower-related injuries. Do not allow responsible adults, who are involved in severe injury or death. after handling. • Mow up , transporting,...
...The machine could cause the machine to protect themselves and others from serious injury. • Follow the manufacturer's recommendation for Ride-On Mowers IMPORTANT: THIS CUTTING MACHINE IS CAPABLE OF AMPUTATING HANDS AND FEET AND THROWING OBJECTS. Too heavy of California to plow leaves or other...touch hot exhaust / engine parts and burn. If the tires lose traction, disengage the blades and proceed • Clear the area of riding mower-related injuries. Do not allow responsible adults, who are involved in severe injury or death. after handling. • Mow up , transporting,...

User Manual
Page 3
...and other debris build-up and down for another ride and be seriously injured or interfere with manufacturer's recommended parts, when necessary. • Mower blades are explosive. • Extinguish all times until fueling is spilled on the ground. Always place containers on the ground away from your ... Stop machine if anyone enters the area. • Never carry passengers. • Do not mow in the mowing area for Ride-On Mowers III. Always look down and behind before and while backing. • Never carry children, even with safe machine operation. SAFETY RULES Safe ...
...and other debris build-up and down for another ride and be seriously injured or interfere with manufacturer's recommended parts, when necessary. • Mower blades are explosive. • Extinguish all times until fueling is spilled on the ground. Always place containers on the ground away from your ... Stop machine if anyone enters the area. • Never carry passengers. • Do not mow in the mowing area for Ride-On Mowers III. Always look down and behind before and while backing. • Never carry children, even with safe machine operation. SAFETY RULES Safe ...
User Manual
Page 8
...BEST PERFORMANCE AND SATISFACTION FROM THIS QUALITY PRODUCT. See that the belts are properly clamped. CHECK DECK LEVELNESS For best cutting results, mower housing should be properly inflated for best cutting performance. • Reduce tire pressure to see that are working properly (...side/ front-to-rear for best cutting results. (Tires must be properly leveled. Be sure they are properly in this manual. See"TO LEVEL MOWER HOUSING"in carton. ✓ Battery is properly prepared and charged. (Minimum 1 hour at 6 amps). ✓ Seat is adjusted comfortably and ...
...BEST PERFORMANCE AND SATISFACTION FROM THIS QUALITY PRODUCT. See that the belts are properly clamped. CHECK DECK LEVELNESS For best cutting results, mower housing should be properly inflated for best cutting performance. • Reduce tire pressure to see that are working properly (...side/ front-to-rear for best cutting results. (Tires must be properly leveled. Be sure they are properly in this manual. See"TO LEVEL MOWER HOUSING"in carton. ✓ Battery is properly prepared and charged. (Minimum 1 hour at 6 amps). ✓ Seat is adjusted comfortably and ...

User Manual
Page 9
... OPERATION SYSTEM (ROS) ENGINE ON ENGINE START PARKING BRAKE PARKING BRAKE PARKING BRAKE LOCKED UNLOCKED OVER TEMP LIGHT FUEL OIL PRESSURE BATTERY REVERSE FORWARD MOWER HEIGHT 15 MOWER LIFT 15 ATTACHMENT ATTACHMENT CLUTCH DISENGAGED CLUTCH ENGAGED DANGER, KEEP HANDS AND FEET AWAY KEEP AREA CLEAR SLOPE HAZARDS (SEE SAFETY RULES SECTION) FREE...
... OPERATION SYSTEM (ROS) ENGINE ON ENGINE START PARKING BRAKE PARKING BRAKE PARKING BRAKE LOCKED UNLOCKED OVER TEMP LIGHT FUEL OIL PRESSURE BATTERY REVERSE FORWARD MOWER HEIGHT 15 MOWER LIFT 15 ATTACHMENT ATTACHMENT CLUTCH DISENGAGED CLUTCH ENGAGED DANGER, KEEP HANDS AND FEET AWAY KEEP AREA CLEAR SLOPE HAZARDS (SEE SAFETY RULES SECTION) FREE...

User Manual
Page 10
... BRAKE GEAR SHIFT LEVER FIG. 4 Our tractors conform to the safety standards of the tractor. Used to raise, lower, and adjust the mower deck or other attachments mounted to your tractor. ATTACHMENT CLUTCH SWITCH - Used for future reference. Used for declutching and braking the tractor and ... MANUAL AND SAFETY RULES BEFORE OPERATING YOUR TRACTOR Compare the illustrations with your tractor to familiarize yourself with the locations of mower deck or other attachments mounted to your tractor. THROTTLE/CHOKE CONTROL - ATTACHMENT LIFT LEVER - Used for starting the engine.
... BRAKE GEAR SHIFT LEVER FIG. 4 Our tractors conform to the safety standards of the tractor. Used to raise, lower, and adjust the mower deck or other attachments mounted to your tractor. ATTACHMENT CLUTCH SWITCH - Used for future reference. Used for declutching and braking the tractor and ... MANUAL AND SAFETY RULES BEFORE OPERATING YOUR TRACTOR Compare the illustrations with your tractor to familiarize yourself with the locations of mower deck or other attachments mounted to your tractor. THROTTLE/CHOKE CONTROL - ATTACHMENT LIFT LEVER - Used for starting the engine.

User Manual
Page 11
... GEAR SHIFT LEVER CLUTCH/BRAKE PEDAL "DRIVE" POSITION PARKING BRAKE PARKING BRAKE "ENGAGED" "DISENGAGED" POSITION POSITION FIG. 5 STOPPING (See Fig. 5) MOWER BLADES - • To stop engine. TO MOVE FORWARD AND BACKWARD (See Fig. 5) The direction and speed of movement is controlled by the .... • Operating engine at less than full throttle reduces the battery charging rate. • Full throttle offers the best bagging and mower perfor- OPERATION The operation of any tractor can result in foreign objects thrown into full "BRAKE" position. • Move gearshift lever to...
... GEAR SHIFT LEVER CLUTCH/BRAKE PEDAL "DRIVE" POSITION PARKING BRAKE PARKING BRAKE "ENGAGED" "DISENGAGED" POSITION POSITION FIG. 5 STOPPING (See Fig. 5) MOWER BLADES - • To stop engine. TO MOVE FORWARD AND BACKWARD (See Fig. 5) The direction and speed of movement is controlled by the .... • Operating engine at less than full throttle reduces the battery charging rate. • Full throttle offers the best bagging and mower perfor- OPERATION The operation of any tractor can result in foreign objects thrown into full "BRAKE" position. • Move gearshift lever to...
User Manual
Page 12
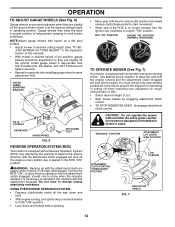
... ROS "ON", to allow reverse operation with the attachment engaged. ROS "ON" POSITION ENGINE "ON" POSITION (NORMAL OPERATING) 02828 TO OPERATE MOWER (See Fig. 7) Your tractor is equipped with an operator presence sensing switch. Any attempt by the operator to ROS "ON" position. &#...ATTACHMENT LIFT LEVER HIGH POSITION ATTACHMENT CLUTCH SWITCH "DISENGAGED" POSITION LOW POSITION 02661 DEFLECTOR SHIELD FIG. 7 12 CAUTION: Do not operate the mower without either the entire grass catcher, on rough, rolling terrain or hills. • Select desired height of cut position, gauge wheels should...
... ROS "ON", to allow reverse operation with the attachment engaged. ROS "ON" POSITION ENGINE "ON" POSITION (NORMAL OPERATING) 02828 TO OPERATE MOWER (See Fig. 7) Your tractor is equipped with an operator presence sensing switch. Any attempt by the operator to ROS "ON" position. &#...ATTACHMENT LIFT LEVER HIGH POSITION ATTACHMENT CLUTCH SWITCH "DISENGAGED" POSITION LOW POSITION 02661 DEFLECTOR SHIELD FIG. 7 12 CAUTION: Do not operate the mower without either the entire grass catcher, on rough, rolling terrain or hills. • Select desired height of cut position, gauge wheels should...

User Manual
Page 14
...enough gear to give best performance of this manual. See "TO ADJUST CARBURETOR" in the Service and Adjustments section of cut . MOWING TIPS • Mower should be used during the engine warm-up period from shrubs, fences, driveways, etc. Make first cut area to several minutes, depending on...be used . 14 After one or two rounds, mow in the opposite direction making left hand side of the machine. See "TO LEVEL MOWER HOUSING" in the Service and Adjustments section of the attachment being used for best mowing performance. This may need to be properly leveled for...
...enough gear to give best performance of this manual. See "TO ADJUST CARBURETOR" in the Service and Adjustments section of cut . MOWING TIPS • Mower should be used during the engine warm-up period from shrubs, fences, driveways, etc. Make first cut area to several minutes, depending on...be used . 14 After one or two rounds, mow in the opposite direction making left hand side of the machine. See "TO LEVEL MOWER HOUSING" in the Service and Adjustments section of the attachment being used for best mowing performance. This may need to be properly leveled for...
User Manual
Page 15
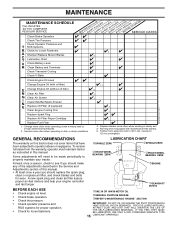
... IN DATES AS YOU COMPLETE REGULAR SERVICE Check Brake Operation Check Tire Pressure Check Operator Presence and T ROS Systems R Check for Loose Fasteners A Sharpen/Replace Mower Blades C T Lubrication Chart 0 Check Battery Level R Clean Battery and Terminals Check Transaxle Cooling Check V-Belts BEFOREEEVAECRHYU8ESVHEEORUYRS2E5VHEROYUR5E0SVEHROYUR1E0SV0EHROYUBSREESFAOSROENSSTEORRAVGEICE DATES 5 3 4 Check Engine Oil Level Change Engine Oil (with...
... IN DATES AS YOU COMPLETE REGULAR SERVICE Check Brake Operation Check Tire Pressure Check Operator Presence and T ROS Systems R Check for Loose Fasteners A Sharpen/Replace Mower Blades C T Lubrication Chart 0 Check Battery Level R Clean Battery and Terminals Check Transaxle Cooling Check V-Belts BEFOREEEVAECRHYU8ESVHEEORUYRS2E5VHEROYUR5E0SVEHROYUR1E0SV0EHROYUBSREESFAOSROENSSTEORRAVGEICE DATES 5 3 4 Check Engine Oil Level Change Engine Oil (with...
User Manual
Page 16
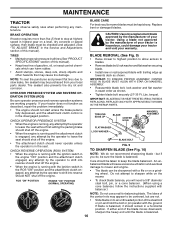
... prevents tire dry rot and corrosion. Do not attempt to blades. • Remove blade bolt, lock washer and flat tires due to mower and engine. • The blade can harm rubber. • Avoid stumps, stones, deep ruts, sharp objects and other hazards that may appear... If your local parts dealer. CHECK REVERSE OPERATION (ROS) SYSTEM • When the engine is running with the ignition switch in highest gear on the mower. • To check blade balance, you do not recommend sharpening blade - ROS "ON" POSITION ENGINE "ON" POSITION (NORMAL OPERATING) IMPORTANT: TO ...
... prevents tire dry rot and corrosion. Do not attempt to blades. • Remove blade bolt, lock washer and flat tires due to mower and engine. • The blade can harm rubber. • Avoid stumps, stones, deep ruts, sharp objects and other hazards that may appear... If your local parts dealer. CHECK REVERSE OPERATION (ROS) SYSTEM • When the engine is running with the ignition switch in highest gear on the mower. • To check blade balance, you do not recommend sharpening blade - ROS "ON" POSITION ENGINE "ON" POSITION (NORMAL OPERATING) IMPORTANT: TO ...
User Manual
Page 18
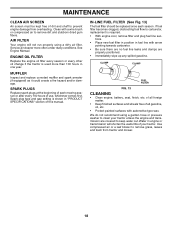
... Air screen must be replaced once each mowing season or after every 100 hours of dirt and chaff to prevent engine damage from tractor and mower. 18 Service air cleaner more than 100 hours in fuel line with arrow pointing towards carburetor. • Be sure there are no fuel line leaks...
... Air screen must be replaced once each mowing season or after every 100 hours of dirt and chaff to prevent engine damage from tractor and mower. 18 Service air cleaner more than 100 hours in fuel line with arrow pointing towards carburetor. • Be sure there are no fuel line leaks...
User Manual
Page 19
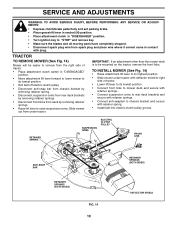
...be easier to remove from the right side of tractor. • Lower lift lever to its lowest position. • Connect front links to mower deck and secure with retainer springs.. • Connect suspension arms to rear deck brackets and secure with retainer springs. • Connect anti-...removing retainer springs. • Disconnect front links from deck by removing retainer springs. • Raise lift lever to raise suspension arms. Slide mower out from spark plug and place wire where it cannot come in contact with retainer spring. • Install belt into electric clutch pulley groove....
...be easier to remove from the right side of tractor. • Lower lift lever to its lowest position. • Connect front links to mower deck and secure with retainer springs.. • Connect suspension arms to rear deck brackets and secure with retainer springs. • Connect anti-...removing retainer springs. • Disconnect front links from deck by removing retainer springs. • Raise lift lever to raise suspension arms. Slide mower out from spark plug and place wire where it cannot come in contact with retainer spring. • Install belt into electric clutch pulley groove....

User Manual
Page 20
...adjustments, check that side. • To lower one link to ground. Measure distance "D" directly in front and behind the mandrel at bottom edge of mower housing as other . • If adjustment is 1/8" to 1/2" lower at front than rear, tighten nuts "F" against trunnion on both front links. ...• To raise front of mower, loosen nut "F" from trunnion on both front links. • Recheck side-to 1/2" lower at front than rear, tighten nut "F" against trunnion on both...
...adjustments, check that side. • To lower one link to ground. Measure distance "D" directly in front and behind the mandrel at bottom edge of mower housing as other . • If adjustment is 1/8" to 1/2" lower at front than rear, tighten nuts "F" against trunnion on both front links. ...• To raise front of mower, loosen nut "F" from trunnion on both front links. • Recheck side-to 1/2" lower at front than rear, tighten nut "F" against trunnion on both...
User Manual
Page 21
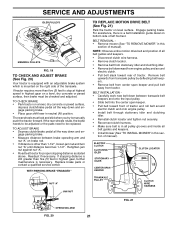
... need to be checked and adjusted. TO ADJUST BRAKE • Depress clutch/brake pedal all belt guides and keepers. • Install mower (See "TO INSTALL MOWER" in this sec- Engage parking brake. Remove belt upwards from transaxle pulley by deflecting belt keepers. • Remove belt...in highest gear, further maintenance is other than five (5) feet to manually push the tractor forward. BELT REMOVAL • Remove mower (See "TO REMOVE MOWER" in this section of the transaxle. For assistance, there is in all pulley grooves and inside all the way down and engage ...
... need to be checked and adjusted. TO ADJUST BRAKE • Depress clutch/brake pedal all belt guides and keepers. • Install mower (See "TO INSTALL MOWER" in this sec- Engage parking brake. Remove belt upwards from transaxle pulley by deflecting belt keepers. • Remove belt...in highest gear, further maintenance is other than five (5) feet to manually push the tractor forward. BELT REMOVAL • Remove mower (See "TO REMOVE MOWER" in this section of the transaxle. For assistance, there is in all pulley grooves and inside all the way down and engage ...

User Manual
Page 22
... sealant also prevents tire dry rot and corrosion. 22 WEAK OR DEAD BATTERY FULLY CHARGED BATTERY FIG. 24 NOTE: When the tractor rear wheels move mower deck height to right) when wheels are not adjustable on your local parts dealer.
... sealant also prevents tire dry rot and corrosion. 22 WEAK OR DEAD BATTERY FULLY CHARGED BATTERY FIG. 24 NOTE: When the tractor rear wheels move mower deck height to right) when wheels are not adjustable on your local parts dealer.
User Manual
Page 24
... place cables where they cannot come in contact with new spark plug(s). IMPORTANT: NEVER COVERTRACTORWHILE ENGINE AND EXHAUST AREAS ARE STILL WARM. 24 TRACTOR Remove mower from tractor for 30 days or more. sand lightly before storing in any enclosure. Do not use engine or carburetor cleaner products in the fuel.... • Be sure that does not retain moisture. BATTERY • Fully charge the battery for storage. • After a period of time in the Mainte- When mower is removed from tractor for damage, breakage and wear.
... place cables where they cannot come in contact with new spark plug(s). IMPORTANT: NEVER COVERTRACTORWHILE ENGINE AND EXHAUST AREAS ARE STILL WARM. 24 TRACTOR Remove mower from tractor for 30 days or more. sand lightly before storing in any enclosure. Do not use engine or carburetor cleaner products in the fuel.... • Be sure that does not retain moisture. BATTERY • Fully charge the battery for storage. • After a period of time in the Mainte- When mower is removed from tractor for damage, breakage and wear.

User Manual
Page 25
... and carburetor, refill tank with fresh gasoline and replace fuel filter. 10. Hard to start 1. Engine valves out of mower housing. 4. Empty fuel tank and refill tank with fresh, clean gasoline. 9. Clutch/brake pedal not depressed. 2. Corroded battery ...6. Clean/replace air filter. 2. Attachment clutch is engaged. 3. Replace blade mandrel. 3. Carburetor out of grass, leaves and trash under mower. 4. Check/replace solenoid or starter. 9. Connect and tighten spark plug wire. 11. Recharge or replace battery. 4. Build-up of adjustment. 10...
... and carburetor, refill tank with fresh gasoline and replace fuel filter. 10. Hard to start 1. Engine valves out of mower housing. 4. Empty fuel tank and refill tank with fresh, clean gasoline. 9. Clutch/brake pedal not depressed. 2. Corroded battery ...6. Clean/replace air filter. 2. Attachment clutch is engaged. 3. Replace blade mandrel. 3. Carburetor out of grass, leaves and trash under mower. 4. Check/replace solenoid or starter. 9. Connect and tighten spark plug wire. 11. Recharge or replace battery. 4. Build-up of adjustment. 10...

User Manual
Page 26
.... Replace bulb(s) or lamp(s). 3. Replace blade. Level mower deck. 3. Mower blades will not charge 1. Replace idler pulley. 4. Clogged mower deck vent holes from buildup of grass, leaves, and trash under mower. 8. Place throttle control in clutch mechanism. 2. Shift to...slower speed. 3. Replace blade mandrel. Headlight(s) not working (if so equipped) 1. Wet grass. 4. Replace mower drive belt. 9. Faulty light switch. 4. Poor cut - Mower deck not level. 3. Light switch is shifted into reverse 1. Turn light switch "ON". 2. Check wiring ...
.... Replace bulb(s) or lamp(s). 3. Replace blade. Level mower deck. 3. Mower blades will not charge 1. Replace idler pulley. 4. Clogged mower deck vent holes from buildup of grass, leaves, and trash under mower. 8. Place throttle control in clutch mechanism. 2. Shift to...slower speed. 3. Replace blade mandrel. Headlight(s) not working (if so equipped) 1. Wet grass. 4. Replace mower drive belt. 9. Faulty light switch. 4. Poor cut - Mower deck not level. 3. Light switch is shifted into reverse 1. Turn light switch "ON". 2. Check wiring ...


