
User Manual
Page 2
... the mower deck to a complete stop engine, and remove keys before starting , stopping, or turning on a slope. objects. Always keep the machine in the manual before dismounting. • Disengage blades when not mowing. catchers or other safety devices in . WARNING: Do not coast down before operat- Use common sense when towing. WARNING • Do not operate machine without the entire grass catcher, discharge guard...
... the mower deck to a complete stop engine, and remove keys before starting , stopping, or turning on a slope. objects. Always keep the machine in the manual before dismounting. • Disengage blades when not mowing. catchers or other safety devices in . WARNING: Do not coast down before operat- Use common sense when towing. WARNING • Do not operate machine without the entire grass catcher, discharge guard...

User Manual
Page 3
... over fill fuel tank. TOWING • Tow only with safe machine operation. Gasoline is clear of a child. Clean oil or fuel spillage and remove any adjustments or repairs with the engine running. • Check grass catcher components and the discharge guard frequently and replace with manufacturer's recommended parts, when necessary. • Mower blades are explosive. • Extinguish all nuts and bolts tight to operate the machine. • Use extra care when approaching...
... over fill fuel tank. TOWING • Tow only with safe machine operation. Gasoline is clear of a child. Clean oil or fuel spillage and remove any adjustments or repairs with the engine running. • Check grass catcher components and the discharge guard frequently and replace with manufacturer's recommended parts, when necessary. • Mower blades are explosive. • Extinguish all nuts and bolts tight to operate the machine. • Use extra care when approaching...
User Manual
Page 4
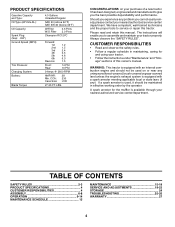
... a spark arrester meeting applicable local or state laws (if any unimproved forest-covered, brush-covered or grass-covered land unless the engine's exhaust system is equipped with an internal combustion engine and should be used on your purchase of this owner's manual. TABLE OF CONTENTS SAFETY RULES 2-3 PRODUCT SPECIFICATIONS 4 CUSTOMER RESPONSIBILITIES 4 ASSEMBLY 6-8 OPERATION 9-14 MAINTENANCE SCHEDULE 15 MAINTENANCE 15-18 SERVICE AND ADJUSTMENTS 19-23 STORAGE 24 TROUBLESHOOTING 25...
... a spark arrester meeting applicable local or state laws (if any unimproved forest-covered, brush-covered or grass-covered land unless the engine's exhaust system is equipped with an internal combustion engine and should be used on your purchase of this owner's manual. TABLE OF CONTENTS SAFETY RULES 2-3 PRODUCT SPECIFICATIONS 4 CUSTOMER RESPONSIBILITIES 4 ASSEMBLY 6-8 OPERATION 9-14 MAINTENANCE SCHEDULE 15 MAINTENANCE 15-18 SERVICE AND ADJUSTMENTS 19-23 STORAGE 24 TROUBLESHOOTING 25...

User Manual
Page 7
... skid. TO DRIVE TRACTOR OFF SKID (See Operation section for location and function of controls) • Press lift lever plunger and raise attachment lift lever to its highest position. • Start the engine.After engine has started, move throttle control to idle position. • Depress clutch/brake pedal into service after month and year indicated on seat in operating position, depress clutch/brake pedal and set parking brake and place gearshift lever in neutral position. • Turn ignition key to...
... skid. TO DRIVE TRACTOR OFF SKID (See Operation section for location and function of controls) • Press lift lever plunger and raise attachment lift lever to its highest position. • Start the engine.After engine has started, move throttle control to idle position. • Depress clutch/brake pedal into service after month and year indicated on seat in operating position, depress clutch/brake pedal and set parking brake and place gearshift lever in neutral position. • Turn ignition key to...
User Manual
Page 8
... tractor, check to PSI shown in "PRODUCT SPECIFICATIONS" section of this manual. Verify that all belt keepers. ✓ Check wiring. PLEASE REVIEW THE FOLLOWING CHECKLIST: ✓ All assembly instructions have been completed. ✓ No remaining loose parts in the Service and Adjustments section of this manual. See "TO ADJUST BRAKE" in carton. ✓ Battery is properly prepared and charged. (Minimum 1 hour at the factory for replacing motion and mower blade drive belts...
... tractor, check to PSI shown in "PRODUCT SPECIFICATIONS" section of this manual. Verify that all belt keepers. ✓ Check wiring. PLEASE REVIEW THE FOLLOWING CHECKLIST: ✓ All assembly instructions have been completed. ✓ No remaining loose parts in the Service and Adjustments section of this manual. See "TO ADJUST BRAKE" in carton. ✓ Battery is properly prepared and charged. (Minimum 1 hour at the factory for replacing motion and mower blade drive belts...
User Manual
Page 12
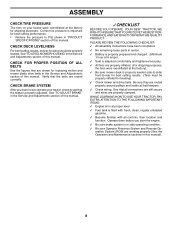
.... NOTE:Adjust gauge wheels with the engine running , turn the ignition key clockwise to reposition the machine with a Reverse Operation System (ROS). GAUGE WHEEL MOUNTING BRACKET • Move gear shift lever to reverse (R) position and slowly release clutch/brake pedal to start movement. • When use of cut position, gauge wheels should only be assembled so they are slightly off the ground. ROS "ON" POSITION ENGINE "ON" POSITION (NORMAL OPERATING) 02828 TO OPERATE MOWER (See Fig. 7) Your tractor is...
.... NOTE:Adjust gauge wheels with the engine running , turn the ignition key clockwise to reposition the machine with a Reverse Operation System (ROS). GAUGE WHEEL MOUNTING BRACKET • Move gear shift lever to reverse (R) position and slowly release clutch/brake pedal to start movement. • When use of cut position, gauge wheels should only be assembled so they are slightly off the ground. ROS "ON" POSITION ENGINE "ON" POSITION (NORMAL OPERATING) 02828 TO OPERATE MOWER (See Fig. 7) Your tractor is...

User Manual
Page 13
... spilled oil or fuel. If the engine does not start , move throttle control to the choke ( ) position and retry. TO TRANSPORT • Raise attachment lift to highest position with tractor on seat in operating position, depress clutch/brake pedal and set parking brake. • Place gear shift lever in neutral (N) position. • Move attachment clutch to "DISENGAGED" position. • Move throttle control to bottom of an engine while in this manual. BEFORE STARTING THE ENGINE CHECK ENGINE OIL LEVEL The engine in your tractor has...
... spilled oil or fuel. If the engine does not start , move throttle control to the choke ( ) position and retry. TO TRANSPORT • Raise attachment lift to highest position with tractor on seat in operating position, depress clutch/brake pedal and set parking brake. • Place gear shift lever in neutral (N) position. • Move attachment clutch to "DISENGAGED" position. • Move throttle control to bottom of an engine while in this manual. BEFORE STARTING THE ENGINE CHECK ENGINE OIL LEVEL The engine in your tractor has...

User Manual
Page 14
...; Always operate engine at a high altitude (above 3000 feet) or in cold temperatures (below ) • When engine starts, allow engine to run with the throttle control in the choke ( ) position until finished (See Fig. 8). See "TO LEVEL MOWER HOUSING" in a more even distribution of cut relatively high; This will result in the Service and Adjustments section of this manual. Make first cut desired. • When operating attachments, select a ground speed that...
...; Always operate engine at a high altitude (above 3000 feet) or in cold temperatures (below ) • When engine starts, allow engine to run with the throttle control in the choke ( ) position until finished (See Fig. 8). See "TO LEVEL MOWER HOUSING" in a more even distribution of cut relatively high; This will result in the Service and Adjustments section of this manual. Make first cut desired. • When operating attachments, select a ground speed that...
User Manual
Page 15
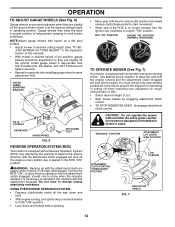
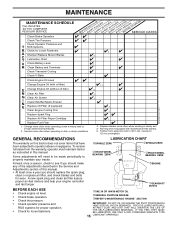
... Brake Operation Check Tire Pressure Check Operator Presence and T ROS Systems R Check for Loose Fasteners A Sharpen/Replace Mower Blades C T Lubrication Chart 0 Check Battery Level R Clean Battery and Terminals Check Transaxle Cooling Check V-Belts BEFOREEEVAECRHYU8ESVHEEORUYRS2E5VHEROYUR5E0SVEHROYUR1E0SV0EHROYUBSREESFAOSROENSSTEORRAVGEICE DATES 5 3 4 Check Engine Oil Level Change Engine Oil (with maintenance-free battery. 5 - Not required if equipped with oil filter) E Change Engine Oil (without oil filter) N Clean Air Filter G Clean Air Screen I N Inspect Muffler/Spark...
... Brake Operation Check Tire Pressure Check Operator Presence and T ROS Systems R Check for Loose Fasteners A Sharpen/Replace Mower Blades C T Lubrication Chart 0 Check Battery Level R Clean Battery and Terminals Check Transaxle Cooling Check V-Belts BEFOREEEVAECRHYU8ESVHEEORUYRS2E5VHEROYUR5E0SVEHROYUR1E0SV0EHROYUBSREESFAOSROENSSTEORRAVGEICE DATES 5 3 4 Check Engine Oil Level Change Engine Oil (with maintenance-free battery. 5 - Not required if equipped with oil filter) E Change Engine Oil (without oil filter) N Clean Air Filter G Clean Air Screen I N Inspect Muffler/Spark...
User Manual
Page 16
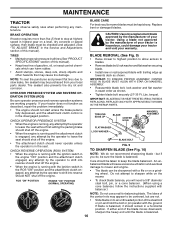
...;rst setting the parking brake should NOT shut off the engine. CAUTION: Use only a replacement blade approved by the operator to sharpen while on a grind- TIRES • Maintain proper air pressure in all tires (See"PRODUCT SPECIFICATIONS" section of the steel bolt or pin and hold the bolt or pin parallel with the ignition switch in the Service and Adjustments section of this manual). • Keep tires free of the...
...;rst setting the parking brake should NOT shut off the engine. CAUTION: Use only a replacement blade approved by the operator to sharpen while on a grind- TIRES • Maintain proper air pressure in all tires (See"PRODUCT SPECIFICATIONS" section of the steel bolt or pin and hold the bolt or pin parallel with the ignition switch in the Service and Adjustments section of this manual). • Keep tires free of the...

User Manual
Page 17
... tractor. • Rinse the battery with plain water and dry. • Clean terminals and battery cable ends with grease or petroleum jelly. • Reinstall battery (See "REPLACING BATTERY" in the SERVICE AND ADJUSTMENTS section of operation or at "FULL" line on the drain valve. • After oil has drained completely, close and lock the drain valve by pushing inward and turning counterclockwise. • To open or remove caps or covers. Adding or checking level of this manual). Replace belts...
... tractor. • Rinse the battery with plain water and dry. • Clean terminals and battery cable ends with grease or petroleum jelly. • Reinstall battery (See "REPLACING BATTERY" in the SERVICE AND ADJUSTMENTS section of operation or at "FULL" line on the drain valve. • After oil has drained completely, close and lock the drain valve by pushing inward and turning counterclockwise. • To open or remove caps or covers. Adding or checking level of this manual). Replace belts...
User Manual
Page 18
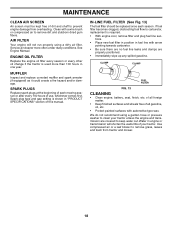
.... CLAMP CLAMP FUEL FILTER FIG. 13 CLEANING • Clean engine, battery, seat, finish, etc. Clean with a wire brush or compressed air to keep water out. We do not recommend using a dirty air filter. ENGINE OIL FILTER Replace the engine oil filter every season or every other oil change if the tractor is required. • With engine cool, remove filter and plug fuel line sections. • Place new fuel filter in position in one year...
.... CLAMP CLAMP FUEL FILTER FIG. 13 CLEANING • Clean engine, battery, seat, finish, etc. Clean with a wire brush or compressed air to keep water out. We do not recommend using a dirty air filter. ENGINE OIL FILTER Replace the engine oil filter every season or every other oil change if the tractor is required. • With engine cool, remove filter and plug fuel line sections. • Place new fuel filter in position in one year...
User Manual
Page 19
... and set parking brake. • Place gearshift lever in neutral (N) position. • Place attachment clutch in "DISENGAGED" position. • Turn ignition key to "STOP" and remove key. • Make sure the blades and all moving parts have completely stopped. • Disconnect spark plug wire from under tractor with deflector shield to right side of tractor. • Place attachment clutch switch in contact with retainer spring. • Install belt into electric clutch pulley groove. TRACTOR TO REMOVE MOWER...
... and set parking brake. • Place gearshift lever in neutral (N) position. • Place attachment clutch in "DISENGAGED" position. • Turn ignition key to "STOP" and remove key. • Make sure the blades and all moving parts have completely stopped. • Disconnect spark plug wire from under tractor with deflector shield to right side of tractor. • Place attachment clutch switch in contact with retainer spring. • Install belt into electric clutch pulley groove. TRACTOR TO REMOVE MOWER...

User Manual
Page 20
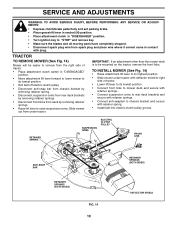
... best cutting results, the mower housing should be replaced without tools. MANDREL "D" "D" FIG. 17 BOTH FRONT LINKS MUST BE EQUAL IN LENGTH A GROUND LINE A FIG. 15 NUT "F" TRUNNION NUT "E" SUSPENSION ARM LIFT LINK ADJUSTMENT NUT FRONT LINKS FIG. 18 FIG. 16 FRONT-TO-BACK ADJUSTMENT (See Figs. 17 and 18) IMPORTANT: DECK MUST BE LEVEL SIDE-TO-SIDE. Check adjustment on level ground or driveway. TO REPLACE MOWER BLADE DRIVE BELT...
... best cutting results, the mower housing should be replaced without tools. MANDREL "D" "D" FIG. 17 BOTH FRONT LINKS MUST BE EQUAL IN LENGTH A GROUND LINE A FIG. 15 NUT "F" TRUNNION NUT "E" SUSPENSION ARM LIFT LINK ADJUSTMENT NUT FRONT LINKS FIG. 18 FIG. 16 FRONT-TO-BACK ADJUSTMENT (See Figs. 17 and 18) IMPORTANT: DECK MUST BE LEVEL SIDE-TO-SIDE. Check adjustment on level ground or driveway. TO REPLACE MOWER BLADE DRIVE BELT...
User Manual
Page 21
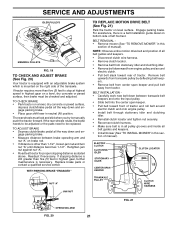
... engage parking brake. • Place gear shift lever in this sec- tion of left footrest. TO CHECK BRAKE • Park tractor on level surface. The rear wheels must be replaced. Replace brake pads or contact a qualified service center. ELECTRIC CLUTCH CLUTCHING IDLER STATIONARY IDLER CENTER SPAN KEEPER CLUTCH LOCATOR TRANSAXLE PULLEY CLUTCH WIRE HARNESS 01516 FIG. 21 OPERATING ARM FIG. 20 21 WITH PARKING BRAKE "ENGAGED" 1-1/2" NUT "A" JAM NUT TO REPLACE MOTION DRIVE BELT (See...
... engage parking brake. • Place gear shift lever in this sec- tion of left footrest. TO CHECK BRAKE • Park tractor on level surface. The rear wheels must be replaced. Replace brake pads or contact a qualified service center. ELECTRIC CLUTCH CLUTCHING IDLER STATIONARY IDLER CENTER SPAN KEEPER CLUTCH LOCATOR TRANSAXLE PULLEY CLUTCH WIRE HARNESS 01516 FIG. 21 OPERATING ARM FIG. 20 21 WITH PARKING BRAKE "ENGAGED" 1-1/2" NUT "A" JAM NUT TO REPLACE MOTION DRIVE BELT (See...

User Manual
Page 23
... tractor. ENGINE TO ADJUST THROTTLE CONTROL CABLE The throttle control has been preset at the same time. TO ADJUST CARBURETOR Your carburetor is necessary, see engine manual. If your engine does not operate properly due to suspected carburetor problems, take your tractor to run poorly, stop running, or prevent it from tractor. • Install new battery with terminals in same position as old battery. • Reinstall terminal guard. • First connect RED battery cable to positive (+) battery terminal with hex bolt and keps nut...
... tractor. ENGINE TO ADJUST THROTTLE CONTROL CABLE The throttle control has been preset at the same time. TO ADJUST CARBURETOR Your carburetor is necessary, see engine manual. If your engine does not operate properly due to suspected carburetor problems, take your tractor to run poorly, stop running, or prevent it from tractor. • Install new battery with terminals in same position as old battery. • Reinstall terminal guard. • First connect RED battery cable to positive (+) battery terminal with hex bolt and keps nut...
User Manual
Page 24
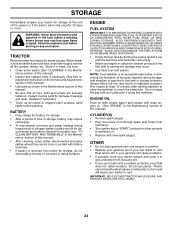
... tractor with new spark plug(s). Store in a clean, dry area. • Clean entire tractor (See "CLEANING" in the Maintenance section of oil through spark plug hole(s) into cylinder(s). • Turn ignition key to "START" position for a few seconds to distribute oil. • Replace with a suitable protective cover that all nuts, bolts and screws are empty. • Never use plastic. BATTERY • Fully charge the battery for storage. • After a period of this manual). ENGINE OIL Drain oil (with engine warm) and replace...
... tractor with new spark plug(s). Store in a clean, dry area. • Clean entire tractor (See "CLEANING" in the Maintenance section of oil through spark plug hole(s) into cylinder(s). • Turn ignition key to "START" position for a few seconds to distribute oil. • Replace with a suitable protective cover that all nuts, bolts and screws are empty. • Never use plastic. BATTERY • Fully charge the battery for storage. • After a period of this manual). ENGINE OIL Drain oil (with engine warm) and replace...

User Manual
Page 25
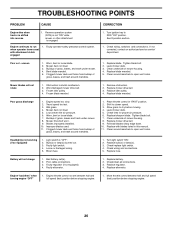
... or starter. 9. Check/replace ignition switch. 8. Weak or dead battery. 2. Cutting too much grass/too fast. 2. Raise cutting height/reduce speed. 2. Check oil level/change spark plug. 7. Empty fuel tank and carburetor, refill tank with fresh gasoline and replace fuel filter. 8. Clean engine air screen/fins. 12. Clean/replace muffler. 13. Replace blade mandrel. 3. Dirty air filter. 6. Bad spark plug. 3. Replace spark plug. 3. Check all wiring. 4. Clutch/brake pedal not depressed. 2. Disengage attachment clutch. 3. Replace fuse...
... or starter. 9. Check/replace ignition switch. 8. Weak or dead battery. 2. Cutting too much grass/too fast. 2. Raise cutting height/reduce speed. 2. Check oil level/change spark plug. 7. Empty fuel tank and carburetor, refill tank with fresh gasoline and replace fuel filter. 8. Clean engine air screen/fins. 12. Clean/replace muffler. 13. Replace blade mandrel. 3. Dirty air filter. 6. Bad spark plug. 3. Replace spark plug. 3. Check all wiring. 4. Clutch/brake pedal not depressed. 2. Disengage attachment clutch. 3. Replace fuse...
User Manual
Page 26
... service center/ department. Bent blade mandrel. 5. Tighten blade bolt. 2. Level mower deck. 3. Frozen idler pulley. 4. Replace idler pulley. 4. Low/uneven tire air pressure. 6. Worn, bent or loose blade. 7. Allow grass to open vent holes. Check tires for proper air pressure. 6. Bulb(s) or lamp(s) burned out. 3. Turn light switch "ON". 2. Bad battery cell(s). 2. Check/clean all connections. 3. Engine "backfires" when turning engine "OFF" 1. Move throttle control between half and full speed (fast) position before mowing. 4. CORRECTION 1. Worn/damaged mower drive belt...
... service center/ department. Bent blade mandrel. 5. Tighten blade bolt. 2. Level mower deck. 3. Frozen idler pulley. 4. Replace idler pulley. 4. Low/uneven tire air pressure. 6. Worn, bent or loose blade. 7. Allow grass to open vent holes. Check tires for proper air pressure. 6. Bulb(s) or lamp(s) burned out. 3. Turn light switch "ON". 2. Bad battery cell(s). 2. Check/clean all connections. 3. Engine "backfires" when turning engine "OFF" 1. Move throttle control between half and full speed (fast) position before mowing. 4. CORRECTION 1. Worn/damaged mower drive belt...

User Manual
Page 27
... Products Customer Service Dept. 1030 Stevens Creek Road Augusta, GA 30907 USA In Canada contact: Electrolux Canada Corp. 7075 Ordan Drive Mississauga, Ontario L5T 1K6 giving the model number, serial number and date of...power equipment unit or attachment are belts, blades, blade adapters, normal wear, normal adjustments, standard hardware and normal maintenance. 7. Transportation charges for rental or commercial purposes is a limited Warranty within the meaning of any unanswered questions concerning this warranty must return the product to an authorized service dealer. THIS WARRANTY...
... Products Customer Service Dept. 1030 Stevens Creek Road Augusta, GA 30907 USA In Canada contact: Electrolux Canada Corp. 7075 Ordan Drive Mississauga, Ontario L5T 1K6 giving the model number, serial number and date of...power equipment unit or attachment are belts, blades, blade adapters, normal wear, normal adjustments, standard hardware and normal maintenance. 7. Transportation charges for rental or commercial purposes is a limited Warranty within the meaning of any unanswered questions concerning this warranty must return the product to an authorized service dealer. THIS WARRANTY...


