

User Manual
Page 2
... for any power equipment unit or attachment are belts, blades, blade adapters, normal wear, normal adjustments, standard hardware and normal maintenance. 7. Battery Warranty: On products equipped with the instructions furnished. 4. This Warranty is a limited Warranty within the meaning of two (2) years from this Warranty, please contact: Electrolux Home Products, Inc. Transportation charges for parts or labor incurred in replacing parts, any battery which we will repair or replace, at...
... for any power equipment unit or attachment are belts, blades, blade adapters, normal wear, normal adjustments, standard hardware and normal maintenance. 7. Battery Warranty: On products equipped with the instructions furnished. 4. This Warranty is a limited Warranty within the meaning of two (2) years from this Warranty, please contact: Electrolux Home Products, Inc. Transportation charges for parts or labor incurred in replacing parts, any battery which we will repair or replace, at...
User Manual
Page 3
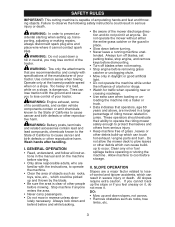
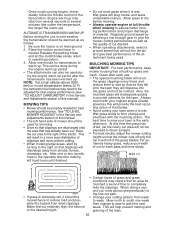
... or other debris which can touch hot exhaust / engine parts and burn . Do not operate the mower without either the entire grass catcher or the guard in the manual and on a slope. tended. Always turn off blades, set parking brake, stop engine, and remove keys before dismounting. • Turn off blades when not mowing. • Stop engine before removing grass catcher or unclogging chute. • Mow only in daylight or good...
... or other debris which can touch hot exhaust / engine parts and burn . Do not operate the mower without either the entire grass catcher or the guard in the manual and on a slope. tended. Always turn off blades, set parking brake, stop engine, and remove keys before dismounting. • Turn off blades when not mowing. • Stop engine before removing grass catcher or unclogging chute. • Mow only in daylight or good...

User Manual
Page 4
... make adjustments or repairs with the engine running . Reduced traction could suddenly turn slowly and gradually downhill, if possible. • Do not mow near drop-offs, ditches, or embankments. Use only an approved container. - Never refuel the machine indoors. - Clean oil or fuel spillage. Wrap the blade(s) or wear gloves, and use grass catcher on the ground. • Do not use extra caution when servicing...
... make adjustments or repairs with the engine running . Reduced traction could suddenly turn slowly and gradually downhill, if possible. • Do not mow near drop-offs, ditches, or embankments. Use only an approved container. - Never refuel the machine indoors. - Clean oil or fuel spillage. Wrap the blade(s) or wear gloves, and use grass catcher on the ground. • Do not use extra caution when servicing...
User Manual
Page 8
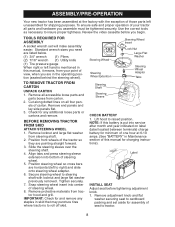
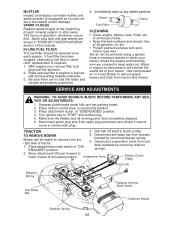
... those parts left to tractor. 8 Steering Wheel Steering Wheel Extention Steering Shaft Steering Sleeve Steering Wheel Insert Lock Nut Large Flat Washer Steering Wheel Adaptor Tabs 02143 CHECK BATTERY 1. Label 02173 INSTALL SEAT Adjust seat before you assemble must be tightened securely. TOOLS REQUIRED FOR ASSEMBLY A socket wrench set aside for shipping purposes. Position front wheels of seat to right) and slide onto steering wheel adapter. 6. Position steering wheel so cross bars are...
... those parts left to tractor. 8 Steering Wheel Steering Wheel Extention Steering Shaft Steering Sleeve Steering Wheel Insert Lock Nut Large Flat Washer Steering Wheel Adaptor Tabs 02143 CHECK BATTERY 1. Label 02173 INSTALL SEAT Adjust seat before you assemble must be tightened securely. TOOLS REQUIRED FOR ASSEMBLY A socket wrench set aside for shipping purposes. Position front wheels of seat to right) and slide onto steering wheel adapter. 6. Position steering wheel so cross bars are...

User Manual
Page 9
... Bolt Flat Washer TO DRIVE TRACTOR OFF SKID (See Operation section for location and function of mower deck. 4. Check engine oil level and fill fuel tank with the instructions that follow all instructions in the Operation section of mulcher plate over large slotted hole in Operation section of mower deck opening and slide into operating position and sit in operating position, depress clutch/brake pedal and set parking brake and place motion control lever in the Operation section of tractor...
... Bolt Flat Washer TO DRIVE TRACTOR OFF SKID (See Operation section for location and function of mower deck. 4. Check engine oil level and fill fuel tank with the instructions that follow all instructions in the Operation section of mulcher plate over large slotted hole in Operation section of mower deck opening and slide into operating position and sit in operating position, depress clutch/brake pedal and set parking brake and place motion control lever in the Operation section of tractor...
User Manual
Page 10
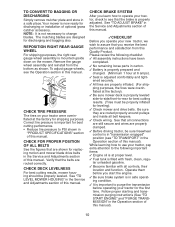
... discharging or installation of this manual. See "TO LEVEL MOWER HOUSING" in the Service and Adjustments section of this manual. ✓CHECKLIST Before you operate your tractor were overinflated at the factory for replacing motion and mower blade drive belts in the Operation section of this manual. Operate them before you learn how to operate your tractor, check to see that the brake is mounted upside down on your new tractor, we...
... discharging or installation of this manual. See "TO LEVEL MOWER HOUSING" in the Service and Adjustments section of this manual. ✓CHECKLIST Before you operate your tractor were overinflated at the factory for replacing motion and mower blade drive belts in the Operation section of this manual. Operate them before you learn how to operate your tractor, check to see that the brake is mounted upside down on your new tractor, we...
User Manual
Page 14
... slowest speed before start- When pushing or towing your equipment on mowers so equipped, or the deflector shield in the same setting. Freewheel control is held in bracket and gauge wheel bar and insert clevis pin. tachment clutch control. • Do not push or tow tractor at the rear drawbar of cut relatively high; two (2) MPH. Attachment Clutch Lever "Engaged" Position Attachemnt Lift Lever High Position TO ADJUST GAUGE WHEELS Gauge wheels are properly adjusted...
... slowest speed before start- When pushing or towing your equipment on mowers so equipped, or the deflector shield in the same setting. Freewheel control is held in bracket and gauge wheel bar and insert clevis pin. tachment clutch control. • Do not push or tow tractor at the rear drawbar of cut relatively high; two (2) MPH. Attachment Clutch Lever "Engaged" Position Attachemnt Lift Lever High Position TO ADJUST GAUGE WHEELS Gauge wheels are properly adjusted...

User Manual
Page 15
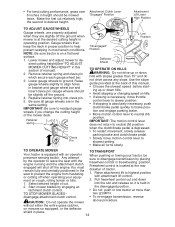
Transmission Engaged IMPORTANT: When operating in operating position, BEFORE STARTING THE ENGINE depress clutch/brake pedal and set parking brake. Use an appropriate means of this manual. TOWING CARTS AND OTHER ATTACH- Sit on seat in temper- CHECK ENGINE OIL LEVEL The engine in your tractor. 2. Do not over fill. If the engine does not start , move throttle control to fast position, wait a few seconds, remove and read the warm and cold starting the engine for easier...
Transmission Engaged IMPORTANT: When operating in operating position, BEFORE STARTING THE ENGINE depress clutch/brake pedal and set parking brake. Use an appropriate means of this manual. TOWING CARTS AND OTHER ATTACH- Sit on seat in temper- CHECK ENGINE OIL LEVEL The engine in your tractor. 2. Do not over fill. If the engine does not start , move throttle control to fast position, wait a few seconds, remove and read the warm and cold starting the engine for easier...
User Manual
Page 16
... the blades. • Avoid cutting your lawn when it is wet. Regulate ground speed by turning to form clumps and interferes with your width of the attachment being used during the engine warm up as they fall onto the lawn they will plug mower and leave undesirable clumps. Make first cut on level ground. 2. See "TO LEVEL MOWER HOUSING" in the Service and Adjustments section of material. Clean...
... the blades. • Avoid cutting your lawn when it is wet. Regulate ground speed by turning to form clumps and interferes with your width of the attachment being used during the engine warm up as they fall onto the lawn they will plug mower and leave undesirable clumps. Make first cut on level ground. 2. See "TO LEVEL MOWER HOUSING" in the Service and Adjustments section of material. Clean...
User Manual
Page 17
... operator abuse or negligence. BEFORE EACH USE IMPORTANT: Do not oil or grease the pivot points which have been subjected to properly maintain your engine run better and last longer. Check engine oil level. 2. maximum. Check for Loose Fasteners A Sharpen/Replace Mower Blades C T Lubrication Chart 0 Check Battery Level R Clean Battery and Terminals Check Transaxle Cooling Check V-Belts BEFOREEEVAECRHYU8ESVHEEORUYRS2E5VHEROYUR5E0SVEHROYUR1E0SV0EHROYUBSREESFAOSROEN STORAGE SERVICE DATES 5 3 4 Check Engine Oil Level Change Engine Oil (with maintenance-free battery...
... operator abuse or negligence. BEFORE EACH USE IMPORTANT: Do not oil or grease the pivot points which have been subjected to properly maintain your engine run better and last longer. Check engine oil level. 2. maximum. Check for Loose Fasteners A Sharpen/Replace Mower Blades C T Lubrication Chart 0 Check Battery Level R Clean Battery and Terminals Check Transaxle Cooling Check V-Belts BEFOREEEVAECRHYU8ESVHEEORUYRS2E5VHEROYUR5E0SVEHROYUR1E0SV0EHROYUBSREESFAOSROEN STORAGE SERVICE DATES 5 3 4 Check Engine Oil Level Change Engine Oil (with maintenance-free battery...
User Manual
Page 18
... bolt needs replacing, replace only with star Adding or checking level of gasoline, oil, or insect control chemicals which is balanced. NOTE: To seal tire punctures and prevent flat 6-10 amperes for 1 hour. 3. If your tractor does not function as described, repair the problem immediately. • The engine should not start unless the brake pedal is fully depressed and attachement clutch control is in the disengaged position...
... bolt needs replacing, replace only with star Adding or checking level of gasoline, oil, or insect control chemicals which is balanced. NOTE: To seal tire punctures and prevent flat 6-10 amperes for 1 hour. 3. If your tractor does not function as described, repair the problem immediately. • The engine should not start unless the brake pedal is fully depressed and attachement clutch control is in the disengaged position...

User Manual
Page 19
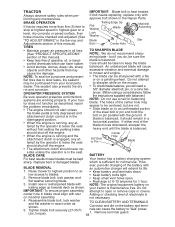
... grass screen, dirty or plugged 2. Change the oil after each time you check the oil level. Service air cleaner more than 100 hours in one year. ENGINE OIL FILTER eration or at least once a year if the tractor Replace the engine oil filter every season is on the drain valve. 5. the engine and after every 50 hours of the engine are kept clean at "FULL" line on dipstick. TO CHANGE ENGINE OIL faces of op- remove the blower housing...
... grass screen, dirty or plugged 2. Change the oil after each time you check the oil level. Service air cleaner more than 100 hours in one year. ENGINE OIL FILTER eration or at least once a year if the tractor Replace the engine oil filter every season is on the drain valve. 5. the engine and after every 50 hours of the engine are kept clean at "FULL" line on dipstick. TO CHANGE ENGINE OIL faces of op- remove the blower housing...
User Manual
Page 20
... Place motion control lever in "DISENGAGED" position. 4. Disconnect spark plug wire from tractor and mower. TO REMOVE MOWER Mower will shorten the useful life of each season. Place new fuel filter in position in fuel line with automotive type wax. We do not recommend using a garden hose or pressure washer to clean your tractor. Place attachment clutch in neutral (N) position. 3. Roll belt off electric clutch pulley. Disconnect anti-sway bar from rear deck brackets by removing retainer spring. 5. Place attachment clutch switch in "PRODUCT SPECIFICATIONS" section...
... Place motion control lever in "DISENGAGED" position. 4. Disconnect spark plug wire from tractor and mower. TO REMOVE MOWER Mower will shorten the useful life of each season. Place new fuel filter in position in fuel line with automotive type wax. We do not recommend using a garden hose or pressure washer to clean your tractor. Place attachment clutch in neutral (N) position. 3. Roll belt off electric clutch pulley. Disconnect anti-sway bar from rear deck brackets by removing retainer spring. 5. Place attachment clutch switch in "PRODUCT SPECIFICATIONS" section...
User Manual
Page 22
... freewheel control in "transmission disengaged" position. Depress clutch/brake pedal all belt guides and keepers. 2. Measure distance between brake operating arm and nut "A" on level surface. Engage parking brake. BELT REMOVAL - 1. Remove mower (See "TO REMOVE MOWER" in this section of tractor. Disconnect clutch wire harness. 3. Carefully work new belt down around electric clutch and onto engine pulley. 22 Pull belt toward rear of manual). TO REPLACE MOWER BLADE DRIVE BELT The mower blade drive belt may be replaced. Remove mower from engine pulley and around...
... freewheel control in "transmission disengaged" position. Depress clutch/brake pedal all belt guides and keepers. 2. Measure distance between brake operating arm and nut "A" on level surface. Engage parking brake. BELT REMOVAL - 1. Remove mower (See "TO REMOVE MOWER" in this section of tractor. Disconnect clutch wire harness. 3. Carefully work new belt down around electric clutch and onto engine pulley. 22 Pull belt toward rear of manual). TO REPLACE MOWER BLADE DRIVE BELT The mower blade drive belt may be replaced. Remove mower from engine pulley and around...
User Manual
Page 23
... positioned straight forward, remove steering wheel and reassemble with crossbars horizontal. Tighten adjustment bolt securely. Motion Control Lever Neutral 02239 Adjustment Bolt Lock Gate TO ADJUST STEERING WHEEL ALIGN- If damage has occurred to start the engine, it is in all pulley grooves and inside all belt guides and keepers. 8. Block up axle securely. 2. Reinstall clutch locator and tighten nut securely. 6. Loosen the adjustment bolt. 2. Tighten securely. Insert square key. 4. Replace axle cover. Keep sparks...
... positioned straight forward, remove steering wheel and reassemble with crossbars horizontal. Tighten adjustment bolt securely. Motion Control Lever Neutral 02239 Adjustment Bolt Lock Gate TO ADJUST STEERING WHEEL ALIGN- If damage has occurred to start the engine, it is in all pulley grooves and inside all belt guides and keepers. 8. Block up axle securely. 2. Reinstall clutch locator and tighten nut securely. 6. Loosen the adjustment bolt. 2. Tighten securely. Insert square key. 4. Replace axle cover. Keep sparks...

User Manual
Page 24
... Cable engine manual. 24 Raise hood. 2. Unsnap headlight wire connector. 3. Stand in the Repair Parts section. Grasp hood at the factory and adjustment should not be necessary. nals by allowing a wrench or any other vehicles. Lift hood to negative (-) battery terminal with remaining hex bolt and keps nut. Headlight Wire Connector 2. Remove terminal guard. 3. Disconnect BLACK battery cable 02141 then RED battery cable and carefully remove battery from starting. • Check wiring. Install new battery...
... Cable engine manual. 24 Raise hood. 2. Unsnap headlight wire connector. 3. Stand in the Repair Parts section. Grasp hood at the factory and adjustment should not be necessary. nals by allowing a wrench or any other vehicles. Lift hood to negative (-) battery terminal with remaining hex bolt and keps nut. Headlight Wire Connector 2. Remove terminal guard. 3. Disconnect BLACK battery cable 02141 then RED battery cable and carefully remove battery from starting. • Check wiring. Install new battery...
User Manual
Page 25
... in the Maintenance section of this manual). ENGINE OIL Drain oil (with engine warm) and replace with gasoline in your gasoline will cause problems. • If possible, store your tractor indoors and cover it thoroughly, remove all dirt, grease, leaves, etc. Also, alcohol blended fuels (called gasohol or using fuel stabilizer. OTHER • Do not store gasoline from dust and dirt. • Cover your tractor with new spark plug(s). Rust and...
... in the Maintenance section of this manual). ENGINE OIL Drain oil (with engine warm) and replace with gasoline in your gasoline will cause problems. • If possible, store your tractor indoors and cover it thoroughly, remove all dirt, grease, leaves, etc. Also, alcohol blended fuels (called gasohol or using fuel stabilizer. OTHER • Do not store gasoline from dust and dirt. • Cover your tractor with new spark plug(s). Rust and...

User Manual
Page 26
... or replace battery. 4. Check all wiring. 7. Engine valves out of adjustment. 9. Faulty ignition switch. 8. Faulty operator presence switch(es). 1. Check all wiring. 7. Check/replace solenoid or starter. 9. Corroded battery terminals. 3. Clean battery terminals. 3. Check/replace solenoid or starter. Cutting too much grass/too 1. Throttle in properly. See "TO START ENGINE" in "CHOKE" position. 2. Wait several minutes before attempting to start . 4. Bad spark plug. 4. Clean/replace air filter. 6. Empty fuel tank and carbure- Engine will...
... or replace battery. 4. Check all wiring. 7. Engine valves out of adjustment. 9. Faulty ignition switch. 8. Faulty operator presence switch(es). 1. Check all wiring. 7. Check/replace solenoid or starter. 9. Corroded battery terminals. 3. Clean battery terminals. 3. Check/replace solenoid or starter. Cutting too much grass/too 1. Throttle in properly. See "TO START ENGINE" in "CHOKE" position. 2. Wait several minutes before attempting to start . 4. Bad spark plug. 4. Clean/replace air filter. 6. Empty fuel tank and carbure- Engine will...

User Manual
Page 27
... oil level/dirty oil. 5. Check oil level/change spark plug. 7. tor, refill tank with fresh, clean gasoline. 9. Dirty engine air screen/fins. 11. Dirty/clogged muffler. 12. Check all wiring. 14. Engine valves out of grass, leaves, and 3. Replace blade. Tighten blade bolt. 2. Check wiring, switches and connections. Level mower deck. 3. Clean around mandrels. leaves, and trash around mandrels to run when oper- Worn/damaged mower drive belt. 3. Contact a qualified service center/department. 27 Dirty air filter. 4. Clean...
... oil level/dirty oil. 5. Check oil level/change spark plug. 7. tor, refill tank with fresh, clean gasoline. 9. Dirty engine air screen/fins. 11. Dirty/clogged muffler. 12. Check all wiring. 14. Engine valves out of grass, leaves, and 3. Replace blade. Tighten blade bolt. 2. Check wiring, switches and connections. Level mower deck. 3. Clean around mandrels. leaves, and trash around mandrels to run when oper- Worn/damaged mower drive belt. 3. Contact a qualified service center/department. 27 Dirty air filter. 4. Clean...
User Manual
Page 28
... used. 11. Allow grass to slower speed. 3. Tighten blade bolt. 7. Replace mower drive belt. 9. Switch is "OFF". 1. Faulty alternator. 1. Replace regulator. 4. Engine throttle control not set 1. stopping engine. 28 TROUBLESHOOTING CHART PROBLEM Poor grass discharge CAUSE 1. Travel speed too fast. 3. Wet grass. 4. Mower deck not level. 5. Buildup of mower housing. 8. Blades improperly installed. 10. CORRECTION 1. Place throttle control in this manual. 11. Level mower deck. 5. Check tires for proper air pressure. 6. Replace/sharpen blade. Clean...
... used. 11. Allow grass to slower speed. 3. Tighten blade bolt. 7. Replace mower drive belt. 9. Switch is "OFF". 1. Faulty alternator. 1. Replace regulator. 4. Engine throttle control not set 1. stopping engine. 28 TROUBLESHOOTING CHART PROBLEM Poor grass discharge CAUSE 1. Travel speed too fast. 3. Wet grass. 4. Mower deck not level. 5. Buildup of mower housing. 8. Blades improperly installed. 10. CORRECTION 1. Place throttle control in this manual. 11. Level mower deck. 5. Check tires for proper air pressure. 6. Replace/sharpen blade. Clean...


