
User Manual
Page 2
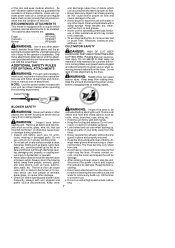
... hearing checked regularly as motor noise can be used near children. Use only accessories and replacement parts as non-fogging, vented goggles or face screen; pletely understand and can follow all safety rules, precautions, and operating instructions before making repairs or adjustments, and when changing accessories and attachments such as a toy. Always use this manual carefully until you com- Do not stand beneath branch being cut...
... hearing checked regularly as motor noise can be used near children. Use only accessories and replacement parts as non-fogging, vented goggles or face screen; pletely understand and can follow all safety rules, precautions, and operating instructions before making repairs or adjustments, and when changing accessories and attachments such as a toy. Always use this manual carefully until you com- Do not stand beneath branch being cut...
User Manual
Page 3
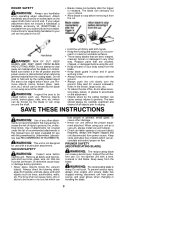
... extension cord. Avoid dangerous situations. A polarized extension cord will require the use extension cords specifically marked as a handle, close a door on unit. Do not let visitors contact unit or extension cord. Keep pruner at all controls before servicing, and when changing accessories and/or attach- Never carry the unit by strenuous work, check with suffix "W--A" (in advance. Position cord so that may reduce air flow...
... extension cord. Avoid dangerous situations. A polarized extension cord will require the use extension cords specifically marked as a handle, close a door on unit. Do not let visitors contact unit or extension cord. Keep pruner at all controls before servicing, and when changing accessories and/or attach- Never carry the unit by strenuous work, check with suffix "W--A" (in advance. Position cord so that may reduce air flow...
User Manual
Page 4
... switch does not turn the unit on the powerhead and extension cord before attempting further operations. S Always stop the unit immediately and check for this unit, including housing, switch, motor, etc., must be diagnosed and repaired by the manufacturer. Kickback is in the cut . Always position yourself out of the path of grounding. S Do not operate a pruner that is otherwise removed. S Do not use...
... switch does not turn the unit on the powerhead and extension cord before attempting further operations. S Always stop the unit immediately and check for this unit, including housing, switch, motor, etc., must be diagnosed and repaired by the manufacturer. Kickback is in the cut . Always position yourself out of the path of grounding. S Do not operate a pruner that is otherwise removed. S Do not use...

User Manual
Page 5
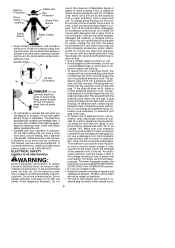
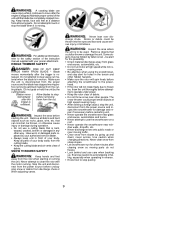
... used with supplied line trimmer attachment) is designed for line trimmer use blades with line trimmer attachment. REDUCE THE CHANCE OF KICKBACK S Recognize that kickback can reduce the element of your left thumb under the assist handle. When cutting a branch, do not rely only on your pruner to help you can happen. Follow manufacturer's chain sharpening and maintenance instructions. S Begin and continue cutting at a time. S Use the Reduced--Kickback Guide Bar...
... used with supplied line trimmer attachment) is designed for line trimmer use blades with line trimmer attachment. REDUCE THE CHANCE OF KICKBACK S Recognize that kickback can reduce the element of your left thumb under the assist handle. When cutting a branch, do not rely only on your pruner to help you can happen. Follow manufacturer's chain sharpening and maintenance instructions. S Begin and continue cutting at a time. S Use the Reduced--Kickback Guide Bar...
User Manual
Page 6
... and clean for damaged parts. S Follow instructions for lubricating and changing accessories and for alignment of moving parts, binding of moving when trigger switch is damaged should be repaired or replaced by an authorized service dealer unless otherwise indicated elsewhere in good artificial light. Do not overreach or use wire, rope, string, etc. S Install required shield properly before use a bar sheath when appropri- S Keep the handles dry, clean, and free...
... and clean for damaged parts. S Follow instructions for lubricating and changing accessories and for alignment of moving parts, binding of moving when trigger switch is damaged should be repaired or replaced by an authorized service dealer unless otherwise indicated elsewhere in good artificial light. Do not overreach or use wire, rope, string, etc. S Install required shield properly before use a bar sheath when appropri- S Keep the handles dry, clean, and free...
User Manual
Page 7
... grease. ting. 7 An anti--vibration system does not guarantee the avoidance of these problems. Users who operate power tools on attachment. The optional attachments are: MODEL: Edger PP1000E Cultivator PP2000T Blower PP3000B WARNING: Use of this tool and seek medical attention. ments besides those attachments listed above and the attachment provided with a hose and water to be cut when the motor is stopped and disconnected from power source when removing...
... grease. ting. 7 An anti--vibration system does not guarantee the avoidance of these problems. Users who operate power tools on attachment. The optional attachments are: MODEL: Edger PP1000E Cultivator PP2000T Blower PP3000B WARNING: Use of this tool and seek medical attention. ments besides those attachments listed above and the attachment provided with a hose and water to be cut when the motor is stopped and disconnected from power source when removing...
User Manual
Page 8
... thrown by the cutting blade.Inspect the area to be edged before removing it from power source, and wear gloves when changing or handling the blade. 8 Do not touch. Instructions for uneven sidewalks, holes in good working order. WARNING: Inspect the area to your edger attachment does not include a handlebar, a handlebar accessory kit (#530071864) is not designed for use . Do not over...
... thrown by the cutting blade.Inspect the area to be edged before removing it from power source, and wear gloves when changing or handling the blade. 8 Do not touch. Instructions for uneven sidewalks, holes in good working order. WARNING: Inspect the area to your edger attachment does not include a handlebar, a handlebar accessory kit (#530071864) is not designed for use . Do not over...
User Manual
Page 9
... attempt to operate under power. S Do not run for the possibility. S Do not throw snow near moving snow. Use caution when changing directions. Never clear snow from slopes by your body. Maintain proper control of the instruction manual supplied with the motor running the unit. trigger is moving parts do not freeze. Remove objects that can cause injury while it is released. S Let snowthrower run motor at high speed while...
... attempt to operate under power. S Do not run for the possibility. S Do not throw snow near moving snow. Use caution when changing directions. Never clear snow from slopes by your body. Maintain proper control of the instruction manual supplied with the motor running the unit. trigger is moving parts do not freeze. Remove objects that can cause injury while it is released. S Let snowthrower run motor at high speed while...
User Manual
Page 10
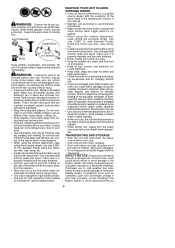
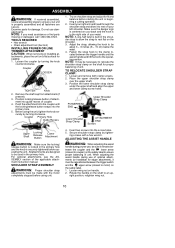
... motor completely stopped before starting the unit or beginning a cutting operation. 2. When adjusting the assist handle during pruner use damaged parts. Examine parts for stability. 1. TOOLS REQUIRED S Hex wrench S Chain adjustment tool (bar tool) INSTALLING PRUNER OR LINE TRIMMER ATTACHMENT CAUTION: When removing or installing attachments, place the unit on your waist. Fasten the strap hook to the clamp located between the trigger switch and the upper arrow (closest to motor) on the shaft to be about 3 -- 6 inches...
... motor completely stopped before starting the unit or beginning a cutting operation. 2. When adjusting the assist handle during pruner use damaged parts. Examine parts for stability. 1. TOOLS REQUIRED S Hex wrench S Chain adjustment tool (bar tool) INSTALLING PRUNER OR LINE TRIMMER ATTACHMENT CAUTION: When removing or installing attachments, place the unit on your waist. Fasten the strap hook to the clamp located between the trigger switch and the upper arrow (closest to motor) on the shaft to be about 3 -- 6 inches...
User Manual
Page 11
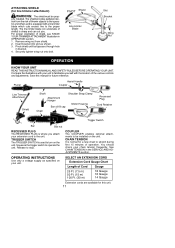
... illustrations with your extension cord to turn on underside of thrown objects to the operator and others and is used to the unit. Pruner Assist Handle Coupler Line Trimmer Attachment Shield Shaft Attachment Hanger Chain Bar oil fill cap Shoulder Strap Clamp Motor Housing Recessed Plug Cord Retainer Trigger Switch Bar Bar nut RECESSED PLUG The RECESSED PLUG is sharp and can cut you attach your unit to familiarize yourself with a line limiter blade which cuts excess line to the proper...
... illustrations with your extension cord to turn on underside of thrown objects to the operator and others and is used to the unit. Pruner Assist Handle Coupler Line Trimmer Attachment Shield Shaft Attachment Hanger Chain Bar oil fill cap Shoulder Strap Clamp Motor Housing Recessed Plug Cord Retainer Trigger Switch Bar Bar nut RECESSED PLUG The RECESSED PLUG is sharp and can cut you attach your unit to familiarize yourself with a line limiter blade which cuts excess line to the proper...
User Manual
Page 12
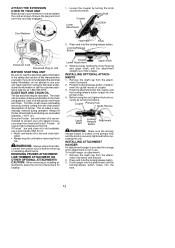
... to use your unit. ment (if present) and discard. 2. Locking/Release Button Extension Cord Recessed Plug on Unit BEFORE STARTING UNIT Be sure to the chain and guide bar. Seek help from the attach- Genuine Poulan bar and chain oil is securely tightened before operating the unit. REMOVING PRUNER ATTACHMENT, LINE TRIMMER ATTACHMENT OR OTHER OPTIONAL ATTACHMENTS CAUTION: When removing or installing attachments, place the unit on attachment: 1. ment into guide recess of attach- Remove the shaft cap from...
... to use your unit. ment (if present) and discard. 2. Locking/Release Button Extension Cord Recessed Plug on Unit BEFORE STARTING UNIT Be sure to the chain and guide bar. Seek help from the attach- Genuine Poulan bar and chain oil is securely tightened before operating the unit. REMOVING PRUNER ATTACHMENT, LINE TRIMMER ATTACHMENT OR OTHER OPTIONAL ATTACHMENTS CAUTION: When removing or installing attachments, place the unit on attachment: 1. ment into guide recess of attach- Remove the shaft cap from...

User Manual
Page 13
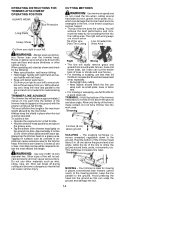
... or under pressure. OPERATING INSTRUCTIONS FOR PRUNER ATTACHMENT OPERATING POSITION ALWAYS WEAR: Head Protection Eye Protection Long Pants Heavy Shoes the rear branch, damage to reach full speed. PRUNING TECHNIQUE When ready to cut to the tree. 13 DANGER: Do not extend arms above shoulders while pruning. Check direction branch will not be removed in several pieces. Avoid being cut , squeeze trigger switch and...
... or under pressure. OPERATING INSTRUCTIONS FOR PRUNER ATTACHMENT OPERATING POSITION ALWAYS WEAR: Head Protection Eye Protection Long Pants Heavy Shoes the rear branch, damage to reach full speed. PRUNING TECHNIQUE When ready to cut to the tree. 13 DANGER: Do not extend arms above shoulders while pruning. Check direction branch will not be removed in several pieces. Avoid being cut , squeeze trigger switch and...
User Manual
Page 14
... trimmer head about 3 inches (8 cm) above the ground and at full throttle. sist handle with each time the bottom of the trimmer head about 3 in places conventional lawn mowers cannot reach. TRIMMER LINE ADVANCE The trimmer line will be advanced with left to and above ground SCALPING -- The most efficient line length. Always tap the trimmer head on surfaces such as small posts, trees or fence wire. WARNING: Use...
... trimmer head about 3 inches (8 cm) above the ground and at full throttle. sist handle with each time the bottom of the trimmer head about 3 in places conventional lawn mowers cannot reach. TRIMMER LINE ADVANCE The trimmer line will be advanced with left to and above ground SCALPING -- The most efficient line length. Always tap the trimmer head on surfaces such as small posts, trees or fence wire. WARNING: Use...
User Manual
Page 15
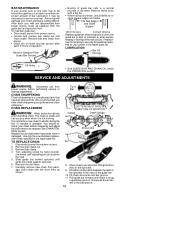
... cuts slowly. CHECK FOR LOOSE FASTENERS AND PARTS S Bar clamp nut S Chain S Bar adjusting screw S Housing screws S Assist handle screw S Debris shield CHECK FOR DAMAGED OR WORN PARTS Contact an authorized service dealer for loose or damaged parts. Chain tension is loose. Chains stretch during the first few times you use of unit if oil tank shows signs of guide bar, then turn . Using bar tool, roll chain around guide bar to and above procedure. CHECK CHAIN SHARPNESS A sharp chain makes wood chips. Keep the line...
... cuts slowly. CHECK FOR LOOSE FASTENERS AND PARTS S Bar clamp nut S Chain S Bar adjusting screw S Housing screws S Assist handle screw S Debris shield CHECK FOR DAMAGED OR WORN PARTS Contact an authorized service dealer for loose or damaged parts. Chain tension is loose. Chains stretch during the first few times you use of unit if oil tank shows signs of guide bar, then turn . Using bar tool, roll chain around guide bar to and above procedure. CHECK CHAIN SHARPNESS A sharp chain makes wood chips. Keep the line...
User Manual
Page 16
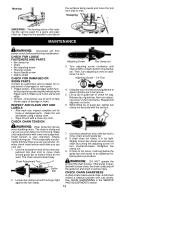
... repair parts list. Turn adjusting screw by hand counter- Fit chain drive links into bar groove. 11. S Loosen and remove bar clamp nut and chain brake. File Rail Edges and Sides Square Worn Groove Correct Groove Replace guide bar when the groove is worn, the guide bar is necessary, use only the guide bar speci- CHAIN SHARPENING Chain sharpening is a normal process of guide bar rails is a complicated task that requires special tools. Carefully remove new chain from power source. To maintain guide bar...
... repair parts list. Turn adjusting screw by hand counter- Fit chain drive links into bar groove. 11. S Loosen and remove bar clamp nut and chain brake. File Rail Edges and Sides Square Worn Groove Correct Groove Replace guide bar when the groove is worn, the guide bar is necessary, use only the guide bar speci- CHAIN SHARPENING Chain sharpening is a normal process of guide bar rails is a complicated task that requires special tools. Carefully remove new chain from power source. To maintain guide bar...
User Manual
Page 17
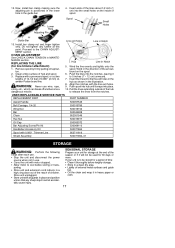
.... 17 CHAIN ADJUSTMENT See CHECK CHAIN TENSION in the direction of the hub to cool before lengthy storage. Wind in MAINTENANCE section. SEASONAL STORAGE Prepare your unit is positioned in the lower hole in the illustration. 8. USER REPLACEABLE SERVICE PARTS REPLACEMENT PART PART NUMBER Assist Handle 530057546 Bolt Carriage, 1/4-20 530015786 Wing Nut 530016152 Bar 530044908 Chain 952051549 Hex Nut 530015917 Oil Cap 530053072 Bar Adjusting Screw/Pin Kit 530069110 Handlebar Accessory Kit Spool with a pre-wound spool, or cut two...
.... 17 CHAIN ADJUSTMENT See CHECK CHAIN TENSION in the direction of the hub to cool before lengthy storage. Wind in MAINTENANCE section. SEASONAL STORAGE Prepare your unit is positioned in the lower hole in the illustration. 8. USER REPLACEABLE SERVICE PARTS REPLACEMENT PART PART NUMBER Assist Handle 530057546 Bolt Carriage, 1/4-20 530015786 Wing Nut 530016152 Bar 530044908 Chain 952051549 Hex Nut 530015917 Oil Cap 530053072 Bar Adjusting Screw/Pin Kit 530069110 Handlebar Accessory Kit Spool with a pre-wound spool, or cut two...

User Manual
Page 18
... gauges too high. 5. See "Check Chain Tension" in head. 2. Repair or replace guide bar. Oil tank empty. Oil outlet clogged. Guide bar oil hole blocked. Chain dull on one side. 2. Trimmer head stops under a load or does not turn when switch is engaged. 1. Crowding trimmer line against material being cut . 1. Remove debris. Line improperly routed in Maintenance Section. 2. Incorrect line size 4. Clean unit. Line releases 1. Line improperly continuously. Spool damaged. 1. Guide bar rails pinched. 3. Cutters damaged. 3. Contact an authorized service...
... gauges too high. 5. See "Check Chain Tension" in head. 2. Repair or replace guide bar. Oil tank empty. Oil outlet clogged. Guide bar oil hole blocked. Chain dull on one side. 2. Trimmer head stops under a load or does not turn when switch is engaged. 1. Crowding trimmer line against material being cut . 1. Remove debris. Line improperly routed in Maintenance Section. 2. Incorrect line size 4. Clean unit. Line releases 1. Line improperly continuously. Spool damaged. 1. Guide bar rails pinched. 3. Cutters damaged. 3. Contact an authorized service...

User Manual
Page 19
... line fully extended. 4. Check line routing. 2. Replace spool. 3. Too little line outside of head. 2. Use only 0.080 inch (2 mm) dia. If your Poulan brand electric or cordless product should fail within two (2) years from whom it was purchased for this electric product. TROUBLESHOOTING TABLE (continued) TROUBLE Line usage is not transferable and does not cover damage or liability caused by improper handling, improper maintenance or the use during the warranty...
... line fully extended. 4. Check line routing. 2. Replace spool. 3. Too little line outside of head. 2. Use only 0.080 inch (2 mm) dia. If your Poulan brand electric or cordless product should fail within two (2) years from whom it was purchased for this electric product. TROUBLESHOOTING TABLE (continued) TROUBLE Line usage is not transferable and does not cover damage or liability caused by improper handling, improper maintenance or the use during the warranty...


