
User Manual
Page 1
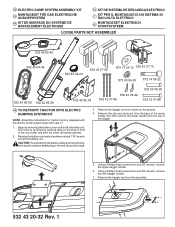
... then the cover will swing upwards. 2. Using a Phillips head screw driver and 3/8" wrench, remove the rear bagger handle. 7. Remove the battery connector hardware using a 7/16" wrench and lift the battery out. Using a Phillips head screw driver and 3/8" wrench, remove the upper bagger handle. 6. Remove the bagger top from the top of the unit. Begin by pushing back on the left side of the bagger. 5. ELECTRIC DUMP SYSTEM ASSEMBLY KIT MONTAGEKIT FÜ...
... then the cover will swing upwards. 2. Using a Phillips head screw driver and 3/8" wrench, remove the rear bagger handle. 7. Remove the battery connector hardware using a 7/16" wrench and lift the battery out. Using a Phillips head screw driver and 3/8" wrench, remove the upper bagger handle. 6. Remove the bagger top from the top of the unit. Begin by pushing back on the left side of the bagger. 5. ELECTRIC DUMP SYSTEM ASSEMBLY KIT MONTAGEKIT FÜ...
User Manual
Page 2
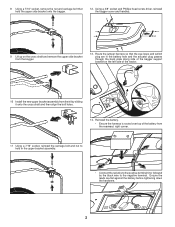
... assembly. • Connect the red wire to the positive terminal first, followed by sliding it onto the cross shaft and then align the bolt holes. 14. Using a 3/8" socket and Phillips head screw driver, reinstall the bagger cover and handles. 9 Lift up on the left side of the battery from the bagger. 13. 8 Using a 7/16" socket, remove the nut and carriage bolt that the eye loops and switch plug...
... assembly. • Connect the red wire to the positive terminal first, followed by sliding it onto the cross shaft and then align the bolt holes. 14. Using a 3/8" socket and Phillips head screw driver, reinstall the bagger cover and handles. 9 Lift up on the left side of the battery from the bagger. 13. 8 Using a 7/16" socket, remove the nut and carriage bolt that the eye loops and switch plug...

User Manual
Page 3
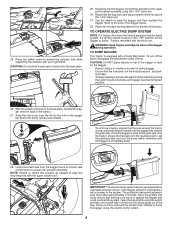
... lower bracket assembly. 18. ASSEMBLY INSTRUCTIONS FOR TRACTORS FACTORY EQUIPPED WITH ELECTRIC DUMP SYSTEM BEGIN HERE. 17. Plug the harness into the battery cover. 3 Use the zip ties in the frame. Install the 2 1/2" carriage bolt from the kit through the switch opening and then attach the new battery cover. 23. Replace the adjustment bracket (A) with the current hole in the kit to secure the wires to the tractor Owner's/Operator's Manual for adjustment procedures. Using a 9/16" wrench...
... lower bracket assembly. 18. ASSEMBLY INSTRUCTIONS FOR TRACTORS FACTORY EQUIPPED WITH ELECTRIC DUMP SYSTEM BEGIN HERE. 17. Plug the harness into the battery cover. 3 Use the zip ties in the frame. Install the 2 1/2" carriage bolt from the kit through the switch opening and then attach the new battery cover. 23. Replace the adjustment bracket (A) with the current hole in the kit to secure the wires to the tractor Owner's/Operator's Manual for adjustment procedures. Using a 9/16" wrench...
User Manual
Page 4
...; Position tractor in location you have the factory equipped electric dump system, the ignition switch must be equipped with the kit do not. To turn the dump switch clockwise until the bagger is in the neutral position, set the parking brake, and turn off the alarm disengage the attachment clutch control. WARNING: Keep fingers and objects clear of the tractor. 27. Set park- The protection device will cut power to...
...; Position tractor in location you have the factory equipped electric dump system, the ignition switch must be equipped with the kit do not. To turn the dump switch clockwise until the bagger is in the neutral position, set the parking brake, and turn off the alarm disengage the attachment clutch control. WARNING: Keep fingers and objects clear of the tractor. 27. Set park- The protection device will cut power to...


