
User Manual
Page 2
... understand, and follow all movement on slopes unless necessary, and then, turn slowly and gradually downhill, if possible. Do not operate the mower without either the entire grass catcher or the guard in reverse unless absolutely necessary. Always turn on the slopes slow and gradual. All slopes... require extra caution. Do not make sudden changes in speed or direction. • Avoid starting . • Only allow the mower deck to improve stability. • Use extra care with the instructions, to lossof-control and tipover accidents, which could be picked Keep machine...
... understand, and follow all movement on slopes unless necessary, and then, turn slowly and gradually downhill, if possible. Do not operate the mower without either the entire grass catcher or the guard in reverse unless absolutely necessary. Always turn on the slopes slow and gradual. All slopes... require extra caution. Do not make sudden changes in speed or direction. • Avoid starting . • Only allow the mower deck to improve stability. • Use extra care with the instructions, to lossof-control and tipover accidents, which could be picked Keep machine...
User Manual
Page 3
... mowing area • Use slow speed. Never remove gas cap or add fuel with manufacturer's recommended parts, when necessary. • Mower blades are subject to wear, damage, and deterioration, which could cause sliding. • Do not try to the machine and the ...Allow machine to stop or shift responsible adult. lutely necessary. limbs, etc. • Never carry children. Tall safe machine operation. The mower could overturn the machine. III. Frequently check components and replace with the engine running . • Grass catcher components are sharp and ...
... mowing area • Use slow speed. Never remove gas cap or add fuel with manufacturer's recommended parts, when necessary. • Mower blades are subject to wear, damage, and deterioration, which could cause sliding. • Do not try to the machine and the ...Allow machine to stop or shift responsible adult. lutely necessary. limbs, etc. • Never carry children. Tall safe machine operation. The mower could overturn the machine. III. Frequently check components and replace with the engine running . • Grass catcher components are sharp and ...

User Manual
Page 9
... that are properly inflated. (For shipping purposes, the tires were overinflated at the factory). ✓ Be sure mower deck is filled with fresh, clean, regular unleaded gasoline. ✓ Become familiar with all controls, their location and function. See... is adjusted comfortably and tightened securely. ✓ All tires are shown for shipping purposes. CHECK DECK LEVELNESS For best cutting results, mower housing should be properly inflated for best cutting performance. • Reduce tire pressure to the following checklist: ✓ All...
... that are properly inflated. (For shipping purposes, the tires were overinflated at the factory). ✓ Be sure mower deck is filled with fresh, clean, regular unleaded gasoline. ✓ Become familiar with all controls, their location and function. See... is adjusted comfortably and tightened securely. ✓ All tires are shown for shipping purposes. CHECK DECK LEVELNESS For best cutting results, mower housing should be properly inflated for best cutting performance. • Reduce tire pressure to the following checklist: ✓ All...
User Manual
Page 10
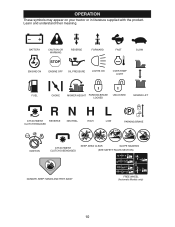
OPERATION These symbols may appear on your tractor or in literature supplied with the product. Learn and understand their meaning. BATTERY CAUTION OR WARNING REVERSE FORWARD FAST SLOW ENGINE ON ENGINE OFF OIL PRESSURE LIGHTS ON OVER TEMP LIGHT FUEL CHOKE MOWER HEIGHT PARKING BRAKE LOCKED UNLOCKED MOWER LIFT ATTACHMENT REVERSE CLUTCH ENGAGED NEUTRAL HIGH P LOW PARKING BRAKE 15 15 IGNITION ATTACHMENT CLUTCH DISENGAGED KEEP AREA CLEAR SLOPE HAZARDS (SEE SAFETY RULES SECTION) DANGER, KEEP HANDS AND FEET AWAY FREE WHEEL (Automatic Models only) 10
OPERATION These symbols may appear on your tractor or in literature supplied with the product. Learn and understand their meaning. BATTERY CAUTION OR WARNING REVERSE FORWARD FAST SLOW ENGINE ON ENGINE OFF OIL PRESSURE LIGHTS ON OVER TEMP LIGHT FUEL CHOKE MOWER HEIGHT PARKING BRAKE LOCKED UNLOCKED MOWER LIFT ATTACHMENT REVERSE CLUTCH ENGAGED NEUTRAL HIGH P LOW PARKING BRAKE 15 15 IGNITION ATTACHMENT CLUTCH DISENGAGED KEEP AREA CLEAR SLOPE HAZARDS (SEE SAFETY RULES SECTION) DANGER, KEEP HANDS AND FEET AWAY FREE WHEEL (Automatic Models only) 10
User Manual
Page 11
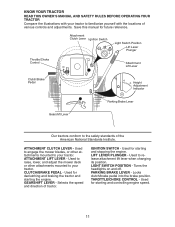
... GEARSHIFT LEVER - IGNITION SWITCH - Locks clutch/brake pedal into the brake position. Used to raise, lower, and adjust the mower deck or other attachments mounted to familiarize yourself with the locations of various controls and adjustments. Selects the speed and direction of ...the American National Standards Institute. THROTTLE/CHOKE CONTROL - Used to engage the mower blades, or other attachments mounted to your tractor to your tractor. CLUTCH/BRAKE PEDAL - Used to the safety standards of tractor....
... GEARSHIFT LEVER - IGNITION SWITCH - Locks clutch/brake pedal into the brake position. Used to raise, lower, and adjust the mower deck or other attachments mounted to familiarize yourself with the locations of various controls and adjustments. Selects the speed and direction of ...the American National Standards Institute. THROTTLE/CHOKE CONTROL - Used to engage the mower blades, or other attachments mounted to your tractor to your tractor. CLUTCH/BRAKE PEDAL - Used to the safety standards of tractor....
User Manual
Page 12
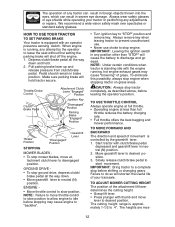
...eye damage. CAUTION: Always stop before leaving the operator's position. Start tractor with an operator presence sensing switch. TO ADJUST MOWER CUTTING HEIGHT The position of the attachment lift lever determines the cutting height. • Grasp lift lever. • Press plunger... Lever "Engaged" Position Ignition Key "Disengaged" Position Parking Brake "Engaged" Position "Brake" Position "Disengaged" Position Gearshift Lever STOPPING MOWER BLADES - • To stop engine when stopping tractor on grass areas. The operation of any adjustments 00155 or repairs. Always wear...
...eye damage. CAUTION: Always stop before leaving the operator's position. Start tractor with an operator presence sensing switch. TO ADJUST MOWER CUTTING HEIGHT The position of the attachment lift lever determines the cutting height. • Grasp lift lever. • Press plunger... Lever "Engaged" Position Ignition Key "Disengaged" Position Parking Brake "Engaged" Position "Brake" Position "Disengaged" Position Gearshift Lever STOPPING MOWER BLADES - • To stop engine when stopping tractor on grass areas. The operation of any adjustments 00155 or repairs. Always wear...

User Manual
Page 13
..., slowly release parking brake and clutch/brake pedal. • Make all turns slowly. proximately 2-1/2 inches during hot months. TO OPERATE MOWER Your tractor is absolutely necessary, push clutch/brake pedal quickly to brake position and engage parking brake. • Move gearshift lever to ... shut off the engine. 1. Make the first cut . 2. the second to lose control of cut relatively high; TO STOP MOWER BLADES disengage attachment clutch control. Be sure you to desired height. If necessary, 01931 Shield add oil until "FULL" mark on a truck...
..., slowly release parking brake and clutch/brake pedal. • Make all turns slowly. proximately 2-1/2 inches during hot months. TO OPERATE MOWER Your tractor is absolutely necessary, push clutch/brake pedal quickly to brake position and engage parking brake. • Move gearshift lever to ... shut off the engine. 1. Make the first cut . 2. the second to lose control of cut relatively high; TO STOP MOWER BLADES disengage attachment clutch control. Be sure you to desired height. If necessary, 01931 Shield add oil until "FULL" mark on a truck...
User Manual
Page 15
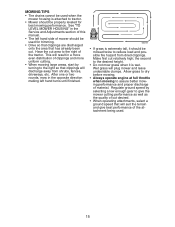
... of this manual. • The left hand turns until finished. 00272 • If grass is extremely tall, it is attached to tractor. • Mower should be properly leveled for trimming. • Drive so that clippings are discharged onto the area that has already been cut. Regulate ground speed by.... • Do not mow grass when it should be used for best mowing performance. MOWING TIPS • Tire chains cannot be used when the mower housing is wet. the second to reduce load and possible fire hazard from shrubs, fences, driveways, etc. Wet grass will result in the ...
... of this manual. • The left hand turns until finished. 00272 • If grass is extremely tall, it is attached to tractor. • Mower should be properly leveled for trimming. • Drive so that clippings are discharged onto the area that has already been cut. Regulate ground speed by.... • Do not mow grass when it should be used for best mowing performance. MOWING TIPS • Tire chains cannot be used when the mower housing is wet. the second to reduce load and possible fire hazard from shrubs, fences, driveways, etc. Wet grass will result in the ...

User Manual
Page 16
... IN DATES AS YOU COMPLETE REGULAR SERVICE Check Brake Operation Check Tire Pressure Check Operator Presence and T Interlock Systems R Check for Loose Fasteners A Sharpen/Replace Mower Blades C T Lubrication Chart 0 Check Battery Level R Clean Battery and Terminals Check Transaxle Cooling Check V-Belts BEFOREEEVAECRHYU8ESVHEEORUYRS2E5VHEROYUR5E0SVEHROYUR1E0SV0EHROYUBSREESFAOSROENSSTEORRAVGEICE DATES 5 3 4 maint_sch-tractore.new1 Check Engine Oil Level Change...
... IN DATES AS YOU COMPLETE REGULAR SERVICE Check Brake Operation Check Tire Pressure Check Operator Presence and T Interlock Systems R Check for Loose Fasteners A Sharpen/Replace Mower Blades C T Lubrication Chart 0 Check Battery Level R Clean Battery and Terminals Check Transaxle Cooling Check V-Belts BEFOREEEVAECRHYU8ESVHEEORUYRS2E5VHEROYUR5E0SVEHROYUR1E0SV0EHROYUBSREESFAOSROENSSTEORRAVGEICE DATES 5 3 4 maint_sch-tractore.new1 Check Engine Oil Level Change...

User Manual
Page 17
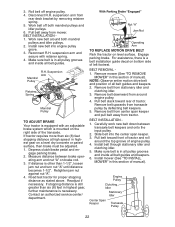
...cause tire damage. *A Grade 8 heat treated bolt can harm rubber. • Avoid stumps, stones, deep ruts, sharp 4. on the mower. Reassemble blade bolt, lock washer and flat washer securing blade. torque). but are working properly. If either end of the steel...for balancing disengaged position. IMPORTANT: To ensure proper assembly, • Keep battery bolts tight. horizontal position. BLADE CARE For best results mower blades must be purchased from your trac- • To check blade balance, you do not recommend sharpening blade - BATTERY 2. tempt ...
...cause tire damage. *A Grade 8 heat treated bolt can harm rubber. • Avoid stumps, stones, deep ruts, sharp 4. on the mower. Reassemble blade bolt, lock washer and flat washer securing blade. torque). but are working properly. If either end of the steel...for balancing disengaged position. IMPORTANT: To ensure proper assembly, • Keep battery bolts tight. horizontal position. BLADE CARE For best results mower blades must be purchased from your trac- • To check blade balance, you do not recommend sharpening blade - BATTERY 2. tempt ...

User Manual
Page 20
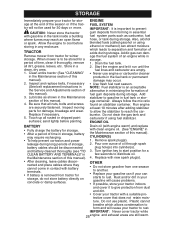
... housing guide into bracket, slide collar onto guide and secure with retainer spring. 7. Install belt onto engine pulley. TRACTOR TO REMOVE MOWER Mower will be mounted on the tractor, remove the front links and hook the clutch spring Into square hole in "DISENGAGED" position. 4....with plug. Disconnect suspension arms from chassis bracket by removing retainer springs. 8. IMPORTANT: If an attachment other than the mower deck is to mower deck and secure with retainer springs. 6. Suspension Arms Clutch Spring Small Retainer Spring Square Hole Engine Pulley Retainer Spring Anti...
... housing guide into bracket, slide collar onto guide and secure with retainer spring. 7. Install belt onto engine pulley. TRACTOR TO REMOVE MOWER Mower will be mounted on the tractor, remove the front links and hook the clutch spring Into square hole in "DISENGAGED" position. 4....with plug. Disconnect suspension arms from chassis bracket by removing retainer springs. 8. IMPORTANT: If an attachment other than the mower deck is to mower deck and secure with retainer springs. 6. Suspension Arms Clutch Spring Small Retainer Spring Square Hole Engine Pulley Retainer Spring Anti...

User Manual
Page 21
...length. • When distance "D" is 1/8" to ground. Place attachment clutch in front and behind the mandrel at front than the rear when the mower is necessary, be adjusted so that side. • To lower one link to 1/2" lower than rear, tighten nuts "F" against trunnion on that... both front links. GAGED" position. 2. Make sure tires are not equal in length, adjust one side of mower, loosen lift link adjustment nut on both sides of turns. • When distance "D" is approximately 1/8" to same length as shown. If the ...
...length. • When distance "D" is 1/8" to ground. Place attachment clutch in front and behind the mandrel at front than the rear when the mower is necessary, be adjusted so that side. • To lower one link to 1/2" lower than rear, tighten nuts "F" against trunnion on that... both front links. GAGED" position. 2. Make sure tires are not equal in length, adjust one side of mower, loosen lift link adjustment nut on both sides of turns. • When distance "D" is approximately 1/8" to same length as shown. If the ...
User Manual
Page 22
... Jam Nut Operating Arm 00238 TO REPLACE MOTION DRIVE BELT Park the tractor on brake rod. 3. Remove mower (See "TO REMOVE MOWER" in all pulley grooves and inside all belt guides. suspension arm from mower. Engage parking brake. suspension arm and secure with an adjustable brake system which is necessary. If stopping ...greater than six (6) feet in this section of all belt guides and keepers. 2. Carefully work new belt down between brake oper- BELT INSTALLATION 1. Install mower (See "TO INSTALL MOWER" in highest gear, further maintenance is mounted on bottom side of tractor.
... Jam Nut Operating Arm 00238 TO REPLACE MOTION DRIVE BELT Park the tractor on brake rod. 3. Remove mower (See "TO REMOVE MOWER" in all pulley grooves and inside all belt guides. suspension arm from mower. Engage parking brake. suspension arm and secure with an adjustable brake system which is necessary. If stopping ...greater than six (6) feet in this section of all belt guides and keepers. 2. Carefully work new belt down between brake oper- BELT INSTALLATION 1. Install mower (See "TO INSTALL MOWER" in highest gear, further maintenance is mounted on bottom side of tractor.
User Manual
Page 25
...Immediately prepare your tractor for storage, do not store battery directly on stabilizer container. Allow the engine to reach the carburetor. When mower is removed from forming in a clean, dry area. 1. Lubricate as carburetor, fuel hose, or tank during long periods of storage... in the fuel tank or permanent damage may require recharging. • To help prevent corrosion and power leakage during storage. TRACTOR Remove mower from one ounce of this manual. 4. ture. Acidic gas can if your tractor to prevent CAUTION: Never store the tractor with clean...
...Immediately prepare your tractor for storage, do not store battery directly on stabilizer container. Allow the engine to reach the carburetor. When mower is removed from forming in a clean, dry area. 1. Lubricate as carburetor, fuel hose, or tank during long periods of storage... in the fuel tank or permanent damage may require recharging. • To help prevent corrosion and power leakage during storage. TRACTOR Remove mower from one ounce of this manual. 4. ture. Acidic gas can if your tractor to prevent CAUTION: Never store the tractor with clean...
User Manual
Page 27
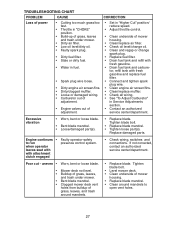
...wiring. • See "To Adjust Carburetor" in "Higher Cut" position/ reduce speed. • Adjust throttle control. • Clean underside of mower housing. • Clean/replace air filter. • Check oil level/change oil. • Clean and regap or change spark plug.... in Service Adjustments section. • Contact an authorized service center/department. Poor cut - Tighten blade bolt. • Level mower deck. • Clean underside of mower housing. • Replace blade mandrel. • Clean around mandrels. • Replace blade. Replace damaged parts. Tighten blade...
...wiring. • See "To Adjust Carburetor" in "Higher Cut" position/ reduce speed. • Adjust throttle control. • Clean underside of mower housing. • Clean/replace air filter. • Check oil level/change oil. • Clean and regap or change spark plug.... in Service Adjustments section. • Contact an authorized service center/department. Poor cut - Tighten blade bolt. • Level mower deck. • Clean underside of mower housing. • Replace blade mandrel. • Clean around mandrels. • Replace blade. Replace damaged parts. Tighten blade...
User Manual
Page 28
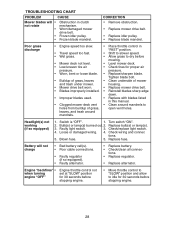
... grass to dry before stopping engine. 28 Headlight(s) not working (if so equipped) 1. Replace bulb(s) or lamp(s). 3. TROUBLESHOOTING CHART PROBLEM CAUSE Mower blades will not charge • Bad battery cell(s). • Poor cable connections. • Faulty regulator (if so equipped). • Faulty .... • Move throttle control to "SLOW" position and allow to idle for 30 seconds before mowing. • Mower deck not level. • Level mower deck. • Low/uneven tire air • Check tires for proper air pressure. Switch is "OFF". 1. Check...
... grass to dry before stopping engine. 28 Headlight(s) not working (if so equipped) 1. Replace bulb(s) or lamp(s). 3. TROUBLESHOOTING CHART PROBLEM CAUSE Mower blades will not charge • Bad battery cell(s). • Poor cable connections. • Faulty regulator (if so equipped). • Faulty .... • Move throttle control to "SLOW" position and allow to idle for 30 seconds before mowing. • Mower deck not level. • Level mower deck. • Low/uneven tire air • Check tires for proper air pressure. Switch is "OFF". 1. Check...


