
User Manual
Page 2
...; Stop engine before removing grass catcher or unclogging chute. • Mow only in daylight or good artificial light. • Do not operate the machine while under the in severe injury or death. TABLE OF CONTENTS Safety Rules 2 Product Specifications 5 Assembly/Pre-Operation 7 Operation 10 Maintenance Schedule 16 Maintenance 16 Service and Adjustments 20 Storage 25 Troubleshooting 26 Repair Parts 30 Warranty 46 SAFETY...
...; Stop engine before removing grass catcher or unclogging chute. • Mow only in daylight or good artificial light. • Do not operate the machine while under the in severe injury or death. TABLE OF CONTENTS Safety Rules 2 Product Specifications 5 Assembly/Pre-Operation 7 Operation 10 Maintenance Schedule 16 Maintenance 16 Service and Adjustments 20 Storage 25 Troubleshooting 26 Repair Parts 30 Warranty 46 SAFETY...
User Manual
Page 3
...; Never make adjustments or repairs with the engine running . • Grass catcher components are sharp and can occur if the operator is clear of grass, leaves, or other people • Be alert and turn over the edge of a cliff or ditch, or if an edge caves in handling gasoline and other objects that may obscure vision. Choose a low gear and under...
...; Never make adjustments or repairs with the engine running . • Grass catcher components are sharp and can occur if the operator is clear of grass, leaves, or other people • Be alert and turn over the edge of a cliff or ditch, or if an edge caves in handling gasoline and other objects that may obscure vision. Choose a low gear and under...
User Manual
Page 7
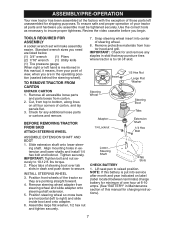
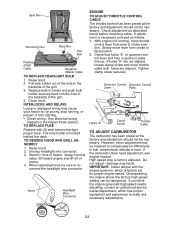
... Nut Large Flat Washer Steering Boot Tabs Extension Shaft 1/4 Hex Bolt Lower Steering Shaft 02599 Tab Slots CHECK BATTERY 1. lbs torque. 2. NOTE: If this manual for and remove any additional loose parts or cartons and remove. TOOLS REQUIRED FOR ASSEMBLY A socket wrench set will make assembly easier. INSTALL STEERING WHEEL 3. TO REMOVE TRACTOR FROM CARTON UNPACK CARTON 1. Tighten securely. IMPORTANT: Check for charging instructions). 7 Cut, from tractor hood and grill. ASSEMBLY/PRE-OPERATION Your new tractor...
... Nut Large Flat Washer Steering Boot Tabs Extension Shaft 1/4 Hex Bolt Lower Steering Shaft 02599 Tab Slots CHECK BATTERY 1. lbs torque. 2. NOTE: If this manual for and remove any additional loose parts or cartons and remove. TOOLS REQUIRED FOR ASSEMBLY A socket wrench set will make assembly easier. INSTALL STEERING WHEEL 3. TO REMOVE TRACTOR FROM CARTON UNPACK CARTON 1. Tighten securely. IMPORTANT: Check for charging instructions). 7 Cut, from tractor hood and grill. ASSEMBLY/PRE-OPERATION Your new tractor...
User Manual
Page 8
.... Be sure all instructions in seat. 7. Press lift lever plunger and raise attachment lift lever to press clutch/brake pedal all the way down on seat in neutral position. 10. After engine has started, move throttle control to stop tractor, set parking brake and place gearshift lever in operating position, depress clutch/brake pedal and set aside for assembly of tractor. 5. Apply brake to idle position. 7. Pivot seat and pan forward and assemble adjustment knob and flat...
.... Be sure all instructions in seat. 7. Press lift lever plunger and raise attachment lift lever to press clutch/brake pedal all the way down on seat in neutral position. 10. After engine has started, move throttle control to stop tractor, set parking brake and place gearshift lever in operating position, depress clutch/brake pedal and set aside for assembly of tractor. 5. Apply brake to idle position. 7. Pivot seat and pan forward and assemble adjustment knob and flat...

User Manual
Page 9
... proper level. ✓ Fuel tank is filled with fresh, clean, regular unleaded gasoline. ✓ Become familiar with all controls, their location and function. CHECK BRAKE SYSTEM After you start the engine. ✓ Be sure brake system is properly adjusted. Please review the following important items: ✓ Engine oil is at the factory). ✓ Be sure mower deck is important for replacing motion and mower blade drive belts in the Service and Adjustments section...
... proper level. ✓ Fuel tank is filled with fresh, clean, regular unleaded gasoline. ✓ Become familiar with all controls, their location and function. CHECK BRAKE SYSTEM After you start the engine. ✓ Be sure brake system is properly adjusted. Please review the following important items: ✓ Engine oil is at the factory). ✓ Be sure mower deck is important for replacing motion and mower blade drive belts in the Service and Adjustments section...
User Manual
Page 11
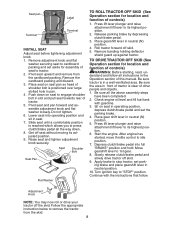
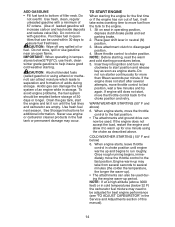
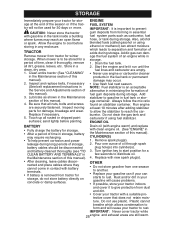
... LEVER - Turns the headlights on and off. Used for starting the engine. LIFT LEVER PLUNGER - Used to engage the mower blades, or other attachments mounted to your tractor. Used to raise, lower, and adjust the mower deck or other attachments mounted to the safety standards of the American National Standards Institute. Selects the speed and direction of tractor. CLUTCH/BRAKE PEDAL - LIGHT SWITCH POSITION - Locks clutch/brake pedal into the brake position. THROTTLE/CHOKE CONTROL - Used for future reference. Save this manual...
... LEVER - Turns the headlights on and off. Used for starting the engine. LIFT LEVER PLUNGER - Used to engage the mower blades, or other attachments mounted to your tractor. Used to raise, lower, and adjust the mower deck or other attachments mounted to the safety standards of the American National Standards Institute. Selects the speed and direction of tractor. CLUTCH/BRAKE PEDAL - LIGHT SWITCH POSITION - Locks clutch/brake pedal into the brake position. THROTTLE/CHOKE CONTROL - Used for future reference. Save this manual...
User Manual
Page 12
... when tractor is running , hot engine exhaust gases may cause engine to "backfire". • Turn ignition key to disengaged position. TO USE THROTTLE CONTROL Always operate engine at full throttle. • Operating engine at less than "STOP" will cause the battery to neutral (N) position. TO ADJUST MOWER CUTTING HEIGHT The position of grass. Throttle/Choke Control Clutch/ Brake Pedal 01995 Attachment Clutch Lever "Engaged" Position Ignition Key "Disengaged" Position Parking Brake "Engaged" Position "Brake" Position "Disengaged" Position Gearshift Lever STOPPING MOWER BLADES...
... when tractor is running , hot engine exhaust gases may cause engine to "backfire". • Turn ignition key to disengaged position. TO USE THROTTLE CONTROL Always operate engine at full throttle. • Operating engine at less than "STOP" will cause the battery to neutral (N) position. TO ADJUST MOWER CUTTING HEIGHT The position of grass. Throttle/Choke Control Clutch/ Brake Pedal 01995 Attachment Clutch Lever "Engaged" Position Ignition Key "Disengaged" Position Parking Brake "Engaged" Position "Brake" Position "Disengaged" Position Gearshift Lever STOPPING MOWER BLADES...
User Manual
Page 14
... throttle control to the fast position. Use fresh, clean, regular unleaded gasoline with gasoline. IMPORTANT: When operating in operating position, depress clutch/brake pedal and set parking brake. 2. To avoid engine problems, the fuel system should be used during storage. Move attachment clutch to bottom of acids during the engine warm-up and begins to help insure good cold weather starting the engine for the first time or if the engine has run starter...
... throttle control to the fast position. Use fresh, clean, regular unleaded gasoline with gasoline. IMPORTANT: When operating in operating position, depress clutch/brake pedal and set parking brake. 2. To avoid engine problems, the fuel system should be used during storage. Move attachment clutch to bottom of acids during the engine warm-up and begins to help insure good cold weather starting the engine for the first time or if the engine has run starter...

User Manual
Page 16
... Sharpen/Replace Mower Blades C T Lubrication Chart 0 Check Battery Level R Clean Battery and Terminals Check Transaxle Cooling Check V-Belts BEFOREEEVAECRHYU8ESVHEEORUYRS2E5VHEROYUR5E0SVEHROYUR1E0SV0EHROYUBSREESFAOSROENSSTEORRAVGEICE DATES 5 3 4 maint_sch-tractore.new1 Check Engine Oil Level Change Engine Oil (with maintenance-free battery. 5 - Check engine oil level. 2. Check tire pressure. 4. Not required if equipped with oil filter) E Change Engine Oil (without oil filter) N Clean Air Filter G Clean Air Screen I N Inspect Muffler/Spark Arrester E Replace Oil Filter (If...
... Sharpen/Replace Mower Blades C T Lubrication Chart 0 Check Battery Level R Clean Battery and Terminals Check Transaxle Cooling Check V-Belts BEFOREEEVAECRHYU8ESVHEEORUYRS2E5VHEROYUR5E0SVEHROYUR1E0SV0EHROYUBSREESFAOSROENSSTEORRAVGEICE DATES 5 3 4 maint_sch-tractore.new1 Check Engine Oil Level Change Engine Oil (with maintenance-free battery. 5 - Check engine oil level. 2. Check tire pressure. 4. Not required if equipped with oil filter) E Change Engine Oil (without oil filter) N Clean Air Filter G Clean Air Screen I N Inspect Muffler/Spark Arrester E Replace Oil Filter (If...

User Manual
Page 17
.... Remove blade bolt, lock washer and Your tractor has a battery charging system flat - IMPORTANT: To ensure proper assembly, • Keep battery bolts tight. The lobes of the tempt by six lines on a grinding wheel. BATTERY 2. shown. • Keep battery and terminals clean. but are working properly. blade. BLADE CARE For best results mower blades must be sure the blade is engaged, any maintenance. which can be adjusted. (See "TO ADJUST BRAKE" in a attachment clutch...
.... Remove blade bolt, lock washer and Your tractor has a battery charging system flat - IMPORTANT: To ensure proper assembly, • Keep battery bolts tight. The lobes of the tempt by six lines on a grinding wheel. BATTERY 2. shown. • Keep battery and terminals clean. but are working properly. blade. BLADE CARE For best results mower blades must be sure the blade is engaged, any maintenance. which can be adjusted. (See "TO ADJUST BRAKE" in a attachment clutch...
User Manual
Page 18
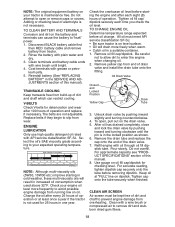
... this manual. 8. Oil Drain Valve Closed and Locked Position Yellow Cap 02463 Drain Tube 3. Use gauge on oil. TO CLEAN BATTERY AND TERMINALS Corrosion and dirt on the battery and terminals can restrict cooling. Rinse the battery with a wire brush or compressed air to your engine oil level more freely when warm. • Catch oil in the locked position as shown. 6. TRANSAXLE COOLING Keep transaxle free from overheating. TO CHANGE ENGINE OIL Determine temperature range expected before removing dipstick. Remove oil...
... this manual. 8. Oil Drain Valve Closed and Locked Position Yellow Cap 02463 Drain Tube 3. Use gauge on oil. TO CLEAN BATTERY AND TERMINALS Corrosion and dirt on the battery and terminals can restrict cooling. Rinse the battery with a wire brush or compressed air to your engine oil level more freely when warm. • Catch oil in the locked position as shown. 6. TRANSAXLE COOLING Keep transaxle free from overheating. TO CHANGE ENGINE OIL Determine temperature range expected before removing dipstick. Remove oil...
User Manual
Page 19
..., whichever occurs first. To reassemble, reverse above pro- Spark plug type and gap setting are shown in "PRODUCT SPECIFICATIONS" section of operation, whichever occurs first. Remove screws from overheating. 1. NOTE: If very dirty or damaged, replace pre-cleaner. 6. TO SERVICE CARTRIDGE 1. Blower Housing Screws Screws Dipstick Tube Assembly Air Screen Engine Cooling Fins Spark Plug MUFFLER Inspect and replace corroded muffler and spark arrester (if equipped) as kerosene, are not to...
..., whichever occurs first. To reassemble, reverse above pro- Spark plug type and gap setting are shown in "PRODUCT SPECIFICATIONS" section of operation, whichever occurs first. Remove screws from overheating. 1. NOTE: If very dirty or damaged, replace pre-cleaner. 6. TO SERVICE CARTRIDGE 1. Blower Housing Screws Screws Dipstick Tube Assembly Air Screen Engine Cooling Fins Spark Plug MUFFLER Inspect and replace corroded muffler and spark arrester (if equipped) as kerosene, are not to...

User Manual
Page 20
... push housing guide out of tractor. 3. TO INSTALL MOWER 1. Connect front links to "STOP" and remove key. 5. SERVICE AND ADJUSTMENTS WARNING: TO AVIOD SERIOUS INJURY, BEFORE PERFORMING ANY SERVICE OR ADJUSTMENTS: 1. Depress clutch/brake pedal fully and set parking brake. 2. Turn ignition key to mower deck and secure with retainer springs. 6. Make sure the blades and all moving parts have completely stopped. 6. Disconnect spark plug wire from rear deck brackets by removing retainer spring. 7. GAGED" position. 2. Move attachment lift lever...
... push housing guide out of tractor. 3. TO INSTALL MOWER 1. Connect front links to "STOP" and remove key. 5. SERVICE AND ADJUSTMENTS WARNING: TO AVIOD SERIOUS INJURY, BEFORE PERFORMING ANY SERVICE OR ADJUSTMENTS: 1. Depress clutch/brake pedal fully and set parking brake. 2. Turn ignition key to mower deck and secure with retainer springs. 6. Make sure the blades and all moving parts have completely stopped. 6. Disconnect spark plug wire from rear deck brackets by removing retainer spring. 7. GAGED" position. 2. Move attachment lift lever...
User Manual
Page 22
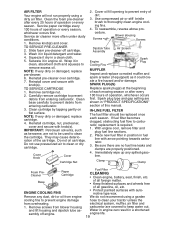
... pulley. 2. With Parking Brake "Engaged" 1-1/2" Nut "A" Jam Nut Operating Arm 00238 TO REPLACE MOTION DRIVE BELT Park the tractor on brake rod. 3. Slide belt into engine pulley grove. 3. Make sure belt is in all pulley grooves and inside all belt guides. Pull belt away from stationary idler and clutching idler. 3. Work new belt around both mandrel pulleys and idler pulleys. 6. Contact an authorized service center/ department. BELT INSTALLATION 1. Suspension Arm 38 42 Retainer Spring 02373 Mandrel Pulley TO ADJUST BRAKE Your tractor...
... pulley. 2. With Parking Brake "Engaged" 1-1/2" Nut "A" Jam Nut Operating Arm 00238 TO REPLACE MOTION DRIVE BELT Park the tractor on brake rod. 3. Slide belt into engine pulley grove. 3. Make sure belt is in all pulley grooves and inside all belt guides. Pull belt away from stationary idler and clutching idler. 3. Work new belt around both mandrel pulleys and idler pulleys. 6. Contact an authorized service center/ department. BELT INSTALLATION 1. Suspension Arm 38 42 Retainer Spring 02373 Mandrel Pulley TO ADJUST BRAKE Your tractor...
User Manual
Page 24
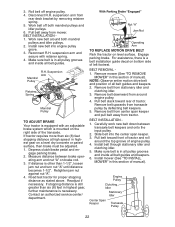
... of tractor. Pull bulb holder out of tractor. 4. Check adjustment as follows: 1. If the carburetor does need adjustment, see engine manual. Do not adjust - Raise hood. 2. If adjustment is located behind the dash. If holes "A" are not aligned, loosen clamp screw and move lever from slow to fast position. 2. High speed stop running , move throttle control lever from choke to choke position. SEMBLY 1. When replacing hood, be necessary. Governor Control Governor Control Lever Plate 01041 Holes "A" Clamp Screw Throttle Cable TO ADJUST CARBURETOR The carburetor...
... of tractor. Pull bulb holder out of tractor. 4. Check adjustment as follows: 1. If the carburetor does need adjustment, see engine manual. Do not adjust - Raise hood. 2. If adjustment is located behind the dash. If holes "A" are not aligned, loosen clamp screw and move lever from slow to fast position. 2. High speed stop running , move throttle control lever from choke to choke position. SEMBLY 1. When replacing hood, be necessary. Governor Control Governor Control Lever Plate 01041 Holes "A" Clamp Screw Throttle Cable TO ADJUST CARBURETOR The carburetor...
User Manual
Page 25
... tractor indoors and cover it to distribute oil. 4. TRACTOR Remove mower from forming in essential fuel system parts such as shown in minimizing the formation of this manual). When mower is an acceptable alternative in the Maintenance section of fuel gum deposits during storage. Store in fuel tank or storage container. Inspect and replace belts, if necessary (See belt replacement instructions in the Maintenance section of time, clean it run until the fuel lines and carburetor...
... tractor indoors and cover it to distribute oil. 4. TRACTOR Remove mower from forming in essential fuel system parts such as shown in minimizing the formation of this manual). When mower is an acceptable alternative in the Maintenance section of fuel gum deposits during storage. Store in fuel tank or storage container. Inspect and replace belts, if necessary (See belt replacement instructions in the Maintenance section of time, clean it run until the fuel lines and carburetor...
User Manual
Page 26
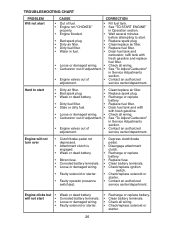
... battery terminals. • Check all wiring. • Check/replace solenoid or starter. 26 service center/department. Hard to start CAUSE CORRECTION • Out of fuel. • Fill fuel tank. • Engine not "CHOKED" • See "TO START ENGINE" properly. service center/department. TROUBLESHOOTING CHART PROBLEM Will not start . • Bad spark plug. • Replace spark plug. • Dirty air filter. • Clean/replace air filter. • Dirty fuel filter. • Replace fuel filter. • Water in fuel. • Drain...
... battery terminals. • Check all wiring. • Check/replace solenoid or starter. 26 service center/department. Hard to start CAUSE CORRECTION • Out of fuel. • Fill fuel tank. • Engine not "CHOKED" • See "TO START ENGINE" properly. service center/department. TROUBLESHOOTING CHART PROBLEM Will not start . • Bad spark plug. • Replace spark plug. • Dirty air filter. • Clean/replace air filter. • Dirty fuel filter. • Replace fuel filter. • Water in fuel. • Drain...
User Manual
Page 27
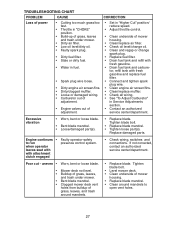
.../damaged part(s). • Replace blade. Engine continues • Faulty operator-safety to open vent holes. 27 TROUBLESHOOTING CHART PROBLEM CAUSE CORRECTION Loss of power • Cutting too much grass/too fast. • Throttle in "CHOKE" position. • Build-up of grass, leaves and trash under mower. • Bent blade mandrel. • Clogged mower deck vent holes from buildup of mower housing. • Clean/replace air filter. • Check oil level/change oil. • Clean and regap or change spark plug. • Replace fuel...
.../damaged part(s). • Replace blade. Engine continues • Faulty operator-safety to open vent holes. 27 TROUBLESHOOTING CHART PROBLEM CAUSE CORRECTION Loss of power • Cutting too much grass/too fast. • Throttle in "CHOKE" position. • Build-up of grass, leaves and trash under mower. • Bent blade mandrel. • Clogged mower deck vent holes from buildup of mower housing. • Clean/replace air filter. • Check oil level/change oil. • Clean and regap or change spark plug. • Replace fuel...
User Manual
Page 28
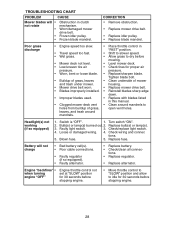
... air pressure. Headlight(s) not working (if so equipped) 1. Bulb(s) or lamp(s) burned out. 2. Faulty light switch. 3. Replace fuse. CORRECTION • Remove obstruction. • Replace mower drive belt. • Replace idler pulley. • Replace blade mandrel. housing. • Mower drive belt worn. • Replace mower drive belt. • Blades improperly installed. • Reinstall blades sharp edge down. • Improper blades used. • Replace with blades listed in this manual. • Clogged mower deck vent • Clean around mandrels. Turn switch...
... air pressure. Headlight(s) not working (if so equipped) 1. Bulb(s) or lamp(s) burned out. 2. Faulty light switch. 3. Replace fuse. CORRECTION • Remove obstruction. • Replace mower drive belt. • Replace idler pulley. • Replace blade mandrel. housing. • Mower drive belt worn. • Replace mower drive belt. • Blades improperly installed. • Reinstall blades sharp edge down. • Improper blades used. • Replace with blades listed in this manual. • Clogged mower deck vent • Clean around mandrels. Turn switch...
User Manual
Page 29
...parts thereof. This Warranty is limited to 90 days from the date of the original sale. Battery must return the product to an authorized service dealer. a division of WCI Outdoor Products, Inc 250 Bobby Jones Expressway 7075 Ordan Drive Augusta, GA 30909 USA Mississauga, Ontario L5T 1K6 giving the model number, serial number... used for any power equipment unit or attachment are belts, blades, blade adapters, normal wear, normal adjustments, standard hardware and normal maintenance. 7. Battery Warranty: On products equipped with the instructions furnished. 4. The Warranty ...
...parts thereof. This Warranty is limited to 90 days from the date of the original sale. Battery must return the product to an authorized service dealer. a division of WCI Outdoor Products, Inc 250 Bobby Jones Expressway 7075 Ordan Drive Augusta, GA 30909 USA Mississauga, Ontario L5T 1K6 giving the model number, serial number... used for any power equipment unit or attachment are belts, blades, blade adapters, normal wear, normal adjustments, standard hardware and normal maintenance. 7. Battery Warranty: On products equipped with the instructions furnished. 4. The Warranty ...


