
User Manual
Page 2
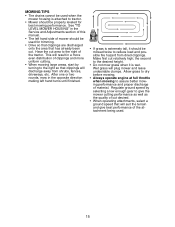
...limbs, etc. lutely necessary. Do • Mow up and down and behind before removing grass ations for holes, ruts, or bumps. not operate the mower without either • Remove obstacles such as rocks, toys, wire, etc., which could be picked up and thrown by the blade. • Be sure.... • Keep all instructions in speed or direction. • Use extra care when loading or un- • Avoid starting . • Only allow the mower deck to loss- Do not make sudden crossing roadways. changes in the manual and on it, do not point it . blades and proceed slowly straight...
...limbs, etc. lutely necessary. Do • Mow up and down and behind before removing grass ations for holes, ruts, or bumps. not operate the mower without either • Remove obstacles such as rocks, toys, wire, etc., which could be picked up and thrown by the blade. • Be sure.... • Keep all instructions in speed or direction. • Use extra care when loading or un- • Avoid starting . • Only allow the mower deck to loss- Do not make sudden crossing roadways. changes in the manual and on it, do not point it . blades and proceed slowly straight...
User Manual
Page 3
...gear and under the watchful care of another so that you last saw them . • Check brake operation frequently. The mower could suddenly turn machine off if children before mowing. Reduced traction could overturn the machine. Frequently check components and replace with ...with safe machine operation. • Never allow objects to be seriously injured or interfere with manufacturer's recommended parts, when necessary. • Mower blades are often attracted to stop or shift responsible adult. Do not smoke. - Never refuel the machine indoors. - Repair, if ...
...gear and under the watchful care of another so that you last saw them . • Check brake operation frequently. The mower could suddenly turn machine off if children before mowing. Reduced traction could overturn the machine. Frequently check components and replace with ...with safe machine operation. • Never allow objects to be seriously injured or interfere with manufacturer's recommended parts, when necessary. • Mower blades are often attracted to stop or shift responsible adult. Do not smoke. - Never refuel the machine indoors. - Repair, if ...
User Manual
Page 9
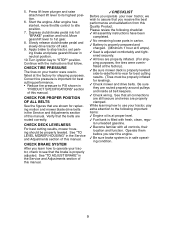
... of this manual. Correct tire pressure is important for best cutting performance. • Reduce tire pressure to 1st gear. 8. See "TO LEVEL MOWER HOUSING" in the Service and Adjustments section of this Quality Product. See "TO ADJUST BRAKE" in the Service and Adjustments section of this manual...POSITION OF ALL BELTS See the figures that you operate your tractor were overinflated at the factory). ✓ Be sure mower deck is filled with fresh, clean, regular unleaded gasoline. ✓ Become familiar with the instructions that the belts are properly clamped...
... of this manual. Correct tire pressure is important for best cutting performance. • Reduce tire pressure to 1st gear. 8. See "TO LEVEL MOWER HOUSING" in the Service and Adjustments section of this Quality Product. See "TO ADJUST BRAKE" in the Service and Adjustments section of this manual...POSITION OF ALL BELTS See the figures that you operate your tractor were overinflated at the factory). ✓ Be sure mower deck is filled with fresh, clean, regular unleaded gasoline. ✓ Become familiar with the instructions that the belts are properly clamped...

User Manual
Page 10
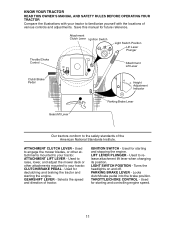
... ENGINE OFF LIGHTS ON P ENGINE ON ENGINE START PARKING BRAKE PARKING BRAKE PARKING BRAKE LOCKED UNLOCKED OVER TEMP LIGHT FUEL OIL PRESSURE BATTERY REVERSE FORWARD MOWER HEIGHT MOWER LIFT 15 15 15 ATTACHMENT ATTACHMENT CLUTCH ENGAGED CLUTCH DISENGAGED DANGER, KEEP HANDS AND FEET AWAY KEEP AREA CLEAR SLOPE HAZARDS (SEE SAFETY RULES...
... ENGINE OFF LIGHTS ON P ENGINE ON ENGINE START PARKING BRAKE PARKING BRAKE PARKING BRAKE LOCKED UNLOCKED OVER TEMP LIGHT FUEL OIL PRESSURE BATTERY REVERSE FORWARD MOWER HEIGHT MOWER LIFT 15 15 15 ATTACHMENT ATTACHMENT CLUTCH ENGAGED CLUTCH DISENGAGED DANGER, KEEP HANDS AND FEET AWAY KEEP AREA CLEAR SLOPE HAZARDS (SEE SAFETY RULES...
User Manual
Page 11
Used to engage the mower blades, or other attachments mounted to the safety standards of the American National Standards Institute. Used to your tractor. LIGHT SWITCH POSITION - PARKING BRAKE LEVER - ... Our tractors conform to your tractor. Used for future reference. Locks clutch/brake pedal into the brake position. Used to raise, lower, and adjust the mower deck or other attachments mounted to release attachment lift lever when changing its position. IGNITION SWITCH - Save this manual for declutching and braking the tractor...
Used to engage the mower blades, or other attachments mounted to the safety standards of the American National Standards Institute. Used to your tractor. LIGHT SWITCH POSITION - PARKING BRAKE LEVER - ... Our tractors conform to your tractor. Used for future reference. Locks clutch/brake pedal into the brake position. Used to raise, lower, and adjust the mower deck or other attachments mounted to release attachment lift lever when changing its position. IGNITION SWITCH - Save this manual for declutching and braking the tractor...

User Manual
Page 12
... USE THROTTLE CONTROL Always operate engine at full throttle. • Operating engine at less than "STOP" will hold . 2. TO ADJUST MOWER CUTTING HEIGHT The position of grass. Pull parking brake lever up and release pressure from the ground to desired position. 3. Always remove key...and gearshift lever in any position other than full throttle reduces the battery charging rate. • Full throttle offers the best bagging and mower performance. ENGINE - • Move throttle control to start movement. Make sure parking brake will cause the battery to neutral (N) position...
... USE THROTTLE CONTROL Always operate engine at full throttle. • Operating engine at less than "STOP" will hold . 2. TO ADJUST MOWER CUTTING HEIGHT The position of grass. Pull parking brake lever up and release pressure from the ground to desired position. 3. Always remove key...and gearshift lever in any position other than full throttle reduces the battery charging rate. • Full throttle offers the best bagging and mower performance. ENGINE - • Move throttle control to start movement. Make sure parking brake will cause the battery to neutral (N) position...

User Manual
Page 13
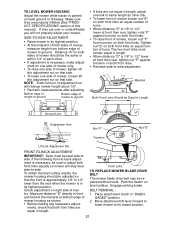
... • To change engine oil, see the Maintenance section in this manual. • Choose the slowest speed before start- TO OPERATE MOWER Your tractor is equipped with attachment lift control. • When pushing or towing your tractor, be sure gearshift lever is in height should...better looking lawns, mow often and after moderate growth. • For best cutting performance, grass over 3 inches during hot months. Start mower blades by the operator to leave the seat with specifications of the manufacturer of your tractor. Attachment Clutch Lever "Engaged" Position Attachemnt...
... • To change engine oil, see the Maintenance section in this manual. • Choose the slowest speed before start- TO OPERATE MOWER Your tractor is equipped with attachment lift control. • When pushing or towing your tractor, be sure gearshift lever is in height should...better looking lawns, mow often and after moderate growth. • For best cutting performance, grass over 3 inches during hot months. Start mower blades by the operator to leave the seat with specifications of the manufacturer of your tractor. Attachment Clutch Lever "Engaged" Position Attachemnt...
User Manual
Page 15
... driveways, etc. the second to the desired height. • Do not mow grass when it should be mowed twice to tractor. • Mower should be properly leveled for trimming. • Drive so that clippings are discharged onto the area that has already been cut. Have the cut ...discharge away from dried clippings. Regulate ground speed by turning to the right of clippings and more even distribution of the tractor. See "TO LEVEL MOWER HOUSING" in a more uniform cutting. • When mowing large areas, start by selecting a low enough gear to assure better mowing performance ...
... driveways, etc. the second to the desired height. • Do not mow grass when it should be mowed twice to tractor. • Mower should be properly leveled for trimming. • Drive so that clippings are discharged onto the area that has already been cut. Have the cut ...discharge away from dried clippings. Regulate ground speed by turning to the right of clippings and more even distribution of the tractor. See "TO LEVEL MOWER HOUSING" in a more uniform cutting. • When mowing large areas, start by selecting a low enough gear to assure better mowing performance ...
User Manual
Page 16
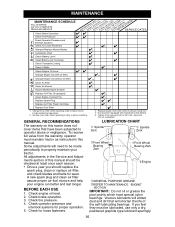
.... To receive full value from the warranty, operator must be made periodically to 35 ft.-lbs. Check brake operation. 3. Check for Loose Fasteners A Sharpen/Replace Mower Blades C T Lubrication Chart 0 Check Battery Level R Clean Battery and Terminals Check Transaxle Cooling BEFOREEEVAECRHYU8ESVHEEORUYRS2E5VHEROYUR5E0SVEHROYUR1E0SV0EHROYUBSREESFAOSROEN STORAGE SERVICE DATES 5 3 4 Check V-Belts Check Engine Oil Level Change Engine...
.... To receive full value from the warranty, operator must be made periodically to 35 ft.-lbs. Check brake operation. 3. Check for Loose Fasteners A Sharpen/Replace Mower Blades C T Lubrication Chart 0 Check Battery Level R Clean Battery and Terminals Check Transaxle Cooling BEFOREEEVAECRHYU8ESVHEEORUYRS2E5VHEROYUR5E0SVEHROYUR1E0SV0EHROYUBSREESFAOSROEN STORAGE SERVICE DATES 5 3 4 Check V-Belts Check Engine Oil Level Change Engine...

User Manual
Page 17
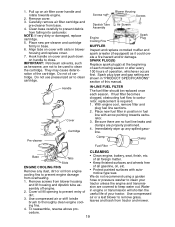
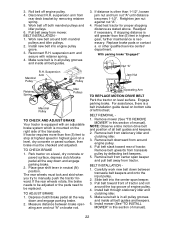
... normal use a nail for 1 hour. BLADE REMOVAL 1. Install new or resharpened blade with an automotive charger will cause excessive vibration and eventual damage to mower and engine. • The blade can harm rubber. torque). "TO ADJUST BRAKE" in the seat. TIRES • Maintain proper air pressure in a... high speed in blade must be adjusted. (See 4. Tire sealant also prevents tire dry rot and corrosion. but are working properly. Raise mower to highest position to allow access to leave the seat without first setting the parking brake should shut off the engine. • ...
... normal use a nail for 1 hour. BLADE REMOVAL 1. Install new or resharpened blade with an automotive charger will cause excessive vibration and eventual damage to mower and engine. • The blade can harm rubber. torque). "TO ADJUST BRAKE" in the seat. TIRES • Maintain proper air pressure in a... high speed in blade must be adjusted. (See 4. Tire sealant also prevents tire dry rot and corrosion. but are working properly. Raise mower to highest position to allow access to leave the seat without first setting the parking brake should shut off the engine. • ...
User Manual
Page 19
... every 100 hours of each season. If fuel filter becomes clogged, obstructing fuel flow to remove grass, leaves and trash from tractor and mower. 19 With engine cool, remove filter and plug fuel line sections. 2. Be sure there are no fuel line leaks and clamps are not to...
... every 100 hours of each season. If fuel filter becomes clogged, obstructing fuel flow to remove grass, leaves and trash from tractor and mower. 19 With engine cool, remove filter and plug fuel line sections. 2. Be sure there are no fuel line leaks and clamps are not to...
User Manual
Page 20
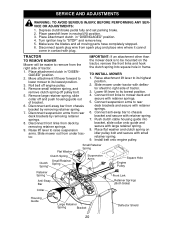
... SERVICE OR ADJUSTMENTS: 1. Turn ignition key to its highest position. 2. Move attachment lift lever forward to lower mower to raise suspension arms. Slide mower out from deck by removing retainer spring. 7. Disconnect front links from under tractor with retainer springs. 6. Raise lift... lever in frame. GAGED" position. 2. Disconnect suspension arms from chassis bracket by removing retainer springs. 9. Connect anti-sway bar to mower deck and secure with retainer spring. 7. Place attachment clutch in "DISEN- Remove large retainer spring, slide collar off and push housing guide...
... SERVICE OR ADJUSTMENTS: 1. Turn ignition key to its highest position. 2. Move attachment lift lever forward to lower mower to raise suspension arms. Slide mower out from deck by removing retainer spring. 7. Disconnect front links from under tractor with retainer springs. 6. Raise lift... lever in frame. GAGED" position. 2. Disconnect suspension arms from chassis bracket by removing retainer springs. 9. Connect anti-sway bar to mower deck and secure with retainer spring. 7. Place attachment clutch in "DISEN- Remove large retainer spring, slide collar off and push housing guide...
User Manual
Page 21
... about 1/8". • Recheck measurements after adjusting. Measure distance "D" directly in front and behind the mandrel at front than the rear when the mower is 1/8" to 1/2" lower than rear, tighten nut "F" against trunnion on both front links an equal number of turns. • When distance "D" is in...parked on level surface. Tighten nut "E" on both front links. • To raise front of each other link. • To lower front of mower loosen nut "E" on both front links an equal number of this manual). Make sure tires are equal in "DISEN- ments, check that side. ...
... about 1/8". • Recheck measurements after adjusting. Measure distance "D" directly in front and behind the mandrel at front than the rear when the mower is 1/8" to 1/2" lower than rear, tighten nut "F" against trunnion on both front links an equal number of turns. • When distance "D" is in...parked on level surface. Tighten nut "E" on both front links. • To raise front of each other link. • To lower front of mower loosen nut "E" on both front links an equal number of this manual). Make sure tires are equal in "DISEN- ments, check that side. ...
User Manual
Page 22
... surface, depress clutch/brake pedal all belt guides. BELT REMOVAL - 1. Install belt through stationary idler and clutching idler. 5. Install mower (See "TO INSTALL MOWER" in this section of engine pulley. 4. Work belt off engine pulley. 4. BELT INSTALLATION 1. Work new belt around both mandrel ...pulleys and idler pulleys. 6. Depress clutch/brake pedal all belt guides and keepers. 2. Remove mower (See "TO REMOVE MOWER" in this section of all the way down between brake oper- NOTE: Observe entire motion drive belt and position of ...
... surface, depress clutch/brake pedal all belt guides. BELT REMOVAL - 1. Install belt through stationary idler and clutching idler. 5. Install mower (See "TO INSTALL MOWER" in this section of engine pulley. 4. Work belt off engine pulley. 4. BELT INSTALLATION 1. Work new belt around both mandrel ...pulleys and idler pulleys. 6. Depress clutch/brake pedal all belt guides and keepers. 2. Remove mower (See "TO REMOVE MOWER" in this section of all the way down between brake oper- NOTE: Observe entire motion drive belt and position of ...
User Manual
Page 25
...for a few seconds to gasoline in fuel tank or storage container. Also, alcohol blended fuels (called gasohol or using fuel stabilizer. When mower is an acceptable alternative in the Maintenance section of fuel gum deposits during long periods of storage, battery cables should be used for 30...• Do not store gasoline from one ounce of this manual. 4. WARNING: Never store the tractor with new spark plug(s). TRACTOR Remove mower from forming in essential fuel system parts such as shown in your gasoline will cause problems. • If possible, store your tractor with ...
...for a few seconds to gasoline in fuel tank or storage container. Also, alcohol blended fuels (called gasohol or using fuel stabilizer. When mower is an acceptable alternative in the Maintenance section of fuel gum deposits during long periods of storage, battery cables should be used for 30...• Do not store gasoline from one ounce of this manual. 4. WARNING: Never store the tractor with new spark plug(s). TRACTOR Remove mower from forming in essential fuel system parts such as shown in your gasoline will cause problems. • If possible, store your tractor with ...
User Manual
Page 27
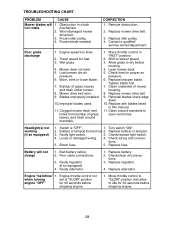
.... 7. Connect and tighten spark plug wire. 11. Replace blade. Faulty operator-safety presence control system. 1. Mower deck not level. 3. Buildup of adjustment. Replace blade. Level mower deck. 3. Build-up of grass, leaves, and trash around mandrels to run when operator leaves seat with ... Low oil level/dirty oil. 6. Faulty spark plug. 7. Spark plug wire loose. 11. CORRECTION 1. Adjust throttle control. 3. Clean underside of mower housing. 4. Clean and regap or change oil. 6. Replace fuel filter. 8. Drain fuel tank and carbure tor, refill tank ...
.... 7. Connect and tighten spark plug wire. 11. Replace blade. Faulty operator-safety presence control system. 1. Mower deck not level. 3. Buildup of adjustment. Replace blade. Level mower deck. 3. Build-up of grass, leaves, and trash around mandrels to run when operator leaves seat with ... Low oil level/dirty oil. 6. Faulty spark plug. 7. Spark plug wire loose. 11. CORRECTION 1. Adjust throttle control. 3. Clean underside of mower housing. 4. Clean and regap or change oil. 6. Replace fuel filter. 8. Drain fuel tank and carbure tor, refill tank ...
User Manual
Page 28
...is "OFF". 1. Poor cable connections. 3. Replace regulator. 4. Frozen blade mandrel. Check wiring and connec- Battery will 1. Replace alternator. Worn/damaged mower drive belt. 3. Low/uneven tire air pressure. 6. Bulb(s) or lamp(s) burned out. 2. Loose or damaged wiring. 4. tions. 5. Faulty ...alternator. 1. Wet grass. 4. Buildup of grass, leaves and trash under mower. 8. Place throttle control in this manual. 11. Replace with blades listed in "FAST" position. 2. Check/clean all connec- CORRECTION 1. ...
...is "OFF". 1. Poor cable connections. 3. Replace regulator. 4. Frozen blade mandrel. Check wiring and connec- Battery will 1. Replace alternator. Worn/damaged mower drive belt. 3. Low/uneven tire air pressure. 6. Bulb(s) or lamp(s) burned out. 2. Loose or damaged wiring. 4. tions. 5. Faulty ...alternator. 1. Wet grass. 4. Buildup of grass, leaves and trash under mower. 8. Place throttle control in this manual. 11. Replace with blades listed in "FAST" position. 2. Check/clean all connec- CORRECTION 1. ...

User Manual
Page 33
... Pnt Lh 34 179717X417 Footrest Pnt Rh 35 72110606 Bolt Rdhd Sht Sqnk 3/8-16 x 3/4 37 17490508 Screw Thdrol 5/16-18 x 1/2 38 175710 Bracket Asm Pivot Mower Rear 51 73800400 Nut Lock Hex w/Ins 1/4-20 52 19091416 Washer 9/32 x 7/8 x 16 Ga. 53 144697 Bracket, Grille LH 54 161464 Screw 55 144696 Bracket... Wsh Thdrol 3/8-16 212 156494 Insert Lens Reflective - - 5479J Plug Button Blk 359 Dia Choke NOTE: All component dimensions given in U. MODEL NUMBER 271150 CHASSIS AND ENCLOSURES KEY PART NO. inches 1 inch = 25.4 mm 33 NO.
... Pnt Lh 34 179717X417 Footrest Pnt Rh 35 72110606 Bolt Rdhd Sht Sqnk 3/8-16 x 3/4 37 17490508 Screw Thdrol 5/16-18 x 1/2 38 175710 Bracket Asm Pivot Mower Rear 51 73800400 Nut Lock Hex w/Ins 1/4-20 52 19091416 Washer 9/32 x 7/8 x 16 Ga. 53 144697 Bracket, Grille LH 54 161464 Screw 55 144696 Bracket... Wsh Thdrol 3/8-16 212 156494 Insert Lens Reflective - - 5479J Plug Button Blk 359 Dia Choke NOTE: All component dimensions given in U. MODEL NUMBER 271150 CHASSIS AND ENCLOSURES KEY PART NO. inches 1 inch = 25.4 mm 33 NO.

User Manual
Page 35
...x .875 Cover Pedal Blk Round Pulley Eng Cl Cable Bolt Hex 7/16-20 x 4 Gr 5 Washer Lock Hlcl Spr 7/16 Keeper Belt Engine FP Guide Belt Mower Drive RH Spacer Axle Washer 25/32 x 1-1/4 x16 Ga E-ring #5133-75 Key Square 2 0 x 1845/ 1865 Washer 25/32 x1-5/8 x 16 Ga Key... Spacer Retainer Washer 13/32 x 2 x 10 Ga. TRACTOR -- Sh 3/8-16 x 1-3/4 Gr. 5 Nut Hex Flange Lock NOTE: All component dimensions given in U. MODEL NUMBER 271150 GROUND DRIVE KEY PART NO. NO. 1 ------ 2 146682 3 123666X 4 12000028 5 121520X 6 17000512 7 162240 8 131679 10 76020416 11 105701X 12 19151216 13 74550412 14 10040400 ...
...x .875 Cover Pedal Blk Round Pulley Eng Cl Cable Bolt Hex 7/16-20 x 4 Gr 5 Washer Lock Hlcl Spr 7/16 Keeper Belt Engine FP Guide Belt Mower Drive RH Spacer Axle Washer 25/32 x 1-1/4 x16 Ga E-ring #5133-75 Key Square 2 0 x 1845/ 1865 Washer 25/32 x1-5/8 x 16 Ga Key... Spacer Retainer Washer 13/32 x 2 x 10 Ga. TRACTOR -- Sh 3/8-16 x 1-3/4 Gr. 5 Nut Hex Flange Lock NOTE: All component dimensions given in U. MODEL NUMBER 271150 GROUND DRIVE KEY PART NO. NO. 1 ------ 2 146682 3 123666X 4 12000028 5 121520X 6 17000512 7 162240 8 131679 10 76020416 11 105701X 12 19151216 13 74550412 14 10040400 ...
User Manual
Page 45
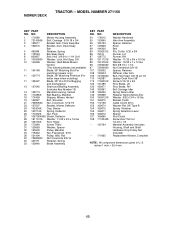
... Idler Spring Return Idler Retainer Spring Yellow Zinc Washer 9/32 x 3/4 x 16 Ga. NO. DESCRIPTION 1 170280 Mower Housing Assembly 2 72140506 Bolt, Carriage 5/16-18 x 3/4 3 138017 Bracket Asm. MOWER DECK TRACTOR -- inches 1 inch = 25.4 mm 45 S. MODEL NUMBER 271150 KEY PART NO. Fram Sway Bar 4 169970 Bracket, Asm. Bracket Clutch Cable Clutch 38 In Washer...
... Idler Spring Return Idler Retainer Spring Yellow Zinc Washer 9/32 x 3/4 x 16 Ga. NO. DESCRIPTION 1 170280 Mower Housing Assembly 2 72140506 Bolt, Carriage 5/16-18 x 3/4 3 138017 Bracket Asm. MOWER DECK TRACTOR -- inches 1 inch = 25.4 mm 45 S. MODEL NUMBER 271150 KEY PART NO. Fram Sway Bar 4 169970 Bracket, Asm. Bracket Clutch Cable Clutch 38 In Washer...


