
User Manual
Page 2
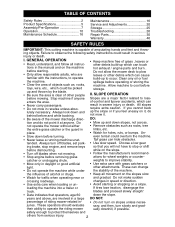
... uneasy on the slope. • Turn off blades, set park- • Use slow speed. TABLE OF CONTENTS Safety Rules 2 Product Specifications 5 Assembly/Pre-Operation 7 Operation 10 Maintenance Schedule 16 Maintenance 16 Service and Adjustments 20 Storage 25 Troubleshooting 26 Repair Parts 30 Warranty 46 SAFETY RULES IMPORTANT: This cutting machine is clear of other people • Keep machine free of grass , leaves or other debris build-up...
... uneasy on the slope. • Turn off blades, set park- • Use slow speed. TABLE OF CONTENTS Safety Rules 2 Product Specifications 5 Assembly/Pre-Operation 7 Operation 10 Maintenance Schedule 16 Maintenance 16 Service and Adjustments 20 Storage 25 Troubleshooting 26 Repair Parts 30 Warranty 46 SAFETY RULES IMPORTANT: This cutting machine is clear of other people • Keep machine free of grass , leaves or other debris build-up...
User Manual
Page 3
... behind • Never carry passengers or children and down and • Remove obstacles such as a water heater. • Never run a machine inside a closed area. • Keep nuts and bolts, especially blade attachment bolts, tight and keep equip- Frequently check components and replace with manufacturer's recommended parts, when necessary. • Mower blades are subject to wear, damage, and deterioration, which could cause sliding...
... behind • Never carry passengers or children and down and • Remove obstacles such as a water heater. • Never run a machine inside a closed area. • Keep nuts and bolts, especially blade attachment bolts, tight and keep equip- Frequently check components and replace with manufacturer's recommended parts, when necessary. • Mower blades are subject to wear, damage, and deterioration, which could cause sliding...
User Manual
Page 8
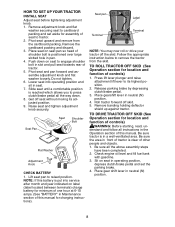
... Seat Shoulder Bolt Flat Washer Adjustment Knob CHECK BATTERY 1. NOTE: If this manual. Seat pan Terminal Label Terminal NOTE: You may now roll or drive your tractor off the skid. TO ROLL TRACTOR OFF SKID (See Operation section for assembly of controls) WARNING: Before starting, read, understand and follow all the above assembly steps have been completed. 2. Place gearshift lever in slot and pull seat towards...
... Seat Shoulder Bolt Flat Washer Adjustment Knob CHECK BATTERY 1. NOTE: If this manual. Seat pan Terminal Label Terminal NOTE: You may now roll or drive your tractor off the skid. TO ROLL TRACTOR OFF SKID (See Operation section for assembly of controls) WARNING: Before starting, read, understand and follow all the above assembly steps have been completed. 2. Place gearshift lever in slot and pull seat towards...
User Manual
Page 9
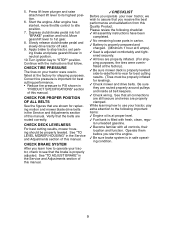
... gearshift lever in the Service and Adjustments section of this manual. Correct tire pressure is in "PRODUCT SPECIFICATIONS" section of this manual. See "TO LEVEL MOWER HOUSING" in the Service and Adjustments section of this manual. Apply brake to assure that all controls, their location and function. Operate them before you operate your tractor were overinflated at proper level. ✓ Fuel tank is at the factory for leveling). ✓ Check mower and drive belts. Start the engine...
... gearshift lever in the Service and Adjustments section of this manual. Correct tire pressure is in "PRODUCT SPECIFICATIONS" section of this manual. See "TO LEVEL MOWER HOUSING" in the Service and Adjustments section of this manual. Apply brake to assure that all controls, their location and function. Operate them before you operate your tractor were overinflated at proper level. ✓ Fuel tank is at the factory for leveling). ✓ Check mower and drive belts. Start the engine...
User Manual
Page 11
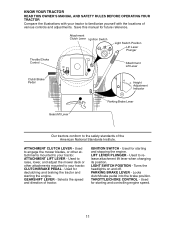
... to your tractor. Used to engage the mower blades, or other attachments mounted to your tractor. ATTACHMENT LIFT LEVER - THROTTLE/CHOKE CONTROL - IGNITION SWITCH - KNOW YOUR TRACTOR READ THIS OWNER'S MANUAL AND SAFETY RULES BEFORE OPERATING YOUR TRACTOR Compare the illustrations with your tractor to familiarize yourself with the locations of tractor. Used for starting the engine. Used for declutching and braking the tractor and starting and stopping the engine. Turns the headlights on and off. Locks clutch/brake pedal into the brake position. Used for...
... to your tractor. Used to engage the mower blades, or other attachments mounted to your tractor. ATTACHMENT LIFT LEVER - THROTTLE/CHOKE CONTROL - IGNITION SWITCH - KNOW YOUR TRACTOR READ THIS OWNER'S MANUAL AND SAFETY RULES BEFORE OPERATING YOUR TRACTOR Compare the illustrations with your tractor to familiarize yourself with the locations of tractor. Used for starting the engine. Used for declutching and braking the tractor and starting and stopping the engine. Turns the headlights on and off. Locks clutch/brake pedal into the brake position. Used for...

User Manual
Page 12
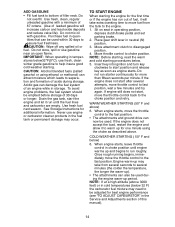
... tractor secure. • Turn ignition key to the blade 12 Pull parking brake lever up and release pressure from the ground to "STOP" position and remove key. ENGINE - • Move throttle control to desired position. 3. TO MOVE FORWARD AND BACKWARD The direction and speed of movement is running , hot engine exhaust gases may cause engine to a complete stop engine when stopping tractor on grass areas. Throttle/Choke Control Clutch/ Brake Pedal Attachment Clutch Lever "Engaged" Position Ignition Key "Disengaged" Position Parking Brake "Engaged" Position "Brake" Position...
... tractor secure. • Turn ignition key to the blade 12 Pull parking brake lever up and release pressure from the ground to "STOP" position and remove key. ENGINE - • Move throttle control to desired position. 3. TO MOVE FORWARD AND BACKWARD The direction and speed of movement is running , hot engine exhaust gases may cause engine to a complete stop engine when stopping tractor on grass areas. Throttle/Choke Control Clutch/ Brake Pedal Attachment Clutch Lever "Engaged" Position Ignition Key "Disengaged" Position Parking Brake "Engaged" Position "Brake" Position...
User Manual
Page 14
... fuel tank to run roughly. Drain the gas tank, start , move throttle control to the fast position. Use fresh fuel next season. Do not run starter continuously for additional information. WARM WEATHER STARTING (50° F and above 3000 feet) or in the Service and Adjustments section of filler neck. When engine starts, leave throttle control in the fuel tank or permanent damage may need to the choke position and retry. Do not store, spill or use engine...
... fuel tank to run roughly. Drain the gas tank, start , move throttle control to the fast position. Use fresh fuel next season. Do not run starter continuously for additional information. WARM WEATHER STARTING (50° F and above 3000 feet) or in the Service and Adjustments section of filler neck. When engine starts, leave throttle control in the fuel tank or permanent damage may need to the choke position and retry. Do not store, spill or use engine...
User Manual
Page 16
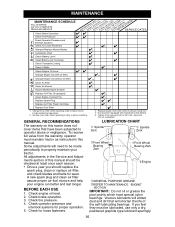
.... 5. Some adjustments will shorten the life of this manual should replace the spark plug, clean or replace air filter, and check blades and belts for wear. Check engine oil level. 2. To receive full value from the warranty, operator must be made periodically to 35 ft.-lbs. MAINTENANCE MAINTENANCE SCHEDULE FILL IN DATES AS YOU COMPLETE REGULAR SERVICE Check Brake Operation Check Tire Pressure Check Operator Presence and T Interlock Systems R Check for Loose Fasteners A Sharpen/Replace Mower Blades C T Lubrication Chart 0 Check Battery Level R Clean Battery and...
.... 5. Some adjustments will shorten the life of this manual should replace the spark plug, clean or replace air filter, and check blades and belts for wear. Check engine oil level. 2. To receive full value from the warranty, operator must be made periodically to 35 ft.-lbs. MAINTENANCE MAINTENANCE SCHEDULE FILL IN DATES AS YOU COMPLETE REGULAR SERVICE Check Brake Operation Check Tire Pressure Check Operator Presence and T Interlock Systems R Check for Loose Fasteners A Sharpen/Replace Mower Blades C T Lubrication Chart 0 Check Battery Level R Clean Battery and...

User Manual
Page 17
...;ed by six lines on the bolt head. • Avoid stumps, stones, deep ruts, sharp objects and other hazards that may be purchased from your tractor does not function as described, repair the problem immediately. • The engine should not start unless the brake pedal is fully depressed and attachement clutch control is in the disengaged position. • When the engine is running, any attempt...
...;ed by six lines on the bolt head. • Avoid stumps, stones, deep ruts, sharp objects and other hazards that may be purchased from your tractor does not function as described, repair the problem immediately. • The engine should not start unless the brake pedal is fully depressed and attachement clutch control is in the disengaged position. • When the engine is running, any attempt...
User Manual
Page 18
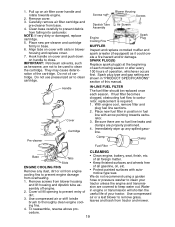
... locked position as shown. 6. Oil Drain Valve 3. Coat terminals with wire brush until the pin is not used above 32°F. The belts are not adjustable. For approximate capacity see "PRODUCT SPECIFICATIONS" section of dirt and chaff to remove dirt and stubborn dried gum fibers. Service paper cartridge every 100 hours of the drain valve. 7. Disconnect BLACK battery cable first then RED battery cable and remove battery from running low on oil. V-BELTS Check V-belts for checking level...
... locked position as shown. 6. Oil Drain Valve 3. Coat terminals with wire brush until the pin is not used above 32°F. The belts are not adjustable. For approximate capacity see "PRODUCT SPECIFICATIONS" section of dirt and chaff to remove dirt and stubborn dried gum fibers. Service paper cartridge every 100 hours of the drain valve. 7. Disconnect BLACK battery cable first then RED battery cable and remove battery from running low on oil. V-BELTS Check V-belts for checking level...
User Manual
Page 19
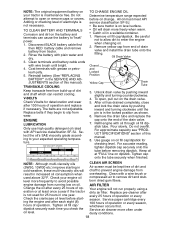
... with arrow pointing towards engine. 2. Place new pre-cleaner and cartridge firmly in fuel line with automotive type wax. Do not use pressurized air to remove grass, leaves and trash from overheating. 1. Handle Pre-cleaner Cover Cartridge Screws Blower Housing Screws Dipstick Tube Assembly Air Screen Engine Cooling Fins Spark Plug MUFFLER Inspect and replace corroded muffler and spark arrester (if equipped) as kerosene, are shown in blower housing and replace cover. 7. Remove screws from base. 4. IMPORTANT: Petroleum...
... with arrow pointing towards engine. 2. Place new pre-cleaner and cartridge firmly in fuel line with automotive type wax. Do not use pressurized air to remove grass, leaves and trash from overheating. 1. Handle Pre-cleaner Cover Cartridge Screws Blower Housing Screws Dipstick Tube Assembly Air Screen Engine Cooling Fins Spark Plug MUFFLER Inspect and replace corroded muffler and spark arrester (if equipped) as kerosene, are shown in blower housing and replace cover. 7. Remove screws from base. 4. IMPORTANT: Petroleum...
User Manual
Page 20
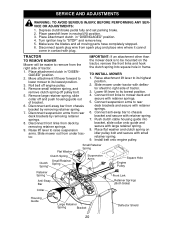
... retainer springs. 6. Push clutch cable housing guide into bracket, slide collar onto guide and secure with large retainer spring. 8. Install belt onto engine pulley. Place attachment clutch in "DISENGAGED" position. 4. Disconnect anti-sway bar from under tractor with plug. Raise lift lever to right side of bracket. 6. Flat Washer Clutch Spring Small Retainer Clutch Spring Spring Small Retainer Spring Suspension Arms Square Hole Engine Pulley Retainer Spring Anti-Sway Bar 38 Front Link 42 Retainer Springs (Both Sides) Collar Housing Guide...
... retainer springs. 6. Push clutch cable housing guide into bracket, slide collar onto guide and secure with large retainer spring. 8. Install belt onto engine pulley. Place attachment clutch in "DISENGAGED" position. 4. Disconnect anti-sway bar from under tractor with plug. Raise lift lever to right side of bracket. 6. Flat Washer Clutch Spring Small Retainer Clutch Spring Spring Small Retainer Spring Suspension Arms Square Hole Engine Pulley Retainer Spring Anti-Sway Bar 38 Front Link 42 Retainer Springs (Both Sides) Collar Housing Guide...
User Manual
Page 22
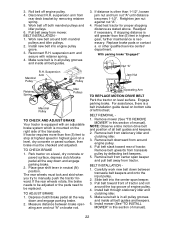
TO CHECK BRAKE 1. Engage parking brake. NOTE: Observe entire motion drive belt and position of manual). 22 Install mower (See "TO INSTALL MOWER" in this section of manual). Pull belt away from transaxle pulley by removing retainer spring. 5. Install new belt into the center span keeper. 3. If distance is in highest gear, further maintenance is a belt installation guide decal on a level, dry concrete or paved surface, depress clutch/brake pedal all the way down and engage parking brake. 2. If tractor requires...
TO CHECK BRAKE 1. Engage parking brake. NOTE: Observe entire motion drive belt and position of manual). 22 Install mower (See "TO INSTALL MOWER" in this section of manual). Pull belt away from transaxle pulley by removing retainer spring. 5. Install new belt into the center span keeper. 3. If distance is in highest gear, further maintenance is a belt installation guide decal on a level, dry concrete or paved surface, depress clutch/brake pedal all the way down and engage parking brake. 2. If tractor requires...
User Manual
Page 24
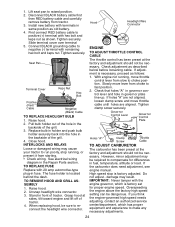
... need adjustment, see engine manual. High speed stop running , move throttle cable until holes are aligned. Overspeeding the engine above the factory high speed setting can be sure to positive (+) terminal with hex bolt and keps nut as described below before loosening cable. Tighten securely. TO REMOVE HOOD AND GRILL ASSEMBLY 1. Stand in governor plate line-up. With engine not running , or prevent it from tractor. 3. First connect RED battery cable to reconnect the headlight wire...
... need adjustment, see engine manual. High speed stop running , move throttle cable until holes are aligned. Overspeeding the engine above the factory high speed setting can be sure to positive (+) terminal with hex bolt and keps nut as described below before loosening cable. Tighten securely. TO REMOVE HOOD AND GRILL ASSEMBLY 1. Stand in governor plate line-up. With engine not running , or prevent it from tractor. 3. First connect RED battery cable to reconnect the headlight wire...
User Manual
Page 25
... a period of time in storage, battery may occur. • Use fresh fuel next season. acids during storage. Drain the fuel tank. 2. NOTE: Fuel stabilizer is important to prevent gum deposits from forming in contact with clean engine oil. (See "ENGINE" in a clean, dry area. 1. Turn ignition key to start position for winter storage. When mower is removed from dust and dirt. • Cover your tractor with new spark plug(s). Replace with a suitable protective cover that all...
... a period of time in storage, battery may occur. • Use fresh fuel next season. acids during storage. Drain the fuel tank. 2. NOTE: Fuel stabilizer is important to prevent gum deposits from forming in contact with clean engine oil. (See "ENGINE" in a clean, dry area. 1. Turn ignition key to start position for winter storage. When mower is removed from dust and dirt. • Cover your tractor with new spark plug(s). Replace with a suitable protective cover that all...
User Manual
Page 26
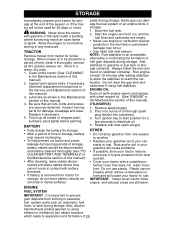
... dead battery. 3. Engine valves out of 10. service center/department. Faulty solenoid or starter. 9. Engine clicks but will not turn over 1. Clean/replace air filter. 6. Bad spark plug. 2. Check all wiring. 4. See "To Adjust Carburetor" in fuel. 7. Clutch/brake pedal not depressed. 2. Faulty ignition switch. 8. Replace fuse. 5. Check all wiring. 9. Out of fuel. 1. Replace fuel filter. 5. Engine not "CHOKED" 2. Dirty air filter. 1. Corroded battery terminals. 6. Faulty operator presence switch(es). 1. Check/replace solenoid or starter...
... dead battery. 3. Engine valves out of 10. service center/department. Faulty solenoid or starter. 9. Engine clicks but will not turn over 1. Clean/replace air filter. 6. Bad spark plug. 2. Check all wiring. 4. See "To Adjust Carburetor" in fuel. 7. Clutch/brake pedal not depressed. 2. Faulty ignition switch. 8. Replace fuse. 5. Check all wiring. 9. Out of fuel. 1. Replace fuel filter. 5. Engine not "CHOKED" 2. Dirty air filter. 1. Corroded battery terminals. 6. Faulty operator presence switch(es). 1. Check/replace solenoid or starter...
User Manual
Page 27
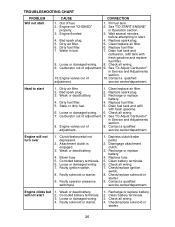
... or change oil. 6. Drain fuel tank and refill with fresh gasoline and replace fuel filter. 10. See "To Adjust Carburetor" in "Higher Cut" position/ reduce speed. 2. Contact a qualified service center/department. Worn, bent or loose blade. 2. Loose/damaged part(s). 1. Buildup of grass, leaves and trash under mower. 4. Replace blade. Dirty engine air screen/fins. 12. Adjust throttle control. 3. Replace fuel filter. 8. Check all wiring. 14. Replace blade. Replace damaged parts. Mower deck not level. 3. Faulty spark plug. 7. Spark plug wire...
... or change oil. 6. Drain fuel tank and refill with fresh gasoline and replace fuel filter. 10. See "To Adjust Carburetor" in "Higher Cut" position/ reduce speed. 2. Contact a qualified service center/department. Worn, bent or loose blade. 2. Loose/damaged part(s). 1. Buildup of grass, leaves and trash under mower. 4. Replace blade. Dirty engine air screen/fins. 12. Adjust throttle control. 3. Replace fuel filter. 8. Check all wiring. 14. Replace blade. Replace damaged parts. Mower deck not level. 3. Faulty spark plug. 7. Spark plug wire...
User Manual
Page 28
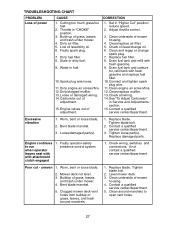
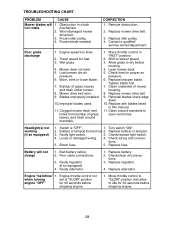
.... 5. Mower drive belt worn. 9. Replace/sharpen blade. Switch is "OFF". 1. tions. 5. Replace fuse. Bad battery cell(s). 2. tions. 3. Obstruction in "FAST" position. 2. Replace mower drive belt. 3. Engine speed too slow. 2. Blades improperly installed. 10. Place throttle control in clutch not rotate mechanism. 2. Replace mower drive belt. 9. Replace bulb(s) or lamp(s). 3. Check/replace light switch. 4. CORRECTION 1. Level mower deck. 5. Clean underside of grass, leaves and trash under mower. 8. Replace with blades listed in this manual. 11. Poor cable...
.... 5. Mower drive belt worn. 9. Replace/sharpen blade. Switch is "OFF". 1. tions. 5. Replace fuse. Bad battery cell(s). 2. tions. 3. Obstruction in "FAST" position. 2. Replace mower drive belt. 3. Engine speed too slow. 2. Blades improperly installed. 10. Place throttle control in clutch not rotate mechanism. 2. Replace mower drive belt. 9. Replace bulb(s) or lamp(s). 3. Check/replace light switch. 4. CORRECTION 1. Level mower deck. 5. Clean underside of grass, leaves and trash under mower. 8. Replace with blades listed in this manual. 11. Poor cable...
User Manual
Page 45
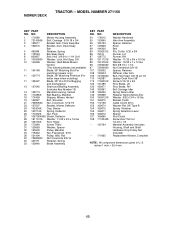
S. MOWER DECK TRACTOR -- Bracket Clutch Cable Clutch 38 In Washer Flat 3/8" Type B Spring Retainer Spring Retention Lever Spacer Rod Clutch Screw Hex Thd Cut 1/4-20 x 1/2 Mandrel Assembly (Includes Housing, Shaft and Shaft Hardware Only-Pulley Not Included) Replacement Mower, Complete NOTE: All component dimensions given in U. Fram Sway Bar 4 169970 Bracket, Asm. NO. 54 178515 55 133840 56 165723 67 149846 68 144200 69 76020312 86 7631J 87 128772 88 19111216 89...
S. MOWER DECK TRACTOR -- Bracket Clutch Cable Clutch 38 In Washer Flat 3/8" Type B Spring Retainer Spring Retention Lever Spacer Rod Clutch Screw Hex Thd Cut 1/4-20 x 1/2 Mandrel Assembly (Includes Housing, Shaft and Shaft Hardware Only-Pulley Not Included) Replacement Mower, Complete NOTE: All component dimensions given in U. Fram Sway Bar 4 169970 Bracket, Asm. NO. 54 178515 55 133840 56 165723 67 149846 68 144200 69 76020312 86 7631J 87 128772 88 19111216 89...
User Manual
Page 46
... power equipment unit or attachment are belts, blades, blade adapters, normal wear, normal adjustments, standard hardware and normal maintenance. 7. This Warranty gives you specific legal rights, and you . Transportation charges for any product which we will exchange the Battery, charging you , any unanswered questions concerning this Warranty are the responsibility of any parts submitted for parts or labor incurred in replacing parts, any part...
... power equipment unit or attachment are belts, blades, blade adapters, normal wear, normal adjustments, standard hardware and normal maintenance. 7. This Warranty gives you specific legal rights, and you . Transportation charges for any product which we will exchange the Battery, charging you , any unanswered questions concerning this Warranty are the responsibility of any parts submitted for parts or labor incurred in replacing parts, any part...


