
User Manual
Page 2
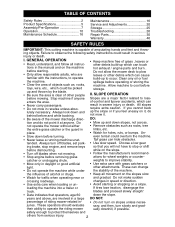
... look down slopes, not across. If you cannot back up which can touch hot exhaust / engine parts and burn . even terrain could result in the manual and on the slope. • Turn off blades, set park- • Use slow speed. tended. while on the machine before and while backing. • Be...
... look down slopes, not across. If you cannot back up which can touch hot exhaust / engine parts and burn . even terrain could result in the manual and on the slope. • Turn off blades, set park- • Use slow speed. tended. while on the machine before and while backing. • Be...
User Manual
Page 5
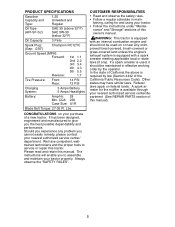
... will enable you the best possible dependability and performance. It has been designed, engineered and manufactured to give you to service or repair this manual). 5 In the state of California the above 32°F) SAE 5W-30 (below 32°F) Oil Capacity: 3 Pints Spark Plug: ... • Read and observe the safety rules. • Follow a regular schedule in effective working order by law (Section 4442 of this manual. nance" and "Storage" sections of the California Public Resources Code). Should you experience any unimproved forest-covered, brush-covered or grass-covered ...
... will enable you the best possible dependability and performance. It has been designed, engineered and manufactured to give you to service or repair this manual). 5 In the state of California the above 32°F) SAE 5W-30 (below 32°F) Oil Capacity: 3 Pints Spark Plug: ... • Read and observe the safety rules. • Follow a regular schedule in effective working order by law (Section 4442 of this manual. nance" and "Storage" sections of the California Public Resources Code). Should you experience any unimproved forest-covered, brush-covered or grass-covered ...

User Manual
Page 7
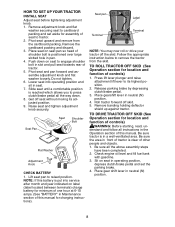
... REMOVE TRACTOR FROM CARTON UNPACK CARTON 1. Assemble large flat washer, 1/2 hex nut and tighten securely. 7. Check for shipping purposes. Align mounting holes in this manual, it means, from tractor hood and grill. Slide extension shaft onto lower steering shaft. INSTALL STEERING WHEEL 3.
... REMOVE TRACTOR FROM CARTON UNPACK CARTON 1. Assemble large flat washer, 1/2 hex nut and tighten securely. 7. Check for shipping purposes. Align mounting holes in this manual, it means, from tractor hood and grill. Slide extension shaft onto lower steering shaft. INSTALL STEERING WHEEL 3.
User Manual
Page 8
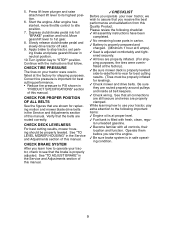
... 1. Remove banding holding deflector shield up against tractor. Be sure all the way down on seat pan so head of this manual for minimum of this manual. Check engine oil level and fill fuel tank with gasoline. 3. NOTE: If this battery is put into operating position and sit in...
... 1. Remove banding holding deflector shield up against tractor. Be sure all the way down on seat pan so head of this manual for minimum of this manual. Check engine oil level and fill fuel tank with gasoline. 3. NOTE: If this battery is put into operating position and sit in...
User Manual
Page 9
... are properly clamped. Move gearshift lever to "STOP" position. CHECK BRAKE SYSTEM After you receive the best performance and satisfaction from this manual. Apply brake to the following checklist: ✓ All assembly instructions have been completed. ✓ No remaining loose parts in fl... were overinflated at the factory for replacing motion and mower blade drive belts in "PRODUCT SPECIFICATIONS" section of this manual. Correct tire pressure is filled with fresh, clean, regular unleaded gasoline. ✓ Become familiar with the instructions that...
... are properly clamped. Move gearshift lever to "STOP" position. CHECK BRAKE SYSTEM After you receive the best performance and satisfaction from this manual. Apply brake to the following checklist: ✓ All assembly instructions have been completed. ✓ No remaining loose parts in fl... were overinflated at the factory for replacing motion and mower blade drive belts in "PRODUCT SPECIFICATIONS" section of this manual. Correct tire pressure is filled with fresh, clean, regular unleaded gasoline. ✓ Become familiar with the instructions that...
User Manual
Page 11
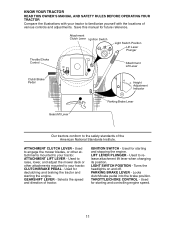
ATTACHMENT CLUTCH LEVER - IGNITION SWITCH - KNOW YOUR TRACTOR READ THIS OWNER'S MANUAL AND SAFETY RULES BEFORE OPERATING YOUR TRACTOR Compare the illustrations with the locations of various controls and adjustments. Used to engage the mower ... the mower deck or other attachments mounted to your tractor to your tractor. CLUTCH/BRAKE PEDAL - GEARSHIFT LEVER - PARKING BRAKE LEVER - Save this manual for starting and stopping the engine. Used for starting the engine. LIGHT SWITCH POSITION - Used for declutching and braking the tractor and starting and controlling...
ATTACHMENT CLUTCH LEVER - IGNITION SWITCH - KNOW YOUR TRACTOR READ THIS OWNER'S MANUAL AND SAFETY RULES BEFORE OPERATING YOUR TRACTOR Compare the illustrations with the locations of various controls and adjustments. Used to engage the mower ... the mower deck or other attachments mounted to your tractor to your tractor. CLUTCH/BRAKE PEDAL - GEARSHIFT LEVER - PARKING BRAKE LEVER - Save this manual for starting and stopping the engine. Used for starting the engine. LIGHT SWITCH POSITION - Used for declutching and braking the tractor and starting and controlling...

User Manual
Page 13
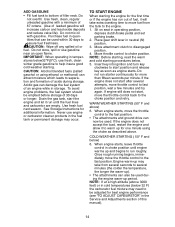
... hood from damage when transporting your tractor has been shipped, from the factory, already filled with summer weight oil. 1. Too heavy of this manual). • To change oil for easier starting (See "OIL VISCOSITY CHART" in the Maintenance section of a load, while on a truck or ... clutch engaged will shut off the engine. 1. TO STOP MOWER BLADES disengage attachment clutch control. TO OPERATE MOWER Your tractor is in this manual. • Choose the slowest speed before start- proximately 2-1/2 inches during hot months. CAUTION: Do not operate the mower without either the ...
... hood from damage when transporting your tractor has been shipped, from the factory, already filled with summer weight oil. 1. Too heavy of this manual). • To change oil for easier starting (See "OIL VISCOSITY CHART" in the Maintenance section of a load, while on a truck or ... clutch engaged will shut off the engine. 1. TO STOP MOWER BLADES disengage attachment clutch control. TO OPERATE MOWER Your tractor is in this manual. • Choose the slowest speed before start- proximately 2-1/2 inches during hot months. CAUTION: Do not operate the mower without either the ...
User Manual
Page 14
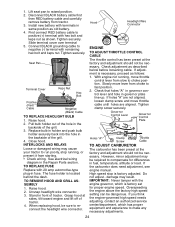
... the gas tank, start position and release key as soon as described above. Move attachment clutch to choke position. Do not run out of this manual). 14 WARM WEATHER STARTING (50° F and above 3000 feet) or in cold temperatures (below 32 F) the carburetor fuel mixture may need to be adjusted...
... the gas tank, start position and release key as soon as described above. Move attachment clutch to choke position. Do not run out of this manual). 14 WARM WEATHER STARTING (50° F and above 3000 feet) or in cold temperatures (below 32 F) the carburetor fuel mixture may need to be adjusted...
User Manual
Page 15
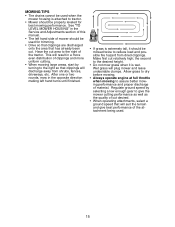
... area to the right of material. Wet grass will suit the terrain and give the mower cutting performance as well as the quality of this manual. • The left hand turns until finished. • If grass is wet. Regulate ground speed by turning to the right so that will plug...
... area to the right of material. Wet grass will suit the terrain and give the mower cutting performance as well as the quality of this manual. • The left hand turns until finished. • If grass is wet. Regulate ground speed by turning to the right so that will plug...
User Manual
Page 16
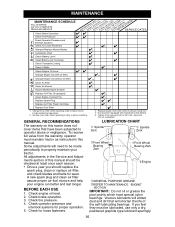
...better and last longer. To receive full value from the warranty, operator must be made periodically to 35 ft.-lbs. All adjustments in this manual should replace the spark plug, clean or replace air filter, and check blades and belts for wear. Not required if equipped with... Air Filter Paper Cartridge Replace Fuel Filter 1 - GENERAL RECOMMENDATIONS The warranty on this tractor does not cover items that will shorten the life of this manual. Check tire pressure. 4. Check for proper operation. 5. If you should be checked at least once each season. • Once a year you ...
...better and last longer. To receive full value from the warranty, operator must be made periodically to 35 ft.-lbs. All adjustments in this manual should replace the spark plug, clean or replace air filter, and check blades and belts for wear. Not required if equipped with... Air Filter Paper Cartridge Replace Fuel Filter 1 - GENERAL RECOMMENDATIONS The warranty on this tractor does not cover items that will shorten the life of this manual. Check tire pressure. 4. Check for proper operation. 5. If you should be checked at least once each season. • Once a year you ...

User Manual
Page 17
... mower blades must align with balancer.) NOTE: Do not use . BLADE REMOVAL 1. "TO ADJUST BRAKE" in the Service and Adjustments section of this manual). • Keep tires free of the blade moves downward, sharpen the heavy end until the blade is grade 8 heat treated. If your local parts...be purchased from your tractor does not function as shown. Raise mower to highest position to allow access to an unthreaded portion of this manual). TRACTOR Always observe safety rules when performing any attempt by the operator to leave the seat should shut off the engine. • When...
... mower blades must align with balancer.) NOTE: Do not use . BLADE REMOVAL 1. "TO ADJUST BRAKE" in the Service and Adjustments section of this manual). • Keep tires free of the blade moves downward, sharpen the heavy end until the blade is grade 8 heat treated. If your local parts...be purchased from your tractor does not function as shown. Raise mower to highest position to allow access to an unthreaded portion of this manual). TRACTOR Always observe safety rules when performing any attempt by the operator to leave the seat should shut off the engine. • When...
User Manual
Page 18
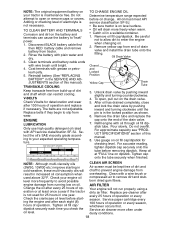
... when used for 25 hours in the SERVICE AND ADJUSTMENTS section of operation or every season. Service paper cartridge every 100 hours of this manual). All oil must be kept free of operation or at "FULL" line on dipstick. Coat terminals with oil through oil fill dip...cable and remove battery from wear. 3. Use gauge on oil fill cap/dipstick for deterioration and wear after every 25 hours of this manual. 8. Determine temperature range expected before oil change. The belts are not adjustable. TRANSAXLE COOLING Yellow Cap Drain Tube Keep transaxle free from end ...
... when used for 25 hours in the SERVICE AND ADJUSTMENTS section of operation or every season. Service paper cartridge every 100 hours of this manual). All oil must be kept free of operation or at "FULL" line on dipstick. Coat terminals with oil through oil fill dip...cable and remove battery from wear. 3. Use gauge on oil fill cap/dipstick for deterioration and wear after every 25 hours of this manual. 8. Determine temperature range expected before oil change. The belts are not adjustable. TRANSAXLE COOLING Yellow Cap Drain Tube Keep transaxle free from end ...
User Manual
Page 19
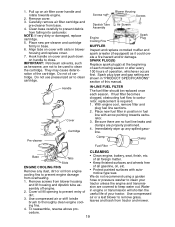
... engine cool, remove filter and plug fuel line sections. 2. To reassemble, reverse above procedure. • Keep finished surfaces and wheels free of this manual. Align tabs on air filter cover handle and rotate towards carburetor. 3. Do not oil cartridge. If fuel filter becomes clogged, obstructing fuel fl...
... engine cool, remove filter and plug fuel line sections. 2. To reassemble, reverse above procedure. • Keep finished surfaces and wheels free of this manual. Align tabs on air filter cover handle and rotate towards carburetor. 3. Do not oil cartridge. If fuel filter becomes clogged, obstructing fuel fl...
User Manual
Page 21
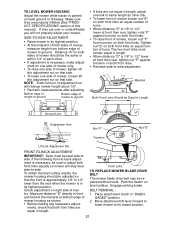
... ground • If links are properly in front and behind the mandrel at front than rear, tighten nut "F" against trunnion on both sides of this manual). Front Links TO REPLACE MOWER BLADE DRIVE BELT The mower blade drive belt may be level side-to ground. Move attachment lift lever forward to...
... ground • If links are properly in front and behind the mandrel at front than rear, tighten nut "F" against trunnion on both sides of this manual). Front Links TO REPLACE MOWER BLADE DRIVE BELT The mower blade drive belt may be level side-to ground. Move attachment lift lever forward to...
User Manual
Page 22
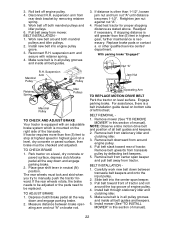
...TO REPLACE MOTION DRIVE BELT Park the tractor on brake rod. Pull belt slack toward front of tractor and roll around the top groove of manual). 22 Remove belt from center span keeper and pull belt away from around both mandrel pulleys and idler pulleys. 6. Slide belt into engine... feet to be checked and adjusted. Park tractor on a level, dry concrete or paved surface, then brake must lock and skid when you try to manually push the tractor forward. For assistance, there is in this section of left footrest. Remove mower (See "TO REMOVE MOWER" in neutral (N) position. ...
...TO REPLACE MOTION DRIVE BELT Park the tractor on brake rod. Pull belt slack toward front of tractor and roll around the top groove of manual). 22 Remove belt from center span keeper and pull belt away from around both mandrel pulleys and idler pulleys. 6. Slide belt into engine... feet to be checked and adjusted. Park tractor on a level, dry concrete or paved surface, then brake must lock and skid when you try to manually push the tractor forward. For assistance, there is in this section of left footrest. Remove mower (See "TO REMOVE MOWER" in neutral (N) position. ...
User Manual
Page 23
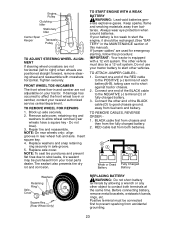
... first to allow wheel removal (rear wheels have a square key - Repair tire and reassemble. If "jumper cables" are used for emergency starting, follow this manual). TO ATTACH JUMPER CABLES - 1. BLACK cable first from chassis and then from batteries. Weak or Dead Fully Charged Battery Battery Washers Retaining Ring Axle...
... first to allow wheel removal (rear wheels have a square key - Repair tire and reassemble. If "jumper cables" are used for emergency starting, follow this manual). TO ATTACH JUMPER CABLES - 1. BLACK cable first from chassis and then from batteries. Weak or Dead Fully Charged Battery Battery Washers Retaining Ring Axle...
User Manual
Page 24
... ADJUST CARBURETOR The carburetor has been preset at sides, tilt toward engine and lift off of tractor. If the carburetor does need adjustment, see engine manual. IMPORTANT: Never tamper with remaining hex bolt and keps nut. Install new battery with 20 amp automotive-type plug-in the backside of the grill...
... ADJUST CARBURETOR The carburetor has been preset at sides, tilt toward engine and lift off of tractor. If the carburetor does need adjustment, see engine manual. IMPORTANT: Never tamper with remaining hex bolt and keps nut. Install new battery with 20 amp automotive-type plug-in the backside of the grill...
User Manual
Page 25
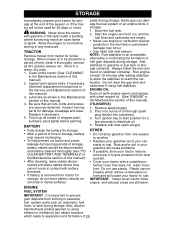
...store your tractor indoors and cover it thoroughly, remove all dirt, grease, leaves, etc. sand lightly before storing in the Maintenance section of this manual). 3. Drain the fuel tank. 2. Do not drain the gas tank and carburetor if using ethanol or methanol) can attract moisture which allows condensation...• Replace your gasoline can if your can damage the fuel system of an engine while in the Service and Adjustments section of this manual). Rust and/or dirt in fuel tank or storage container. Plastic cannot breathe which leads to prevent gum deposits from dust and dirt. ...
...store your tractor indoors and cover it thoroughly, remove all dirt, grease, leaves, etc. sand lightly before storing in the Maintenance section of this manual). 3. Drain the fuel tank. 2. Do not drain the gas tank and carburetor if using ethanol or methanol) can attract moisture which allows condensation...• Replace your gasoline can if your can damage the fuel system of an engine while in the Service and Adjustments section of this manual). Rust and/or dirt in fuel tank or storage container. Plastic cannot breathe which leads to prevent gum deposits from dust and dirt. ...
User Manual
Page 28
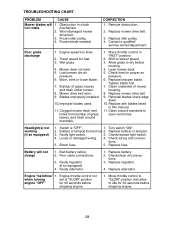
...- Buildup of mower housing. 8. Level mower deck. 5. Reinstall blades sharp edge down. 10. Clean underside of grass, leaves and trash under mower. 8. Obstruction in this manual. 11. Mower deck not level. 5. TROUBLESHOOTING CHART PROBLEM CAUSE Mower blades will not charge 1. Place throttle control in "FAST" position. 2. Tighten blade bolt. 7. Check wiring...
...- Buildup of mower housing. 8. Level mower deck. 5. Reinstall blades sharp edge down. 10. Clean underside of grass, leaves and trash under mower. 8. Obstruction in this manual. 11. Mower deck not level. 5. TROUBLESHOOTING CHART PROBLEM CAUSE Mower blades will not charge 1. Place throttle control in "FAST" position. 2. Tighten blade bolt. 7. Check wiring...
User Manual
Page 41
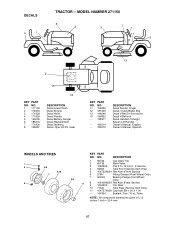
... Lower Dash Decal Engine Decal Hood Decal Fender Decal Battery Danger Decal Replacement Decal Steering Decal, Oper sdl P/L Gear 13 KEY PART NO. MODEL NUMBER 271150 6 3 1 3 7 11 5 8 2 15 KEY PART NO. DESCRIPTION 1 59192 Cap Valve Tire 2 65139 Stem Valve 3 106222X Tire F Ts 15 X 6 0 - 6 Service 4 59904 Tube Front (Service Item Only... DESCRIPTION Decal Fender Dnger Decal, Clutch/Brake Eng Decal V-Belt Dr Sch tractor Decal V-Belt sch Decal Handle Lft Height Adjust (Lift Handle) Owner's Manual, English Owner's Manual, Spanish WHEELS AND TIRES 1 2 5,8 4,10 7 6 KEY PART NO.
... Lower Dash Decal Engine Decal Hood Decal Fender Decal Battery Danger Decal Replacement Decal Steering Decal, Oper sdl P/L Gear 13 KEY PART NO. MODEL NUMBER 271150 6 3 1 3 7 11 5 8 2 15 KEY PART NO. DESCRIPTION 1 59192 Cap Valve Tire 2 65139 Stem Valve 3 106222X Tire F Ts 15 X 6 0 - 6 Service 4 59904 Tube Front (Service Item Only... DESCRIPTION Decal Fender Dnger Decal, Clutch/Brake Eng Decal V-Belt Dr Sch tractor Decal V-Belt sch Decal Handle Lft Height Adjust (Lift Handle) Owner's Manual, English Owner's Manual, Spanish WHEELS AND TIRES 1 2 5,8 4,10 7 6 KEY PART NO.


