
User Manual
Page 9
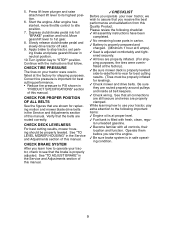
...Turn ignition key to stop tractor, set parking brake and place gearshift lever in flated for leveling). ✓ Check mower and drive belts. Continue with all controls, their location and function. CHECK DECK LEVELNESS For best cutting results, mower housing should be properly in neutral position... in the Service and Adjustments section of this Quality Product. Correct tire pressure is important for replacing motion and mower blade drive belts in the Service and Adjustments section of this manual. See "TO LEVEL MOWER HOUSING" in the Service and Adjustments section of ...
...Turn ignition key to stop tractor, set parking brake and place gearshift lever in flated for leveling). ✓ Check mower and drive belts. Continue with all controls, their location and function. CHECK DECK LEVELNESS For best cutting results, mower housing should be properly in neutral position... in the Service and Adjustments section of this Quality Product. Correct tire pressure is important for replacing motion and mower blade drive belts in the Service and Adjustments section of this manual. See "TO LEVEL MOWER HOUSING" in the Service and Adjustments section of ...
User Manual
Page 16
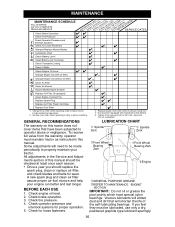
... Blades C T Lubrication Chart 0 Check Battery Level R Clean Battery and Terminals Check Transaxle Cooling BEFOREEEVAECRHYU8ESVHEEORUYRS2E5VHEROYUR5E0SVEHROYUR1E0SV0EHROYUBSREESFAOSROEN STORAGE SERVICE DATES 5 3 4 Check V-Belts Check Engine Oil Level Change Engine Oil (with maintenance-free battery. 5 - MAINTENANCE MAINTENANCE SCHEDULE FILL IN DATES AS YOU COMPLETE REGULAR SERVICE Check... should replace the spark plug, clean or replace air filter, and check blades and belts for proper operation. 5. Do not overtighten. All adjustments in high ambient temperatures. 2 -
... Blades C T Lubrication Chart 0 Check Battery Level R Clean Battery and Terminals Check Transaxle Cooling BEFOREEEVAECRHYU8ESVHEEORUYRS2E5VHEROYUR5E0SVEHROYUR1E0SV0EHROYUBSREESFAOSROEN STORAGE SERVICE DATES 5 3 4 Check V-Belts Check Engine Oil Level Change Engine Oil (with maintenance-free battery. 5 - MAINTENANCE MAINTENANCE SCHEDULE FILL IN DATES AS YOU COMPLETE REGULAR SERVICE Check... should replace the spark plug, clean or replace air filter, and check blades and belts for proper operation. 5. Do not overtighten. All adjustments in high ambient temperatures. 2 -
User Manual
Page 18
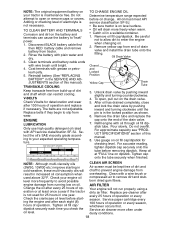
...Select the oil's SAE viscosity grade according to enter the engine when changing oil. 2. All oil must be kept free of operation. Replace belts if they begin to open , pull out on TO CHANGE ENGINE OIL your tractor is maintenance free. Service air cleaner more freely when warm.... cap/dipstick for deterioration and wear after every 25 hours of this manual). Adding or checking level of operation and replace if necessary. V-BELTS Check V-belts for checking level. Remove oil fill cap/dipstick. Tighten cap onto the tube securely when finished. Clean with plain water ...
...Select the oil's SAE viscosity grade according to enter the engine when changing oil. 2. All oil must be kept free of operation. Replace belts if they begin to open , pull out on TO CHANGE ENGINE OIL your tractor is maintenance free. Service air cleaner more freely when warm.... cap/dipstick for deterioration and wear after every 25 hours of this manual). Adding or checking level of operation and replace if necessary. V-BELTS Check V-belts for checking level. Remove oil fill cap/dipstick. Tighten cap onto the tube securely when finished. Clean with plain water ...
User Manual
Page 20
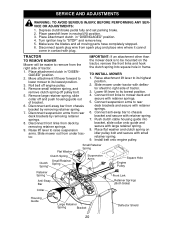
... Shield 20 Raise lift lever to raise suspension arms. Slide mower out from spark plug and place wire where it cannot come in "DISEN- Roll belt off pulley bolt. 5. Disconnect front links from the right side of tractor. 1. Slide mower under tractor. Connect anti-sway bar to chassis bracket and ...out of tractor. 3. IMPORTANT: If an attachment other than the mower deck is to be easier to rear deck brackets and secure with plug. Install belt onto engine pulley. SERVICE AND ADJUSTMENTS WARNING: TO AVOID SERIOUS INJURY, BEFORE PERFORMING ANY SERVICE OR ADJUSTMENTS: 1.
... Shield 20 Raise lift lever to raise suspension arms. Slide mower out from spark plug and place wire where it cannot come in "DISEN- Roll belt off pulley bolt. 5. Disconnect front links from the right side of tractor. 1. Slide mower under tractor. Connect anti-sway bar to chassis bracket and ...out of tractor. 3. IMPORTANT: If an attachment other than the mower deck is to be easier to rear deck brackets and secure with plug. Install belt onto engine pulley. SERVICE AND ADJUSTMENTS WARNING: TO AVOID SERIOUS INJURY, BEFORE PERFORMING ANY SERVICE OR ADJUSTMENTS: 1.
User Manual
Page 21
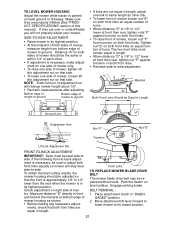
...Links Should be Equal in front and behind the mandrel at bottom edge of turns. ments, check that the front is approximately 1/8" to -side. BELT REMOVAL 1. Check adjustment on both front links are over or underinflated, you will change mower height about 1/8". • Recheck measurements after ... lower at front than the rear when the mower is parked on both front links. Front Links TO REPLACE MOWER BLADE DRIVE BELT The mower blade drive belt may be level side-to its highest position. • At the midpoint of both sides of mower, measure height from trunnion...
...Links Should be Equal in front and behind the mandrel at bottom edge of turns. ments, check that the front is approximately 1/8" to -side. BELT REMOVAL 1. Check adjustment on both front links are over or underinflated, you will change mower height about 1/8". • Recheck measurements after ... lower at front than the rear when the mower is parked on both front links. Front Links TO REPLACE MOWER BLADE DRIVE BELT The mower blade drive belt may be level side-to its highest position. • At the midpoint of both sides of mower, measure height from trunnion...
User Manual
Page 22
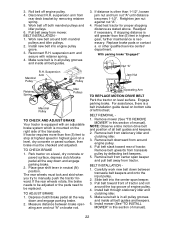
...footrest. TO CHECK BRAKE 1. Place gear shift lever in highest gear on the right side of engine pulley. 4. Depress clutch/brake pedal all belt guides and keepers. 6. Remove mower (See "TO REMOVE MOWER" in all pulley grooves and inside all the way down and engage parking brake. 2.... jam nut against nut "A". 4. Reconnect R.H. If stopping distance is still greater than five (5) feet to be checked and adjusted. Work new belt around both mandrel pulleys and idler pulleys. 6. If the rear wheels rotate, the brake needs to be adjusted or the pads need to stop at...
...footrest. TO CHECK BRAKE 1. Place gear shift lever in highest gear on the right side of engine pulley. 4. Depress clutch/brake pedal all belt guides and keepers. 6. Remove mower (See "TO REMOVE MOWER" in all pulley grooves and inside all the way down and engage parking brake. 2.... jam nut against nut "A". 4. Reconnect R.H. If stopping distance is still greater than five (5) feet to be checked and adjusted. Work new belt around both mandrel pulleys and idler pulleys. 6. If the rear wheels rotate, the brake needs to be adjusted or the pads need to stop at...
User Manual
Page 25
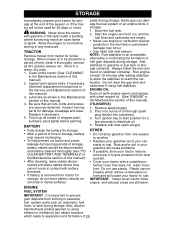
... occur. • Use fresh fuel next season. acids during storage. Always follow the mix ratio found on concrete or damp surfaces. Inspect and replace belts, if necessary (See belt replacement instructions in fuel tank or storage container. Touch up all dirt, grease, leaves, etc. Pour one season to another. • Replace your...
... occur. • Use fresh fuel next season. acids during storage. Always follow the mix ratio found on concrete or damp surfaces. Inspect and replace belts, if necessary (See belt replacement instructions in fuel tank or storage container. Touch up all dirt, grease, leaves, etc. Pour one season to another. • Replace your...
User Manual
Page 28
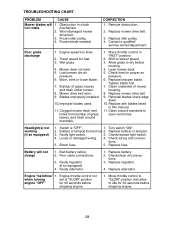
...listed in "FAST" position. 2. Turn switch "ON". 2. Battery will 1. Faulty regulator (if so equipped). 4. Check/clean all connec- Replace mower drive belt. 9. Check wiring and connec- Replace fuse. Engine speed too slow. 2. Allow grass to idle for proper air pressure. 6. Level mower deck. 5. ... seconds before stopping engine. 28 Low/uneven tire air pressure. 6. Switch is "OFF". 1. Worn/damaged mower drive belt. 3. Poor cable connections. 3. Mower drive belt worn. 9. Headlight(s) not working (if so equipped) 1. Engine "backfires" 1.
...listed in "FAST" position. 2. Turn switch "ON". 2. Battery will 1. Faulty regulator (if so equipped). 4. Check/clean all connec- Replace mower drive belt. 9. Check wiring and connec- Replace fuse. Engine speed too slow. 2. Allow grass to idle for proper air pressure. 6. Level mower deck. 5. ... seconds before stopping engine. 28 Low/uneven tire air pressure. 6. Switch is "OFF". 1. Worn/damaged mower drive belt. 3. Poor cable connections. 3. Mower drive belt worn. 9. Headlight(s) not working (if so equipped) 1. Engine "backfires" 1.
User Manual
Page 35
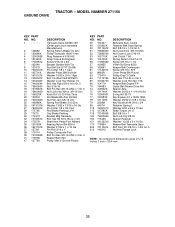
... 112 19091210 113 127285X 116 72140608 120 73900600 150 175456 151 19133210 170 178394 202 72110614 212 145212 DESCRIPTION Bellcrank Asm. Keeper Belt Transaxle Gear Bolt Carr. S. MODEL NUMBER 271150 GROUND DRIVE KEY PART NO. NO. 1 ------ 2 146682 3 123666X 4 12000028 5 121520X 6 17000512 7 162240 8 131679 10 76020416 11 105701X...Screw 3/8-16 x .875 Cover Pedal Blk Round Pulley Eng Cl Cable Bolt Hex 7/16-20 x 4 Gr 5 Washer Lock Hlcl Spr 7/16 Keeper Belt Engine FP Guide Belt Mower Drive RH Spacer Axle Washer 25/32 x 1-1/4 x16 Ga E-ring #5133-75 Key Square 2 0 x 1845/ 1865 Washer 25/32 x1-5/8...
... 112 19091210 113 127285X 116 72140608 120 73900600 150 175456 151 19133210 170 178394 202 72110614 212 145212 DESCRIPTION Bellcrank Asm. Keeper Belt Transaxle Gear Bolt Carr. S. MODEL NUMBER 271150 GROUND DRIVE KEY PART NO. NO. 1 ------ 2 146682 3 123666X 4 12000028 5 121520X 6 17000512 7 162240 8 131679 10 76020416 11 105701X...Screw 3/8-16 x .875 Cover Pedal Blk Round Pulley Eng Cl Cable Bolt Hex 7/16-20 x 4 Gr 5 Washer Lock Hlcl Spr 7/16 Keeper Belt Engine FP Guide Belt Mower Drive RH Spacer Axle Washer 25/32 x 1-1/4 x16 Ga E-ring #5133-75 Key Square 2 0 x 1845/ 1865 Washer 25/32 x1-5/8...
User Manual
Page 41
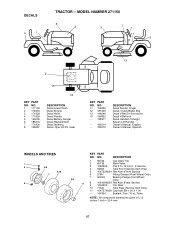
... 12 181249 13 146046 15 136832 - - 138311 - - 185514 - - 185515 DESCRIPTION Decal Fender Dnger Decal, Clutch/Brake Eng Decal V-Belt Dr Sch tractor Decal V-Belt sch Decal Handle Lft Height Adjust (Lift Handle) Owner's Manual, English Owner's Manual, Spanish WHEELS AND TIRES 1 2 5,8 4,10 7... Fender Decal Battery Danger Decal Replacement Decal Steering Decal, Oper sdl P/L Gear 13 KEY PART NO. Tube) NOTE: All component dimensions given in U. MODEL NUMBER 271150 6 3 1 3 7 11 5 8 2 15 KEY PART NO. DESCRIPTION 1 59192 Cap Valve Tire 2 65139 Stem Valve 3 106222X Tire F Ts 15 X ...
... 12 181249 13 146046 15 136832 - - 138311 - - 185514 - - 185515 DESCRIPTION Decal Fender Dnger Decal, Clutch/Brake Eng Decal V-Belt Dr Sch tractor Decal V-Belt sch Decal Handle Lft Height Adjust (Lift Handle) Owner's Manual, English Owner's Manual, Spanish WHEELS AND TIRES 1 2 5,8 4,10 7... Fender Decal Battery Danger Decal Replacement Decal Steering Decal, Oper sdl P/L Gear 13 KEY PART NO. Tube) NOTE: All component dimensions given in U. MODEL NUMBER 271150 6 3 1 3 7 11 5 8 2 15 KEY PART NO. DESCRIPTION 1 59192 Cap Valve Tire 2 65139 Stem Valve 3 106222X Tire F Ts 15 X ...
User Manual
Page 45
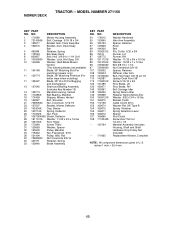
... 152 172758 153 169674 154 169675 155 169671 156 169672 157 169669 158 17720408 - - 130794 - - 171665 DESCRIPTION Washer Hardened Idler Arm Assembly Spacer, Retainer Knob Belt Pin, Cotter 3/32 x 3/4 Runner, LH Runner, RH Washer 11/32 x 3/4 x 16 Ga Washer 13/32 x 1 x 12 Ga Bolt 3/8-16 x 1-1/4 Nut Centerlock 3/8-16 Spacer, Retainer Stiffener..., Flangelock 9/16 36 131494 Pulley, Idler, Flat 40 73680600 Nut Crownlock 3/8-16 45 4497H Retainer, Spring 53 130840 Brake Assembly KEY PART NO. MODEL NUMBER 271150 KEY PART NO.
... 152 172758 153 169674 154 169675 155 169671 156 169672 157 169669 158 17720408 - - 130794 - - 171665 DESCRIPTION Washer Hardened Idler Arm Assembly Spacer, Retainer Knob Belt Pin, Cotter 3/32 x 3/4 Runner, LH Runner, RH Washer 11/32 x 3/4 x 16 Ga Washer 13/32 x 1 x 12 Ga Bolt 3/8-16 x 1-1/4 Nut Centerlock 3/8-16 Spacer, Retainer Stiffener..., Flangelock 9/16 36 131494 Pulley, Idler, Flat 40 73680600 Nut Crownlock 3/8-16 45 4497H Retainer, Spring 53 130840 Brake Assembly KEY PART NO. MODEL NUMBER 271150 KEY PART NO.
User Manual
Page 46
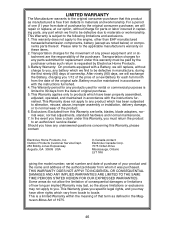
... Warranty period for any battery which vary from whom it was purchased. This Warranty does not apply to any power equipment unit or attachment are belts, blades, blade adapters, normal wear, normal adjustments, standard hardware and normal maintenance. 7. Exclusions: Excluded from the date of any product which we find to...
... Warranty period for any battery which vary from whom it was purchased. This Warranty does not apply to any power equipment unit or attachment are belts, blades, blade adapters, normal wear, normal adjustments, standard hardware and normal maintenance. 7. Exclusions: Excluded from the date of any product which we find to...

