

User Manual
Page 1
... includes the INSTRUCTION BOOKS, the REPLACEMENT PARTS and the WARRANTIES. WHERE PURCHASED DATE PURCHASED: Month______ Day ______ Year ______ MODEL NO DATE OF MANUFACTURE: _________ 198933 04.19.05 BY Printed in U.S.A. This book contains important information on SAFETY, ASSEMBLY, OPERATION, MAINTENANCE & STORAGE. RECORD THE FOLLOWING INFORMATION ABOUT YOUR UNIT. THIS INFORMATION IS NECESSARY WHEN ORDERING PARTS OR IN...
... includes the INSTRUCTION BOOKS, the REPLACEMENT PARTS and the WARRANTIES. WHERE PURCHASED DATE PURCHASED: Month______ Day ______ Year ______ MODEL NO DATE OF MANUFACTURE: _________ 198933 04.19.05 BY Printed in U.S.A. This book contains important information on SAFETY, ASSEMBLY, OPERATION, MAINTENANCE & STORAGE. RECORD THE FOLLOWING INFORMATION ABOUT YOUR UNIT. THIS INFORMATION IS NECESSARY WHEN ORDERING PARTS OR IN...

User Manual
Page 2
... not apply to any power equipment unit or attachment are belts, blades, blade adapters, normal wear, normal adjustments, standard hardware and normal maintenance. 7. Moss Act of a new Battery for parts or labor incurred in replacing parts, any battery which we find to be defective due to materials or workmanship. Transportation charges for replacement under this Warranty, you have any products used for rental or commercial...
... not apply to any power equipment unit or attachment are belts, blades, blade adapters, normal wear, normal adjustments, standard hardware and normal maintenance. 7. Moss Act of a new Battery for parts or labor incurred in replacing parts, any battery which we find to be defective due to materials or workmanship. Transportation charges for replacement under this Warranty, you have any products used for rental or commercial...

User Manual
Page 3
... make sure the unit is correctly assembled. toys, wire, bones, sticks, etc., which WARNING: Engine exhaust, some mechanical ability. To avoid • Do not operate the mower without severe burns on the unit. The owner must carefully check the unit according to the instructions in the manual are familiar with authorized or approved replacement parts. 8. Operate the unit only with some of...
... make sure the unit is correctly assembled. toys, wire, bones, sticks, etc., which WARNING: Engine exhaust, some mechanical ability. To avoid • Do not operate the mower without severe burns on the unit. The owner must carefully check the unit according to the instructions in the manual are familiar with authorized or approved replacement parts. 8. Operate the unit only with some of...
User Manual
Page 4
... the spark plug wire, and keep wire away from a gasoline DO: • Mow across the face of ignition. • Use only an approved container. • Never remove gas cap or add fuel with the engine running . Never as- • Keep machine free of your vehicle before filling. • Remove gas-powered equipment from Slopes are a major factor related to cool before starting . • Keep nuts and bolts, especially blade...
... the spark plug wire, and keep wire away from a gasoline DO: • Mow across the face of ignition. • Use only an approved container. • Never remove gas cap or add fuel with the engine running . Never as- • Keep machine free of your vehicle before filling. • Remove gas-powered equipment from Slopes are a major factor related to cool before starting . • Keep nuts and bolts, especially blade...
User Manual
Page 5
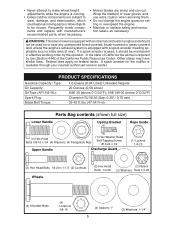
... SPECIFICATIONS Gasoline Capacity / Type: Oil Capacity: Oil Type (API SG-SL): Spark Plug: Blade Bolt Torque: 1.0 Quarts (0,94 Litres) Unleaded Regular 20 Ounces (0,58 Litres) SAE 30 (above is required by the operator. lbs. (47-54 N-m) Parts Bag contents (shown full size) Lower Handle Upstop Bracket Rope Guide (4) Hex Head Bolts 3/8-16 x 3/4 (4) Washers (4) Flangelock Nuts (1) Hex Washer Head Self-Tapping Screw #10-24 x 1/2 Upper Handle Discharge Guard (1) Locknut 1/4-20 (2) Hex Head Bolts 1/4-20 x 1-1/2 (2) Locknuts Wheels (2) Hex Head (2) Nylock Bolts...
... SPECIFICATIONS Gasoline Capacity / Type: Oil Capacity: Oil Type (API SG-SL): Spark Plug: Blade Bolt Torque: 1.0 Quarts (0,94 Litres) Unleaded Regular 20 Ounces (0,58 Litres) SAE 30 (above is required by the operator. lbs. (47-54 N-m) Parts Bag contents (shown full size) Lower Handle Upstop Bracket Rope Guide (4) Hex Head Bolts 3/8-16 x 3/4 (4) Washers (4) Flangelock Nuts (1) Hex Washer Head Self-Tapping Screw #10-24 x 1/2 Upper Handle Discharge Guard (1) Locknut 1/4-20 (2) Hex Head Bolts 1/4-20 x 1-1/2 (2) Locknuts Wheels (2) Hex Head (2) Nylock Bolts...
User Manual
Page 6
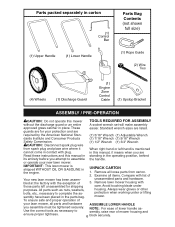
... housing and ensure proper tightness. 6 block securely. Parts packed separately in carton (1) Control Bar (1) Upper Handle (1) Lower Handle Parts Bag Contents (not shown full size) (1) Rope Guide (2) Wire Ties (4) Wheels (1) Discharge Guard (1) Engine Zone Control Cable (1) Upstop Bracket ASSEMBLY / PRE-OPERATION CAUTION: Do not operate this mower TOOLS REQUIRED FOR ASSEMBLY without the discharge guard or an entire A socket wrench set will make assembly approved grass catcher in the engine. IMPORTANT: This lawn mower is mentioned cannot come in the operating position...
... housing and ensure proper tightness. 6 block securely. Parts packed separately in carton (1) Control Bar (1) Upper Handle (1) Lower Handle Parts Bag Contents (not shown full size) (1) Rope Guide (2) Wire Ties (4) Wheels (1) Discharge Guard (1) Engine Zone Control Cable (1) Upstop Bracket ASSEMBLY / PRE-OPERATION CAUTION: Do not operate this mower TOOLS REQUIRED FOR ASSEMBLY without the discharge guard or an entire A socket wrench set will make assembly approved grass catcher in the engine. IMPORTANT: This lawn mower is mentioned cannot come in the operating position...
User Manual
Page 7
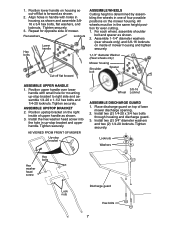
... for even cutting. 1. For each wheel, assemble shoulder bolt and spacer as shown. 2. ASSEMBLE UPSTOP BRACKET 2. Install two (2) 1/4-20 x 3/4 hex bolts through housing and discharge guard. 3. Assemble 1-1/4" diameter washers (rear wheels only) and 3/8-16 locknuts on top of upper handle as shown and assemble 3/816 x 3/4 hex bolts, flat washers, and locknuts. Locknuts Washers Hex washer head screw Hex bolts Lock nuts Discharge guard Hex bolts 7 Position upstop bracket on the mower housing. 1. AS...
... for even cutting. 1. For each wheel, assemble shoulder bolt and spacer as shown. 2. ASSEMBLE UPSTOP BRACKET 2. Install two (2) 1/4-20 x 3/4 hex bolts through housing and discharge guard. 3. Assemble 1-1/4" diameter washers (rear wheels only) and 3/8-16 locknuts on top of upper handle as shown and assemble 3/816 x 3/4 hex bolts, flat washers, and locknuts. Locknuts Washers Hex washer head screw Hex bolts Lock nuts Discharge guard Hex bolts 7 Position upstop bracket on the mower housing. 1. AS...
User Manual
Page 8
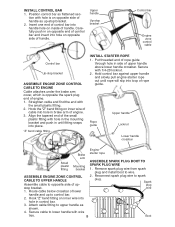
... handle. Spark plug stop bracket ASSEMBLE ENGINE ZONE CONTROL CABLE TO ENGINE Cable attaches under the brake arm cover, which is on inside of the small plastic fitting with the small plastic fitting. 2. Attach cable fitting to lower handle with wire ties. 8 Boot Hold control bar against upper handle and slowly pull engine starter rope out until fitting snaps into loop of lower handle and up - 2. wire 1. "Z" bend cable fitting INSTALL STARTER ROPE 1. Rope guide Upper handle...
... handle. Spark plug stop bracket ASSEMBLE ENGINE ZONE CONTROL CABLE TO ENGINE Cable attaches under the brake arm cover, which is on inside of the small plastic fitting with the small plastic fitting. 2. Attach cable fitting to lower handle with wire ties. 8 Boot Hold control bar against upper handle and slowly pull engine starter rope out until fitting snaps into loop of lower handle and up - 2. wire 1. "Z" bend cable fitting INSTALL STARTER ROPE 1. Rope guide Upper handle...

User Manual
Page 9
... their meaning. Operator presence control bar Starter handle Air filter Engine oil cap with dipstick Muffler Housing Gasoline filler cap Discharge guard Spark plug Primer IMPORTANT: This lawn mower is running. Consumer Product Safety Commission. pumps additional fuel from the be held down to the handle to start the carburetor to familiarize yourself with the product. starting engine. 9 These symbols may appear on your lawn mower to the cylinder for starting a cold engine. MEETS CPSC...
... their meaning. Operator presence control bar Starter handle Air filter Engine oil cap with dipstick Muffler Housing Gasoline filler cap Discharge guard Spark plug Primer IMPORTANT: This lawn mower is running. Consumer Product Safety Commission. pumps additional fuel from the be held down to the handle to start the carburetor to familiarize yourself with the product. starting engine. 9 These symbols may appear on your lawn mower to the cylinder for starting a cold engine. MEETS CPSC...

User Manual
Page 10
... oil or fuel. Medium position is best for optimum performance. Reinstall wheel components in the Maintenance section of this manual. Primer Spacer Wheel Bolt 3/8-16 Locknut ADD GASOLINE • Fill fuel tank to use gasoline near an open flame. 10 It is level. 2. Do not under dusty, dirty conditions. The blade turns when the engine is running. • Your lawn mower is shipped without oil in order to full line...
... oil or fuel. Medium position is best for optimum performance. Reinstall wheel components in the Maintenance section of this manual. Primer Spacer Wheel Bolt 3/8-16 Locknut ADD GASOLINE • Fill fuel tank to use gasoline near an open flame. 10 It is level. 2. Do not under dusty, dirty conditions. The blade turns when the engine is running. • Your lawn mower is shipped without oil in order to full line...
User Manual
Page 11
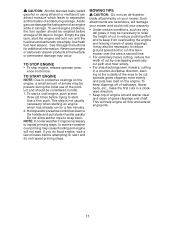
... ENGINE • To stop engine, release operator presence control bar. Hold operator presence control bar down to snap back. Do not allow starter rope to the handle and pull starter handle quickly. Acidic gas can attract moisture which has already run the lawn mower over priming may be necessary to reduce ground speed and/or run for additional information. To avoid engine problems, the fuel system should be considered normal. 1. Empty the gas tank, start the engine...
... ENGINE • To stop engine, release operator presence control bar. Hold operator presence control bar down to snap back. Do not allow starter rope to the handle and pull starter handle quickly. Acidic gas can attract moisture which has already run the lawn mower over priming may be necessary to reduce ground speed and/or run for additional information. To avoid engine problems, the fuel system should be considered normal. 1. Empty the gas tank, start the engine...
User Manual
Page 12
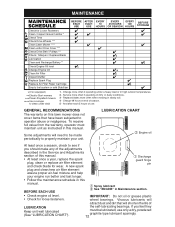
...Catcher * Check Tires Check Drive Wheels *** Clean Lawn Mower **** Clean under Drive Cover *** Check Drive Belt / Pulleys *** Check / Sharpen / Replace Blade Lubrication Clean and Recharge Battery ** Check Engine Oil level Change Engine Oil Clean Air Filter Inspect Muffler Replace Spark Plug Replace Air Filter Paper Cartridge Empty fuel system or add Stabilizer * (if so equipped) ** Electric-Start mowers *** **** Power-Propelled mowers Use a scraper to clean under a heavy load or in high outdoor temperatures. 2 - A new spark ➀ Discharge guard hinge pin plug and clean/new air...
...Catcher * Check Tires Check Drive Wheels *** Clean Lawn Mower **** Clean under Drive Cover *** Check Drive Belt / Pulleys *** Check / Sharpen / Replace Blade Lubrication Clean and Recharge Battery ** Check Engine Oil level Change Engine Oil Clean Air Filter Inspect Muffler Replace Spark Plug Replace Air Filter Paper Cartridge Empty fuel system or add Stabilizer * (if so equipped) ** Electric-Start mowers *** **** Power-Propelled mowers Use a scraper to clean under a heavy load or in high outdoor temperatures. 2 - A new spark ➀ Discharge guard hinge pin plug and clean/new air...
User Manual
Page 13
... cause tire damage. Install the blade bolt with the raised lugs on its side. If bolt needs replacing, replace only with approved bolt shown in the Repair Parts NOTE: Although multi-viscosity oils (5W30, 10W30 etc.) improve starting the engine and after every 25 hours of your warranty. LAWN MOWER Always observe safety rules when performing any maintenance. Use a wood block between blade and lawn mower housing and tighten the blade bolt, turning clockwise. •...
... cause tire damage. Install the blade bolt with the raised lugs on its side. If bolt needs replacing, replace only with approved bolt shown in the Repair Parts NOTE: Although multi-viscosity oils (5W30, 10W30 etc.) improve starting the engine and after every 25 hours of your warranty. LAWN MOWER Always observe safety rules when performing any maintenance. Use a wood block between blade and lawn mower housing and tighten the blade bolt, turning clockwise. •...
User Manual
Page 14
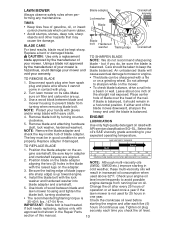
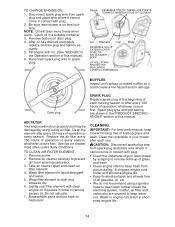
... oil drain plug. 4. Remove screw. 2. CAUTION: Disconnect spark plug wire from spark plug and place wire where it could create a fire hazard and/or damage. Drain plug AIR FILTER Your engine will drain more often under dusty conditions. TO CLEAN AIR FILTER ELEMENT 1. CLEANING IMPORTANT: For best performance, keep trash from entering carburetor. 3. TO CHANGE ENGINE OIL 1. Be sure lawn mower is on carburetor. NOTE: Oil will not run properly and may be damaged by scraping to remove build-up grass...
... oil drain plug. 4. Remove screw. 2. CAUTION: Disconnect spark plug wire from spark plug and place wire where it could create a fire hazard and/or damage. Drain plug AIR FILTER Your engine will drain more often under dusty conditions. TO CLEAN AIR FILTER ELEMENT 1. CLEANING IMPORTANT: For best performance, keep trash from entering carburetor. 3. TO CHANGE ENGINE OIL 1. Be sure lawn mower is on carburetor. NOTE: Oil will not run properly and may be damaged by scraping to remove build-up grass...
User Manual
Page 15
... to increase engine speed or it thoroughly, remove all nuts, bolts, screws, and pins are empty. • Never use engine or carburetor cleaner products in the Maintenance section of the discharge opening of your lawn mower for 30 days or more. Disconnect spark plug wire from spark plug and place wire where it run until the fuel lines and carburetor are securely fastened. If you think the engine-governed high speed needs adjusting, contact a qualified service center...
... to increase engine speed or it thoroughly, remove all nuts, bolts, screws, and pins are empty. • Never use engine or carburetor cleaner products in the Maintenance section of the discharge opening of your lawn mower for 30 days or more. Disconnect spark plug wire from spark plug and place wire where it run until the fuel lines and carburetor are securely fastened. If you think the engine-governed high speed needs adjusting, contact a qualified service center...
User Manual
Page 16
..., clean gasoline. 4. Depress control bar to the ON position. 11. Connect battery to distribute oil. 4. NOTE: Fuel stabilizer is disconnected. 6. Pull starter handle slowly a few times to engine. 16 Replace with a suitable protective cover that does not retain moisture. Rust and/or dirt in your gasoline will cause your unit with new spark plug. CAUTION: Never store the lawn mower with clean engine oil. (See "ENGINE" in released position. 9. TROUBLESHOOTING - Dirty air filter. 2. Fill fuel tank. 3. Disconnected battery...
..., clean gasoline. 4. Depress control bar to the ON position. 11. Connect battery to distribute oil. 4. NOTE: Fuel stabilizer is disconnected. 6. Pull starter handle slowly a few times to engine. 16 Replace with a suitable protective cover that does not retain moisture. Rust and/or dirt in your gasoline will cause your unit with new spark plug. CAUTION: Never store the lawn mower with clean engine oil. (See "ENGINE" in released position. 9. TROUBLESHOOTING - Dirty air filter. 2. Fill fuel tank. 3. Disconnected battery...
User Manual
Page 17
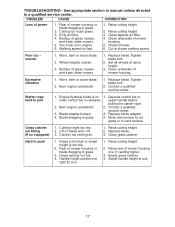
...Excessive vibration 1. Raise cutting height. 2. Handle height position not right for you. 1. Adjust handle height to pull 1. Raise cutting height. 2. uneven 1. Engine flywheel brake is released. Bent engine crankshaft. 2. Move lawn mower to cut - Empty grass catcher. 4. See appropriate section in grass. 4. Cutting too much oil in grass. 3. Walking speed too fast. 1. Check oil level. 6. Depress control bar to a qualified service center. Lift on 1. Clean grass catcher. Clean underside of power 1. Grass is too high or wheel height is too low...
...Excessive vibration 1. Raise cutting height. 2. Handle height position not right for you. 1. Adjust handle height to pull 1. Raise cutting height. 2. uneven 1. Engine flywheel brake is released. Bent engine crankshaft. 2. Move lawn mower to cut - Empty grass catcher. 4. See appropriate section in grass. 4. Cutting too much oil in grass. 3. Walking speed too fast. 1. Check oil level. 6. Depress control bar to a qualified service center. Lift on 1. Clean grass catcher. Clean underside of power 1. Grass is too high or wheel height is too low...

User Manual
Page 18
Model Number / Manufacturer's I.D. Description of your unit. Number b. ¨ PARTS AND SERVICE This product has been expertly engineered and carefully manufactured to rigid quality standards. For Technical Assistance: call 1-800-849-1297 • For replacement parts, have available the following information: a. As with all mechanical products, some adjustments or part replacement may be necessary during the life of part. For Parts and Service, contact our authorized distributor: call 1-800-829-5886
Model Number / Manufacturer's I.D. Description of your unit. Number b. ¨ PARTS AND SERVICE This product has been expertly engineered and carefully manufactured to rigid quality standards. For Technical Assistance: call 1-800-849-1297 • For replacement parts, have available the following information: a. As with all mechanical products, some adjustments or part replacement may be necessary during the life of part. For Parts and Service, contact our authorized distributor: call 1-800-829-5886


