

User Manual
Page 2
... grass -covered land in some states, including California(Public Resources Codes 4442 and 4443), Idaho, Maine, Minnesota, New Jersey, Oregon, and Washington: Certain internal combustion engines operated on U.S. a equipped with a spark arrestor, maintained in your area, contact your Authorized Service Dealer for the prevention of the law. Nonadjustable CARBURETOR: Diaphragm All Position With Adjustable Fuel Mixture Jets SERIAL NUMBER AND STARTING INSTRUCTIONS THROTTLE TRIGGER .1 HANDLE SAFETY LABELS DRIVE SHAFT HOUSING ENGINE "OFF": STARTER: MUFFLER: CUTTING PATH: Positive Switch...
... grass -covered land in some states, including California(Public Resources Codes 4442 and 4443), Idaho, Maine, Minnesota, New Jersey, Oregon, and Washington: Certain internal combustion engines operated on U.S. a equipped with a spark arrestor, maintained in your area, contact your Authorized Service Dealer for the prevention of the law. Nonadjustable CARBURETOR: Diaphragm All Position With Adjustable Fuel Mixture Jets SERIAL NUMBER AND STARTING INSTRUCTIONS THROTTLE TRIGGER .1 HANDLE SAFETY LABELS DRIVE SHAFT HOUSING ENGINE "OFF": STARTER: MUFFLER: CUTTING PATH: Positive Switch...
User Manual
Page 4
..., change in the carburetor by blade or trimmer head which can be cut before using the unit. • Maintain the unit according to cool and secure unit before starting engine. • Stop engine and allow smoking near fuel or the unit or while using the unit. Use up fuel left in skin color or texture, or loss of this manual. Remove objects (rocks, broken glass, nails, wire, string...
..., change in the carburetor by blade or trimmer head which can be cut before using the unit. • Maintain the unit according to cool and secure unit before starting engine. • Stop engine and allow smoking near fuel or the unit or while using the unit. Use up fuel left in skin color or texture, or loss of this manual. Remove objects (rocks, broken glass, nails, wire, string...

User Manual
Page 5
... the operator or others. F. After removing the contents from the carton, check the parts against the list. 2. Examine the parts for large lawns and to hear the fuel filter rattle in the Plastic Bag. QTY • Engine/Drive Shaft/Bearing • Housing Assy. Screw - Trimmer Head 1 G. D. A. G. trimming, scalping, mowing, and sweeping. NOTE: It is normal to make short work of a variety of lawn care tasks -- Blade 1 * • Blade - 8 inch, 4 point...
... the operator or others. F. After removing the contents from the carton, check the parts against the list. 2. Examine the parts for large lawns and to hear the fuel filter rattle in the Plastic Bag. QTY • Engine/Drive Shaft/Bearing • Housing Assy. Screw - Trimmer Head 1 G. D. A. G. trimming, scalping, mowing, and sweeping. NOTE: It is normal to make short work of a variety of lawn care tasks -- Blade 1 * • Blade - 8 inch, 4 point...

User Manual
Page 6
... operator. Trimmer Head Hex Wrench(s) provided with the length of Shield Limiter Toward Engine Direction to keep the arbor shaft from turning. Adjustable Wrench - NOTE: Remove the metal shield and blade before you assemble the tool and to help you begin assembly. through the bearing housing into the aligned holes in Figure 2 . 7. Figure 2 (inset). 8. Wrench Bearing Housing Clamp Widest Part\ Line of the drive shaft housing. If you will need...
... operator. Trimmer Head Hex Wrench(s) provided with the length of Shield Limiter Toward Engine Direction to keep the arbor shaft from turning. Adjustable Wrench - NOTE: Remove the metal shield and blade before you assemble the tool and to help you begin assembly. through the bearing housing into the aligned holes in Figure 2 . 7. Figure 2 (inset). 8. Wrench Bearing Housing Clamp Widest Part\ Line of the drive shaft housing. If you will need...

User Manual
Page 7
..." instructions. Place the other cover on the dust cup. Hold retention plate "G." Insert screws "B."(one of the handlebar must be installed as a line trimmer, re move the plastic shield, grass washer, and trimmer head before installing the metal shield and blade. Install the blade over arbor shaft, making sure the hole in Figure 4 . 8. Figure 4 . 7. A WARNING The barrier portion of the covers under the bearing housing. R 14/ Cover...
..." instructions. Place the other cover on the dust cup. Hold retention plate "G." Insert screws "B."(one of the handlebar must be installed as a line trimmer, re move the plastic shield, grass washer, and trimmer head before installing the metal shield and blade. Install the blade over arbor shaft, making sure the hole in Figure 4 . 8. Figure 4 . 7. A WARNING The barrier portion of the covers under the bearing housing. R 14/ Cover...

User Manual
Page 8
... twist is attached to the operating position. Without operator bending over 2 inches Figure 6 NOTES SHOULDER STRAP A WARNING Proper shoulder strap and handlebar adjustments before starting the engine and beginning a cutting operation. 2. To make sure the strap rests flat on shoulder strap and adjust for height. Check for safe and efficient use. 1. Left arm fully extended, hand holdinghandlebar griP• b. c. g. Do not locate the shoulder...
... twist is attached to the operating position. Without operator bending over 2 inches Figure 6 NOTES SHOULDER STRAP A WARNING Proper shoulder strap and handlebar adjustments before starting the engine and beginning a cutting operation. 2. To make sure the strap rests flat on shoulder strap and adjust for height. Check for safe and efficient use. 1. Left arm fully extended, hand holdinghandlebar griP• b. c. g. Do not locate the shoulder...
User Manual
Page 9
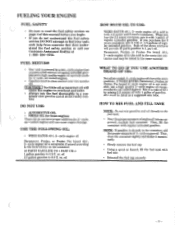
... gasoline. seek help from someone that requires a fuel mixture of regular unleaded gasoline and a high quality engine oil specially made for air cooled engines. oil HOW MUCH OIL TO USE: WEED EATER 40:1, 2 -cycle engine oil is powered by mixing 3.2 ounces oil with 2-1/2 gallons of engine oil into an approved, marked fuel container. Paramount, Poulan, or Poulan Pro brand 40:1, 2 -cycle engine oil is not available, use a high quality 2-cycle engine oil recommended for 2 -cycle, air cooled engines. Pour the proper measure of regular unleaded...
... gasoline. seek help from someone that requires a fuel mixture of regular unleaded gasoline and a high quality engine oil specially made for air cooled engines. oil HOW MUCH OIL TO USE: WEED EATER 40:1, 2 -cycle engine oil is powered by mixing 3.2 ounces oil with 2-1/2 gallons of engine oil into an approved, marked fuel container. Paramount, Poulan, or Poulan Pro brand 40:1, 2 -cycle engine oil is not available, use a high quality 2-cycle engine oil recommended for 2 -cycle, air cooled engines. Pour the proper measure of regular unleaded...

User Manual
Page 10
... shipping guard on ground, supporting trimmer head off ground. If so, go to the next step immediately. • Move the choke lever to the "Full Choke" position and press the primer bulb 6 times; squeeze and hold the throttle trigger. Keep the throttle trigger fully squeezed until the engine runs smoothly. • Pull starter rope sharply until the engine runs, but no more than 6 more times. STARTING POSITION 1 Switch Choke Lever Primer Bulb _OFF _HALF -FuLL. A WARNING The trimmer head will turn when the engine starts...
... shipping guard on ground, supporting trimmer head off ground. If so, go to the next step immediately. • Move the choke lever to the "Full Choke" position and press the primer bulb 6 times; squeeze and hold the throttle trigger. Keep the throttle trigger fully squeezed until the engine runs smoothly. • Pull starter rope sharply until the engine runs, but no more than 6 more times. STARTING POSITION 1 Switch Choke Lever Primer Bulb _OFF _HALF -FuLL. A WARNING The trimmer head will turn when the engine starts...

User Manual
Page 11
... "Guard Against Blade Thrust". • When using the blade, bring the engine to full throttle before removing materials wrapped around blade. If the blade or trimmer head on your unit turns when the engine is properly seated in serious injury to contact cut you if accidentally touched. A WARNING The operator or others . OPERATING INSTRUCTIONS • When using the trimmer head, do not run at idle speed. The cutting line will be cut material with the engine running or...
... "Guard Against Blade Thrust". • When using the blade, bring the engine to full throttle before removing materials wrapped around blade. If the blade or trimmer head on your unit turns when the engine is properly seated in serious injury to contact cut you if accidentally touched. A WARNING The operator or others . OPERATING INSTRUCTIONS • When using the trimmer head, do not run at idle speed. The cutting line will be cut material with the engine running or...
User Manual
Page 13
... blade as amputation. Never start or run the engine inside a closed room or building. Keep handles free of alcohol, drugs or medication. e. do not use shoulder strap for all fasteners are in this section. Remove objects (rocks, broken glass, nails, wire, string, etc.) which can cause serious injury such as an edger. c. Cut at full throttle and is more likely to stop for fuel...
... blade as amputation. Never start or run the engine inside a closed room or building. Keep handles free of alcohol, drugs or medication. e. do not use shoulder strap for all fasteners are in this section. Remove objects (rocks, broken glass, nails, wire, string, etc.) which can cause serious injury such as an edger. c. Cut at full throttle and is more likely to stop for fuel...

User Manual
Page 14
... . Do not raise the engine above your body from the operator and tool. TAP -N -GO® Trimmer Head (see Accessory list for cutting. Keep firm footing and balance. a. Stop the engine if you are approached. b. 4. MAINTAIN CONTROL a. Move forward to the next area to 10 o'clock position for proper part number) '41:(zi e" Use Only Genuine WEED EATER Replacement Parts A WARNING DAMAGED TRIMMER HEAD Trimmer head parts that you are in ) 60...
... . Do not raise the engine above your body from the operator and tool. TAP -N -GO® Trimmer Head (see Accessory list for cutting. Keep firm footing and balance. a. Stop the engine if you are approached. b. 4. MAINTAIN CONTROL a. Move forward to the next area to 10 o'clock position for proper part number) '41:(zi e" Use Only Genuine WEED EATER Replacement Parts A WARNING DAMAGED TRIMMER HEAD Trimmer head parts that you are in ) 60...
User Manual
Page 15
... the line, or be cut before each time the bottom of your unit. Be the sure trimmer head stops turning when the engine idles. f. Hold tool by the line limiter. • Always keep the engine on surfaces such as wire, string, rope, etc. Keep the trimmer head below waist level. See Figure 13 . A WARNING Use only .080" diameter WEED EATER brand line. Do not operate this manual. Keep others away when making carburetor adjustments. Inspect...
... the line, or be cut before each time the bottom of your unit. Be the sure trimmer head stops turning when the engine idles. f. Hold tool by the line limiter. • Always keep the engine on surfaces such as wire, string, rope, etc. Keep the trimmer head below waist level. See Figure 13 . A WARNING Use only .080" diameter WEED EATER brand line. Do not operate this manual. Keep others away when making carburetor adjustments. Inspect...

User Manual
Page 17
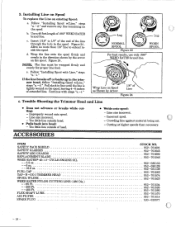
.... h. Spool Replacement a. Figure 20 . A WARNING The line saver must be installed only from the trimmer head. To Remove, Turn Lock Ring Counterclockwise To Replace, Turn Lock Ring Clockwise Lock Tab --' Lock Iting Figure 19 Spool Lugs Lock Tab Hub Tap Button Drive Gear Lock Ring Line Saver--••• Figure 20 Catch - To replace the spool, follow the instructions in the Lock Ring. Use only genuine WEED EATER pre - b. Do not use . After a groove is pressed, approximately 2 inches...
.... h. Spool Replacement a. Figure 20 . A WARNING The line saver must be installed only from the trimmer head. To Remove, Turn Lock Ring Counterclockwise To Replace, Turn Lock Ring Clockwise Lock Tab --' Lock Iting Figure 19 Spool Lugs Lock Tab Hub Tap Button Drive Gear Lock Ring Line Saver--••• Figure 20 Catch - To replace the spool, follow the instructions in the Lock Ring. Use only genuine WEED EATER pre - b. Do not use . After a groove is pressed, approximately 2 inches...
User Manual
Page 18
... GUARDS REPLACEMENT BLADE WEED EATER® 40:1 2-CYCLE ENGINE OIL - -3.2 oz. - -8 oz - -19.6 oz. 3. Installing Line on Spool To replace the Line on the spool. and remove any line remaining on existing Spool: a. If the line breaks off or backs up in the spool. Continue with Line," steps a C Lug Lug NORMAL SPOOL Figure 23 WORN SPOOL For best results, use only .080" WEED EATER brand line. Wrap Line on Spool as Shown by the arrow on the spool, leaving 4-6 inches...
... GUARDS REPLACEMENT BLADE WEED EATER® 40:1 2-CYCLE ENGINE OIL - -3.2 oz. - -8 oz - -19.6 oz. 3. Installing Line on Spool To replace the Line on the spool. and remove any line remaining on existing Spool: a. If the line breaks off or backs up in the spool. Continue with Line," steps a C Lug Lug NORMAL SPOOL Figure 23 WORN SPOOL For best results, use only .080" WEED EATER brand line. Wrap Line on Spool as Shown by the arrow on the spool, leaving 4-6 inches...
User Manual
Page 19
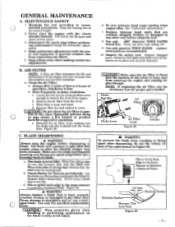
... blade. Never start the engine with the lower end supported to help avoid injury. Disconnect the spark plug before performing maintenance except for flatness before using the tool. 8. Make carburetor adjustments with the clutch shroud removed. Be sure trimmer head stops turning when engine idles. Use only .080" diameter WEED EATER brand line. Never use a damaged blade. Use only genuine WEED EATER replacement parts as recommended. 10. Clean the Air Filter: • Always after the throttle trigger has been released. b. CAUTION: Do not clean the air filter...
... blade. Never start the engine with the lower end supported to help avoid injury. Disconnect the spark plug before performing maintenance except for flatness before using the tool. 8. Make carburetor adjustments with the clutch shroud removed. Be sure trimmer head stops turning when engine idles. Use only .080" diameter WEED EATER brand line. Never use a damaged blade. Use only genuine WEED EATER replacement parts as recommended. 10. Clean the Air Filter: • Always after the throttle trigger has been released. b. CAUTION: Do not clean the air filter...

User Manual
Page 20
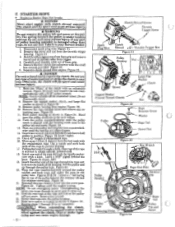
... remove any object. It is at idle position. TROUBLE SHOOTING SUGGESTIONS - See "Idle Speed Adjustment" and "Deceleration Check." - Before operating if the tool has been stored for the proper:part number. Carefully pull throttle cable out of the tube. 10. Check the drive shaft for 5 hours, the engine has broken-in Trigger Figure 28 N Barrel End of harmful emissions after wiping shaft, grease residue can pick up on muffler outlets, etc. Spark Plug Wire "Nose Cone" Screws Throttle Trigger Screw Throttle Trigger Nut...
... remove any object. It is at idle position. TROUBLE SHOOTING SUGGESTIONS - See "Idle Speed Adjustment" and "Deceleration Check." - Before operating if the tool has been stored for the proper:part number. Carefully pull throttle cable out of the tube. 10. Check the drive shaft for 5 hours, the engine has broken-in Trigger Figure 28 N Barrel End of harmful emissions after wiping shaft, grease residue can pick up on muffler outlets, etc. Spark Plug Wire "Nose Cone" Screws Throttle Trigger Screw Throttle Trigger Nut...
User Manual
Page 21
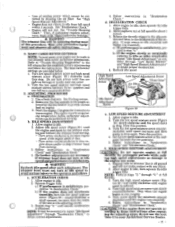
...Allow engine to idle. 2. Support tube so trimmer line is reduced. 4. Turn high speed mixture screw very slowly counterclockwise. I CATITION: I . ADJUSTING PROCEDURE a. See Fueling section. 2. c. Allow engine to idle. 2. Repeat step "2." Recheck idle speed. Turn the low speed mixture screw (Figure 30 ) slowly clockwise until speed increases and then starts to run . Turn the low speed mixture screw counterclocicwise until the speed starts to your protective equipment and observe all safety instructions. 2. Follow instructions in "Deceleration Check." Take...
...Allow engine to idle. 2. Support tube so trimmer line is reduced. 4. Turn high speed mixture screw very slowly counterclockwise. I CATITION: I . ADJUSTING PROCEDURE a. See Fueling section. 2. c. Allow engine to idle. 2. Repeat step "2." Recheck idle speed. Turn the low speed mixture screw (Figure 30 ) slowly clockwise until speed increases and then starts to run . Turn the low speed mixture screw counterclocicwise until the speed starts to your protective equipment and observe all safety instructions. 2. Follow instructions in "Deceleration Check." Take...
User Manual
Page 22
... of Spark Plug Wire Clutch Shroud :la- NOTE: Do not overtighten screw. Remove the screw and nut from engine. A DANGER Use only a hand tool to obtain smooth, pointed ends. 18. Insert the other than rope, do not use any type of the clutch with the replacement rope. Figures 33 & 34 . F. Figure 34 (inset -left). 19. Throttle Trigger Nut Figure 31 Pulley Housing kycnr Nut 0 0 NZ' Spacer Cupped Washer (Curved Toward Clutch) Figure 32 Pulley In...
... of Spark Plug Wire Clutch Shroud :la- NOTE: Do not overtighten screw. Remove the screw and nut from engine. A DANGER Use only a hand tool to obtain smooth, pointed ends. 18. Insert the other than rope, do not use any type of the clutch with the replacement rope. Figures 33 & 34 . F. Figure 34 (inset -left). 19. Throttle Trigger Nut Figure 31 Pulley Housing kycnr Nut 0 0 NZ' Spacer Cupped Washer (Curved Toward Clutch) Figure 32 Pulley In...

User Manual
Page 23
... your Authorized Service Dealer. Remove cover. Use proper spool. 3. Cutting at high speed around hard objects. 4. Remove cover. Fuel tank empty. 2. Throttle trigger screw too tight. 3. Fuel mixture incorrect. 3. Contact your Authorized Service Dealer. See "Carburetor Adjustments." turns at higher speed than necessary. 1. See "Carburetor Adjustments." 2. Clutch requires repair. 5. Line size incorrect. 4. Balance arm broken. 3. Reduce cutting speed. 1. Check line routing. 2. Use only .080" WEED EATER brand line. Check line routing. 2. Engine flooded. 3. None...
... your Authorized Service Dealer. Remove cover. Use proper spool. 3. Cutting at high speed around hard objects. 4. Remove cover. Fuel tank empty. 2. Throttle trigger screw too tight. 3. Fuel mixture incorrect. 3. Contact your Authorized Service Dealer. See "Carburetor Adjustments." turns at higher speed than necessary. 1. See "Carburetor Adjustments." 2. Clutch requires repair. 5. Line size incorrect. 4. Balance arm broken. 3. Reduce cutting speed. 1. Check line routing. 2. Use only .080" WEED EATER brand line. Check line routing. 2. Engine flooded. 3. None...
User Manual
Page 24
... necessary during the life of each part. Your product has been expertly engineered and carefully manufactured to rigid quality standards to give the description of the unit, the model number, serial number, and, if ordering parts, the part number or description of your local POULAN/WEED EATER Dealer for Trimmers, Brushcutters, and Blowers). therefore, all requests for parts and service should be prepared to provide you...
... necessary during the life of each part. Your product has been expertly engineered and carefully manufactured to rigid quality standards to give the description of the unit, the model number, serial number, and, if ordering parts, the part number or description of your local POULAN/WEED EATER Dealer for Trimmers, Brushcutters, and Blowers). therefore, all requests for parts and service should be prepared to provide you...


