
User Manual
Page 2
... on mowers so equipped before starting when setting up and thrown by the manufacturer. always disconnect spark plug wire and foot or wearing open sandals. birth defects or other reproductive harm. • Do not operate the mower without WARNING: Battery posts, terminals and proper guards, plates, grass catcher or related accessories contain lead and lead other reproductive harm. proved by the blade. I. Be...
... on mowers so equipped before starting when setting up and thrown by the manufacturer. always disconnect spark plug wire and foot or wearing open sandals. birth defects or other reproductive harm. • Do not operate the mower without WARNING: Battery posts, terminals and proper guards, plates, grass catcher or related accessories contain lead and lead other reproductive harm. proved by the blade. I. Be...
User Manual
Page 3
... wet grass. IV. Never remove gas cap or add fuel with safety devices. Do not smoke. - Save this Operator's Manual in good condition. • Never tamper with the engine running .Disconnect the spark plug wire, and keep equipment in its entirety before storing. • Stop and inspect the equipment if you last saw them . • Do not change the engine governor setting or overspeed the engine. SLOPE OPERATION...
... wet grass. IV. Never remove gas cap or add fuel with safety devices. Do not smoke. - Save this Operator's Manual in good condition. • Never tamper with the engine running .Disconnect the spark plug wire, and keep equipment in its entirety before storing. • Stop and inspect the equipment if you last saw them . • Do not change the engine governor setting or overspeed the engine. SLOPE OPERATION...
User Manual
Page 4
... of this lawn mower without the discharge guard or an entire approved grass catcher in operating position. 4 These guards are for the grass discharge opening on the right side of the mower housing, it is a side discharge mower. CAUTION: Disconnect spark plug wire from spark plug and place wire where it means when you will indicate the manufacturer and type or brand name of engine powers the mower. What kind of engine is the...
... of this lawn mower without the discharge guard or an entire approved grass catcher in operating position. 4 These guards are for the grass discharge opening on the right side of the mower housing, it is a side discharge mower. CAUTION: Disconnect spark plug wire from spark plug and place wire where it means when you will indicate the manufacturer and type or brand name of engine powers the mower. What kind of engine is the...
User Manual
Page 5
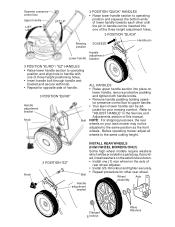
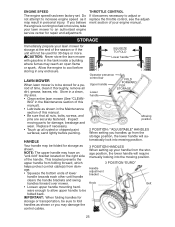
... INSTALL REAR WHEELS (HIGH WHEEL MOWERS ONLY) Some high wheel models require washers which will be provided in handle with one of three height positioning holes. • Insert handle bolt through handle and bracket and secure with knob. • Repeat for opposite side of handle. 3 POSITION "EURO" Handle adjustment bracket Knob Bolt ALL HANDLES • Raise upper handle section into place on lower handle, remove protective padding and tighten both handle knobs. • Remove handle padding holding operator presence control bar...
... INSTALL REAR WHEELS (HIGH WHEEL MOWERS ONLY) Some high wheel models require washers which will be provided in handle with one of three height positioning holes. • Insert handle bolt through handle and bracket and secure with knob. • Repeat for opposite side of handle. 3 POSITION "EURO" Handle adjustment bracket Knob Bolt ALL HANDLES • Raise upper handle section into place on lower handle, remove protective padding and tighten both handle knobs. • Remove handle padding holding operator presence control bar...

User Manual
Page 7
... catcher top. • Install two (2) sharp pointed screws into top of assembly, place catcher top upside down on frame to operate mower with original manufacturer's specifications. Sharp pointed screws (Rear and side holes) Catcher top BRAPEGUMLFOLOVCREAWSTALCRAHDCEKTRO Blunt pointed screws Catcher bag and frame (Front holes) Hem Start here Upper tubular frame TO ATTACH HARD TOP CATCHER • Open the rear door on mower housing...
... catcher top. • Install two (2) sharp pointed screws into top of assembly, place catcher top upside down on frame to operate mower with original manufacturer's specifications. Sharp pointed screws (Rear and side holes) Catcher top BRAPEGUMLFOLOVCREAWSTALCRAHDCEKTRO Blunt pointed screws Catcher bag and frame (Front holes) Hem Start here Upper tubular frame TO ATTACH HARD TOP CATCHER • Open the rear door on mower housing...
User Manual
Page 9
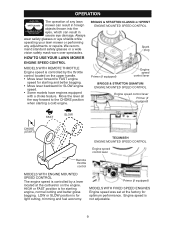
... CONTROL Engine speed control lever Remote throttle control MODELS WITH ENGINE MOUNTED SPEED CONTROL The engine speed is not adjustable. 9 Engine speed is controlled by the throttle control located on the engine. Primer (if equipped) MODELS WITH FIXED SPEED ENGINES Engine speed was set at the carburetor on the upper handle. • Move lever forward to the CHOKE position when starting engine, normal cutting and better grass bagging. We recommend standard safety glasses or a wide vision safety mask worn over spectacles. HOW TO USE YOUR LAWN MOWER ENGINE SPEED CONTROL MODELS...
... CONTROL Engine speed control lever Remote throttle control MODELS WITH ENGINE MOUNTED SPEED CONTROL The engine speed is not adjustable. 9 Engine speed is controlled by the throttle control located on the engine. Primer (if equipped) MODELS WITH FIXED SPEED ENGINES Engine speed was set at the carburetor on the upper handle. • Move lever forward to the CHOKE position when starting engine, normal cutting and better grass bagging. We recommend standard safety glasses or a wide vision safety mask worn over spectacles. HOW TO USE YOUR LAWN MOWER ENGINE SPEED CONTROL MODELS...
User Manual
Page 10
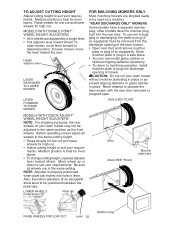
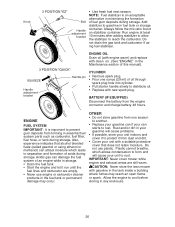
.... NOTE: Adjuster is best for high cut . Raise wheels for low cut and lower wheels for most lawns. Medium position is best for high cut . • Adjust cutting height to be used as the front wheels. "REAR DISCHARGE ONLY" MOWERS Some models have a seperate mulcher plug, other models have the mulcher plug built into discharge opening of mower. MODELS WITH "SINGLE POINT" WHEEL HEIGHT ADJUSTERS • All 4 wheels are adjusted by a single lever. • Pull adjuster lever toward wheel. Also, 9-position adjusters (if...
.... NOTE: Adjuster is best for high cut . Raise wheels for low cut and lower wheels for most lawns. Medium position is best for high cut . • Adjust cutting height to be used as the front wheels. "REAR DISCHARGE ONLY" MOWERS Some models have a seperate mulcher plug, other models have the mulcher plug built into discharge opening of mower. MODELS WITH "SINGLE POINT" WHEEL HEIGHT ADJUSTERS • All 4 wheels are adjusted by a single lever. • Pull adjuster lever toward wheel. Also, 9-position adjusters (if...

User Manual
Page 11
... plug Screw and lock nut Hinge bracket Lock lever "down" position RAISE LEVER TO LOCK Mulcher plate MULCHER PLUG TYPE "A" To convert to mulching operation, mulcher plug must be removed from mower. CAUTION: Do not run your lawn mower without discharge guard, approved grass catcher or mulcher plate or plug in place. • Allow discharge guard to rest against lock lever. • To return to discharging or bagging operation, simply lower lock lever and remove mulcher plug from underside of lawn mower...
... plug Screw and lock nut Hinge bracket Lock lever "down" position RAISE LEVER TO LOCK Mulcher plate MULCHER PLUG TYPE "A" To convert to mulching operation, mulcher plug must be removed from mower. CAUTION: Do not run your lawn mower without discharge guard, approved grass catcher or mulcher plate or plug in place. • Allow discharge guard to rest against lock lever. • To return to discharging or bagging operation, simply lower lock lever and remove mulcher plug from underside of lawn mower...

User Manual
Page 14
... from mower. Operator presence control bar Drive control GRASS CATCHER (REAR BAGGING MODELS ONLY) TO EMPTY GRASS CATCHER • Simply open . NOTE: Do not move speed control lever unless the engine is released. To stop forward motion without self-propelling. • To keep drive control engaged when turning corners, push down to handle. • To stop when the operator presence control bar is running . TO ENGAGE DRIVE CONTROL DRIVE CONTROL DISENGAGED REAR WHEEL DRIVE (SINGLE SPEED) • To start and Your lawn mower...
... from mower. Operator presence control bar Drive control GRASS CATCHER (REAR BAGGING MODELS ONLY) TO EMPTY GRASS CATCHER • Simply open . NOTE: Do not move speed control lever unless the engine is released. To stop forward motion without self-propelling. • To keep drive control engaged when turning corners, push down to handle. • To stop when the operator presence control bar is running . TO ENGAGE DRIVE CONTROL DRIVE CONTROL DISENGAGED REAR WHEEL DRIVE (SINGLE SPEED) • To start and Your lawn mower...

User Manual
Page 15
... and disconnect spark plug wire from spark plug. • Pull out button on DRIVE underside) CONTROL Drive control lever DRIVE CONTROL DISENGAGED Drive speed control lever Operator presence control bar "AUTOWALK" ADJUSTMENT Over time, the drive control system may become "loose", resulting in use. Operator presence control bar FRONT WHEEL DRIVE MODELS ONLY: • To keep drive control engaged when turning corners, push down on the drive cable. NOTE: If after releasing the drive control the mower will stop when either the operator presence control bar or drive control bar are...
... and disconnect spark plug wire from spark plug. • Pull out button on DRIVE underside) CONTROL Drive control lever DRIVE CONTROL DISENGAGED Drive speed control lever Operator presence control bar "AUTOWALK" ADJUSTMENT Over time, the drive control system may become "loose", resulting in use. Operator presence control bar FRONT WHEEL DRIVE MODELS ONLY: • To keep drive control engaged when turning corners, push down on the drive cable. NOTE: If after releasing the drive control the mower will stop when either the operator presence control bar or drive control bar are...
User Manual
Page 16
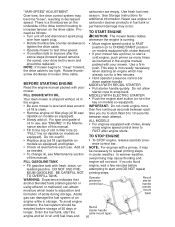
... occur. ence control bar. • Check oil level before each • Remove engine oil filler plug (oil fill cap/ time you do flood • Fill gasoline tank with your mower. Drain the fuel tank, start . Rotate thumbscrew clockwise to loosen drive cable. • Move engine speed control to FAST position (or to CHOKE/START position on models so equipped). MODELS WITH RECOIL STARTER • Pull starter handle quickly. models so equipped) and tighten. down against handle. FILL ENGINE WITH OIL MODELS WITH ELECTRIC STARTER Your lawn mower is worn...
... occur. ence control bar. • Check oil level before each • Remove engine oil filler plug (oil fill cap/ time you do flood • Fill gasoline tank with your mower. Drain the fuel tank, start . Rotate thumbscrew clockwise to loosen drive cable. • Move engine speed control to FAST position (or to CHOKE/START position on models so equipped). MODELS WITH RECOIL STARTER • Pull starter handle quickly. models so equipped) and tighten. down against handle. FILL ENGINE WITH OIL MODELS WITH ELECTRIC STARTER Your lawn mower is worn...

User Manual
Page 18
... EACH USE • Check engine oil level. • Check for wear. Some adjustments will shorten the life LUBRICATION CHART ➀ Wheel adjuster (on this manual. of this manual. IMPORTANT: Do not oil or grease plastic wheel bearings. If you feel they must maintain mower as instructed in the Service and Adjustments section of the self-lubricating bearings. MAINTENANCE GENERAL RECOMMENDATIONS The warranty on each season. • Once a year, replace the spark plug, clean or replace air...
... EACH USE • Check engine oil level. • Check for wear. Some adjustments will shorten the life LUBRICATION CHART ➀ Wheel adjuster (on this manual. of this manual. IMPORTANT: Do not oil or grease plastic wheel bearings. If you feel they must maintain mower as instructed in the Service and Adjustments section of the self-lubricating bearings. MAINTENANCE GENERAL RECOMMENDATIONS The warranty on each season. • Once a year, replace the spark plug, clean or replace air...

User Manual
Page 19
... clean the drive wheels, check both drive wheels. • Remove wheels from wheel adjusters. • Remove any trash or grass cuttings from both drive wheels. • Remove hubcaps (if equipped), hairpin cotters and washers (or flange locknut If equipped with heavy cloth. • Remove blade bolt, lock washer and flat washer. • Remove blade and blade adapter. • Inspect the key inside the dust cover, pinion and/or drive wheel gear teeth. TO REPLACE BLADE • Turn lawn mower. IMPORTANT: Blade bolt...
... clean the drive wheels, check both drive wheels. • Remove wheels from wheel adjusters. • Remove any trash or grass cuttings from both drive wheels. • Remove hubcaps (if equipped), hairpin cotters and washers (or flange locknut If equipped with heavy cloth. • Remove blade bolt, lock washer and flat washer. • Remove blade and blade adapter. • Inspect the key inside the dust cover, pinion and/or drive wheel gear teeth. TO REPLACE BLADE • Turn lawn mower. IMPORTANT: Blade bolt...
User Manual
Page 20
... engine manual. AIR FILTER Your engine will not run properly and may be installed correctly. MUFFLER Inspect and replace corroded muffler as it could create a fire hazard and/or damage. Do not substitute. REAR WHEEL GEAR DRIVE ONLY: • If you remove the drive pinions, wipe clean with oil fill cap/dipstick, remove bottom drain plug or remove engine oil cap and turn the pinion around the drive should be kept clean and free...
... engine manual. AIR FILTER Your engine will not run properly and may be installed correctly. MUFFLER Inspect and replace corroded muffler as it could create a fire hazard and/or damage. Do not substitute. REAR WHEEL GEAR DRIVE ONLY: • If you remove the drive pinions, wipe clean with oil fill cap/dipstick, remove bottom drain plug or remove engine oil cap and turn the pinion around the drive should be kept clean and free...
User Manual
Page 21
... and wheels free of your lawn mower unless the electrical system, muffler, air filter, and carburetor are off center for raising or lowering the handle. • Remove upper handle and all parts removed from mounting pins. • Turn lower handle over to keep water out. SERVICE AND ADJUSTMENTS CAUTION: Before performing any service or adjustments: • Release operator presence control bar. • Make sure the blade and all gasoline, oil, etc...
... and wheels free of your lawn mower unless the electrical system, muffler, air filter, and carburetor are off center for raising or lowering the handle. • Remove upper handle and all parts removed from mounting pins. • Turn lower handle over to keep water out. SERVICE AND ADJUSTMENTS CAUTION: Before performing any service or adjustments: • Release operator presence control bar. • Make sure the blade and all gasoline, oil, etc...

User Manual
Page 24
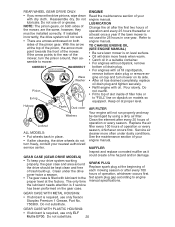
... WHEEL GEAR DRIVE washer • Disconnect spark plug wire from spark Tab plug and place wire where it cannot come in clutch frame. and remove drive cover Debris shield Blade bolt from lawn mower housing. • Remove drive cable from anchor, then Trailing edge Lock-washer detach spring from idler arm assembly. • Remove idler arm assembly from engine pulley; lbs. NOTE: Protect your engine manual for the engine to hold the control bar Belt Hex Idler arm Housing in clutch frame. • When reinstalling the belt cover...
... WHEEL GEAR DRIVE washer • Disconnect spark plug wire from spark Tab plug and place wire where it cannot come in clutch frame. and remove drive cover Debris shield Blade bolt from lawn mower housing. • Remove drive cable from anchor, then Trailing edge Lock-washer detach spring from idler arm assembly. • Remove idler arm assembly from engine pulley; lbs. NOTE: Protect your engine manual for the engine to hold the control bar Belt Hex Idler arm Housing in clutch frame. • When reinstalling the belt cover...
User Manual
Page 25
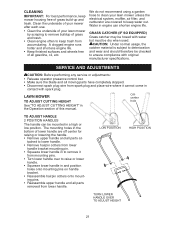
... the Maintenance section of this manual. • Be sure that all rusted or chipped paint surfaces; HANDLE Your handle may damage the control cables. SQUEEZE TO FOLD Lower handle Operator presence control bar Upper handle Lower handle FOLD FORWARD FOR STORAGE Mowing position 2 POSITION / "ADJUSTABLE" HANDLES When setting you may be used for repair and adjustment. LAWN MOWER When lawn mower is running too fast or too slow, take your lawn mower to an authorized engine service center for...
... the Maintenance section of this manual. • Be sure that all rusted or chipped paint surfaces; HANDLE Your handle may damage the control cables. SQUEEZE TO FOLD Lower handle Operator presence control bar Upper handle Lower handle FOLD FORWARD FOR STORAGE Mowing position 2 POSITION / "ADJUSTABLE" HANDLES When setting you may be used for repair and adjustment. LAWN MOWER When lawn mower is running too fast or too slow, take your lawn mower to an authorized engine service center for...
User Manual
Page 26
...; Pull starter handle slowly to distribute oil. • Replace with a suitable protective cover that alcohol blended fuels (called gasohol or using fuel stabilizer. 3 POSITION "QUICK" SQUEEZE Handle pin Handle adjustment bracket ENGINE OIL Drain oil (with engine warm) and replace with gasoline in the fuel tank or permanent damage may reach an open flame or spark. CAUTION: Never store the lawn mower with clean oil. (See "ENGINE" in fuel tank or storage container. Do not drain the gas tank and carburetor if using ethanol...
...; Pull starter handle slowly to distribute oil. • Replace with a suitable protective cover that alcohol blended fuels (called gasohol or using fuel stabilizer. 3 POSITION "QUICK" SQUEEZE Handle pin Handle adjustment bracket ENGINE OIL Drain oil (with engine warm) and replace with gasoline in the fuel tank or permanent damage may reach an open flame or spark. CAUTION: Never store the lawn mower with clean oil. (See "ENGINE" in fuel tank or storage container. Do not drain the gas tank and carburetor if using ethanol...
User Manual
Page 27
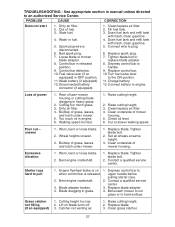
... Charge battery. 12. Cutting too much oil in fuel. 5. Walking speed too fast. 1. Check oil level. 6. Tighten blade bolt. 2. Starter rope hard to handle. 9. Engine flywheel brake is on blade worn off. 3. Contact a qualified service center. 3. Grass catcher not filling (If so equipped) 1. Cutting height too low. 2. Dirty air filter. 2. Water in engine. 6. Bad spark plug. 7. Loose blade or broken blade adapter. 8. Replace control bar. 10. Buildup of fuel. 3. Raise cutting height. 3. Cut at same height. 3. Set all wheels...
... Charge battery. 12. Cutting too much oil in fuel. 5. Walking speed too fast. 1. Check oil level. 6. Tighten blade bolt. 2. Starter rope hard to handle. 9. Engine flywheel brake is on blade worn off. 3. Contact a qualified service center. 3. Grass catcher not filling (If so equipped) 1. Cutting height too low. 2. Dirty air filter. 2. Water in engine. 6. Bad spark plug. 7. Loose blade or broken blade adapter. 8. Replace control bar. 10. Buildup of fuel. 3. Raise cutting height. 3. Cut at same height. 3. Set all wheels...
User Manual
Page 28
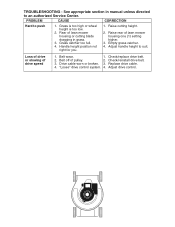
Rear of lawn mower housing one (1) setting higher. 3. Raise rear of lawn mower housing or cutting blade dragging in manual unless directed to suit. Empty grass catcher. 4. Check/replace drive belt. 2. Check/reinstall drive belt. 3. See appropriate section in grass. 3. Adjust handle height to an authorized Service Center. Loss of drive or slowing of pulley. 2. Grass catcher too full. 4. Adjust drive control. Drive cable worn or broken. 3. "Loose" drive control system. 4. Raise cutting height. 2. Belt wear. 1. TROUBLESHOOTING - PROBLEM CAUSE ...
Rear of lawn mower housing one (1) setting higher. 3. Raise rear of lawn mower housing or cutting blade dragging in manual unless directed to suit. Empty grass catcher. 4. Check/replace drive belt. 2. Check/reinstall drive belt. 3. See appropriate section in grass. 3. Adjust handle height to an authorized Service Center. Loss of drive or slowing of pulley. 2. Grass catcher too full. 4. Adjust drive control. Drive cable worn or broken. 3. "Loose" drive control system. 4. Raise cutting height. 2. Belt wear. 1. TROUBLESHOOTING - PROBLEM CAUSE ...


