

User Manual
Page 2
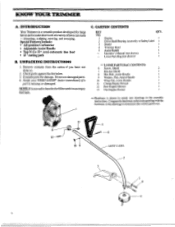
...- 6500 - 7500 Idle - 2800 - 3200 Solid State Diaphragm All Position with a spark arrestor; If this item is required in your area, order Part #952-7016I2 from your stateor local authorities for the prevention offire. Trimmer Line Advance C. This unit is available as an optional... part. Pre-Operation Checks C. Line Trimmer Safety B. FUEL CAP -+ STARTER ROPE HANDLE AIR FILTER STARTING INSTRUCTIONS OFF BUTTON SERIAL NUMBER y , ASSIST ...
...- 6500 - 7500 Idle - 2800 - 3200 Solid State Diaphragm All Position with a spark arrestor; If this item is required in your area, order Part #952-7016I2 from your stateor local authorities for the prevention offire. Trimmer Line Advance C. This unit is available as an optional... part. Pre-Operation Checks C. Line Trimmer Safety B. FUEL CAP -+ STARTER ROPE HANDLE AIR FILTER STARTING INSTRUCTIONS OFF BUTTON SERIAL NUMBER y , ASSIST ...

User Manual
Page 5
...the engine stopped and the muffler away from pieces of a hazard than 112/ hours per day. 6. See `Accessories." 2. Replace damaged parts. Remove objects (rocks, broken glass, nails, wire, string, etc.) which arenotcoveredin thismanual, use the optional shoulder strap for this tool...) A OPERATOR SAFETY I. Always wear a safety faceshield orsafetygoggles. Always wear heavy, long pants, boots and gloves. Replace trimmer head parts that the trimmer head will help protect you are approached. 3. Make carburetor adjustments with both hands. 6. Use only WEED EATER°...
...the engine stopped and the muffler away from pieces of a hazard than 112/ hours per day. 6. See `Accessories." 2. Replace damaged parts. Remove objects (rocks, broken glass, nails, wire, string, etc.) which arenotcoveredin thismanual, use the optional shoulder strap for this tool...) A OPERATOR SAFETY I. Always wear a safety faceshield orsafetygoggles. Always wear heavy, long pants, boots and gloves. Replace trimmer head parts that the trimmer head will help protect you are approached. 3. Make carburetor adjustments with both hands. 6. Use only WEED EATER°...
User Manual
Page 6
..._8 SAFETY LABEL 6 Engine Drive Shaft/Bearing Assembly w/Safety Label Shield Trimmer Head Assist Handle Operator's Manual (not shown) Loose Parts Bag (not shown) ' * * LOOSE PARTS BAG CONTENTS: 6 Screw, Shield 2 7 Bracket-Shield 1 8 Hex Bolt, Assist Handle 9 Washer, Flat, Assist Handle ... Your Trimmer is shown in actual size drawings in the drawings to determine the correct part to hearthefuel filter rattleinan empty fuel tank. C. Compare the hardware in the loose parts bag with the hardware in the assembly instructions. UNPACKING INSTRUCTIONS 1. CARTON CONTENTS KEY NO...
..._8 SAFETY LABEL 6 Engine Drive Shaft/Bearing Assembly w/Safety Label Shield Trimmer Head Assist Handle Operator's Manual (not shown) Loose Parts Bag (not shown) ' * * LOOSE PARTS BAG CONTENTS: 6 Screw, Shield 2 7 Bracket-Shield 1 8 Hex Bolt, Assist Handle 9 Washer, Flat, Assist Handle ... Your Trimmer is shown in actual size drawings in the drawings to determine the correct part to hearthefuel filter rattleinan empty fuel tank. C. Compare the hardware in the loose parts bag with the hardware in the assembly instructions. UNPACKING INSTRUCTIONS 1. CARTON CONTENTS KEY NO...
User Manual
Page 7
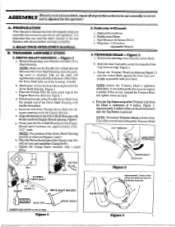
... familiar with your hand. d. Place the Clamp from the straight end of the tool. Pull about 6 inches of the Flexible Drive Shaft from the loose parts bag on the shaft will not turn and install the Clamp Screw. Tape Measure & Grease Pencil d. Figure 2 a. Figure 2. t MARK I -1/4" WRENCH DIRECTION ID INSTALL ARBOR SHAFT...
... familiar with your hand. d. Place the Clamp from the straight end of the tool. Pull about 6 inches of the Flexible Drive Shaft from the loose parts bag on the shaft will not turn and install the Clamp Screw. Tape Measure & Grease Pencil d. Figure 2 a. Figure 2. t MARK I -1/4" WRENCH DIRECTION ID INSTALL ARBOR SHAFT...

User Manual
Page 8
.... Left arm fully extended, hand holding the Rear Handle, and fingers on the Drive Shaft Housing. Loosen the Wing Nut by hand only: 2). sttWitiltS1 WIDEST PART OF SHIELD RAISED AREA BOTTOM OF SHIELD "V"SLOIT SHOULDER DUST CUP KEYWAY KEY // SCREW S. Install theBracket and Screwsas shown in the side of tool evenly...
.... Left arm fully extended, hand holding the Rear Handle, and fingers on the Drive Shaft Housing. Loosen the Wing Nut by hand only: 2). sttWitiltS1 WIDEST PART OF SHIELD RAISED AREA BOTTOM OF SHIELD "V"SLOIT SHOULDER DUST CUP KEYWAY KEY // SCREW S. Install theBracket and Screwsas shown in the side of tool evenly...
User Manual
Page 9
... mixture of gasoline and oil is used into an approved, marked container.Donot mixgasolineandoildirectly in thefuel tank. 3.USE THE FOLLOWING: Poulan Weed EaterT" 40:1 Engine Oil is powered bya two-cycle enginewhich requires a fuel mixture of America) - After a short...POULAN/WEED EATER 40:1 Engine Oil is very important. Does not have proper additives for 2-cycle engines and can cause engine damage. • AUTOMOTIVE OIL - Slowly remove fuel container cover. g. Fill the tank using the tool. ENGINE INFORMATION A. If none of the 2-cycle engine requires lubticationof moving parts...
... mixture of gasoline and oil is used into an approved, marked container.Donot mixgasolineandoildirectly in thefuel tank. 3.USE THE FOLLOWING: Poulan Weed EaterT" 40:1 Engine Oil is powered bya two-cycle enginewhich requires a fuel mixture of America) - After a short...POULAN/WEED EATER 40:1 Engine Oil is very important. Does not have proper additives for 2-cycle engines and can cause engine damage. • AUTOMOTIVE OIL - Slowly remove fuel container cover. g. Fill the tank using the tool. ENGINE INFORMATION A. If none of the 2-cycle engine requires lubticationof moving parts...
User Manual
Page 10
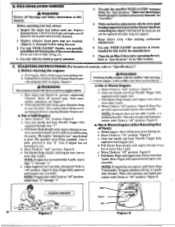
..."off ' position. Allow engine to operraingpositionorclipping ShoulderStmpto tool. 2. Keep Triggerfullysqueezed 5 more than 5 pulls. Replace trimmer head parts that are in this tool by hand;do not use the optional shoulder strap for support. 7. Makecarburetoradjustments with Choke at ... 5 pulls, it is probablyflooded. Inspect the entire tool before each use wire or rope, string, etc. 4. Replace damaged parts. Never use . Makesurethetrimmer head isproperly installedandsecurelyfastened.See 'Assembly." 6. Refer to 'off - STARTING INSTRUCTIONS (For location of Fuel...
..."off ' position. Allow engine to operraingpositionorclipping ShoulderStmpto tool. 2. Keep Triggerfullysqueezed 5 more than 5 pulls. Replace trimmer head parts that are in this tool by hand;do not use the optional shoulder strap for support. 7. Makecarburetoradjustments with Choke at ... 5 pulls, it is probablyflooded. Inspect the entire tool before each use wire or rope, string, etc. 4. Replace damaged parts. Never use . Makesurethetrimmer head isproperly installedandsecurelyfastened.See 'Assembly." 6. Refer to 'off - STARTING INSTRUCTIONS (For location of Fuel...

User Manual
Page 11
... at less than necessary. The operator must wear a safety face shield or goggles. The cutting line will throw objects and cut. Throw damaged parts away. PUSH "OFF^ BUTTON TO STOP ENGINE Salmi Na necormAs...i IMPOIrT4W,I 2 pm a ksbe mSe OrTaliNIMITT !WIMP" LA 711211 Figure 9 USING...'Pap-N-Go HTM Trimmer Head M52-'701604 Use Only Genuine Weed Eater® Parts AWARNING DAMAGED TRIMMER HEAD Trimmer head parts that are chipped, cracked, or damaged in the Engine Shroud. Replace damaged parts before using the tool. 11 OPERATING INSTRUCTIONS 1. At lower speeds there is ...
... at less than necessary. The operator must wear a safety face shield or goggles. The cutting line will throw objects and cut. Throw damaged parts away. PUSH "OFF^ BUTTON TO STOP ENGINE Salmi Na necormAs...i IMPOIrT4W,I 2 pm a ksbe mSe OrTaliNIMITT !WIMP" LA 711211 Figure 9 USING...'Pap-N-Go HTM Trimmer Head M52-'701604 Use Only Genuine Weed Eater® Parts AWARNING DAMAGED TRIMMER HEAD Trimmer head parts that are chipped, cracked, or damaged in the Engine Shroud. Replace damaged parts before using the tool. 11 OPERATING INSTRUCTIONS 1. At lower speeds there is ...
User Manual
Page 12
OPERATOR a. e. Neverstartor run theengineinsidea closed room or building. Replace damaged parts. Be sure the shield is running at full throttle. 2. Makesurethetrimmerhead isproperlyinstalled and securely fastened. Hold the tool with both hands. do not use the optional ...
OPERATOR a. e. Neverstartor run theengineinsidea closed room or building. Replace damaged parts. Be sure the shield is running at full throttle. 2. Makesurethetrimmerhead isproperlyinstalled and securely fastened. Hold the tool with both hands. do not use the optional ...

User Manual
Page 14
... 19) by attempting to turn Cover counterclockwise b. to remove \ \i Turn Lock Ring clockwise rink to the lock ring. A WARNING Trimmer head parts that are properly fastened (as wellasoptimum performance. • Alwaysdean dirt and debris from the locked position to turn clockwise elk . Place Spool in.... d. Align the Lock Ring over the three Catches on the Line again. g. Remove the Lock Ring and Spool. Inspect all parts. Replace damaged parts. Check to change the Spool from thespool and hub when performing any way can fly apart and cause serious injury. Figure 20....
... 19) by attempting to turn Cover counterclockwise b. to remove \ \i Turn Lock Ring clockwise rink to the lock ring. A WARNING Trimmer head parts that are properly fastened (as wellasoptimum performance. • Alwaysdean dirt and debris from the locked position to turn clockwise elk . Place Spool in.... d. Align the Lock Ring over the three Catches on the Line again. g. Remove the Lock Ring and Spool. Inspect all parts. Replace damaged parts. Check to change the Spool from thespool and hub when performing any way can fly apart and cause serious injury. Figure 20....

User Manual
Page 15
... the Line is tightly wound on Spool. Never use the optional shoulder strap for fuel leaks. Replace damaged parts. Keep others away when making carburetor adjustments. 5. Use only genuine WEED EATER® replacement parts as shown by the manufacturer. 8. and remove any way before performing maintenance except for proper line feed. 5).Follow...
... the Line is tightly wound on Spool. Never use the optional shoulder strap for fuel leaks. Replace damaged parts. Keep others away when making carburetor adjustments. 5. Use only genuine WEED EATER® replacement parts as shown by the manufacturer. 8. and remove any way before performing maintenance except for proper line feed. 5).Follow...

User Manual
Page 17
.... 6. CAUTION:} Take care to remove any surface that may have dirt or debris. Inject the remaining contents of the tube into the Engine Shroud. Reassemble parts. A cloth will stop engine. Using a clean cloth, wipe the surface of operation. - CAUTION: Before replacing the fan housing, make certain that the"... Drive Shaft: - Before operating if the unit has been stored for 90 days or longer. • Use WEED EATER® Flex Shaft Lube Part No. 530-030102. • Use the following procedure for broken wires, twists, or kinks and replace if damage is in 'Assembly" to stop...
.... 6. CAUTION:} Take care to remove any surface that may have dirt or debris. Inject the remaining contents of the tube into the Engine Shroud. Reassemble parts. A cloth will stop engine. Using a clean cloth, wipe the surface of operation. - CAUTION: Before replacing the fan housing, make certain that the"... Drive Shaft: - Before operating if the unit has been stored for 90 days or longer. • Use WEED EATER® Flex Shaft Lube Part No. 530-030102. • Use the following procedure for broken wires, twists, or kinks and replace if damage is in 'Assembly" to stop...
User Manual
Page 19
...-701570 952-701548 952-701612 ITEM 2-CYCLE ENGINE OIL - 8 OZ. (16:1) - 8 OZ. (32:1) - 4 OZ. (32:1) FUEL CAP AIR FILTER SPARK PLUG MUFFLER GUARD KIT ILLUSTRATED PARTS LIST OPERATOR'S MANUAL STOCK NO. 952-003039 952-030117 952-030119 952-701583 952-701568 952-030077 952-069262 530-066427 530-067065 19 Fuel...
...-701570 952-701548 952-701612 ITEM 2-CYCLE ENGINE OIL - 8 OZ. (16:1) - 8 OZ. (32:1) - 4 OZ. (32:1) FUEL CAP AIR FILTER SPARK PLUG MUFFLER GUARD KIT ILLUSTRATED PARTS LIST OPERATOR'S MANUAL STOCK NO. 952-003039 952-030117 952-030119 952-701583 952-701568 952-030077 952-069262 530-066427 530-067065 19 Fuel...
User Manual
Page 20
... operating characteristics or the appearance of your product differs from Poulan/Weed Eater Division White Consolidated Industries, Inc.. b. NOTE: Poulan/Wepil Eater Division provides parts and service through its authorized distributorsanddealers;therefore, all of part. For replacement parts have available the following information: a. PARTS AND SERVICE Your Poulan /Weed Eater product has been expertly engineered and carefully...
... operating characteristics or the appearance of your product differs from Poulan/Weed Eater Division White Consolidated Industries, Inc.. b. NOTE: Poulan/Wepil Eater Division provides parts and service through its authorized distributorsanddealers;therefore, all of part. For replacement parts have available the following information: a. PARTS AND SERVICE Your Poulan /Weed Eater product has been expertly engineered and carefully...


