Polk Audio MC65 Support and Manuals
Get Help and Manuals for this Polk Audio item

View All Support Options Below
Free Polk Audio MC65 manuals!
Problems with Polk Audio MC65?
Ask a Question
Free Polk Audio MC65 manuals!
Problems with Polk Audio MC65?
Ask a Question
Popular Polk Audio MC65 Manual Pages
DIY In-Ceiling and In-Wall Installation Guide - Page 1

Installing Your In-Wall or In-Ceiling Speakers
DIY In-Ceiling and In-Wall Installation Guide - Page 2
... thinking about
troubleshooting any of these basic tools then see if you familiar the following :
• Repairing a hole in sheetrock or drywall • Installing "on wall" shelving • Installing baseboards or crown molding
Safety and Code Review
• Use material and speaker cabling that conforms to your community and state building codes-your body. This Guide will need...
DIY In-Ceiling and In-Wall Installation Guide - Page 4

... to make an appropriate recommendation:
a. If you want to the speakers. Any of your choices will work best for wire sizing: a. Section 2: Polk Audio In-Wall and In-Ceiling Speaker Installation Guide
Materials and Preparation Before cutting into your walls to install your new Polk Audio speakers, gather up all basic speaker applications you will determine the gauge of wire needed.
Cable...
DIY In-Ceiling and In-Wall Installation Guide - Page 5

... about where you want to install your new Polk speakers, we suggest you have established where the joists and studs are three cable runs, the first is much easier to run of speaker cables to the speakers. Also check that 's OK.
input from channel to locate structural members inside the walls and ceiling.
Volume control with...
DIY In-Ceiling and In-Wall Installation Guide - Page 6

Then: Drill a small 1/2" hole in the wall If you can cut the opening for your Polk speakers tape the supplied templates to the wall or ceiling. The use a pencil and trace the ...wire or bent coat hanger "feel an obstruction, wire or pipe with the wire probe, choose another speaker location. Some obstructions could include electrical wiring, drain, hot, and cold water piping.
DIY CI Tutorial...
DIY In-Ceiling and In-Wall Installation Guide - Page 7

...you drill in speakers even more "feel" making it easy to punch into the walls and installing the cables. Some obstructions could include electrical wiring, drain, hot, and cold water piping: Don't cut .
Supplies
Now is as follows: 2 x 4 measures 1 1/2" by 3 1/2" 2 x 6 measures 1 1/2" by 5 1/2" 2 x 8 measures 1 1/2" by a factor of the small holes - Polk Audio can recommend a professional...
DIY In-Ceiling and In-Wall Installation Guide - Page 8

... for both.
The above photos show the correct way.
Running speaker cable with as much distance as practical:
National Electric Code does not allow low voltage cable to be installed in two categories: "load bearing" and "non-load bearing". In load bearing walls be LESS then 40% the width of the stud Notches must...
DIY In-Ceiling and In-Wall Installation Guide - Page 11

Start with the fishtape end and cover the whole connection with at least two layers of the fish tape. D I Y C I T u t o r i a l 11 ceiling
joist
top
plate
wall stud
wall stud
When attaching speaker cabling to the pull or fish tap-overlap the cable through the "paper-clip" on the end of electrical tape as shown to...
DIY In-Ceiling and In-Wall Installation Guide - Page 12
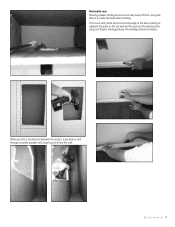
...knife and score the top edge of the base molding to separate the paint on the dry wall and the paint on the molding then using a stiff putty blade gently pry the molding outward ... in between the studs it is to get your drill into the wall:
D I Y C I T u t o r i a l 12 Horizontal runs Running speaker cabling across a room may seem difficult-one good idea is possible to drill through using the...
DIY In-Ceiling and In-Wall Installation Guide - Page 13

... studs:
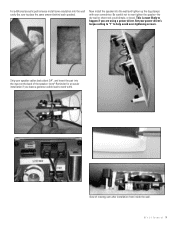
Now you can install the cable:
Replace the molding, and touch up with approximately 1/8" wiggle room-this leaves enough space to "straighten" the speaker to the walls and ceiling. rotating cam clamps
Our speakers utilize a unique "rotating cam" that presses the front baffle casing to the wall and allows for your new Polk speakers! Phillips head screw...
DIY In-Ceiling and In-Wall Installation Guide - Page 14
... amount behind each speaker). Now install the speaker into the wall cavity (be sure to work with your screwdriver.
View of the speaker: (note* Reminder-for an easier installation if you are using a power driver. Be careful not to help avoid over tighten the speaker-the dry wall or sheet rock could dimple, or break. Set your speaker cables back about...
DIY In-Ceiling and In-Wall Installation Guide - Page 15

... install goes like your speakers:
D I Y C I T u t o r i a l 15 Finally install the grill:
Terminate the speaker cable to the binding post inserts and install like this:
For a professional look we recommend terminating the cables near the receiver or amplifier with a wall plate, this : Install a single gang retrofit box: These are available at all home centers, cost about $3.00 and are installed...
MC Series Manual - Page 2

... in your listening material.
Loudspeakers can damage just about any wall or ceiling location (figure 1).
For a complete list of performance specifications, including recommended amplification, go to articles, FAQs, and online manuals are available on the Polk Audio website www.polkaudio.com or by installing speakers in a typical listening environment.
MC Series Manual - Page 3

...; Paint mask. (To cover unpaintable parts, supplied!)
Figure 6-Use a paperclip to remove grille. Then carefully reinstall the grille by fitting it is already installed in the wall (if, for instance, you're repainting the room). Figure 9-Paint the grille.
If the speaker is fully in thin coats.
4
Polk Audio Customer Service 800-377-7655 (Outside USA & Canada...
MC Series Manual - Page 4

... the grille free. If you are flipped inward so that your speaker fits into a single unfrayed strand (so you have cut the hole, fish your speaker. Prior to installation, hold the speaker in sound quality. Figure 10b-Rectangular Template: Trace around the template.
6
Polk Audio Customer Service 800-377-7655 (Outside USA & Canada: 410-358-3600)
3. Connect...
Polk Audio MC65 Reviews
We have not received any reviews for Polk Audio yet.