
F/X Wireless Surround Owner's Manual
Page 1
®Wireless Surround Wireless Surround Speaker System OWNER'S MANUAL CONTROLLED DISPERSION ARRAYTM
®Wireless Surround Wireless Surround Speaker System OWNER'S MANUAL CONTROLLED DISPERSION ARRAYTM
F/X Wireless Surround Owner's Manual
Page 3
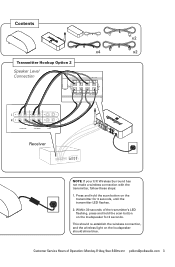
..., press and hold the scan button on the transmitter for 3 seconds. back front Receiver +L R +surr. back ++surround +L R +- Contents x4 Transmitter Hookup Option 2 Speaker Level Connection LL + - + - surround surr. This should re-establish the wireless connection, and the wireless light on the loudspeaker for 3 seconds, until the transmitter LED flashes. 2. back L R sub x2 x2 NOTE: If...
..., press and hold the scan button on the transmitter for 3 seconds. back front Receiver +L R +surr. back ++surround +L R +- Contents x4 Transmitter Hookup Option 2 Speaker Level Connection LL + - + - surround surr. This should re-establish the wireless connection, and the wireless light on the loudspeaker for 3 seconds, until the transmitter LED flashes. 2. back L R sub x2 x2 NOTE: If...
F/X Wireless Surround Owner's Manual
Page 6
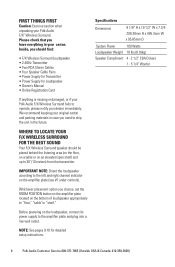
... Weight 18 lbs (8.16kg) Speaker Compliment 4 - 2 1/2" CDA Drivers 1 - 5 1/4" Woofer 6 Polk Audio Customer Service 800-377-7655 (Outside USA & Canada: 410-358-3600) Please check that you choose, set the ROOM POSITION button on the amplifier plate located on the bottom of loudspeaker appropriately to ship the unit in your Polk Audio F/X® Wireless Surround. NOTE: See pages...
... Weight 18 lbs (8.16kg) Speaker Compliment 4 - 2 1/2" CDA Drivers 1 - 5 1/4" Woofer 6 Polk Audio Customer Service 800-377-7655 (Outside USA & Canada: 410-358-3600) Please check that you choose, set the ROOM POSITION button on the amplifier plate located on the bottom of loudspeaker appropriately to ship the unit in your Polk Audio F/X® Wireless Surround. NOTE: See pages...
F/X Wireless Surround Owner's Manual
Page 7
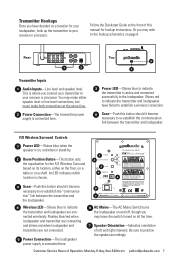
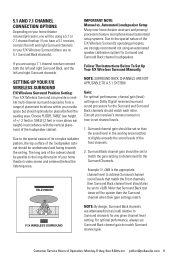
...channels. Transmitter Hookups Once you have failed to establish a wireless connection. 4 Scan-Push this button should it become 6 necessary to re-establish the "communica- F/X Wireless Surround Controls 1 Power LED-Shines blue when the speaker is connected here. 6 AC Mains--The AC Mains ...to the hookup schematics on a shelf. You may refer to the loudspeaker. Rear 1 2 Top 4 3 Transmitter Inputs 1 Audio Inputs-Line level and speaker level. Follow the Quickstart Guide at the same time. 2 Power Connection-The transmitter power supply is connected here. 3 Power ...
...channels. Transmitter Hookups Once you have failed to establish a wireless connection. 4 Scan-Push this button should it become 6 necessary to re-establish the "communica- F/X Wireless Surround Controls 1 Power LED-Shines blue when the speaker is connected here. 6 AC Mains--The AC Mains ...to the hookup schematics on a shelf. You may refer to the loudspeaker. Rear 1 2 Top 4 3 Transmitter Inputs 1 Audio Inputs-Line level and speaker level. Follow the Quickstart Guide at the same time. 2 Power Connection-The transmitter power supply is connected here. 3 Power ...
F/X Wireless Surround Owner's Manual
Page 8
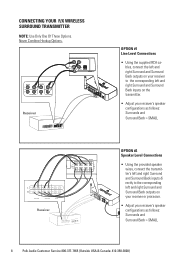
... your receiver or processor. • Adjust your receiver's speaker configurations as follows: Surrounds and Surround Back = SMALL 8 Polk Audio Customer Service 800-377-7655 (Outside USA & Canada: 410-358-3600) front front L R surround center L R sub surr. susrurroruonudnd -- + ssuurrrr.. front L center L R R surround sub surr. back front Receiver L R +surr. CONNECTING YOUR F/X WIRELESS SURROUND TRANSMITTER NOTE: Use Only One Of These Options...
... your receiver or processor. • Adjust your receiver's speaker configurations as follows: Surrounds and Surround Back = SMALL 8 Polk Audio Customer Service 800-377-7655 (Outside USA & Canada: 410-358-3600) front front L R surround center L R sub surr. susrurroruonudnd -- + ssuurrrr.. front L center L R R surround sub surr. back front Receiver L R +surr. CONNECTING YOUR F/X WIRELESS SURROUND TRANSMITTER NOTE: Use Only One Of These Options...
F/X Wireless Surround Owner's Manual
Page 9
...media space but should be placed behind the listening area. The long axis of the F/X Wireless Surround's operating principles, we strongly recommend not using an automated speaker calibration system for any given channel level setting. Automated Loudspeaker Setup Many new home theater receivers ... Monday-Friday, 9AM-5:30PM EST [email protected] 9 F/X WIRELESS SURROUND NOTE: By design, Surround Back channels are attenuated (not as loud) relative to match the gain setting so determined for the Surround and Surround Back channels should be unobstructed and facing towards the ceiling. ...
...media space but should be placed behind the listening area. The long axis of the F/X Wireless Surround's operating principles, we strongly recommend not using an automated speaker calibration system for any given channel level setting. Automated Loudspeaker Setup Many new home theater receivers ... Monday-Friday, 9AM-5:30PM EST [email protected] 9 F/X WIRELESS SURROUND NOTE: By design, Surround Back channels are attenuated (not as loud) relative to match the gain setting so determined for the Surround and Surround Back channels should be unobstructed and facing towards the ceiling. ...
F/X Wireless Surround Owner's Manual
Page 10
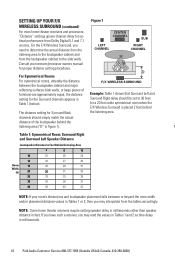
... wide symmetrical room when the F/X Wireless Surround is placed 2 feet behind the D listening area ("D" in milliseconds. 10 Polk Audio Customer Service 800-377-7655 (Outside USA & Canada: 410-358-3600) Example: Table 1 shows that Surround Left and Surround Right delay should simply match the actual...width and/or placement distance values in feet. For the F/X Wireless Surround, you may read the values in Tables 1 and 2 as time delay in figure 1). f Table 1: Symmetrical Room: Surround Right and Surround Left Speaker Distance Loudspeaker Distance In Feet Behind Listening Area 2 8 16...
... wide symmetrical room when the F/X Wireless Surround is placed 2 feet behind the D listening area ("D" in milliseconds. 10 Polk Audio Customer Service 800-377-7655 (Outside USA & Canada: 410-358-3600) Example: Table 1 shows that Surround Left and Surround Right delay should simply match the actual...width and/or placement distance values in feet. For the F/X Wireless Surround, you may read the values in Tables 1 and 2 as time delay in figure 1). f Table 1: Symmetrical Room: Surround Right and Surround Left Speaker Distance Loudspeaker Distance In Feet Behind Listening Area 2 8 16...
F/X Wireless Surround Owner's Manual
Page 11
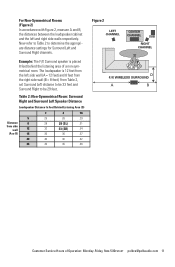
... CENTER CHANNEL SUB RIGHT CHANNEL D F/X WIRELESS SURROUND A B Customer Service Hours of a non-symmetrical room. Now refer to Table 2 to be 29 feet. From Table 2, set Surround Left distance to be 33 feet and Surround Right to determine the appropriate distance settings for Surround Left and Surround Right channels. Example: The F/X Surround speaker is 12 feet from the left...
... CENTER CHANNEL SUB RIGHT CHANNEL D F/X WIRELESS SURROUND A B Customer Service Hours of a non-symmetrical room. Now refer to Table 2 to be 29 feet. From Table 2, set Surround Left distance to be 33 feet and Surround Right to determine the appropriate distance settings for Surround Left and Surround Right channels. Example: The F/X Surround speaker is 12 feet from the left...
F/X Wireless Surround Owner's Manual
Page 12
.... - It is plugged into a live wall outlet and securely connected to reset the "communications" link between the transmitte and speaker of several feet or more between your F/X Wireless Surround and the microwave oven. 12 Polk Audio Customer Service 800-377-7655 (Outside USA & Canada: 410-358-3600) Move the transmitter further away from such sources...
.... - It is plugged into a live wall outlet and securely connected to reset the "communications" link between the transmitte and speaker of several feet or more between your F/X Wireless Surround and the microwave oven. 12 Polk Audio Customer Service 800-377-7655 (Outside USA & Canada: 410-358-3600) Move the transmitter further away from such sources...


