

User Manual
Page 1
ENGLISH DATA PROJECTOR MODEL XD95U User Manual XD95U This User Manual is important to you. Please read it before using your projector.
ENGLISH DATA PROJECTOR MODEL XD95U User Manual XD95U This User Manual is important to you. Please read it before using your projector.
User Manual
Page 2
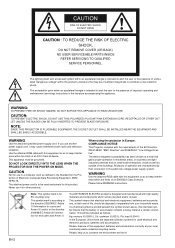
...EXPOSE THIS APPLIANCE TO RAIN OR MOITURE. WARNING Use the attached specified power supply cord. DO NOT LOOK DIRECTLY INTO THE LENS WHEN THE PROJECTOR IS IN THE POWER ON MODE. CAUTION: TO PREVENT ELECTRIC SHOCK, DO NOT USE THIS (POLARIZED) PLUG WITH AN EXTENSION CORD, ...to constitute a risk of an FCC Class B device. Please, help us to conserve the environment we live in Europe: COMPLIANCE NOTICE This Projector complies with arrowhead symbol within an equilateral triangle is to be of sufficient magnitude to the presence of uninsulated "dangerous voltage" within the limits...
...EXPOSE THIS APPLIANCE TO RAIN OR MOITURE. WARNING Use the attached specified power supply cord. DO NOT LOOK DIRECTLY INTO THE LENS WHEN THE PROJECTOR IS IN THE POWER ON MODE. CAUTION: TO PREVENT ELECTRIC SHOCK, DO NOT USE THIS (POLARIZED) PLUG WITH AN EXTENSION CORD, ...to constitute a risk of an FCC Class B device. Please, help us to conserve the environment we live in Europe: COMPLIANCE NOTICE This Projector complies with arrowhead symbol within an equilateral triangle is to be of sufficient magnitude to the presence of uninsulated "dangerous voltage" within the limits...

User Manual
Page 3
... the power cord should be deformed because of heat build-up. If the power cord is for the U.S., Europe and U.K. is provided with the projector turned on the projector. • One of three-pin grounding type. Do not remove the grounding pin from the power plug. EN-3 is provided appropriately. •... This projector uses the power plug of power cords for protecting the lens. If you turn on , it may be damaged, contact your wall outlet, ask ...
... the power cord should be deformed because of heat build-up. If the power cord is for the U.S., Europe and U.K. is provided with the projector turned on the projector. • One of three-pin grounding type. Do not remove the grounding pin from the power plug. EN-3 is provided appropriately. •... This projector uses the power plug of power cords for protecting the lens. If you turn on , it may be damaged, contact your wall outlet, ask ...

User Manual
Page 4
...product names are trademarks or registered trademarks of the FCC Rules. Contents Important safeguards ...5 Projector exterior view ...7 Controls and functions...8 Positioning your projector ...11 Connection...14 Operation ...17 Adjusting the projected image ...21 Optimizing the image ......24 Menu operation...30 Maintenance...35 Lamp information ...36 Indicators ...40 Troubleshooting...41 Specifications...42 Declaration of Conformity Model Number : XD95U Trade Name ...
...product names are trademarks or registered trademarks of the FCC Rules. Contents Important safeguards ...5 Projector exterior view ...7 Controls and functions...8 Positioning your projector ...11 Connection...14 Operation ...17 Adjusting the projected image ...21 Optimizing the image ......24 Menu operation...30 Maintenance...35 Lamp information ...36 Indicators ...40 Troubleshooting...41 Specifications...42 Declaration of Conformity Model Number : XD95U Trade Name ...

User Manual
Page 5
.... 13. Retain instructions The safety and operating instructions should use a mounting accessory recommended by the operating instructions. Do not use this projector from the type of any service or repair to overturn. 9. Refer all these openings or allow them . Pay particular attention to ... . 10. Power-cord protection Power-supply cords should be routed so that the manufacturer's instructions have fallen into the projector. (c) If the projector does not operate normally after you are covered by the manufacturer. 12. Water and moisture Do not use liquid aerosol cleaners...
.... 13. Retain instructions The safety and operating instructions should use a mounting accessory recommended by the operating instructions. Do not use this projector from the type of any service or repair to overturn. 9. Refer all these openings or allow them . Pay particular attention to ... . 10. Power-cord protection Power-supply cords should be routed so that the manufacturer's instructions have fallen into the projector. (c) If the projector does not operate normally after you are covered by the manufacturer. 12. Water and moisture Do not use liquid aerosol cleaners...
User Manual
Page 6
... surface. However, there is no guarantee that to stop before unplugging the power cord. If you keep using the damaged projector. Place the projector on uneven surface. These limits are blocked, heat may cause fire or electric shock. It can lead to provide reasonable protection... against harmful interference in the projector quality and fire. Please contact your eyes. WARNING: Unplug immediately if there is something wrong with your dealer for inspection. ...
... surface. However, there is no guarantee that to stop before unplugging the power cord. If you keep using the damaged projector. Place the projector on uneven surface. These limits are blocked, heat may cause fire or electric shock. It can lead to provide reasonable protection... against harmful interference in the projector quality and fire. Please contact your eyes. WARNING: Unplug immediately if there is something wrong with your dealer for inspection. ...

User Manual
Page 7
...(PC)/Component Video (YPbPr/ YCbCr) signal input socket 11. Quick-release foot 15. Kensington Technology Group 2855 Campus Drive San Mateo, CA 94403, U.S.A. ENGLISH Projector exterior view Front/upper side 1 2 5 3 6 7 4 Rear/lower side 8 9 10 11 12 13 14 15 16 1. Lens cover 5. AC...Technology Group below. S-Video input socket 12. Kensington Lock 14. Focus ring and Zoom ring 6. Rear adjuster foot Kensington Lock This projector has a Kensington Security Standard connector for use it to use with the Kensington System for instructions on page 8 for details.) 2. Lamp...
...(PC)/Component Video (YPbPr/ YCbCr) signal input socket 11. Quick-release foot 15. Kensington Technology Group 2855 Campus Drive San Mateo, CA 94403, U.S.A. ENGLISH Projector exterior view Front/upper side 1 2 5 3 6 7 4 Rear/lower side 8 9 10 11 12 13 14 15 16 1. Lens cover 5. AC...Technology Group below. S-Video input socket 12. Kensington Lock 14. Focus ring and Zoom ring 6. Rear adjuster foot Kensington Lock This projector has a Kensington Security Standard connector for use it to use with the Kensington System for instructions on page 8 for details.) 2. Lamp...
User Manual
Page 8
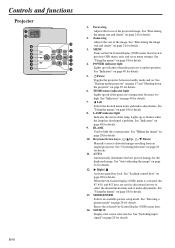
...for details. 4. See "Locking control keys" on page 20 for details. 5. See "Switching input signal" on page 28 for details. 6. Controls and functions Projector 1 2 10 3 4 11 5 6 12 7 13 8 14 9 10 1. Focus ring Adjusts the focus of the image. Zoom ring Adjusts the size.... 3. MODE/ENTER Selects an available picture setup mode. See "Fine-tuning the image size and clarity" on . II Power Toggles the projector between standby mode and on page 21 for details. 10. When the On-Screen Display (OSD) menu is under operation. Keystone/Arrow keys...
...for details. 4. See "Locking control keys" on page 20 for details. 5. See "Switching input signal" on page 28 for details. 6. Controls and functions Projector 1 2 10 3 4 11 5 6 12 7 13 8 14 9 10 1. Focus ring Adjusts the focus of the image. Zoom ring Adjusts the size.... 3. MODE/ENTER Selects an available picture setup mode. See "Fine-tuning the image size and clarity" on . II Power Toggles the projector between standby mode and on page 21 for details. 10. When the On-Screen Display (OSD) menu is under operation. Keystone/Arrow keys...
User Manual
Page 9
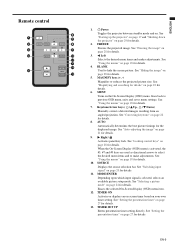
..., / Down) Manually corrects distorted images resulting from an angled projection. II Power 6 Toggles the projector between standby mode and on page 29 for details. ENGLISH Remote control 1 2 3 4 5 1. See "Starting up the projector" on page 17 and "Shutting down 7 the projector" on . See "Correcting keystone" on page 22 for the displayed image. MODE/ENTER...
..., / Down) Manually corrects distorted images resulting from an angled projection. II Power 6 Toggles the projector between standby mode and on page 29 for details. ENGLISH Remote control 1 2 3 4 5 1. See "Starting up the projector" on page 17 and "Shutting down 7 the projector" on . See "Correcting keystone" on page 22 for the displayed image. MODE/ENTER...

User Manual
Page 10
...sensor on the front of wrong type may explode if mistreated. Push the holder into the remote control. • Use of a battery of the projector. Do not recharge, disassemble, or dispose of used battery promptly. Push and hold the locking arm while pulling out the battery holder. 2. EN-10... Remote control effective range Infra-Red (IR) remote control sensor is located on the projector that might obstruct the infra-red beam. Make sure that there are no obstacles between the remote control and the sensor should face outward. 3....
...sensor on the front of wrong type may explode if mistreated. Push the holder into the remote control. • Use of a battery of the projector. Do not recharge, disassemble, or dispose of used battery promptly. Push and hold the locking arm while pulling out the battery holder. 2. EN-10... Remote control effective range Infra-Red (IR) remote control sensor is located on the projector that might obstruct the infra-red beam. Make sure that there are no obstacles between the remote control and the sensor should face outward. 3....
User Manual
Page 11
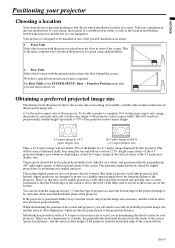
... respectively) of the 4:3 projection display area whenever displaying a scaled 16:9 aspect image in the vertical center of the screen and projector, you in determining the ideal location for quick setup and portability. 2. This is designed to the projection distance. This will need to account for both the projected image size and the...
... respectively) of the 4:3 projection display area whenever displaying a scaled 16:9 aspect image in the vertical center of the screen and projector, you in determining the ideal location for quick setup and portability. 2. This is designed to the projection distance. This will need to account for both the projected image size and the...

User Manual
Page 12
... in the distance from the screen" column is aligned perpendicular to know what screen size will determine the final vertical offset placement of the projector in the left to the right column and make note of the "Hd" value. Select your screen size in relation to determine the...projection distance. 2. For example, if you want to determine the recommended screen size for a given distance This method can be used for the projector is from the screen is limited by the value determined in your room. In these situations, some image distortion will have purchased this row shows...
... in the distance from the screen" column is aligned perpendicular to know what screen size will determine the final vertical offset placement of the projector in the left to the right column and make note of the "Hd" value. Select your screen size in relation to determine the...projection distance. 2. For example, if you want to determine the recommended screen size for a given distance This method can be used for the projector is from the screen is limited by the value determined in your room. In these situations, some image distortion will have purchased this row shows...

User Manual
Page 13
... 18 11 27 14 36 18 45 26 67 35 90 There is 3% tolerance among these numbers due to make allowance for this projector's optical characteristics. This will help you permanently install it best suits your installation location. Hd inch cm 3 8 5 11 6 15... 167 4.2 227 5.8 250 6.3 303 7.7 - - Mitsubishi recommends that if you intend to permanently install the projector, you should physically test the projection size and distance using the actual projector in suit before you determine the exact mounting position so that it , so as to optical component variations. EN...
... 18 11 27 14 36 18 45 26 67 35 90 There is 3% tolerance among these numbers due to make allowance for this projector's optical characteristics. This will help you permanently install it best suits your installation location. Hd inch cm 3 8 5 11 6 15... 167 4.2 227 5.8 250 6.3 303 7.7 - - Mitsubishi recommends that if you intend to permanently install the projector, you should physically test the projection size and distance using the actual projector in suit before you determine the exact mounting position so that it , so as to optical component variations. EN...

User Manual
Page 14
...be included with a monitor symbol on their external video ports when connected to find your notebook's documentation to a projector. Take the supplied VGA cable and connect one of the above connecting methods, however each source. 3. IN signal input socket on page 15... acceptable, but less than standard composite Video. Ensure the cables are connecting legacy version Macintosh computers. Connecting a computer The projector provides a VGA input socket that provide any connections. 2. Better video quality The S-Video method provides a better quality analog video than optimal...
...be included with a monitor symbol on their external video ports when connected to find your notebook's documentation to a projector. Take the supplied VGA cable and connect one of the above connecting methods, however each source. 3. IN signal input socket on page 15... acceptable, but less than standard composite Video. Ensure the cables are connecting legacy version Macintosh computers. Connecting a computer The projector provides a VGA input socket that provide any connections. 2. Better video quality The S-Video method provides a better quality analog video than optimal...

User Manual
Page 15
...; If you have been connected correctly. The final connection path should be like that the Video source device is turned on the projector. Take a Component Video to VGA (D-Sub) adaptor cable and connect the end with 3 RCA type connectors to an S-Video source device: 1. Take an S-Video...following diagram: AV device Component Video to a Component Video source device: 1. To connect the projector to VGA (D-Sub) adaptor cable If the selected video image is not displayed after the projector is turned on and operating correctly. Match the color of the plugs to this device using an...
...; If you have been connected correctly. The final connection path should be like that the Video source device is turned on the projector. Take a Component Video to VGA (D-Sub) adaptor cable and connect the end with 3 RCA type connectors to an S-Video source device: 1. Take an S-Video...following diagram: AV device Component Video to a Component Video source device: 1. To connect the projector to VGA (D-Sub) adaptor cable If the selected video image is not displayed after the projector is turned on and operating correctly. Match the color of the plugs to this device using an...

User Manual
Page 16
... path should be like that shown in the following diagram: AV device Video cable • If the selected video image is not displayed after the projector is turned on and the correct video source has been selected, check that the signal cables have been connected correctly. • You need to a composite... Take a Video cable and connect one end to the composite Video output socket of the Video cable to the VIDEO socket on the projector. To connect the projector to reassess which method you can use . Also check that the Video source device is turned on page 14 for use to connect to...
... path should be like that shown in the following diagram: AV device Video cable • If the selected video image is not displayed after the projector is turned on and the correct video source has been selected, check that the signal cables have been connected correctly. • You need to a composite... Take a Video cable and connect one end to the composite Video output socket of the Video cable to the VIDEO socket on the projector. To connect the projector to reassess which method you can use . Also check that the Video source device is turned on page 14 for use to connect to...

User Manual
Page 17
... the lamp. • To maintain the lamp life, once you are prompted for details. Remove the lens cap. The start up the projector 1. If you turn the projector on . 6. The current input signal being scanned displays in the upper left corner of the connected equipment on , wait at least 5 ...minutes before turning it could become deformed due to provide an Earth leakage breaker. If the projector doesn't detect a valid signal, the message 'No Signal' will see the message 'Out of start up, a startup logo is projected. (If necessary) ...
... the lamp. • To maintain the lamp life, once you are prompted for details. Remove the lens cap. The start up the projector 1. If you turn the projector on . 6. The current input signal being scanned displays in the upper left corner of the connected equipment on , wait at least 5 ...minutes before turning it could become deformed due to provide an Earth leakage breaker. If the projector doesn't detect a valid signal, the message 'No Signal' will see the message 'Out of start up, a startup logo is projected. (If necessary) ...
User Manual
Page 18
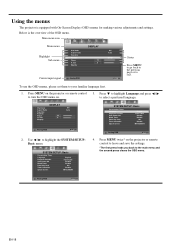
... Press to highlight Language and press / to highlight the SYSTEM SETUP: Basic menu. SYSTEM SETUP: Basic Presentation Timer Language Projector Position Auto Power Off Blank Timer Panel Key Lock Timer Controller Splash Screen English Front Table Disable Disable Off Disable MITSUBISHI SYSTEM ...SETUP: Basic Presentation Timer Language Projector Position Auto Power Off Blank Timer Panel Key Lock Timer Controller Splash Screen English Front Table Disable Disable Off Disable MITSUBISHI...
... Press to highlight Language and press / to highlight the SYSTEM SETUP: Basic menu. SYSTEM SETUP: Basic Presentation Timer Language Projector Position Auto Power Off Blank Timer Panel Key Lock Timer Controller Splash Screen English Front Table Disable Disable Off Disable MITSUBISHI SYSTEM ...SETUP: Basic Presentation Timer Language Projector Position Auto Power Off Blank Timer Panel Key Lock Timer Controller Splash Screen English Front Table Disable Disable Off Disable MITSUBISHI...
User Manual
Page 19
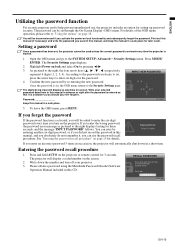
.... Please obtain a password using the Mitsubishi Password Decoder Software Operation Manual included in this manual, and keep the manual in succession, the projector will be asked to enter the six-digit password every time you enter an incorrect password 5 times in a safe place for three seconds...Settings page. Print out this manual (if necessary) and write the password you used unless the correct password is entered every time the projector is activated, you absolutely do not remember it . Password Keep this manual in this manual, and you will display as pictured to...
.... Please obtain a password using the Mitsubishi Password Decoder Software Operation Manual included in this manual, and keep the manual in succession, the projector will be asked to enter the six-digit password every time you enter an incorrect password 5 times in a safe place for three seconds...Settings page. Print out this manual (if necessary) and write the password you used unless the correct password is entered every time the projector is activated, you absolutely do not remember it . Password Keep this manual in this manual, and you will display as pictured to...
User Manual
Page 20
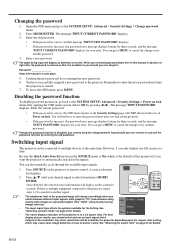
...it can press MENU to automatically search for another message 'INPUT NEW PASSWORD' displays. • If the password is the default of this projector is available to the SYSTEM SETUP: Advanced > Security Settings > Change password menu. 2. You have to cancel the change or try another...should you should you switch between different input signals. Password Keep this resolution. Remember to enter the new password next time the projector is incorrect, the password error message displays lasting for three seconds, and the message 'INPUT PASSWORD' displays for the Setting....
...it can press MENU to automatically search for another message 'INPUT NEW PASSWORD' displays. • If the password is the default of this projector is available to the SYSTEM SETUP: Advanced > Security Settings > Change password menu. 2. You have to cancel the change or try another...should you should you switch between different input signals. Password Keep this resolution. Remember to enter the new password next time the projector is incorrect, the password error message displays lasting for three seconds, and the message 'INPUT PASSWORD' displays for the Setting....