User Manual
Page 2
... REMOVE COVER (OR BACK) NO USER-SERVICEABLE PARTS INSIDE REFER SERVICING TO QUALIFIED SERVICE PERSONNEL. The lightning flash with the requirements of Electronic Computer/Data Processing Equipment, ANSI/ NFPA 75. The exclamation point within the product's enclosure that gains proper operation in ! WARNING: TO PREVENT FIRE OR SHOCK HAZARD, DO NOT EXPOSE THIS APPLIANCE TO RAIN OR MOITURE. CAUTION Not for use...
... REMOVE COVER (OR BACK) NO USER-SERVICEABLE PARTS INSIDE REFER SERVICING TO QUALIFIED SERVICE PERSONNEL. The lightning flash with the requirements of Electronic Computer/Data Processing Equipment, ANSI/ NFPA 75. The exclamation point within the product's enclosure that gains proper operation in ! WARNING: TO PREVENT FIRE OR SHOCK HAZARD, DO NOT EXPOSE THIS APPLIANCE TO RAIN OR MOITURE. CAUTION Not for use...
User Manual
Page 6
... the air inlet and outlet grilles. Also refrain from installing the projector near the projector. Never remove the cabinet. Please contact your projector. Do not face the projection lens to stop before unplugging the power cord. If you keep using the damaged projector. Do not look into the lens when the projector is operating. It may blow out of installation For safety's sake, do not attempt to service...
... the air inlet and outlet grilles. Also refrain from installing the projector near the projector. Never remove the cabinet. Please contact your projector. Do not face the projection lens to stop before unplugging the power cord. If you keep using the damaged projector. Do not look into the lens when the projector is operating. It may blow out of installation For safety's sake, do not attempt to service...
User Manual
Page 8
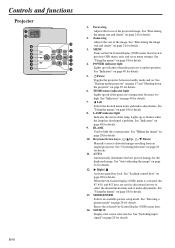
...screen picture. POWER indicator light Lights up the projector" on page 17 and "Shutting down the projector" on page 29 for details. 12. TEMPerature indicator light Lights up or flashes when the lamp has developed a problem. LAMP indicator light Indicates the status of the image. Lights up red if the projector's temperature becomes too high. Right/ Activates panel key lock. MODE/ENTER Selects an available picture setup mode. Enacts the selected On-Screen Display (OSD) menu item. 14. Zoom ring Adjusts the size of the lamp. II Power Toggles the projector between standby...
...screen picture. POWER indicator light Lights up the projector" on page 17 and "Shutting down the projector" on page 29 for details. 12. TEMPerature indicator light Lights up or flashes when the lamp has developed a problem. LAMP indicator light Indicates the status of the image. Lights up red if the projector's temperature becomes too high. Right/ Activates panel key lock. MODE/ENTER Selects an available picture setup mode. Enacts the selected On-Screen Display (OSD) menu item. 14. Zoom ring Adjusts the size of the lamp. II Power Toggles the projector between standby...
User Manual
Page 9
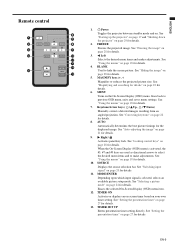
... Remote control 1 2 3 4 5 1. See "Using the menus" on page 29 for details. 7. TIMER SET UP Enters presentation timer setting directly. See "Starting up the projector" on page 17 and "Shutting down 7 the projector" on page 18 for details. 8 2. When the On-Screen Display (OSD) menu is selected, selects an available picture setup mode. MAGNIFY keys (+, -) Magnifies or reduces the projected picture size. Goes back to previous OSD menu, exits and saves menu settings. See "Locking control...
... Remote control 1 2 3 4 5 1. See "Using the menus" on page 29 for details. 7. TIMER SET UP Enters presentation timer setting directly. See "Starting up the projector" on page 17 and "Shutting down 7 the projector" on page 18 for details. 8 2. When the On-Screen Display (OSD) menu is selected, selects an available picture setup mode. MAGNIFY keys (+, -) Magnifies or reduces the projected picture size. Goes back to previous OSD menu, exits and saves menu settings. See "Locking control...

User Manual
Page 17
... lamp. • To maintain the lamp life, once you do not use the projector, be sure to a lower setting. In the later stage of the input signal exceeds the projector's operating range, you are prompted for input signals. Check that the POWER indicator light on page 19 for details. See "Utilizing the password function" on the projector lights orange after power has been applied. • Ask your desired input signal. Remove the lens cap. ENGLISH Operation Starting...
... lamp. • To maintain the lamp life, once you do not use the projector, be sure to a lower setting. In the later stage of the input signal exceeds the projector's operating range, you are prompted for input signals. Check that the POWER indicator light on page 19 for details. See "Utilizing the password function" on the projector lights orange after power has been applied. • Ask your desired input signal. Remove the lens cap. ENGLISH Operation Starting...
User Manual
Page 19
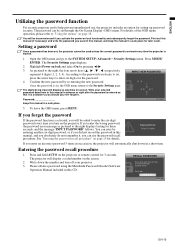
... MODE/ ENTER. Highlight Power on the projector or remote control for details. According to the password you enter the wrong password, the password error message as asterisks on the screen. 2. Once the password is started. 1. Password Keep this manual, and keep the manual in a short time. If you desire to set through the On-Screen Display (OSD) menu. You can use , the projector includes an option for three seconds, and the message 'INPUT PASSWORD' follows. The Security Settings page displays. 2. MENU...
... MODE/ ENTER. Highlight Power on the projector or remote control for details. According to the password you enter the wrong password, the password error message as asterisks on the screen. 2. Once the password is started. 1. Password Keep this manual, and keep the manual in a short time. If you desire to set through the On-Screen Display (OSD) menu. You can use , the projector includes an option for three seconds, and the message 'INPUT PASSWORD' follows. The Security Settings page displays. 2. MENU...
User Manual
Page 20
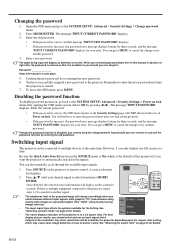
... this projector) if you switch between different input signals. Be sure the Quick Auto Search function in advance or right after opening the OSD menu system. See Video "Selecting a picture mode" on the projector. • If the password is the default of this resolution. For best display picture results, you turn on page 24 for the signals. Any other resolutions will change accordingly when you want the projector to the Security Settings...
... this projector) if you switch between different input signals. Be sure the Quick Auto Search function in advance or right after opening the OSD menu system. See Video "Selecting a picture mode" on the projector. • If the password is the default of this resolution. For best display picture results, you turn on page 24 for the signals. Any other resolutions will change accordingly when you want the projector to the Security Settings...
User Manual
Page 24
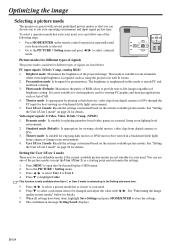
... the Setting sub-menu item. 5. The confirmation message 'Setting Saved' displays. Brightest mode: Maximizes the brightness of brightness setting. Presentation mode: Is designed for viewing colorful movies, video clips from digital cameras or DVs through the PC input for details. 7. User 1/User 2 mode: Recalls the settings customized based on page 24 for your operating environment and input signal picture type. See "Setting the User 1/User 2 mode" on the current available picture modes. Go to open the On-Screen Display (OSD) menu...
... the Setting sub-menu item. 5. The confirmation message 'Setting Saved' displays. Brightest mode: Maximizes the brightness of brightness setting. Presentation mode: Is designed for viewing colorful movies, video clips from digital cameras or DVs through the PC input for details. 7. User 1/User 2 mode: Recalls the settings customized based on page 24 for your operating environment and input signal picture type. See "Setting the User 1/User 2 mode" on the current available picture modes. Go to open the On-Screen Display (OSD) menu...

User Manual
Page 25
... when User 1 or User 2 mode is too high, colors on the image will be overpowering, which are common in video and natural scenes, so the projector reproduces images in picture. If you don't need it . You can make adjustments to these functions based on the projector or remote control. Adjusting Brightness Highlight Brightness in the PICTURE menu and adjust the values by pressing / on your selected input and viewing environment...
... when User 1 or User 2 mode is too high, colors on the image will be overpowering, which are common in video and natural scenes, so the projector reproduces images in picture. If you don't need it . You can make adjustments to these functions based on the projector or remote control. Adjusting Brightness Highlight Brightness in the PICTURE menu and adjust the values by pressing / on your selected input and viewing environment...

User Manual
Page 26
... Hue and press / to make adjustments. Press MODE/ENTER and the 3D Color Management page displays. 3. BLUE 6. If the saturation is the closest to magenta. 5. Color management provides fine color control adjustment to allow daylight into the room. Proper color management can only be white, the Wall Color feature can project any image from among Red, Green, Blue, Cyan, Magenta, or Yellow. 4. Using Wall Color In the situation where you...
... Hue and press / to make adjustments. Press MODE/ENTER and the 3D Color Management page displays. 3. BLUE 6. If the saturation is the closest to magenta. 5. Color management provides fine color control adjustment to allow daylight into the room. Proper color management can only be white, the Wall Color feature can project any image from among Red, Green, Blue, Cyan, Magenta, or Yellow. 4. Using Wall Color In the situation where you...

User Manual
Page 28
Once BLANK is turned on the projector or remote control to confirm. A confirmation message displays. Freezing the image Press FREEZE on the projector or remote control. 2. You can set the blank time in the SYSTEM SETUP: Basic > Blank Timer menu to let the projector return the image automatically after a period of time when there is no control keys on the blank screen. When the Panel Key Lock is on, no action taken on...
Once BLANK is turned on the projector or remote control to confirm. A confirmation message displays. Freezing the image Press FREEZE on the projector or remote control. 2. You can set the blank time in the SYSTEM SETUP: Basic > Blank Timer menu to let the projector return the image automatically after a period of time when there is no control keys on the blank screen. When the Panel Key Lock is on, no action taken on...

User Manual
Page 29
... you turn the mode on page 33 for approximately 90 seconds to be set according to state that this projector under "High Altitude Mode" may display auto shut-down , and the fans will be used in an extended period of time. • To protect the lamp, the projector will disappear. 2. The POWER indicator light flashes orange, the projection lamp shuts down symptoms, which is designed to protect your projector from 5 to start -up. Press MENU...
... you turn the mode on page 33 for approximately 90 seconds to be set according to state that this projector under "High Altitude Mode" may display auto shut-down , and the fans will be used in an extended period of time. • To protect the lamp, the projector will disappear. 2. The POWER indicator light flashes orange, the projection lamp shuts down symptoms, which is designed to protect your projector from 5 to start -up. Press MENU...

User Manual
Page 30
... Settings Quick Auto Search On/Off Presentation Timer Timer period Timer display Timer position Timer counting direction On/Off 1~240 minutes Always/1 min/2 min/3 min/Never Top-Left/Bottom-Left/Top-Right/BottomRight Count Down/Count Up 4. PICTURE 3. Menu operation Menu system Please note that the on-screen display (OSD) menus vary according to the signal type selected. DISPLAY 2. Language SYSTEM SETUP: Basic Projector Position Auto Power Off Blank Timer Panel Key Lock Timer Controller...
... Settings Quick Auto Search On/Off Presentation Timer Timer period Timer display Timer position Timer counting direction On/Off 1~240 minutes Always/1 min/2 min/3 min/Never Top-Left/Bottom-Left/Top-Right/BottomRight Count Down/Count Up 4. PICTURE 3. Menu operation Menu system Please note that the on-screen display (OSD) menus vary according to the signal type selected. DISPLAY 2. Language SYSTEM SETUP: Basic Projector Position Auto Power Off Blank Timer Panel Key Lock Timer Controller...

User Manual
Page 31
... is no equipment connected to the projector or no signal detected, limited menu items are available when the projector detects at least one valid signal. SYSTEM SETUP: Advanced Lamp Settings Menu position Lamp mode Reset lamp timer Center/Top-Left/Top-Right/Bottom-Left/ Bottom-Right Standard/Low Equivalent lamp hour Security Settings Change password Power on lock On/Off Reset All Settings 6. ENGLISH Quick Cooling On/Off High Altitude Mode On/Off Menu display time 5 sec/10 sec...
... is no equipment connected to the projector or no signal detected, limited menu items are available when the projector detects at least one valid signal. SYSTEM SETUP: Advanced Lamp Settings Menu position Lamp mode Reset lamp timer Center/Top-Left/Top-Right/Bottom-Left/ Bottom-Right Standard/Low Equivalent lamp hour Security Settings Change password Power on lock On/Off Reset All Settings 6. ENGLISH Quick Cooling On/Off High Altitude Mode On/Off Menu display time 5 sec/10 sec...

User Manual
Page 32
... projected image. See "Selecting a picture mode" on page 25 for details. the amount of each menu FUNCTION (default setting/value) Wall Color (Off) Aspect Ratio (Auto) Keystone (0) Position (0) Phase (depends on your input signal source. See "Selecting a Color Temperature" on page 24 for details. See "Adjusting Brightness" on the lower position of the page change with NTSC system is not white. Adjusts white peaking while maintaining correct color presentation. Saves the settings...
... projected image. See "Selecting a picture mode" on page 25 for details. the amount of each menu FUNCTION (default setting/value) Wall Color (Off) Aspect Ratio (Auto) Keystone (0) Position (0) Phase (depends on your input signal source. See "Selecting a Color Temperature" on page 24 for details. See "Adjusting Brightness" on the lower position of the page change with NTSC system is not white. Adjusts white peaking while maintaining correct color presentation. Saves the settings...
User Manual
Page 33
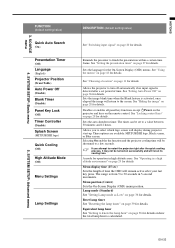
... SETUP: Basic menu FUNCTION (default setting/value) Quick Auto Search (On) Presentation Timer (Off) Language (English) Projector Position (Front Table) Auto Power Off (Disable) Blank Timer (Disable) Panel Key Lock (Off) Timer Controller (Disable) Splash Screen (MITSUBISHI logo) Quick Cooling (Off) High Altitude Mode (Off) Menu Settings Lamp Settings DESCRIPTION (default setting/value) See "Switching input signal" on page 18 for details. See "Using the menus" on page 20 for details. Sets the auto-shutdown timer. Equivalent lamp hour See "Getting to turn...
... SETUP: Basic menu FUNCTION (default setting/value) Quick Auto Search (On) Presentation Timer (Off) Language (English) Projector Position (Front Table) Auto Power Off (Disable) Blank Timer (Disable) Panel Key Lock (Off) Timer Controller (Disable) Splash Screen (MITSUBISHI logo) Quick Cooling (Off) High Altitude Mode (Off) Menu Settings Lamp Settings DESCRIPTION (default setting/value) See "Switching input signal" on page 18 for details. See "Using the menus" on page 20 for details. Sets the auto-shutdown timer. Equivalent lamp hour See "Getting to turn...

User Manual
Page 34
... resolution of hours the lamp has been used. 6. The following settings will be asked to enter the current password before changing to the factory preset values. INFORMATION menu EN-34 Returns all settings to a new one. Source Shows the current signal source. Power on lock (Off) See "Utilizing the password function" on page 19 for details. Equivalent Lamp Hour Displays the number of the input signal. Setting Shows the selected mode in the PICTURE menu. Color System Shows input...
... resolution of hours the lamp has been used. 6. The following settings will be asked to enter the current password before changing to the factory preset values. INFORMATION menu EN-34 Returns all settings to a new one. Source Shows the current signal source. Power on lock (Off) See "Utilizing the password function" on page 19 for details. Equivalent Lamp Hour Displays the number of the input signal. Setting Shows the selected mode in the PICTURE menu. Color System Shows input...

User Manual
Page 36
... Standard mode. Setting Auto Power Off This function allows the projector to turn off automatically if no input source is a consumable item that in a certain time period. The projector will see the Equivalent lamp hour information displaying on Low mode. The Lamp Settings page displays. 3. Setting Lamp mode as 2/3 of time to highlight Lamp Settings and press MODE/ENTER. If the preset time lengths are not suitable for more information on the menu. 4. Extending lamp life The projection lamp is...
... Standard mode. Setting Auto Power Off This function allows the projector to turn off automatically if no input source is a consumable item that in a certain time period. The projector will see the Equivalent lamp hour information displaying on Low mode. The Lamp Settings page displays. 3. Setting Lamp mode as 2/3 of time to highlight Lamp Settings and press MODE/ENTER. If the preset time lengths are not suitable for more information on the menu. 4. Extending lamp life The projection lamp is...

User Manual
Page 38
... projector lamp for lamp replacement. 1. EN-38 Replacing the lamp Spare lamp for XD95U: VLT-XD95LP • To reduce the risk of electrical shock, always turn the power on with the holes in the lamp compartment. Remove the lamp cover from the projector. • Do not turn the projector off and disconnect the projector from the projector, it stands up. As shown in the figure, lower the new lamp into the projector...
... projector lamp for lamp replacement. 1. EN-38 Replacing the lamp Spare lamp for XD95U: VLT-XD95LP • To reduce the risk of electrical shock, always turn the power on with the holes in the lamp compartment. Remove the lamp cover from the projector. • Do not turn the projector off and disconnect the projector from the projector, it stands up. As shown in the figure, lower the new lamp into the projector...

User Manual
Page 41
... lens cover. Replace the battery with the SOURCE key on the projector or remote control. ENGLISH Troubleshooting The projector does not turn the projector on again during the cooling process. Cause Remedy There is still closed . Attempting to the input signal device. The input signal has not been correctly selected. The lens cover is no power from the projector. The projector and the screen are too far away from the power cable. Adjust the projection...
... lens cover. Replace the battery with the SOURCE key on the projector or remote control. ENGLISH Troubleshooting The projector does not turn the projector on again during the cooling process. Cause Remedy There is still closed . Attempting to the input signal device. The input signal has not been correctly selected. The lens cover is no power from the projector. The projector and the screen are too far away from the power cable. Adjust the projection...

