

User Manual
Page 1
ENGLISH DATA PROJECTOR MODEL XD90U User Manual XD90U This User Manual is important to you. Please read it before using your projector.
ENGLISH DATA PROJECTOR MODEL XD90U User Manual XD90U This User Manual is important to you. Please read it before using your projector.

User Manual
Page 2
... THIS (POLARIZED) PLUG WITH AN EXTENSION CORD, RECEPTACLE OR OTHER OUTLET UNLESS THE BLADES CAN BE FULLY INSERTED TO PREVENT BLADE EXPOSURE. NOTE: SINCE THIS PROJECTOR IS PLUGGABLE EQUIPMENT, THE SOCKET-OUTLET SHALL BE INSTALLED NEAR THE EQUIPMENT AND SHALL BE EASILY ACCESSIBLE. The lightning flash with arrowhead symbol within the...
... THIS (POLARIZED) PLUG WITH AN EXTENSION CORD, RECEPTACLE OR OTHER OUTLET UNLESS THE BLADES CAN BE FULLY INSERTED TO PREVENT BLADE EXPOSURE. NOTE: SINCE THIS PROJECTOR IS PLUGGABLE EQUIPMENT, THE SOCKET-OUTLET SHALL BE INSTALLED NEAR THE EQUIPMENT AND SHALL BE EASILY ACCESSIBLE. The lightning flash with arrowhead symbol within the...

User Manual
Page 3
... WHEN THE PROJECTOR IS IN THE POWER ON MODE. All places of -life, should be used electrical and electronic product. Note: This symbol mark is according to the directive 2002/96/EC Article 10 Information for EU countries only. This symbol mark is for users and Annex IV. Your MITSUBISHI ELECTRIC product...
... WHEN THE PROJECTOR IS IN THE POWER ON MODE. All places of -life, should be used electrical and electronic product. Note: This symbol mark is according to the directive 2002/96/EC Article 10 Information for EU countries only. This symbol mark is for users and Annex IV. Your MITSUBISHI ELECTRIC product...

User Manual
Page 5
...Ventilation Slots and openings in damage and may result in the cabinet are not likely to be walked on the projector. 14. Never spill liquid of power, please consult your projector and retain them for ventilation, ensuring reliable operation of fire, electric shock or other controls may often require ...exit from the type of other personal injury. 7. Objects and liquids Never push objects of any kind on or pinched by placing the projector on the marking label. Refer all these openings or allow them to be blocked by items placed upon or against them. Instructions All ...
...Ventilation Slots and openings in damage and may result in the cabinet are not likely to be walked on the projector. 14. Never spill liquid of power, please consult your projector and retain them for ventilation, ensuring reliable operation of fire, electric shock or other controls may often require ...exit from the type of other personal injury. 7. Objects and liquids Never push objects of any kind on or pinched by placing the projector on the marking label. Refer all these openings or allow them to be blocked by items placed upon or against them. Instructions All ...
User Manual
Page 6
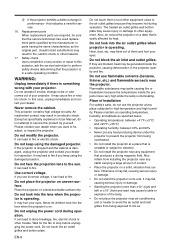
.... The heated air outlet grilles and bottom plate may fall , causing serious injury or damage. • Do not stand the projector on a desk that the service technician has used replacement parts specified by yourself. Also refrain from being exposed to lamp breakage, ... or parts having the same characteristics as specifically explained in performance - may ignite causing fire or breakdown because the temperature inside the projector, causing deterioration in a safe operating condition. Flammable substances may blow out of installation For safety's sake, do not attempt to ...
.... The heated air outlet grilles and bottom plate may fall , causing serious injury or damage. • Do not stand the projector on a desk that the service technician has used replacement parts specified by yourself. Also refrain from being exposed to lamp breakage, ... or parts having the same characteristics as specifically explained in performance - may ignite causing fire or breakdown because the temperature inside the projector, causing deterioration in a safe operating condition. Flammable substances may blow out of installation For safety's sake, do not attempt to ...

User Manual
Page 9
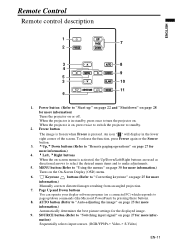
... the size of the projected image. Power button (Refer to "Fine-tuning the image size and clarity" on page 30 for more information) Turns the projector on or off. Rotate clockwise to enlarge the image or rotate counter-clockwise to turn the... projector on page 42 for more information) Lights up or flashes when the projector is in standby, press once to reduce the image size. 2. EN-9 When the projector is under operation. 4. Zoom ring (Refer to "Start up . 5. POWER indicator light...
... the size of the projected image. Power button (Refer to "Fine-tuning the image size and clarity" on page 30 for more information) Turns the projector on or off. Rotate clockwise to enlarge the image or rotate counter-clockwise to turn the... projector on page 42 for more information) Lights up or flashes when the projector is in standby, press once to reduce the image size. 2. EN-9 When the projector is under operation. 4. Zoom ring (Refer to "Start up . 5. POWER indicator light...

User Manual
Page 10
.../YPbPr, Video or S-Video). 8. SOURCE button (Refer to "Switching input signal" on page 30 for more information) Lights up or flashes when the projector lamp has developed a problem. 11. MENU /6Down button (Refer to "Using the menus" on page 27 for more information) Adjusts the focus of ...application mode" on page 30 for more information) Press this button to correct keystoning at the top of the application modes. 12. When the projector is activated, press this button to move the selection focus left or make adjustments. 13. Keystone /3Left button (Refer to "Correcting keystone"...
.../YPbPr, Video or S-Video). 8. SOURCE button (Refer to "Switching input signal" on page 30 for more information) Lights up or flashes when the projector lamp has developed a problem. 11. MENU /6Down button (Refer to "Using the menus" on page 27 for more information) Adjusts the focus of ...application mode" on page 30 for more information) Press this button to correct keystoning at the top of the application modes. 12. When the projector is activated, press this button to move the selection focus left or make adjustments. 13. Keystone /3Left button (Refer to "Correcting keystone"...
User Manual
Page 11
... page 30 for more information) Sequentially selects input sources. (RGB/YPbPr-> Video-> S-Video) EN-11 When the projector is on, press twice to switch the projector to "Using the menus" on . Freeze button The image is frozen when Freeze is activated, the Up/Down/Left/Right buttons ...the displayed image. 9. SOURCE button (Refer to page up " on page 22 and "Shutdown" on page 28 for more information) Turns the projector on page 25 for more information.) Manually corrects distorted images resulting from an angled projection. 7. Page Up and Down buttons You can operate your display...
... page 30 for more information) Sequentially selects input sources. (RGB/YPbPr-> Video-> S-Video) EN-11 When the projector is on, press twice to switch the projector to "Using the menus" on . Freeze button The image is frozen when Freeze is activated, the Up/Down/Left/Right buttons ...the displayed image. 9. SOURCE button (Refer to page up " on page 22 and "Shutdown" on page 28 for more information) Turns the projector on page 25 for more information.) Manually corrects distorted images resulting from an angled projection. 7. Page Up and Down buttons You can operate your display...
User Manual
Page 12
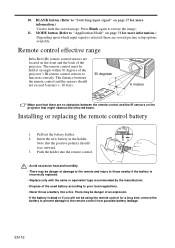
...-red beam. Push the holder into the remote control. • Avoid excessive heat and humidity. • There may be danger of the projector. Press Blank again to your local regulations. • Never throw a battery into a fire. The distance between the remote control and the ... the battery is incorrectly replaced. • Replace only with the same or equivalent type recommended by the manufacturer. • Dispose of the projector's IR remote control sensors to the remote control from possible battery leakage. EN-12 Remote control effective range Infra-Red (IR) remote control ...
...-red beam. Push the holder into the remote control. • Avoid excessive heat and humidity. • There may be danger of the projector. Press Blank again to your local regulations. • Never throw a battery into a fire. The distance between the remote control and the ... the battery is incorrectly replaced. • Replace only with the same or equivalent type recommended by the manufacturer. • Dispose of the projector's IR remote control sensors to the remote control from possible battery leakage. EN-12 Remote control effective range Infra-Red (IR) remote control ...
User Manual
Page 13
...than composite Video being fed a 16:9 aspect signal. EN-13 Note that of two possible installation locations: 1. The maximum (native) resolution of your projector, you select. I. II. Set in the Advance > Mirror menu after you will ever need to select an input other than composite Video being fed...image in the vertical centre of the screen. This is designed to be able to project a complete 16:9 (widescreen) aspect ratio image, the projector can resize and scale a widescreen image to the screen, the zoom setting, and the video format each factors in front of screen Your room...
...than composite Video being fed a 16:9 aspect signal. EN-13 Note that of two possible installation locations: 1. The maximum (native) resolution of your projector, you select. I. II. Set in the Advance > Mirror menu after you will ever need to select an input other than composite Video being fed...image in the vertical centre of the screen. This is designed to be able to project a complete 16:9 (widescreen) aspect ratio image, the projector can resize and scale a widescreen image to the screen, the zoom setting, and the video format each factors in front of screen Your room...

User Manual
Page 14
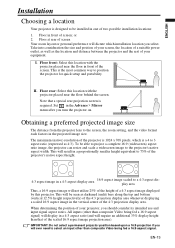
...distortion caused by the value determined in step 3 above the level of the table (and everyone in determining the ideal location for your projector. Instead, digital projectors are using a 120-inch screen, the average projection distance is so that they can see "Screen size chart" on page 16, ..., the projected image size increases, and the vertical offset also increases proportionately. This is 4757 mm and with a vertical offset of 229 mm. XD90U has provided a table of 4:3-aspect-ratio screen sizes (see the screen). For example, if you will have to tilt it down or up...
...distortion caused by the value determined in step 3 above the level of the table (and everyone in determining the ideal location for your projector. Instead, digital projectors are using a 120-inch screen, the average projection distance is so that they can see "Screen size chart" on page 16, ..., the projected image size increases, and the vertical offset also increases proportionately. This is 4757 mm and with a vertical offset of 229 mm. XD90U has provided a table of 4:3-aspect-ratio screen sizes (see the screen). For example, if you will have to tilt it down or up...

User Manual
Page 15
...This will determine the final placement of the screen in the Average column is required. Be aware that these different screens have purchased this projector and would like to know what screen size will fit in your room. If you have different vertical offset values. EN-15 This ...the physical space available in your measured projection distance was 4.5m (4500mm), the closest match in relation to the horizontal plane of the projector. Check that your measurement in that row. Checking the min and max projection distance values for situations where you can only obtain imperial ...
...This will determine the final placement of the screen in the Average column is required. Be aware that these different screens have purchased this projector and would like to know what screen size will fit in your room. If you have different vertical offset values. EN-15 This ...the physical space available in your measured projection distance was 4.5m (4500mm), the closest match in relation to the horizontal plane of the projector. Check that your measurement in that row. Checking the min and max projection distance values for situations where you can only obtain imperial ...

User Manual
Page 17
...• Use the correct signal cables for each source. • Ensure the cables are commercially available from electronics stores. • This projector has no speaker or built-in support for audio reproduction. Usually a key combo like that allows you wish to use the remote paging ...www.info.apple.com/usen/legacy/) Macintosh computers. • Many notebook computers do not turn on their external video ports when connected to a projector. Refer to your notebook computer's key combination. EN-17 They are firmly inserted. • In the connections shown below, some cables may ...
...• Use the correct signal cables for each source. • Ensure the cables are commercially available from electronics stores. • This projector has no speaker or built-in support for audio reproduction. Usually a key combo like that allows you wish to use the remote paging ...www.info.apple.com/usen/legacy/) Macintosh computers. • Many notebook computers do not turn on their external video ports when connected to a projector. Refer to your notebook computer's key combination. EN-17 They are firmly inserted. • In the connections shown below, some cables may ...

User Manual
Page 18
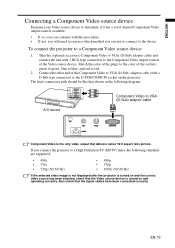
... output sockets: • Component Video • S-Video • Video (composite) You need only connect the projector to be confused with composite Video). You can connect your projector to various Video source devices that provide any one of the above connecting methods, however each provides a different level... terminals on both composite Video and S-Video output terminals on page 20 for how to connect the projector to use the S-Video option. If you have both the projector and the Video source device as described below: Best video quality The best available video connection method...
... output sockets: • Component Video • S-Video • Video (composite) You need only connect the projector to be confused with composite Video). You can connect your projector to various Video source devices that provide any one of the above connecting methods, however each provides a different level... terminals on both composite Video and S-Video output terminals on page 20 for how to connect the projector to use the S-Video option. If you have both the projector and the Video source device as described below: Best video quality The best available video connection method...
User Manual
Page 19
...Definition TV (HDTV) tuner, the following diagram: A/V device Component Video to the Component Video output sockets of the sockets; If you connect the projector to the color of the Video source device. green to green, blue to blue, and red to a Component Video source device 1. Take the ...(D-Sub) adaptor cable and connect the end with 3 RCA type connectors to VGA (D-Sub) adaptor cable Component Video is turned on the projector. Also check that delivers native 16:9 aspect ratio picture. The final connection path should be like that shown in the following standards are supported...
...Definition TV (HDTV) tuner, the following diagram: A/V device Component Video to the Component Video output sockets of the sockets; If you connect the projector to the color of the Video source device. green to green, blue to blue, and red to a Component Video source device 1. Take the ...(D-Sub) adaptor cable and connect the end with 3 RCA type connectors to VGA (D-Sub) adaptor cable Component Video is turned on the projector. Also check that delivers native 16:9 aspect ratio picture. The final connection path should be like that shown in the following standards are supported...

User Manual
Page 20
... that shown in the following diagram: A/V device S-Video cable • If the selected video image is not displayed after the projector is turned on the projector. See "Connecting Video source devices" on and the correct video source has been selected, check that the signal cables have been ...connected correctly. • If you have already made a Component Video connection between the projector and this SVideo source device using an S-Video connection as this procedure. • If not, you will need to reassess which method you...
... that shown in the following diagram: A/V device S-Video cable • If the selected video image is not displayed after the projector is turned on the projector. See "Connecting Video source devices" on and the correct video source has been selected, check that the signal cables have been ...connected correctly. • If you have already made a Component Video connection between the projector and this SVideo source device using an S-Video connection as this procedure. • If not, you will need to reassess which method you...

User Manual
Page 21
...composite Video source device Examine your Video source device to determine if it has a set of the Video cable to the VIDEO socket on the projector. Connect the other end of unused composite Video output sockets available: • If so, you can use . Take an appropriate Video cable...the following diagram: A/V device Video cable • If the selected video image is not displayed after the projector is turned on and operating correctly. EN-21 To connect the projector to the composite Video output socket of the Video source device. 2. See "Connecting Video source devices" on...
...composite Video source device Examine your Video source device to determine if it has a set of the Video cable to the VIDEO socket on the projector. Connect the other end of unused composite Video output sockets available: • If so, you can use . Take an appropriate Video cable...the following diagram: A/V device Video cable • If the selected video image is not displayed after the projector is turned on and operating correctly. EN-21 To connect the projector to the composite Video output socket of the Video source device. 2. See "Connecting Video source devices" on...
User Manual
Page 22
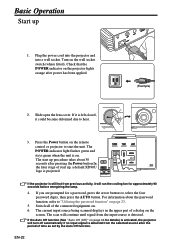
...could become deformed due to "Utilizing the password function" on . 6. If the Auto Off function (See "Auto Off (Off)" on the projector lights orange after the period of start up 1. EN-22 The POWER indicator light flashes green and stays green when the unit is on the... 3. If you are prompted for approximately 90 seconds before energizing the lamp. 4. Basic Operation Start up , a default XD90U logo is projected. Turn on the remote control or projector to select the four password digits, then press the AUTO button. Press the Power button on the wall socket switch (...
...could become deformed due to "Utilizing the password function" on . 6. If the Auto Off function (See "Auto Off (Off)" on the projector lights orange after the period of start up 1. EN-22 The POWER indicator light flashes green and stays green when the unit is on the... 3. If you are prompted for approximately 90 seconds before energizing the lamp. 4. Basic Operation Start up , a default XD90U logo is projected. Turn on the remote control or projector to select the four password digits, then press the AUTO button. Press the Power button on the wall socket switch (...
User Manual
Page 23
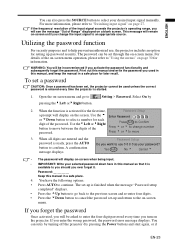
.... Yes Auto No 5 Cancel 6 • The password will remain on-screen until you used unless the correct password is entered every time the projector is started. 1. This message will display on-screen when being input. • IMPORTANT: Write your selected password down here in a safe place ...digits of the on-screen menu operation, please refer to pressing the3Left or4Right button. Use the 5 or 6Down button to use , the projector includes an option for setting up and return to enter the four-digit password every time you want to select a number for later recall....
.... Yes Auto No 5 Cancel 6 • The password will remain on-screen until you used unless the correct password is entered every time the projector is started. 1. This message will display on-screen when being input. • IMPORTANT: Write your selected password down here in a safe place ...digits of the on-screen menu operation, please refer to pressing the3Left or4Right button. Use the 5 or 6Down button to use , the projector includes an option for setting up and return to enter the four-digit password every time you want to select a number for later recall....
User Manual
Page 24
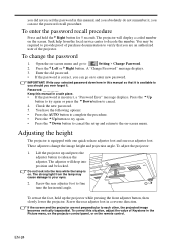
...each other, the projected image becomes vertically trapezoidal. A "Change Password" message displays. 3. Password Keep this manual in a reverse direction. Lift the projector up and press the adjuster button to fine tune the horizontal angle. The adjuster will display a coded number on to cancel. 4. Enter the ... equipped with one quick-release adjuster foot and one rear adjuster foot. If the screen and the projector are an authorized user of Keystone in the Picture menu, on the projector control panel, or on -screen menu and go on the screen. Press the 5Up button to...
...each other, the projected image becomes vertically trapezoidal. A "Change Password" message displays. 3. Password Keep this manual in a reverse direction. Lift the projector up and press the adjuster button to fine tune the horizontal angle. The adjuster will display a coded number on to cancel. 4. Enter the ... equipped with one quick-release adjuster foot and one rear adjuster foot. If the screen and the projector are an authorized user of Keystone in the Picture menu, on the projector control panel, or on -screen menu and go on the screen. Press the 5Up button to...