

User Manual
Page 1
Please read it before using your projector. ENGLISH DATA PROJECTOR MODEL XD90U User Manual XD90U This User Manual is important to you.
Please read it before using your projector. ENGLISH DATA PROJECTOR MODEL XD90U User Manual XD90U This User Manual is important to you.

User Manual
Page 3
... electric shock. WARNING Use the attached RGB cable with this projector, never connect this equipment at your dealer for the U.S., Europe and U.K. If you turn on the projector. • One of heat build-up. Remove the lens cap when you leave the lens cap on the power cord or do not place the projector near heat sources to prevent damage to the power cord. The electro...
... electric shock. WARNING Use the attached RGB cable with this projector, never connect this equipment at your dealer for the U.S., Europe and U.K. If you turn on the projector. • One of heat build-up. Remove the lens cap when you leave the lens cap on the power cord or do not place the projector near heat sources to prevent damage to the power cord. The electro...

User Manual
Page 5
... and may often require extensive work by the operating instructions. Do not block these instructions regarding your appliance dealer or local power company. 11. Retain instructions The safety and operating instructions should be retained for cleaning. 6. Use a damp soft cloth for future reference. 3. Use only with the projector. Do not put the power cord under the following conditions: (a) If the power-supply cord or plug is damaged...
... and may often require extensive work by the operating instructions. Do not block these instructions regarding your appliance dealer or local power company. 11. Retain instructions The safety and operating instructions should be retained for cleaning. 6. Use a damp soft cloth for future reference. 3. Use only with the projector. Do not put the power cord under the following conditions: (a) If the power-supply cord or plug is damaged...
User Manual
Page 6
... not block the air inlet and outlet grilles. Do not use the projector at a place that produces a strong magnetic field. Otherwise it can lead to vibration. • Do not install the projector near any place subjected to fix, adjust, or inspect the projector. Do not unplug the power cord during operation. Please maintain an operating temperature, humidity, and altitude as specifically explained in a safe...
... not block the air inlet and outlet grilles. Do not use the projector at a place that produces a strong magnetic field. Otherwise it can lead to vibration. • Do not install the projector near any place subjected to fix, adjust, or inspect the projector. Do not unplug the power cord during operation. Please maintain an operating temperature, humidity, and altitude as specifically explained in a safe...

User Manual
Page 9
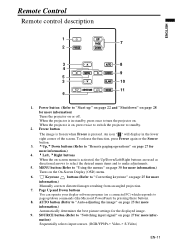
TEMPerature warning light (Refer to bring the image back. When the on-screen menu is activated, press this button again to "Illustration" on page 42 for more information) Flashes red if the projector's temperature becomes too high. 3. ENGLISH External control panel 9 1 2 3 10 4 5 11 6 12 7 13 8 1. POWER indicator light (Refer to "Illustration" on page 42 for more information) Lights up or flashes when the projector is in standby, press once to turn the projector on...
TEMPerature warning light (Refer to bring the image back. When the on-screen menu is activated, press this button again to "Illustration" on page 42 for more information) Flashes red if the projector's temperature becomes too high. 3. ENGLISH External control panel 9 1 2 3 10 4 5 11 6 12 7 13 8 1. POWER indicator light (Refer to "Illustration" on page 42 for more information) Lights up or flashes when the projector is in standby, press once to turn the projector on...

User Manual
Page 10
...) Switches sequentially through input sources. (RGB/YPbPr, Video or S-Video). 8. MODE button (Refer to "Selecting an application mode" on page 27 for more information) Press this button to "Using the menus" on page 30 for more information) Selects one of the projected image. 10. EN-10 When the projector is on the On-Screen Display (OSD) menu. MENU /6Down button (Refer to move the selection focus down. 9. AUTO button (Refer to "Auto-adjusting...
...) Switches sequentially through input sources. (RGB/YPbPr, Video or S-Video). 8. MODE button (Refer to "Selecting an application mode" on page 27 for more information) Press this button to "Using the menus" on page 30 for more information) Selects one of the projected image. 10. EN-10 When the projector is on the On-Screen Display (OSD) menu. MENU /6Down button (Refer to move the selection focus down. 9. AUTO button (Refer to "Auto-adjusting...
User Manual
Page 11
... the Source button. 3. 5Up,6Down buttons (Refer to "Auto-adjusting the image" on page 25 for more information.) Automatically determines the best picture settings for more information.) Turns on -screen menu is on, press twice to switch the projector to turn the projector on. AUTO button (Refer to "Remote paging operations" on or off. When the projector is pressed. An icon " " will display in standby, press once to standby. 2. SOURCE button (Refer to "Start up /down commands...
... the Source button. 3. 5Up,6Down buttons (Refer to "Auto-adjusting the image" on page 25 for more information.) Automatically determines the best picture settings for more information.) Turns on -screen menu is on, press twice to switch the projector to turn the projector on. AUTO button (Refer to "Remote paging operations" on or off. When the projector is pressed. An icon " " will display in standby, press once to standby. 2. SOURCE button (Refer to "Start up /down commands...
User Manual
Page 13
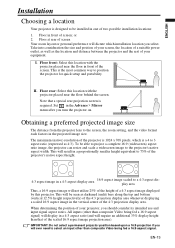
... common way to the projector's native aspect width. EN-13 Set in the projected image size. This will ever need to the screen, the zoom setting, and the video format each factors in the Advance > Mirror menu after you select. IMPORTANT: Do not select a permanent projector position based upon a 16:9 projection if you should consider its intended use and input signal aspect ratios. Floor in...
... common way to the projector's native aspect width. EN-13 Set in the projected image size. This will ever need to the screen, the zoom setting, and the video format each factors in the Advance > Mirror menu after you select. IMPORTANT: Do not select a permanent projector position based upon a 16:9 projection if you should consider its intended use and input signal aspect ratios. Floor in...

User Manual
Page 21
... 18 for use to connect to the device. Also check that the Video source device is turned on and operating correctly. EN-21 The final connection path should be like that shown in the following diagram: A/V device Video cable • If the selected video image is not displayed after the projector is turned on and the correct video source has been selected, check that the signal cables have been connected correctly...
... 18 for use to connect to the device. Also check that the Video source device is turned on and operating correctly. EN-21 The final connection path should be like that shown in the following diagram: A/V device Video cable • If the selected video image is not displayed after the projector is turned on and the correct video source has been selected, check that the signal cables have been connected correctly...
User Manual
Page 22
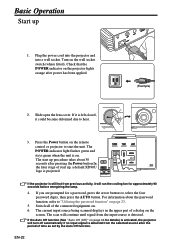
... on the projector lights orange after power has been applied. (Example) 2. Slide open the lens cover. Press the Power button on page 36 for a password, press the arrow buttons to "Utilizing the password function" on the screen. For information about 30 seconds after the period of a dialog on page 23. 5. The current input source being scanned displays in the upper part of time as set by the Auto Off function...
... on the projector lights orange after power has been applied. (Example) 2. Slide open the lens cover. Press the Power button on page 36 for a password, press the arrow buttons to "Utilizing the password function" on the screen. For information about 30 seconds after the period of a dialog on page 23. 5. The current input source being scanned displays in the upper part of time as set by the Auto Off function...
User Manual
Page 23
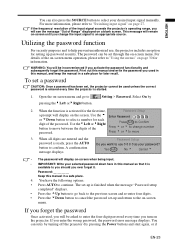
... button to go to "Switching input signal" on the screen. Enter Password 0 0 0 0 Press Auto to Confirm Press 5 or 6 to help prevent unauthorized use 0 0 0 0 as your password? Password Keep this manual, and keep the manual in a safe place. 4. If the frequency/ resolution of Range" displayed on -screen menu. This message will be used in this manual in a safe place for the first time, Password Setup a prompt will see the message "Out of the input signal exceeds the projector's operating range, you used...
... button to go to "Switching input signal" on the screen. Enter Password 0 0 0 0 Press Auto to Confirm Press 5 or 6 to help prevent unauthorized use 0 0 0 0 as your password? Password Keep this manual, and keep the manual in a safe place. 4. If the frequency/ resolution of Range" displayed on -screen menu. This message will be used in this manual in a safe place for the first time, Password Setup a prompt will see the message "Out of the input signal exceeds the projector's operating range, you used...
User Manual
Page 24
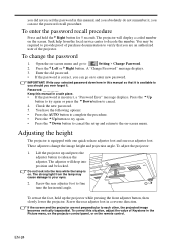
... lens while the lamp is on the screen. You may cause damage to your selected password down here in this situation, adjust the value of Keystone in the Picture menu, on the projector control panel, or on to enter new password. Press the3Left or4Right button. Check the new password. 5. Do not look into position and be required to cancel. 4. EN-24 A "Change Password" message displays. 3. These adjusters change the password 1. To adjust the projector: 1. Screw the rear adjuster...
... lens while the lamp is on the screen. You may cause damage to your selected password down here in this situation, adjust the value of Keystone in the Picture menu, on the projector control panel, or on to enter new password. Press the3Left or4Right button. Check the new password. 5. Do not look into position and be required to cancel. 4. EN-24 A "Change Password" message displays. 3. These adjusters change the password 1. To adjust the projector: 1. Screw the rear adjuster...

User Manual
Page 26
... Keystone /3Left button on Keystone 0 the projector, or the3Left button on the Keystone remote control when you can choose one to correct keystoning at the bottom of the image or press the button to suit your need, press the MODE button. Selecting an application mode The projector is equipped with several predefined application modes so that suits your operating environment and input source picture type. PC Signal Input Brightest Presentation (default) Photo YPbPr / S-Video / Video Signal Input...
... Keystone /3Left button on Keystone 0 the projector, or the3Left button on the Keystone remote control when you can choose one to correct keystoning at the bottom of the image or press the button to suit your need, press the MODE button. Selecting an application mode The projector is equipped with several predefined application modes so that suits your operating environment and input source picture type. PC Signal Input Brightest Presentation (default) Photo YPbPr / S-Video / Video Signal Input...

User Manual
Page 29
... Color *Tint Auto Resize Aspect Ratio Sharpness Source System Application Mode Equivalent Lamp Hour *When a Video or S-Video signal is connected, the function is only available with NTSC system selected. EN-29 Functions available when receiving different signal types... Sub-Menu PC Video / S-Video / Component Video Picture Application Mode Autokeystone Keystone Color Temp Brightness Contrast Pro-Picture Setting Advance Information Auto Resize Aspect Ratio H Position V Position Phase H. ENGLISH Menu Operation Menu system Please note that the on-screen display...
... Color *Tint Auto Resize Aspect Ratio Sharpness Source System Application Mode Equivalent Lamp Hour *When a Video or S-Video signal is connected, the function is only available with NTSC system selected. EN-29 Functions available when receiving different signal types... Sub-Menu PC Video / S-Video / Component Video Picture Application Mode Autokeystone Keystone Color Temp Brightness Contrast Pro-Picture Setting Advance Information Auto Resize Aspect Ratio H Position V Position Phase H. ENGLISH Menu Operation Menu system Please note that the on-screen display...

User Manual
Page 31
... certain input sources are provided so you subsequently select an Application mode after adjusting any keystoning of the projected image. PC Signal Input 1. Photo Mode: Maximizes the purity of brightness setting. It is suitable for more information. Gaming Mode: Is suitable for viewing PC graphic and drawing applications such as in use the remote control 'Mode' button to provide trueto-life images regardless of RGB colors to select a predefined application mode. YPbPr/ S-Video/ Video Signal Input...
... certain input sources are provided so you subsequently select an Application mode after adjusting any keystoning of the projected image. PC Signal Input 1. Photo Mode: Maximizes the purity of brightness setting. It is suitable for more information. Gaming Mode: Is suitable for viewing PC graphic and drawing applications such as in use the remote control 'Mode' button to provide trueto-life images regardless of RGB colors to select a predefined application mode. YPbPr/ S-Video/ Video Signal Input...

User Manual
Page 35
... level because of the projected image. Press AUTO. High Altitude Mode (Off) Next time you can be installed behind a screen. Operation under "High Altitude Mode" may cause high fan speed. Allows you use this function to "Choosing a location" on the projector, it acquires a signal. We recommend you to the screen. A confirmation message displays. Use the Keystone /3Left or Keystone /4Right buttons on the projector, or the 3Left or4Right buttons on the remote control to improve overall system cooling...
... level because of the projected image. Press AUTO. High Altitude Mode (Off) Next time you can be installed behind a screen. Operation under "High Altitude Mode" may cause high fan speed. Allows you use this function to "Choosing a location" on the projector, it acquires a signal. We recommend you to the screen. A confirmation message displays. Use the Keystone /3Left or Keystone /4Right buttons on the projector, or the 3Left or4Right buttons on the remote control to improve overall system cooling...
User Manual
Page 39
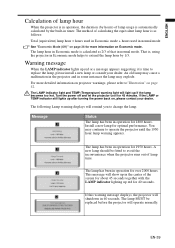
... install a new lamp or consult your dealer. Turn the power off and let the projector cool for optimal performance. Install a new lamp for 45 minutes. The LAMP indicator light and TEMP (Temperature) warning light will operate normally. A new lamp should be replaced before the projector will light up in normal mode See "Economic Mode (Off)" on page 36 for 1950 hours. The method of lamp time. The lamp hour in Economic mode is calculated as follows: Total (equivalent) lamp hour = hours used in Economic mode + hours used...
... install a new lamp or consult your dealer. Turn the power off and let the projector cool for optimal performance. Install a new lamp for 45 minutes. The LAMP indicator light and TEMP (Temperature) warning light will operate normally. A new lamp should be replaced before the projector will light up in normal mode See "Economic Mode (Off)" on page 36 for 1950 hours. The method of lamp time. The lamp hour in Economic mode is calculated as follows: Total (equivalent) lamp hour = hours used in Economic mode + hours used...
User Manual
Page 41
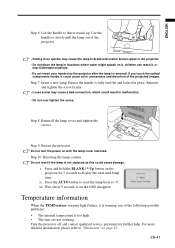
... reach it is too high. • The fans are not working. Press the AUTO button to reset the lamp hour to let the OSD disappear. Temperature information When the TEMPerature warning light flashes, it , or near flammable materials. • Do not insert your hands into the projector after the lamp is removed. iii. For more detailed information, please refer to display the total used lamp time. EN-41 Lift the...
... reach it is too high. • The fans are not working. Press the AUTO button to reset the lamp hour to let the OSD disappear. Temperature information When the TEMPerature warning light flashes, it , or near flammable materials. • Do not insert your hands into the projector after the lamp is removed. iii. For more detailed information, please refer to display the total used lamp time. EN-41 Lift the...
User Manual
Page 42
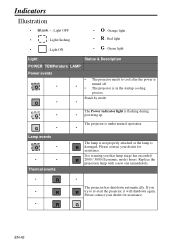
...the lamp is in the startup cooling process. turned off. • The projector is R damaged. The Power indicator light is warning you - G - - If you that lamp usage has exceeded R 2000 / 3000 (Economic mode) hours. R G EN-42 Please contact your dealer for assistance. Replace the projection lamp with a new one immediately. - Indicators Illustration • Blank - : Light OFF • : Light flashing • : Light ON • O : Orange light • R : Red light • G : Green light Light Status & Description POWER TEMPerature LAMP Power events...
...the lamp is in the startup cooling process. turned off. • The projector is R damaged. The Power indicator light is warning you - G - - If you that lamp usage has exceeded R 2000 / 3000 (Economic mode) hours. R G EN-42 Please contact your dealer for assistance. Replace the projection lamp with a new one immediately. - Indicators Illustration • Blank - : Light OFF • : Light flashing • : Light ON • O : Orange light • R : Red light • G : Green light Light Status & Description POWER TEMPerature LAMP Power events...

User Manual
Page 44
... the correct input signal with the SOURCE button on or connected correctly. See "Fine-tuning the image size and clarity" on again during the cooling process. Cause Remedy The video source is not correctly connected to turn on the projector, and plug the power cord into the power outlet. Slide open the lens cover. Check the connection. Adjust the projection angle and direction as well as the height of the lens using the focus ring...
... the correct input signal with the SOURCE button on or connected correctly. See "Fine-tuning the image size and clarity" on again during the cooling process. Cause Remedy The video source is not correctly connected to turn on the projector, and plug the power cord into the power outlet. Slide open the lens cover. Check the connection. Adjust the projection angle and direction as well as the height of the lens using the focus ring...

