
User Manual
Page 5
...projector. Do not unplug the power cord during operation. Also, do not put the projector on a desk that is easily affected by Mitsubishi could void the user's authority to pre- Otherwise it may result in accordance with the instructions, may fall, causing serious injury or damage... aerosols near air-conditioning unit, heater, or humidifier to avoid hot or moist air to other trouble. vent the projector from the ceiling-mounted projector Be sure to high temperature and high humidity. When removing the lamp from being overheated. • Do not install the projector...
...projector. Do not unplug the power cord during operation. Also, do not put the projector on a desk that is easily affected by Mitsubishi could void the user's authority to pre- Otherwise it may result in accordance with the instructions, may fall, causing serious injury or damage... aerosols near air-conditioning unit, heater, or humidifier to avoid hot or moist air to other trouble. vent the projector from the ceiling-mounted projector Be sure to high temperature and high humidity. When removing the lamp from being overheated. • Do not install the projector...

User Manual
Page 8
... direct sunlight or fluorescent. Caution: • Use of a battery of wrong type may not work correctly. Reception angle (vertical) Reception angle (horizontal) Reception angle (vertical), ceiling mount Important: • Do not expose the remote control sensor to +, and -
... direct sunlight or fluorescent. Caution: • Use of a battery of wrong type may not work correctly. Reception angle (vertical) Reception angle (horizontal) Reception angle (vertical), ceiling mount Important: • Do not expose the remote control sensor to +, and -

User Manual
Page 10
...of the screen is 4:3, the positional relation between the bracket and the projector to allow for proper heat distribution. • When using a ceiling mount, please use of any damage caused by use the screw holes as shown on the right. Ask a specialist for installation. For details, ... 352 8.9 - - Hd inch cm 6.8 17 10.2 26 13.6 35 17.0 43 25.5 65 34.0 86 42.5 108 51.1 130 Front projection, ceiling mounting For ceiling mounting, you keep a reasonable space between the projected image and the screen is 16:10 (WXGA) 4:3 Diagonal Size inch cm 40 102 60 152 80 203...
...of the screen is 4:3, the positional relation between the bracket and the projector to allow for proper heat distribution. • When using a ceiling mount, please use of any damage caused by use the screw holes as shown on the right. Ask a specialist for installation. For details, ... 352 8.9 - - Hd inch cm 6.8 17 10.2 26 13.6 35 17.0 43 25.5 65 34.0 86 42.5 108 51.1 130 Front projection, ceiling mounting For ceiling mounting, you keep a reasonable space between the projected image and the screen is 16:10 (WXGA) 4:3 Diagonal Size inch cm 40 102 60 152 80 203...
User Manual
Page 35
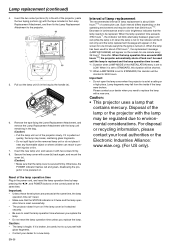
... Do not remove the lamp except for XD600U/XD600U-G/WD620U/WD620U-G: VLT-XD600LP Caution: • Do not remove the lamp immediately after removing it is mounted to the ceiling When removing the lamp unit from the projector mounted to the ceiling, never fail to use the lamp dedicated...to the ceiling. 1. Secure the lamp cover with a new one hour for XD600U/XD600U-G/WD620U/WD620U-G. Contact your face after using the projector. tor mounted to cool down . It may remain inside , unplug and contact your eyes. • When removing the lamp from the ceiling-mounted projector,...
... Do not remove the lamp except for XD600U/XD600U-G/WD620U/WD620U-G: VLT-XD600LP Caution: • Do not remove the lamp immediately after removing it is mounted to the ceiling When removing the lamp unit from the projector mounted to the ceiling, never fail to use the lamp dedicated...to the ceiling. 1. Secure the lamp cover with a new one hour for XD600U/XD600U-G/WD620U/WD620U-G. Contact your face after using the projector. tor mounted to cool down . It may remain inside , unplug and contact your eyes. • When removing the lamp from the ceiling-mounted projector,...
User Manual
Page 36
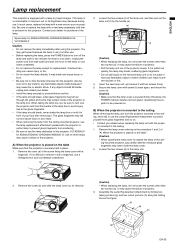
...it is about 4750 hours*1, the replacement message (LAMP EXCHANGE) will blink alternately between green and red (while the lamp is set at a ceiling or a high place. Important: • Unless these three buttons are pressed at the same time. Insert the two cutout portions (h) in ... and the lamp operation time is secured firmly. Secure the lamp cover with two screws firmly. 8. If it with screw (b) back again, and mount the cover (a). (Caution) • Make sure that contains mercury. Lamp fragments may break, scattering glass fragments. • Do not spill liquid ...
...it is about 4750 hours*1, the replacement message (LAMP EXCHANGE) will blink alternately between green and red (while the lamp is set at a ceiling or a high place. Important: • Unless these three buttons are pressed at the same time. Insert the two cutout portions (h) in ... and the lamp operation time is secured firmly. Secure the lamp cover with two screws firmly. 8. If it with screw (b) back again, and mount the cover (a). (Caution) • Make sure that contains mercury. Lamp fragments may break, scattering glass fragments. • Do not spill liquid ...