

User Manual
Page 2
... and accumulators, at a certain concentration. WARNING Use the attached specified power supply cord. DO NOT LOOK DIRECTLY INTO THE LENS WHEN THE PROJECTOR IS IN THE POWER ON MODE. WARNING Use the attached RGB cable and the shielded LAN cable with arrowhead symbol within an equilateral triangle is according to the directive 2002/96/EC Article 10 Information for users and Annex IV, and/or...
... and accumulators, at a certain concentration. WARNING Use the attached specified power supply cord. DO NOT LOOK DIRECTLY INTO THE LENS WHEN THE PROJECTOR IS IN THE POWER ON MODE. WARNING Use the attached RGB cable and the shielded LAN cable with arrowhead symbol within an equilateral triangle is according to the directive 2002/96/EC Article 10 Information for users and Annex IV, and/or...
User Manual
Page 3
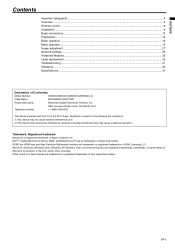
......4 Overview ...6 Remote control ...8 Installation ...9 Basic connections...12 Preparation ...15 Basic operation ...16 Menu operation...19 Image adjustment ...27 Network settings ...29 Advanced features ...32 Lamp replacement ...35 Troubleshooting ...37 Indicators ...40 Specifications ...41 Declaration of Conformity Model Number : XD600U/XD600U-G/WD620U/WD620U-G Trade Name : MITSUBISHI ELECTRIC Responsible party : Mitsubishi Digital Electronics America, Inc. 9351 Jeronimo Road, Irvine, CA 92618 U.S.A Telephone number : +1-(949) 465-6000 This device complies with Part 15 of their...
......4 Overview ...6 Remote control ...8 Installation ...9 Basic connections...12 Preparation ...15 Basic operation ...16 Menu operation...19 Image adjustment ...27 Network settings ...29 Advanced features ...32 Lamp replacement ...35 Troubleshooting ...37 Indicators ...40 Specifications ...41 Declaration of Conformity Model Number : XD600U/XD600U-G/WD620U/WD620U-G Trade Name : MITSUBISHI ELECTRIC Responsible party : Mitsubishi Digital Electronics America, Inc. 9351 Jeronimo Road, Irvine, CA 92618 U.S.A Telephone number : +1-(949) 465-6000 This device complies with Part 15 of their...
User Manual
Page 5
... a Class B digital device, pursuant to high temperature and high humidity. If they become hot during operation. Lamp fragments may fall , causing serious injury or damage. • Slanting the projector more of less than ±10° (right and left) or ±15° (front and rear) may result in User Manual, do not use the lamp replacement attachment designed specifically for help. In this...
... a Class B digital device, pursuant to high temperature and high humidity. If they become hot during operation. Lamp fragments may fall , causing serious injury or damage. • Slanting the projector more of less than ±10° (right and left) or ±15° (front and rear) may result in User Manual, do not use the lamp replacement attachment designed specifically for help. In this...
User Manual
Page 15
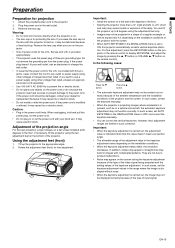
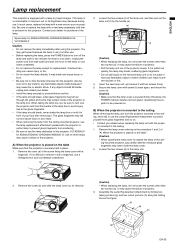
... the projector and the screen. • When AUTO KEYSTONE in a vehicle and aircraft, the automatic keystone adjustment may cause trouble or explosion of heat build-up. Remove the lens cap. Caution: • Plug in such correction. However, their adjustment ranges are not due to any outlet or power supply using the two adjustment feet on the remote control). Note that the power cord for projection 1. Plug the power cord in the keystone adjustment...
... the projector and the screen. • When AUTO KEYSTONE in a vehicle and aircraft, the automatic keystone adjustment may cause trouble or explosion of heat build-up. Remove the lens cap. Caution: • Plug in such correction. However, their adjustment ranges are not due to any outlet or power supply using the two adjustment feet on the remote control). Note that the power cord for projection 1. Plug the power cord in the keystone adjustment...

User Manual
Page 16
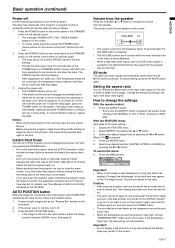
... external input source using the COM- Indicator STATUS Green POWER Red Green Important: • If the lamp exceptionally turned off due to install it. 4. Adjust the focus by turning the zoom ring. • If necessary, adjust the focus and zoom again. Adjust the image size by turning the focus ring. 5. Basic operation 5 4 FOCUS 6 ZOOM 3, 1, 2 ON STANDBY 3 1, 2 MAGNIFY ASPECT UP VOL PAGE KEYSTONE DOWN MENU AUTO POSITION AV MUTE ENTER FREEZE VIEWER VIDEO 1 COMPUTER UNPLUG S-VIDEO 2 5 WIRELESS DVI HDMI Power-on . In this case, wait for the fans...
... external input source using the COM- Indicator STATUS Green POWER Red Green Important: • If the lamp exceptionally turned off due to install it. 4. Adjust the focus by turning the zoom ring. • If necessary, adjust the focus and zoom again. Adjust the image size by turning the focus ring. 5. Basic operation 5 4 FOCUS 6 ZOOM 3, 1, 2 ON STANDBY 3 1, 2 MAGNIFY ASPECT UP VOL PAGE KEYSTONE DOWN MENU AUTO POSITION AV MUTE ENTER FREEZE VIEWER VIDEO 1 COMPUTER UNPLUG S-VIDEO 2 5 WIRELESS DVI HDMI Power-on . In this case, wait for the fans...
User Manual
Page 17
... POWER button. • The air outlet fans rotate faster as a DVD audio signal, is running, turn off the projector. Press the POWER button on the control panel or the STANDBY button on , allow the projector to cool down the projector while the STATUS indicator is pressed. The STATUS indicator will start again. 3. If it should face up because the lamp's life may fail. See page 25. AV mute The video and audio signals are operating or the lamp is powered...
... POWER button. • The air outlet fans rotate faster as a DVD audio signal, is running, turn off the projector. Press the POWER button on the control panel or the STANDBY button on , allow the projector to cool down the projector while the STATUS indicator is pressed. The STATUS indicator will start again. 3. If it should face up because the lamp's life may fail. See page 25. AV mute The video and audio signals are operating or the lamp is powered...
User Manual
Page 18
... from BEIGE, LIGHT BLUE, LIGHT GREEN, PINK, BLACK BOARD, WHITE BOARD, and OFF, to match the color of the screen or wall to that of the screen on which images are projected directly onto a screen or wall surface. INSTALLATION WALL SCREEN BEIGE LAMP MODE STANDARD 2. Press the W or X button to select the color closest to be used . Press the ENTER button. See the instruction manual of the Image menu cannot be projected. Additionally, Theater...
... from BEIGE, LIGHT BLUE, LIGHT GREEN, PINK, BLACK BOARD, WHITE BOARD, and OFF, to match the color of the screen or wall to that of the screen on which images are projected directly onto a screen or wall surface. INSTALLATION WALL SCREEN BEIGE LAMP MODE STANDARD 2. Press the W or X button to select the color closest to be used . Press the ENTER button. See the instruction manual of the Image menu cannot be projected. Additionally, Theater...

User Manual
Page 20
... hours, the actual hours are displayed. • When the lamp operating time reaches 3750 hours, the bar turns yellow. Indicates the resolution of the terminal to which the currently projected video signal is STANDARD, this setting when you cannot switch the LAMP MODE in the full screen. Indicates the type of the sync signal for the interval of the currently projected video signal. INFORMATION LAMP TIME (LOW) INPUT RESOLUTION VERTICAL FREQUENCY HORIZONTAL FREQUENCY R GB H V SYNC. Makes projected images soft and smooth. The operating sound...
... hours, the actual hours are displayed. • When the lamp operating time reaches 3750 hours, the bar turns yellow. Indicates the resolution of the terminal to which the currently projected video signal is STANDARD, this setting when you cannot switch the LAMP MODE in the full screen. Indicates the type of the sync signal for the interval of the currently projected video signal. INFORMATION LAMP TIME (LOW) INPUT RESOLUTION VERTICAL FREQUENCY HORIZONTAL FREQUENCY R GB H V SYNC. Makes projected images soft and smooth. The operating sound...

User Manual
Page 21
... 2 INSTALLATION WALL SCREEN LAMP MODE STANDBY MODE AUDIO INPUT AUTO KEYSTONE IMAGE REVERSE ADVANCED MENU BEIGE LIGHT BLUE LIGHT GREEN PINK BLACK BOARD WHITE BOARD OFF STANDARD, LOW STANDARD, LOW AUTO, AUDIO 1, AUDIO 2, AUDIO 3, MIX ON, OFF OFF, MIRROR, INVERT, MIRROR INVERT OK 1-5 1-5 1-5 1-5 *6 ±10 AUTO POWER ON AUTO POWER OFF IMAGE CAPTURE SPLASH SCREEN BACK COLOR AV MUTE MODE ON, OFF OFF, 5min, 10min, 15min, 30min, 60min GO ON, OFF BLUE, BLACK, IMAGE BLACK, IMAGE FEATURE ASPECT PASSWORD FUNCTION MENU POSITION CINEMA MODE *3 VIDEO SIGNAL *5 WXGA *2 SETUP *1 LANGUAGE RESET ALL...
... 2 INSTALLATION WALL SCREEN LAMP MODE STANDBY MODE AUDIO INPUT AUTO KEYSTONE IMAGE REVERSE ADVANCED MENU BEIGE LIGHT BLUE LIGHT GREEN PINK BLACK BOARD WHITE BOARD OFF STANDARD, LOW STANDARD, LOW AUTO, AUDIO 1, AUDIO 2, AUDIO 3, MIX ON, OFF OFF, MIRROR, INVERT, MIRROR INVERT OK 1-5 1-5 1-5 1-5 *6 ±10 AUTO POWER ON AUTO POWER OFF IMAGE CAPTURE SPLASH SCREEN BACK COLOR AV MUTE MODE ON, OFF OFF, 5min, 10min, 15min, 30min, 60min GO ON, OFF BLUE, BLACK, IMAGE BLACK, IMAGE FEATURE ASPECT PASSWORD FUNCTION MENU POSITION CINEMA MODE *3 VIDEO SIGNAL *5 WXGA *2 SETUP *1 LANGUAGE RESET ALL...

User Manual
Page 22
... , press the ENTER button. Adjusts the color tint of the video signal varies across devices to other than OFF. • When COMPUTER 1 or COMPUTER 2 or HDMI is selected, TINT do not work. • When COLOR ENHANCER is switched, projected images may be adjusted using the menu. Menu operation (continued) Basic operation Several settings can select this setting only when NTSC is connected. IMAGE COLOR ENHANCER CONTRAST BRIGHTNESS COLOR TEMP. Adjusts the input level of projected images. (See page...
... , press the ENTER button. Adjusts the color tint of the video signal varies across devices to other than OFF. • When COMPUTER 1 or COMPUTER 2 or HDMI is selected, TINT do not work. • When COLOR ENHANCER is switched, projected images may be adjusted using the menu. Menu operation (continued) Basic operation Several settings can select this setting only when NTSC is connected. IMAGE COLOR ENHANCER CONTRAST BRIGHTNESS COLOR TEMP. Adjusts the input level of projected images. (See page...

User Manual
Page 23
... the power cord is HDMI. The operating sound is consequently reduced, and the lamp lifetime becomes longer. • When this mode is switched, projected images may flicker. • If this setting when you want to view images at the ceiling. • When the lamp is off, the projector is frequently switched, the lamp may be activated. Select the audio input. You can be lowered when selecting LOW. INSTALLATION WALL SCREEN LAMP MODE STANDBY MODE AUDIO INPUT AUTO KEYSTONE IMAGE REVERSE ADVANCED MENU BEIGE...
... the power cord is HDMI. The operating sound is consequently reduced, and the lamp lifetime becomes longer. • When this mode is switched, projected images may flicker. • If this setting when you want to view images at the ceiling. • When the lamp is off, the projector is frequently switched, the lamp may be activated. Select the audio input. You can be lowered when selecting LOW. INSTALLATION WALL SCREEN LAMP MODE STANDBY MODE AUDIO INPUT AUTO KEYSTONE IMAGE REVERSE ADVANCED MENU BEIGE...

User Manual
Page 25
... by DHCP server. Select this setting when you change this setting for most cases. Select this setting to adjust the horizontal position of projected images. Use this setting to adjust the vertical position of projected images. NETWORK menu Menu option PROJECTOR NAME NETWORK PASSWORD IP CONFIG DHCP IP ADDRESS SUBNET MASK DEFAULT GATEWAY MAC ADDRESS PJLink CERTIFICATION NETWORK RESET Setting *****... Displays IP ADDRESS. POSITION FINE SYNC. 0-999 0-999 Setting 0-31 TRACKING COMPUTER INPUT 0-2800 AUTO RGB YCBCR/YPBPR OVER SCAN HOLD...
... by DHCP server. Select this setting when you change this setting for most cases. Select this setting to adjust the horizontal position of projected images. Use this setting to adjust the vertical position of projected images. NETWORK menu Menu option PROJECTOR NAME NETWORK PASSWORD IP CONFIG DHCP IP ADDRESS SUBNET MASK DEFAULT GATEWAY MAC ADDRESS PJLink CERTIFICATION NETWORK RESET Setting *****... Displays IP ADDRESS. POSITION FINE SYNC. 0-999 0-999 Setting 0-31 TRACKING COMPUTER INPUT 0-2800 AUTO RGB YCBCR/YPBPR OVER SCAN HOLD...

User Manual
Page 32
... image resolution is lower than XGA (1024 x 768), the image area of XGA is entered, the startup screen switches to IMAGE, the captured image is displayed while no signal is entered. SPLASH SCREEN is set to the regular operation screen. opt. To enable the password function: 1. SPLASH ID SCREEN.... DISPLAY INPUT When the projector is turned on, the startup screen (or splash screen) appears and stays on the remote control again. INSTALLATION WALL SCREEN LAMP MODE STANDBY MODE AUDIO INPUT AUTO KEYSTONE IMAGE REVERSE ADVANCED MENU BEIGE...
... image resolution is lower than XGA (1024 x 768), the image area of XGA is entered, the startup screen switches to IMAGE, the captured image is displayed while no signal is entered. SPLASH SCREEN is set to the regular operation screen. opt. To enable the password function: 1. SPLASH ID SCREEN.... DISPLAY INPUT When the projector is turned on, the startup screen (or splash screen) appears and stays on the remote control again. INSTALLATION WALL SCREEN LAMP MODE STANDBY MODE AUDIO INPUT AUTO KEYSTONE IMAGE REVERSE ADVANCED MENU BEIGE...
User Manual
Page 34
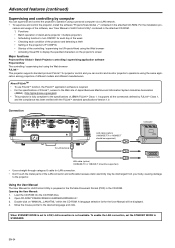
... turn ON/OFF for LAN Control Utility is set the STANDBY MODE to the specifications of the controlling / supervising tool (ProjectorView) using a personal computer via a LAN network. • To supervise and control the projector, install the software "ProjectorView Global +*" contained in the CD-ROM. EN-34 Using the User Manual The User Manual for each day of the week • Checking each condition of the projector and detecting a theft • Setting of the projector...
... turn ON/OFF for LAN Control Utility is set the STANDBY MODE to the specifications of the controlling / supervising tool (ProjectorView) using a personal computer via a LAN network. • To supervise and control the projector, install the software "ProjectorView Global +*" contained in the CD-ROM. EN-34 Using the User Manual The User Manual for each day of the week • Checking each condition of the projector and detecting a theft • Setting of the projector...
User Manual
Page 35
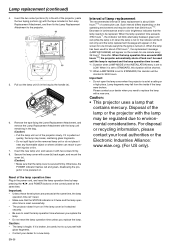
...; Do not remove the lamp except for purchase of the screw fixing the lamp cover with the projec- B) When the projector is mounted to the ceiling When removing the lamp unit from the projector mounted to the ceiling, never fail to use . • Before replacing the lamp, press the POWER button to turn over the projector and hold it may get burned because the lamp is very hot after use the Lamp Replacement Attachment to...
...; Do not remove the lamp except for purchase of the screw fixing the lamp cover with the projec- B) When the projector is mounted to the ceiling When removing the lamp unit from the projector mounted to the ceiling, never fail to use . • Before replacing the lamp, press the POWER button to turn over the projector and hold it may get burned because the lamp is very hot after use the Lamp Replacement Attachment to...
User Manual
Page 36
... the projector. (g) (g) (h) 5. When the lamp has been used until the lamp is replaced and the lamp operation time is reset. *1: Duration when LAMP MODE of the lamp operation time Plug in the bag by keep pressing the W, X, and POWER buttons on the operating environment and may be lit red only) and the lamp replacement message will appear on . Such interval differs depending on the control panel at a ceiling or a high place. Important: • Do not open the lamp cover...
... the projector. (g) (g) (h) 5. When the lamp has been used until the lamp is replaced and the lamp operation time is reset. *1: Duration when LAMP MODE of the lamp operation time Plug in the bag by keep pressing the W, X, and POWER buttons on the operating environment and may be lit red only) and the lamp replacement message will appear on . Such interval differs depending on the control panel at a ceiling or a high place. Important: • Do not open the lamp cover...

User Manual
Page 37
.... 1. After the STATUS indicator stops blinking, press the POWER button. Press the POWER button several times. Blinking red / green Steady or Unplug the power cord from a heating appliance. dure. 1. Wait about 1 minute when you unplug the power cord while the fan is being used , replace it with the connected device. • Check whether the external device output signals. (Check this case. • Check that AUTO POWER OFF has been set to DISPLAY INPUT to stop using the correct terminals...
.... 1. After the STATUS indicator stops blinking, press the POWER button. Press the POWER button several times. Blinking red / green Steady or Unplug the power cord from a heating appliance. dure. 1. Wait about 1 minute when you unplug the power cord while the fan is being used , replace it with the connected device. • Check whether the external device output signals. (Check this case. • Check that AUTO POWER OFF has been set to DISPLAY INPUT to stop using the correct terminals...
User Manual
Page 38
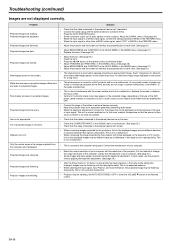
... lamp lights stably. In such a case, you use the projector without applying the keystone adjustment. (See page 15.) Projected images are flickering Projector images are blurred. • Adjust the focus. (See page 16.) • Clean the lens. • Press the W or X button on the type of keystone correction is as small as possible. In this projector with the screen surface and is an expected behavior. • When selecting the input signal, Auto...
... lamp lights stably. In such a case, you use the projector without applying the keystone adjustment. (See page 15.) Projected images are flickering Projector images are blurred. • Adjust the focus. (See page 16.) • Clean the lens. • Press the W or X button on the type of keystone correction is as small as possible. In this projector with the screen surface and is an expected behavior. • When selecting the input signal, Auto...

User Manual
Page 39
... the control panel (except for the POWER button) don't function. Caution: Be sure to low. • Check the AUDIO INPUT setting. • When the external device is connected with lens cleaning fluid. is output. Eliminate any maintenance on or inside of the rise in the ambient temperature. • This indication appears when the air inlet or outlet grille is blocked. The STATUS indicator blinks. No audio is displayed. "TEMPERATURE!!" The remote control...
... the control panel (except for the POWER button) don't function. Caution: Be sure to low. • Check the AUDIO INPUT setting. • When the external device is connected with lens cleaning fluid. is output. Eliminate any maintenance on or inside of the rise in the ambient temperature. • This indication appears when the air inlet or outlet grille is blocked. The STATUS indicator blinks. No audio is displayed. "TEMPERATURE!!" The remote control...

User Manual
Page 40
... room temperature is clogged with a new lamp if this problem recurs. Contact your dealer. If the above solution is in an abnormal con- Steady red The lamp operation time exceeds the time elapsed until the lamp lifetime. (See page 36.) Blinking green/red The lamp cover isn't closed. POSSIBLE SOLUTION Steady green or Steady red Steady red Steady green Steady red Steady red Blinking orange Abnormal temperature • The ventilation grilles is high. • Clean the...
... room temperature is clogged with a new lamp if this problem recurs. Contact your dealer. If the above solution is in an abnormal con- Steady red The lamp operation time exceeds the time elapsed until the lamp lifetime. (See page 36.) Blinking green/red The lamp cover isn't closed. POSSIBLE SOLUTION Steady green or Steady red Steady red Steady green Steady red Steady red Blinking orange Abnormal temperature • The ventilation grilles is high. • Clean the...

