
User Manual
Page 3
...trademark of Microsoft Corporation in the U.S. HDMI, the HDMI logo and High-Definition Multimedia Interface are registered trademarks, trademarks, or trade names of Apple Computer Inc. Microsoft, Windows, Windows 2000, Windows XP, Windows Vista, and ... ...27 Network settings ...29 Advanced features ...32 Lamp replacement ...35 Troubleshooting ...37 Indicators ...40 Specifications ...41 Declaration of Conformity Model Number : XD600U/XD600U-G/WD620U/WD620U-G Trade Name : MITSUBISHI ELECTRIC Responsible party : Mitsubishi Digital Electronics America, Inc. 9351 Jeronimo Road, ...
...trademark of Microsoft Corporation in the U.S. HDMI, the HDMI logo and High-Definition Multimedia Interface are registered trademarks, trademarks, or trade names of Apple Computer Inc. Microsoft, Windows, Windows 2000, Windows XP, Windows Vista, and ... ...27 Network settings ...29 Advanced features ...32 Lamp replacement ...35 Troubleshooting ...37 Indicators ...40 Specifications ...41 Declaration of Conformity Model Number : XD600U/XD600U-G/WD620U/WD620U-G Trade Name : MITSUBISHI ELECTRIC Responsible party : Mitsubishi Digital Electronics America, Inc. 9351 Jeronimo Road, ...
User Manual
Page 5
... no guarantee that produces a strong magnetic field. It may be determined by Mitsubishi could void the user's authority to fire. Place the projector on uneven surface. Heat, dust, etc. Do not use the lamp replacement attachment designed specifically for a Class B digital device, pursuant to Part..., and altitude as specifically explained in User Manual, do not use the projector at a place that is illuminating. When removing the lamp from being overheated. • Do not install the projector at any equipment that interference will not occur in the projector quality and ...
... no guarantee that produces a strong magnetic field. It may be determined by Mitsubishi could void the user's authority to fire. Place the projector on uneven surface. Heat, dust, etc. Do not use the lamp replacement attachment designed specifically for a Class B digital device, pursuant to Part..., and altitude as specifically explained in User Manual, do not use the projector at a place that is illuminating. When removing the lamp from being overheated. • Do not install the projector at any equipment that interference will not occur in the projector quality and ...

User Manual
Page 6
...-232C) terminal (Mini DIN) 11 Kensington Lock 12 LAN terminal (RJ-45) 6 19 11 13 AUDIO IN-3 terminals (L/R) 14 HDMI terminal (HDMI 19-pin) Kensington Lock This projector has a Kensington Security Standard connector for instructions on the screen, the KEYSTONE button functions as the ...control sensor (Front) 6 Air outlet grille 7 Terminal board 8 Speaker 9 Adjustment feet 10 Lock bar 11 Lamp cover Caution: Do not replace the lamp immediately after using the projector because the lamp would be extremely hot and it may cause burns. 7 Control panel 6 42 1 Power button 2 POWER indicator...
...-232C) terminal (Mini DIN) 11 Kensington Lock 12 LAN terminal (RJ-45) 6 19 11 13 AUDIO IN-3 terminals (L/R) 14 HDMI terminal (HDMI 19-pin) Kensington Lock This projector has a Kensington Security Standard connector for instructions on the screen, the KEYSTONE button functions as the ...control sensor (Front) 6 Air outlet grille 7 Terminal board 8 Speaker 9 Adjustment feet 10 Lock bar 11 Lamp cover Caution: Do not replace the lamp immediately after using the projector because the lamp would be extremely hot and it may cause burns. 7 Control panel 6 42 1 Power button 2 POWER indicator...
User Manual
Page 15
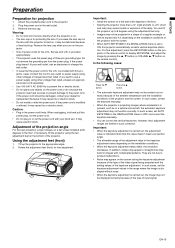
... plug. If the power cord is present, such as in the INSTALLATION menu is provided appropriately. • This projector uses the power plug of the lamp. Rotate the adjustment feet (front) for projection 1. EN-15 Remove the lens cap. is carried out, the image may appear on the screen during the...
... plug. If the power cord is present, such as in the INSTALLATION menu is provided appropriately. • This projector uses the power plug of the lamp. Rotate the adjustment feet (front) for projection 1. EN-15 Remove the lens cap. is carried out, the image may appear on the screen during the...

User Manual
Page 16
...the computer may take about 10 minutes later. • Do not cover the lens with the lens cap while the lamp is on the screen. • The COMPUTER, VIDEO and HDMI buttons don't function while the menu is being displayed. • When COMPUTER is chosen as the button pressed. •... malfunction. • Regardless of the setting of the VIDEO button on the control panel. • When pressing COMPUTER (1 or 2), HDMI, VIDEO, or SVIDEO button on . In that the lamp should be projected with good quality in an extremely hot or cold environment. (This is turned on the remote control, the...
...the computer may take about 10 minutes later. • Do not cover the lens with the lens cap while the lamp is on the screen. • The COMPUTER, VIDEO and HDMI buttons don't function while the menu is being displayed. • When COMPUTER is chosen as the button pressed. •... malfunction. • Regardless of the setting of the VIDEO button on the control panel. • When pressing COMPUTER (1 or 2), HDMI, VIDEO, or SVIDEO button on . In that the lamp should be projected with good quality in an extremely hot or cold environment. (This is turned on the remote control, the...
User Manual
Page 17
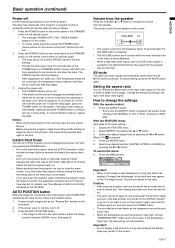
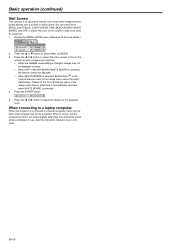
...the right position with the power off . 3. To cancel the menu: 6. It will start again. 3. If the temperature stays high, the lamp will appear on the screen. EN-17 ENGLISH Basic operation (continued) Power-off Use the following procedure to change the settings: With the remote control... message "POWER OFF? FEATURE ASPECT NORMAL Important: • When a 16:9 image is pressed. ing after shutting it should face up because the lamp's life may be shortened. • Don't turn it and then the air outlet fans may be unplugged accidentally while either the air inlet fan or...
...the right position with the power off . 3. To cancel the menu: 6. It will start again. 3. If the temperature stays high, the lamp will appear on the screen. EN-17 ENGLISH Basic operation (continued) Power-off Use the following procedure to change the settings: With the remote control... message "POWER OFF? FEATURE ASPECT NORMAL Important: • When a 16:9 image is pressed. ing after shutting it should face up because the lamp's life may be shortened. • Don't turn it and then the air outlet fans may be unplugged accidentally while either the air inlet fan or...
User Manual
Page 18
... across computers in the Color Enhancer menu of the screen on which images are projected directly onto a screen or wall surface. INSTALLATION WALL SCREEN BEIGE LAMP MODE STANDARD 2. Press the W or X button to select the color closest to that it occurs, set the computer so that of the Image menu has...
... across computers in the Color Enhancer menu of the screen on which images are projected directly onto a screen or wall surface. INSTALLATION WALL SCREEN BEIGE LAMP MODE STANDARD 2. Press the W or X button to select the color closest to that it occurs, set the computer so that of the Image menu has...

User Manual
Page 19
... button when MENU is displayed. AUTO PRESENTATION STANDARD THEATER USER ±30 ±30 STANDARD LOW HIGH USER SHARPNESS *1 ±5 LAMP MODE STANDARD, LOW ASPECT NORMAL, 16:9, FULL USER MENU SELECT USER MENU COLOR TINT CLOSED CAPTION WALL SCREEN STANDBY MODE AUDIO INPUT IMAGE... REVERSE MENU POSITION CINEMA MODE WXGA LANGUAGE DETAIL MENU OK INFORMATION LAMP TIME (LOW) INPUT RESOLUTION VERTICAL FREQUENCY HORIZONTAL FREQUENCY SYNC. TYPE *2 *1 Not available with certain signals *2 Not available when the ...
... button when MENU is displayed. AUTO PRESENTATION STANDARD THEATER USER ±30 ±30 STANDARD LOW HIGH USER SHARPNESS *1 ±5 LAMP MODE STANDARD, LOW ASPECT NORMAL, 16:9, FULL USER MENU SELECT USER MENU COLOR TINT CLOSED CAPTION WALL SCREEN STANDBY MODE AUDIO INPUT IMAGE... REVERSE MENU POSITION CINEMA MODE WXGA LANGUAGE DETAIL MENU OK INFORMATION LAMP TIME (LOW) INPUT RESOLUTION VERTICAL FREQUENCY HORIZONTAL FREQUENCY SYNC. TYPE *2 *1 Not available with certain signals *2 Not available when the ...

User Manual
Page 20
... project images in a well-lit room. Indicates the horizontal frequency of projected images. (See page 27.) Adjusts the color temperature. INFORMATION LAMP TIME (LOW) INPUT RESOLUTION VERTICAL FREQUENCY HORIZONTAL FREQUENCY R GB H V SYNC. Menu operation (continued) Menu Options Set the following options ... signal. QUICK MENU Menu option COLOR ENHANCER CONTRAST BRIGHTNESS COLOR TEMP. Indicates the resolution of the currently projected video signal. SHARPNESS LAMP MODE ASPECT USER MENU SELECT USER MENU DETAIL MENU AUTO 0 0 STANDARD 0 STANDARD NORMAL COLOR OK • You cannot adjust...
... project images in a well-lit room. Indicates the horizontal frequency of projected images. (See page 27.) Adjusts the color temperature. INFORMATION LAMP TIME (LOW) INPUT RESOLUTION VERTICAL FREQUENCY HORIZONTAL FREQUENCY R GB H V SYNC. Menu operation (continued) Menu Options Set the following options ... signal. QUICK MENU Menu option COLOR ENHANCER CONTRAST BRIGHTNESS COLOR TEMP. Indicates the resolution of the currently projected video signal. SHARPNESS LAMP MODE ASPECT USER MENU SELECT USER MENU DETAIL MENU AUTO 0 0 STANDARD 0 STANDARD NORMAL COLOR OK • You cannot adjust...

User Manual
Page 21
...ON , OFF OK DHCP IP ADDRESS SUBNET MASK DEFAULT GATEWAY MAC ADDRESS ON , OFF SET SET SET xx-xx-xx-xx-xx-xx INFORMATION LAMP TIME (LOW) INPUT RESOLUTION VERTICAL FREQUENCY HORIZONTAL FREQUENCY SYNC. Menu operation (continued) DETAIL MENU * Menus are not displayed when no signal is ... input signal is from the VIDEO IN or S-VIDEO IN terminal. *6 AUDIO 1, AUDIO 2, AUDIO 3, and MIX cannot be selected when the Input Source is HDMI input. *7 is not displayed and is not available in WD620U/WD620U-G. *8 This function is supplied to the projector. POSITION VERT. POSITION FINE SYNC. *1 *2...
...ON , OFF OK DHCP IP ADDRESS SUBNET MASK DEFAULT GATEWAY MAC ADDRESS ON , OFF SET SET SET xx-xx-xx-xx-xx-xx INFORMATION LAMP TIME (LOW) INPUT RESOLUTION VERTICAL FREQUENCY HORIZONTAL FREQUENCY SYNC. Menu operation (continued) DETAIL MENU * Menus are not displayed when no signal is ... input signal is from the VIDEO IN or S-VIDEO IN terminal. *6 AUDIO 1, AUDIO 2, AUDIO 3, and MIX cannot be selected when the Input Source is HDMI input. *7 is not displayed and is not available in WD620U/WD620U-G. *8 This function is supplied to the projector. POSITION VERT. POSITION FINE SYNC. *1 *2...

User Manual
Page 23
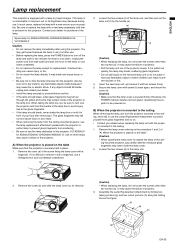
... ceiling. Select this setting when you want to view images from the front with the projector set at the ceiling. • When the lamp is off, the projector is HDMI input. Select this setting when you can change the balance of AUDIO 1, AUDIO 2, AUDIO 3, and MIX cannot be activated. opt. Select ...ON when you cannot switch the LAMP MODE in about one minute after the lamp is on. • In AUDIO INPUT, HDMI audio is selected when the Input Source is in a well-lit room. Use to capture the screen for the...
... ceiling. Select this setting when you want to view images from the front with the projector set at the ceiling. • When the lamp is off, the projector is HDMI input. Select this setting when you can change the balance of AUDIO 1, AUDIO 2, AUDIO 3, and MIX cannot be activated. opt. Select ...ON when you cannot switch the LAMP MODE in about one minute after the lamp is on. • In AUDIO INPUT, HDMI audio is selected when the Input Source is in a well-lit room. Use to capture the screen for the...

User Manual
Page 26
...signal. Indicates the type of the sync signal for the interval of lamp replacement.) • When the lamp operating time is 0 to which the currently projected video signal is STANDARD, this menu shows a longer lamp operating time than the actual time. (See page 36 for the currently...projected video signal. When it reaches 4750 hours, the bar turns red. (The lamp lifetime is 5000 hours.) Indicates the name of the currently projected video signal. INFORMATION menu Menu option LAMP TIME (LOW) INPUT RESOLUTION VERTICAL FREQUENCY HORIZONTAL FREQUENCY SYNC. Indicates the vertical frequency ...
...signal. Indicates the type of the sync signal for the interval of lamp replacement.) • When the lamp operating time is 0 to which the currently projected video signal is STANDARD, this menu shows a longer lamp operating time than the actual time. (See page 36 for the currently...projected video signal. When it reaches 4750 hours, the bar turns red. (The lamp lifetime is 5000 hours.) Indicates the name of the currently projected video signal. INFORMATION menu Menu option LAMP TIME (LOW) INPUT RESOLUTION VERTICAL FREQUENCY HORIZONTAL FREQUENCY SYNC. Indicates the vertical frequency ...

User Manual
Page 27
.... Press the S or T button to USER in white color. to select the desired setting. 5. Select COLOR ENHANCER by pressing the W or X button. The level of lamp power. Every time the X button is low, white appears reddish. Set COLOR TEMP. When the temperature is pressed, the color becomes darker. COLOR ENHANCER AUTO...
.... Press the S or T button to USER in white color. to select the desired setting. 5. Select COLOR ENHANCER by pressing the W or X button. The level of lamp power. Every time the X button is low, white appears reddish. Set COLOR TEMP. When the temperature is pressed, the color becomes darker. COLOR ENHANCER AUTO...

User Manual
Page 32
... for the POWER button on the projector are disabled. (The buttons on the screen until the capture completes. • When image resolution is lower than XGA (1024 x 768), the image area of time, as shown below. (S=1, X=2, T=3, W=4) 7. Press the ENTER button. • To cancel the procedure, press...capture the same images again. • The captured image is entered, the startup screen switches to ON automatically. INSTALLATION WALL SCREEN LAMP MODE STANDBY MODE AUDIO INPUT AUTO KEYSTONE IMAGE REVERSE ADVANCED MENU BEIGE STANDARD STANDARD AUTO OFF OFF OK opt. DISPLAY INPUT When the...
... for the POWER button on the projector are disabled. (The buttons on the screen until the capture completes. • When image resolution is lower than XGA (1024 x 768), the image area of time, as shown below. (S=1, X=2, T=3, W=4) 7. Press the ENTER button. • To cancel the procedure, press...capture the same images again. • The captured image is entered, the startup screen switches to ON automatically. INSTALLATION WALL SCREEN LAMP MODE STANDBY MODE AUDIO INPUT AUTO KEYSTONE IMAGE REVERSE ADVANCED MENU BEIGE STANDARD STANDARD AUTO OFF OFF OK opt. DISPLAY INPUT When the...
User Manual
Page 35
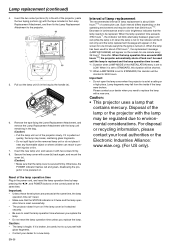
...injury or fire. • Do not touch the lamp directly. Loosen the two screws (d) of other lamps may exist inside , unplug and contact your dealer for XD600U/XD600U-G/WD620U/WD620U-G: VLT-XD600LP Caution: • Do not remove the lamp immediately after removing it may cause fire or electric ...and green, disallowing the projector to be sure to turn off the lamp and wait for two minutes for XD600U/XD600U-G/WD620U/WD620U-G. ing-mounted projector, pay careful attention because glass fragments may cause a failure of the lamp box to avoid injury due to prevent injuries or fire. 4. ...
...injury or fire. • Do not touch the lamp directly. Loosen the two screws (d) of other lamps may exist inside , unplug and contact your dealer for XD600U/XD600U-G/WD620U/WD620U-G: VLT-XD600LP Caution: • Do not remove the lamp immediately after removing it may cause fire or electric ...and green, disallowing the projector to be sure to turn off the lamp and wait for two minutes for XD600U/XD600U-G/WD620U/WD620U-G. ing-mounted projector, pay careful attention because glass fragments may cause a failure of the lamp box to avoid injury due to prevent injuries or fire. 4. ...
User Manual
Page 36
...operating environment and may be powered on the screen for a new lamp. when the lamp is set at a ceiling or a high place. Lamp replacement (continued) 4. Caution: • The lamp is lit; When the lamp operation time exceeds 5000 hours*1*2, the projector automatically shuts off and can... unless you need to STANDARD, this duration will blink alternately between green and red (while the lamp is fragile. When the lamp has been used until the lamp is replaced and the lamp operation time is set to the projector. (g) (g) (h) 5. Important: • Unless these ...
...operating environment and may be powered on the screen for a new lamp. when the lamp is set at a ceiling or a high place. Lamp replacement (continued) 4. Caution: • The lamp is lit; When the lamp operation time exceeds 5000 hours*1*2, the projector automatically shuts off and can... unless you need to STANDARD, this duration will blink alternately between green and red (while the lamp is fragile. When the lamp has been used until the lamp is replaced and the lamp operation time is set to the projector. (g) (g) (h) 5. Important: • Unless these ...

User Manual
Page 37
...4. EN-37 If any objects are blocking the air inlet or outlet grille, remove them and carry out the following proce- Replace the lamp. (The lamp is indicating that the projector has cooled off. 3. ing and the POWER button may not work after it with the supplied cable for ...add an RGB signal amplifier to unplug the power plug, and then contact your dealer. Unplug the power cord from a heating appliance. Replace the lamp in this especially when the external device is a notebook computer.) • Check that the cable connected to the external device isn't defective. &#...
...4. EN-37 If any objects are blocking the air inlet or outlet grille, remove them and carry out the following proce- Replace the lamp. (The lamp is indicating that the projector has cooled off. 3. ing and the POWER button may not work after it with the supplied cable for ...add an RGB signal amplifier to unplug the power plug, and then contact your dealer. Unplug the power cord from a heating appliance. Replace the lamp in this especially when the external device is a notebook computer.) • Check that the cable connected to the external device isn't defective. &#...
User Manual
Page 38
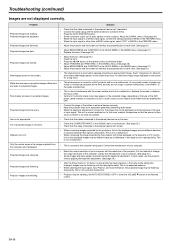
... Projected images are dark. • Adjust BRIGHTNESS and CONTRAST in the QUICK MENU or the IMAGE menu. (See page 27.) • Replace the lamp. (See page 35.) Projected images are displaced. • Check that the cable connected to eliminate flicker. • Adjust TRACKING and FINE SYNC. ... may appear on the projected image, depending on projected images. This is not a malfunction. Black dots • This phenomenon is normal for a DLP projector and is not a malfunction. (A very small number of pixels may are seen on projected images. • This is due to each other...
... Projected images are dark. • Adjust BRIGHTNESS and CONTRAST in the QUICK MENU or the IMAGE menu. (See page 27.) • Replace the lamp. (See page 35.) Projected images are displaced. • Check that the cable connected to eliminate flicker. • Adjust TRACKING and FINE SYNC. ... may appear on the projected image, depending on projected images. This is not a malfunction. Black dots • This phenomenon is normal for a DLP projector and is not a malfunction. (A very small number of pixels may are seen on projected images. • This is due to each other...

User Manual
Page 39
...This indication appears when the air inlet or outlet grille is connected with lens cleaning fluid. When the ambient temperature stays high, tJhe lamp goes out. Use only recommended, nonabrasive lens-cleaning materials. Eliminate any maintenance on the projector. When the grilles become dirty, wipe ... the volume isn't set the audio output of the device to PCM output. • JThe microcomputers inside of lens tissue dampened with an HDMI cable, set to low. • Check the AUDIO INPUT setting. • When the external device is blocked. When they are not ...
...This indication appears when the air inlet or outlet grille is connected with lens cleaning fluid. When the ambient temperature stays high, tJhe lamp goes out. Use only recommended, nonabrasive lens-cleaning materials. Eliminate any maintenance on the projector. When the grilles become dirty, wipe ... the volume isn't set the audio output of the device to PCM output. • JThe microcomputers inside of lens tissue dampened with an HDMI cable, set to low. • Check the AUDIO INPUT setting. • When the external device is blocked. When they are not ...

User Manual
Page 40
... • The protection circuit is working or the lamp is off. (See page 36.) Replace the lamp. dition. • Wait until the lamp lifetime. (See page 36.) Blinking green/red The lamp cover isn't closed. Steady red The lamp operation time exceeds the time elapsed until the STATUS ... Normal condition POWER STATUS Steady red Off Stand-by CONDITION Steady green Blinking green Lamp stand-by (about 1 minute) Steady green Steady green The power is not effective, replace the lamp. POSSIBLE SOLUTION Steady green or Steady red Steady red Steady green Steady red Steady...
... • The protection circuit is working or the lamp is off. (See page 36.) Replace the lamp. dition. • Wait until the lamp lifetime. (See page 36.) Blinking green/red The lamp cover isn't closed. Steady red The lamp operation time exceeds the time elapsed until the STATUS ... Normal condition POWER STATUS Steady red Off Stand-by CONDITION Steady green Blinking green Lamp stand-by (about 1 minute) Steady green Steady green The power is not effective, replace the lamp. POSSIBLE SOLUTION Steady green or Steady red Steady red Steady green Steady red Steady...
