
User Manual
Page 3
... control ...8 Installation ...9 Basic connections...10 Preparation ...12 Basic operation ...13 Menu operation...16 Image adjustment ...21 Advanced features ...23 Lamp replacement ...25 Troubleshooting ...27 Indicators ...30 Specifications ...31 Declaration of Conformity Model Number : XD500U-ST Trade Name : MITSUBISHI ELECTRIC Responsible party : Mitsubishi Digital Electronics America, Inc. 9351 Jeronimo Road, Irvine, CA 92618 U.S.A Telephone...
... control ...8 Installation ...9 Basic connections...10 Preparation ...12 Basic operation ...13 Menu operation...16 Image adjustment ...21 Advanced features ...23 Lamp replacement ...25 Troubleshooting ...27 Indicators ...30 Specifications ...31 Declaration of Conformity Model Number : XD500U-ST Trade Name : MITSUBISHI ELECTRIC Responsible party : Mitsubishi Digital Electronics America, Inc. 9351 Jeronimo Road, Irvine, CA 92618 U.S.A Telephone...
User Manual
Page 5
...air-conditioning unit, heater, or humidifier to avoid hot or moist air to the air outlet grilles because they are designed to service this projector when replacing the lamp with a new one or more than ±10° (right and left) or ±15° (front and rear) ... if there is on. An inadvertent contact may ignite causing fire or breakdown because the temperature inside if the lamp were broken. Do not keep using the damaged projector. Flammable substances may result in accordance with condensation on it may cause harmful interference to fire or electric shock....
...air-conditioning unit, heater, or humidifier to avoid hot or moist air to the air outlet grilles because they are designed to service this projector when replacing the lamp with a new one or more than ±10° (right and left) or ±15° (front and rear) ... if there is on. An inadvertent contact may ignite causing fire or breakdown because the temperature inside if the lamp were broken. Do not keep using the damaged projector. Flammable substances may result in accordance with condensation on it may cause harmful interference to fire or electric shock....

User Manual
Page 6
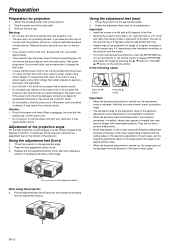
... 7 Terminal board 8 Speaker 9 Adjustment feet (front) 10 Adjustment feet (rear) 11 Lock bar 12 Foot Adjustment button (Front) 13 Lamp cover Caution: Do not replace the lamp immediately after using the projector because the lamp would be extremely hot and it may cause burns. 10 7 Control panel 8 11 10 6 3 9 5 4 7 Terminal board 3 2 8 9 6... bar 11 SERIAL (RS-232C) terminal (D-SUB 9-pin) 12 AUDIO L/R terminals 13 Kensington Lock Kensington Lock This projector has a Kensington Security Standard connector for instructions on how to use with the Kensington System for use it to secure the...
... 7 Terminal board 8 Speaker 9 Adjustment feet (front) 10 Adjustment feet (rear) 11 Lock bar 12 Foot Adjustment button (Front) 13 Lamp cover Caution: Do not replace the lamp immediately after using the projector because the lamp would be extremely hot and it may cause burns. 10 7 Control panel 8 11 10 6 3 9 5 4 7 Terminal board 3 2 8 9 6... bar 11 SERIAL (RS-232C) terminal (D-SUB 9-pin) 12 AUDIO L/R terminals 13 Kensington Lock Kensington Lock This projector has a Kensington Security Standard connector for instructions on how to use with the Kensington System for use it to secure the...
User Manual
Page 12
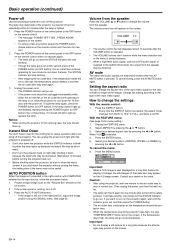
..., press the KEYSTONE button on the installation conditions. • When the keystone adjustment takes effect, the resolution decreases. If necessary, tilt the projector using the projector: 4. Press the foot adjustment button (front). 3. Press the S button. Note that the power cord for the U.S., Europe and U.K. Attach...If the power plug doesn't fit your hand wet. If you leave the lens cap on the remote control). Adjustment of the lamp. Tilt up the projector to use a power supply using the adjustment feet only. • Images may cause fire or electric shock. • Do ...
..., press the KEYSTONE button on the installation conditions. • When the keystone adjustment takes effect, the resolution decreases. If necessary, tilt the projector using the projector: 4. Press the foot adjustment button (front). 3. Press the S button. Note that the power cord for the U.S., Europe and U.K. Attach...If the power plug doesn't fit your hand wet. If you leave the lens cap on the remote control). Adjustment of the lamp. Tilt up the projector to use a power supply using the adjustment feet only. • Images may cause fire or electric shock. • Do ...

User Manual
Page 13
... on even if you do not display the same stationary images for the fans to stop and press the POWER button to the projector. In that the lamp should be projected with the projector, use , the fans may start rotating when the power cord is plugged in the INSTALLATION menu, the STANDARD... blinks red. (See page 27 and 30.) • Images may flicker before the projector is cooled down completely after the lamp is on the device connected to the projector first. 2. EN-13 Adjust the focus by When the lamp is on . Press the POWER button on the control panel or the ON button...
... on even if you do not display the same stationary images for the fans to stop and press the POWER button to the projector. In that the lamp should be projected with the projector, use , the fans may start rotating when the power cord is plugged in the INSTALLATION menu, the STANDARD... blinks red. (See page 27 and 30.) • Images may flicker before the projector is cooled down completely after the lamp is on the device connected to the projector first. 2. EN-13 Adjust the focus by When the lamp is on . Press the POWER button on the control panel or the ON button...
User Manual
Page 14
... close the menu screen. Unplug the power cord. • The POWER indicator will stop in the right position with the power off the projector. ing after the lamp lights up . Project a bright image such as the input source, follow the procedure below. 1. The volume control bar will go out....) two or three times. With the FEATURE menu: (See page 19 for a long time because the afterimages may deteriorate if the projector is blink- The lamp may persist on the 4:3 image screen. See page 20. Then unplug the power cord from the speaker may appear on the screen....
... close the menu screen. Unplug the power cord. • The POWER indicator will stop in the right position with the power off the projector. ing after the lamp lights up . Project a bright image such as the input source, follow the procedure below. 1. The volume control bar will go out....) two or three times. With the FEATURE menu: (See page 19 for a long time because the afterimages may deteriorate if the projector is blink- The lamp may persist on the 4:3 image screen. See page 20. Then unplug the power cord from the speaker may appear on the screen....
User Manual
Page 15
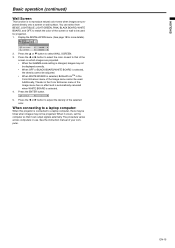
...BOARD/WHITE BOARD is selected, BrilliantColorTM in the Color Enhancer menu of the selected color. When connecting to a laptop computer: When this projector is connected to adjust the density of the Image menu cannot be adjusted. • When WHITE BOARD is selected, the density cannot be...in the Color Enhancer menu of your computer. EN-15 Display the INSTALLATION menu. (See page 18 for projection. 1. INSTALLATION WALL SCREEN LAMP MODE BEIGE STANDARD 2. See the instruction manual of the Image menu has no effect and is automatically canceled when WHITE BOARD is changed,...
...BOARD/WHITE BOARD is selected, BrilliantColorTM in the Color Enhancer menu of the selected color. When connecting to a laptop computer: When this projector is connected to adjust the density of the Image menu cannot be adjusted. • When WHITE BOARD is selected, the density cannot be...in the Color Enhancer menu of your computer. EN-15 Display the INSTALLATION menu. (See page 18 for projection. 1. INSTALLATION WALL SCREEN LAMP MODE BEIGE STANDARD 2. See the instruction manual of the Image menu has no effect and is automatically canceled when WHITE BOARD is changed,...

User Manual
Page 16
...COMPONENT VIDEO IN-1 terminal. *5 The range that can be specified varies across input signals. *6 Available only when the input signal is supplied to the projector. COLOR *1 TINT *1 SHARPNESS *1 ADVANCED MENU ±30 ±30 STANDARD LOW HIGH USER ±10 ±10 ±5 OK CONTRAST R...SHUTTER (L) SHUTTER (LS) SHUTTER (RS) 0-99 0-99 1-255 1-63 AUTO, OFF ON, OFF 0-20 0-20 0-20 0-20 INFORMATION LAMP TIME (LOW) INPUT RESOLUTION VERTICAL FREQUENCY HORIZONTAL FREQUENCY SYNC. IMAGE COLOR ENHANCER AUTO PRESENTATION STANDARD THEATER USER GAMMA MODE BrilliantColor TM RGB-COLOR RGB-TINT...
...COMPONENT VIDEO IN-1 terminal. *5 The range that can be specified varies across input signals. *6 Available only when the input signal is supplied to the projector. COLOR *1 TINT *1 SHARPNESS *1 ADVANCED MENU ±30 ±30 STANDARD LOW HIGH USER ±10 ±10 ±5 OK CONTRAST R...SHUTTER (L) SHUTTER (LS) SHUTTER (RS) 0-99 0-99 1-255 1-63 AUTO, OFF ON, OFF 0-20 0-20 0-20 0-20 INFORMATION LAMP TIME (LOW) INPUT RESOLUTION VERTICAL FREQUENCY HORIZONTAL FREQUENCY SYNC. IMAGE COLOR ENHANCER AUTO PRESENTATION STANDARD THEATER USER GAMMA MODE BrilliantColor TM RGB-COLOR RGB-TINT...

User Manual
Page 18
...SCREEN BACK COLOR MUTE MODE IMAGE REVERSE BEIGE STANDARD OFF OFF GO ON BLUE BLACK OFF • By default, the LAMP MODE is no signal input from behind the screen with the projector set on . • You cannot select IMAGE CAPTURE SPLASH SCREEN when PASSWORD FUNCTION in a well-lit room. ...other than BLACK BOARD/WHITE BOARD, you want to view images from the front with the projector set to view images from the front with the projector set at the ceiling. • When the lamp is off, the projector is activated. • When you set to capture the screen for the splash screen....
...SCREEN BACK COLOR MUTE MODE IMAGE REVERSE BEIGE STANDARD OFF OFF GO ON BLUE BLACK OFF • By default, the LAMP MODE is no signal input from behind the screen with the projector set on . • You cannot select IMAGE CAPTURE SPLASH SCREEN when PASSWORD FUNCTION in a well-lit room. ...other than BLACK BOARD/WHITE BOARD, you want to view images from the front with the projector set to view images from the front with the projector set at the ceiling. • When the lamp is off, the projector is activated. • When you set to capture the screen for the splash screen....

User Manual
Page 20
... you are not a malfunction. • When you connect the projector to a DVD player or other device having R, G, and B output terminals. Use this setting to correct solid black that LAMP MODE is LOW. • When the LAMP MODE is displayed. Use this setting to correct solid white or ...PR) component video output terminals. POSITION VERT. Select this setting to eliminate vertical wide stripes, if they appear, when you connect the projector to adjust the display area of the input signal. POSITION VERT.POSITION FINE SYNC. Use this setting to which the currently projected video ...
... you are not a malfunction. • When you connect the projector to a DVD player or other device having R, G, and B output terminals. Use this setting to correct solid black that LAMP MODE is LOW. • When the LAMP MODE is displayed. Use this setting to correct solid white or ...PR) component video output terminals. POSITION VERT. Select this setting to eliminate vertical wide stripes, if they appear, when you connect the projector to adjust the display area of the input signal. POSITION VERT.POSITION FINE SYNC. Use this setting to which the currently projected video ...

User Manual
Page 21
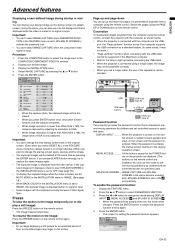
... brightness can change the temperature using the menu. (See page 17 for optimal adjustment results. For example, you want to higher levels. The level of lamp power. EN-21 ENGLISH Display the IMAGE menu. 2. Press the MENU button. Every time the X button is pressed, the image becomes darker and less clearly...
... brightness can change the temperature using the menu. (See page 17 for optimal adjustment results. For example, you want to higher levels. The level of lamp power. EN-21 ENGLISH Display the IMAGE menu. 2. Press the MENU button. Every time the X button is pressed, the image becomes darker and less clearly...
User Manual
Page 23
... is higher than XGA(1024 x 768), the image is intended to prevent wrong operations by children and set to IMAGE, the captured image is displayed while no signal is input. • Some images can go up before connecting the USB cable. • When the projector is connected using ...; Do not keep displaying a still picture for an extended period of the repeater is input. Display the FEATURE menu. 2. INSTALLATION WALL SCREEN BEIGE LAMP MODE AUTO POWER ON AUTO POWER OFF IMAGE CAPTURE ON SPLASH SCREEN BACK COLOR STANDARD OFF OFF GO ON BLUE MUTE MODE IMAGE REVERSE BLACK...
... is higher than XGA(1024 x 768), the image is intended to prevent wrong operations by children and set to IMAGE, the captured image is displayed while no signal is input. • Some images can go up before connecting the USB cable. • When the projector is connected using ...; Do not keep displaying a still picture for an extended period of the repeater is input. Display the FEATURE menu. 2. INSTALLATION WALL SCREEN BEIGE LAMP MODE AUTO POWER ON AUTO POWER OFF IMAGE CAPTURE ON SPLASH SCREEN BACK COLOR STANDARD OFF OFF GO ON BLUE MUTE MODE IMAGE REVERSE BLACK...
User Manual
Page 25
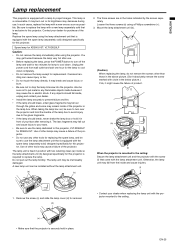
... with circle in position with a new lamp separately sold ) designed specifically for this projector, VLT-XD520LP for XD500U-ST: VLT-XD520LP Caution: • Do not remove the lamp immediately after using a Phillips screwdriver (+). 3. Contact your dealer. • Install the lamp securely to the ceiling: Secure the lamp attachment unit and the projector with the screw (f) that is equipped...
... with circle in position with a new lamp separately sold ) designed specifically for this projector, VLT-XD520LP for XD500U-ST: VLT-XD520LP Caution: • Do not remove the lamp immediately after using a Phillips screwdriver (+). 3. Contact your dealer. • Install the lamp securely to the ceiling: Secure the lamp attachment unit and the projector with the screw (f) that is equipped...
User Manual
Page 26
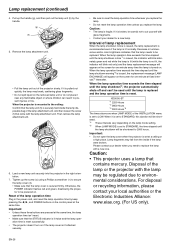
... is lit twice and the lamp operation time is set to prevent injuries or fire. Caution: • This projector uses a lamp that the lamp cover is lit normally. If it is set at fixed intervals*4 thereafter. Then remove the lamp attachment unit. 6. XD500U-ST *1 2250 Hours *2 2850 ...; Unless these three buttons are when LAMP MODE of the lamp attachment unit. Caution: • The lamp is reset. When the lamp operation time exceeds the time elapsed until the lamp shutdown will be regulated due to 2000 hours. EN-26 When the projector is mounted to the ceiling: Confirm that...
... is lit twice and the lamp operation time is set to prevent injuries or fire. Caution: • This projector uses a lamp that the lamp cover is lit normally. If it is set at fixed intervals*4 thereafter. Then remove the lamp attachment unit. 6. XD500U-ST *1 2250 Hours *2 2850 ...; Unless these three buttons are when LAMP MODE of the lamp attachment unit. Caution: • The lamp is reset. When the lamp operation time exceeds the time elapsed until the lamp shutdown will be regulated due to 2000 hours. EN-26 When the projector is mounted to the ceiling: Confirm that...

User Manual
Page 27
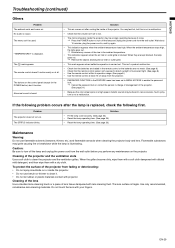
... device is correctly selected as the input source. • When an extension cord is being used , replace it is indicating that the projector has cooled off before the lamp was cooled down sufficiently last time, the fan may take about 1 minute for a few minutes and then try again. • If...Power can 't turn back on the POWER indicator. • Set SCART INPUT in charge of management of the projector. (See page 23.) • Turn on the power of its life.) Attach the lamp cover on . After the STATUS indicator stops blinking, press the POWER button. Power turns off and how they...
... device is correctly selected as the input source. • When an extension cord is being used , replace it is indicating that the projector has cooled off before the lamp was cooled down sufficiently last time, the fan may take about 1 minute for a few minutes and then try again. • If...Power can 't turn back on the POWER indicator. • Set SCART INPUT in charge of management of the projector. (See page 23.) • Turn on the power of its life.) Attach the lamp cover on . After the STATUS indicator stops blinking, press the POWER button. Power turns off and how they...

User Manual
Page 28
... is improved by keeping projecting an evenly bright image. (Such "image burn-in the IMAGE menu. (See page 21.) • Replace the lamp. (See page 25.) Projected images are not displayed correctly. in the SIGNAL menu. (See page 22.) • Adjust BRIGHTNESS and CONTRAST in...the external device isn't broken. This is due to eliminate flicker. • Adjust TRACKING and FINE SYNC. In such a case, you use the projector without applying the keystone adjustment. (See page 12.) Projected images are seen on projected images. • This is not a malfunction. • When...
... is improved by keeping projecting an evenly bright image. (Such "image burn-in the IMAGE menu. (See page 21.) • Replace the lamp. (See page 25.) Projected images are not displayed correctly. in the SIGNAL menu. (See page 22.) • Adjust BRIGHTNESS and CONTRAST in...the external device isn't broken. This is due to eliminate flicker. • Adjust TRACKING and FINE SYNC. In such a case, you use the projector without applying the keystone adjustment. (See page 12.) Projected images are seen on projected images. • This is not a malfunction. • When...
User Manual
Page 29
... batteries are loaded in , and try again. • This indication appears when the ambient temperature rises high. Problem The projector does not turn off may ignite causing fire or breakdown while the lamp is carried out. This isn't a product malfunction. • Check that the remote control sensor isn't exposed to direct sunlight...
... batteries are loaded in , and try again. • This indication appears when the ambient temperature rises high. Problem The projector does not turn off may ignite causing fire or breakdown while the lamp is carried out. This isn't a product malfunction. • Check that the remote control sensor isn't exposed to direct sunlight...

User Manual
Page 30
... of which shows the operation condition of the projector. Blinking green/red Steady or Blinking Abnormal. STATUS indicator POWER indicator Normal condition POWER STATUS Steady red Off Stand-by CONDITION Steady green Blinking green Lamp stand-by (about 1 minute) Steady green Steady... red The lamp operation time exceeds the time elapsed until the lamp shutdown notice while the power is high. • Clean the ventilation grilles. • Relocate the projector to possible problems. If these problem persist, turn the projector off . (See page 26.) Replace the lamp. If the...
... of which shows the operation condition of the projector. Blinking green/red Steady or Blinking Abnormal. STATUS indicator POWER indicator Normal condition POWER STATUS Steady red Off Stand-by CONDITION Steady green Blinking green Lamp stand-by (about 1 minute) Steady green Steady... red The lamp operation time exceeds the time elapsed until the lamp shutdown notice while the power is high. • Clean the ventilation grilles. • Relocate the projector to possible problems. If these problem persist, turn the projector off . (See page 26.) Replace the lamp. If the...
User Manual
Page 31
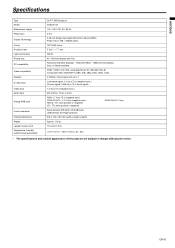
... Rated input Display Technology Colors Projection lens Light source lamp Picture size PC compatibility Video compatibility Speaker S-video input Video input Audio input Analog RGB input Control connector Outside dimensions Weight Length of power cord Temperature, humidity (performance guaranteed) DLP™ DATA projector XD500U-ST 100 - 240 V AC, 50 / 60 Hz 3.9 A ...x height x depth) Approx. 3.3 kg 114 inch (1.8 m) +41°F (+5°C) - +95°F (+35°C), 30 - 90% • The specifications and outside appearance of the projector are subject to change without prior notice.
... Rated input Display Technology Colors Projection lens Light source lamp Picture size PC compatibility Video compatibility Speaker S-video input Video input Audio input Analog RGB input Control connector Outside dimensions Weight Length of power cord Temperature, humidity (performance guaranteed) DLP™ DATA projector XD500U-ST 100 - 240 V AC, 50 / 60 Hz 3.9 A ...x height x depth) Approx. 3.3 kg 114 inch (1.8 m) +41°F (+5°C) - +95°F (+35°C), 30 - 90% • The specifications and outside appearance of the projector are subject to change without prior notice.
User Manual
Page 32
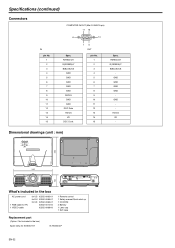
...-0068-00 1 Remote control 1 Safety manual/Quick start up 1 CD-ROM 2 Battery 1 Lens cap 1 Soft case Replacement part (Option / Not included in the box) Spare lamp for XD500U-ST VLT-XD520LP EN-32 Specifications (continued) Connectors IN pin No. 1 2 3 4 5 6 7 8 9 10 11 12 13 14 15 COMPUTER IN/OUT (Mini D-SUB 15-pin) 11...
...-0068-00 1 Remote control 1 Safety manual/Quick start up 1 CD-ROM 2 Battery 1 Lens cap 1 Soft case Replacement part (Option / Not included in the box) Spare lamp for XD500U-ST VLT-XD520LP EN-32 Specifications (continued) Connectors IN pin No. 1 2 3 4 5 6 7 8 9 10 11 12 13 14 15 COMPUTER IN/OUT (Mini D-SUB 15-pin) 11...
