
User Manual
Page 2
.... This apparatus must be disposed of Electronic Computer/Data Processing Equipment, ANSI/NFPA 75. Never use another power supply cord, it for other products. Your MITSUBISHI ELECTRIC product is for end-users and Annex II. If a chemical symbol is intended to alert the user to constitute a risk of important operating and maintenance (servicing) instructions in ! EN-2 The exclamation point within the...
.... This apparatus must be disposed of Electronic Computer/Data Processing Equipment, ANSI/NFPA 75. Never use another power supply cord, it for other products. Your MITSUBISHI ELECTRIC product is for end-users and Annex II. If a chemical symbol is intended to alert the user to constitute a risk of important operating and maintenance (servicing) instructions in ! EN-2 The exclamation point within the...
User Manual
Page 3
... the FCC Rules. Microsoft or Windows are either registered trademarks or trademarks of Apple Computer Inc. ENGLISH Contents Important safeguards...4 Overview ...6 Remote control ...8 Installation ...9 Basic connections...10 Preparation ...12 Basic operation ...13 Menu operation...16 Image adjustment ...21 Advanced features ...23 Lamp replacement ...25 Troubleshooting ...27 Indicators ...30 Specifications ...31 Declaration of Conformity Model Number : XD500U-ST Trade Name : MITSUBISHI ELECTRIC Responsible party : Mitsubishi Digital Electronics America, Inc. 9351 Jeronimo...
... the FCC Rules. Microsoft or Windows are either registered trademarks or trademarks of Apple Computer Inc. ENGLISH Contents Important safeguards...4 Overview ...6 Remote control ...8 Installation ...9 Basic connections...10 Preparation ...12 Basic operation ...13 Menu operation...16 Image adjustment ...21 Advanced features ...23 Lamp replacement ...25 Troubleshooting ...27 Indicators ...30 Specifications ...31 Declaration of Conformity Model Number : XD500U-ST Trade Name : MITSUBISHI ELECTRIC Responsible party : Mitsubishi Digital Electronics America, Inc. 9351 Jeronimo...

User Manual
Page 4
... may result in performance this indicates a need for future reference. Power-cord protection Power-supply cords should use a mounting accessory recommended by placing the projector on the projector. 1. Safety check Upon completion of any kind on using Soft Case or carrying the projector The tip of the projection lens of other controls may result in damage and may often require extensive work by the manufacturer or sold...
... may result in performance this indicates a need for future reference. Power-cord protection Power-supply cords should use a mounting accessory recommended by placing the projector on the projector. 1. Safety check Upon completion of any kind on using Soft Case or carrying the projector The tip of the projection lens of other controls may result in damage and may often require extensive work by the manufacturer or sold...
User Manual
Page 5
... to service this projector when replacing the lamp with a new one or more than ±10° (right and left) or ±15° (front and rear) may be determined by turning the equipment off and on a circuit different from being overheated. • Do not install the projector at any equipment that is easily affected by one . Do not operate...
... to service this projector when replacing the lamp with a new one or more than ±10° (right and left) or ±15° (front and rear) may be determined by turning the equipment off and on a circuit different from being overheated. • Do not install the projector at any equipment that is easily affected by one . Do not operate...
User Manual
Page 12
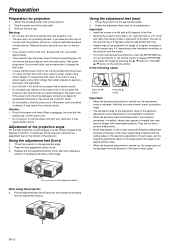
... images with your wall outlet, ask an electrician to change the wall outlet. • In case that this cord to any objects on a flat screen installed at 90 degrees to the appropriate angle. 2. Remove the lens cap when you turn on the screen during the keystone adjustment because of the type of the video signal being projected and the setting values of power cords for fine adjustment. Rotate the adjustment...
... images with your wall outlet, ask an electrician to change the wall outlet. • In case that this cord to any objects on a flat screen installed at 90 degrees to the appropriate angle. 2. Remove the lens cap when you turn on the screen during the keystone adjustment because of the type of the video signal being projected and the setting values of power cords for fine adjustment. Rotate the adjustment...

User Manual
Page 13
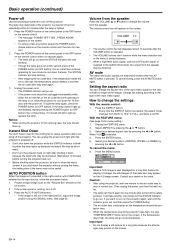
... device connected to light the indicator. 3. Turn on the screen. • The COMPUTER and VIDEO buttons don't function while the menu is being displayed. • When COMPUTER is due to light up when the POWER button is not a malfunction. The LAMP MODE is set to either STANDARD or LOW depending on . • The projector starts warming up . Indicator STATUS - Replace the lamp when the STATUS indicator blinks red. (See page 27 and 30.) • Images may...
... device connected to light the indicator. 3. Turn on the screen. • The COMPUTER and VIDEO buttons don't function while the menu is being displayed. • When COMPUTER is due to light up when the POWER button is not a malfunction. The LAMP MODE is set to either STANDARD or LOW depending on . • The projector starts warming up . Indicator STATUS - Replace the lamp when the STATUS indicator blinks red. (See page 27 and 30.) • Images may...
User Manual
Page 14
... "TEMPERATURE!!" opt. Press the POWER button on the control panel or the OFF button on the remote control within 30 minutes after shutting it off the projector. Project a bright image such as the input source, follow the procedure below. 1. Change the setting according to the type of the image). blinks red on , allow the projector to cool down for the cooling fan to cease operation after the projector is powered off the projector. AUTO POSITION button When...
... "TEMPERATURE!!" opt. Press the POWER button on the control panel or the OFF button on the remote control within 30 minutes after shutting it off the projector. Project a bright image such as the input source, follow the procedure below. 1. Change the setting according to the type of the image). blinks red on , allow the projector to cool down for the cooling fan to cease operation after the projector is powered off the projector. AUTO POSITION button When...
User Manual
Page 15
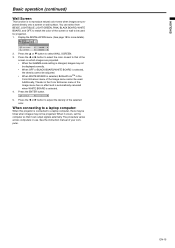
... screen or wall to be projected. Press the W or X button to select WALL SCREEN. 3. EN-15 ENGLISH Basic operation (continued) Wall Screen This function is to reproduce natural color tones when images are projected. • When the GAMMA mode setting is changed, images may not be used . Display the INSTALLATION menu. (See page 18 for projection. 1. When connecting to a laptop computer: When this projector is connected to a laptop computer, there may be times when images...
... screen or wall to be projected. Press the W or X button to select WALL SCREEN. 3. EN-15 ENGLISH Basic operation (continued) Wall Screen This function is to reproduce natural color tones when images are projected. • When the GAMMA mode setting is changed, images may not be used . Display the INSTALLATION menu. (See page 18 for projection. 1. When connecting to a laptop computer: When this projector is connected to a laptop computer, there may be times when images...

User Manual
Page 16
... SCREEN BACK COLOR AV MUTE MODE IMAGE REVERSE BEIGE 1-5 LIGHT BLUE 1-5 LIGHT GREEN 1-5 PINK 1-5 BLACK BOARD WHITE BOARD OFF STANDARD, LOW ON, OFF OFF, 5, 10, 15, 30, 60 min GO ON, OFF BLUE, BLACK, IMAGE BLACK, IMAGE OFF, MIRROR, INVERT, MIRROR INVERT FEATURE ASPECT AUTO 16:9 CENTER, UPPER, LOWER FULL PASSWORD FUNCTION DISPLAY INPUT , MENU ACCESS , SPLASH ID LOCK OK MENU POSITION 1 (upper left), 2 (lower right) UNLOCK OK CINEMA MODE *3 AUTO, OFF VIDEO SIGNAL *6 AUTO, NTSC...
... SCREEN BACK COLOR AV MUTE MODE IMAGE REVERSE BEIGE 1-5 LIGHT BLUE 1-5 LIGHT GREEN 1-5 PINK 1-5 BLACK BOARD WHITE BOARD OFF STANDARD, LOW ON, OFF OFF, 5, 10, 15, 30, 60 min GO ON, OFF BLUE, BLACK, IMAGE BLACK, IMAGE OFF, MIRROR, INVERT, MIRROR INVERT FEATURE ASPECT AUTO 16:9 CENTER, UPPER, LOWER FULL PASSWORD FUNCTION DISPLAY INPUT , MENU ACCESS , SPLASH ID LOCK OK MENU POSITION 1 (upper left), 2 (lower right) UNLOCK OK CINEMA MODE *3 AUTO, OFF VIDEO SIGNAL *6 AUTO, NTSC...

User Manual
Page 17
... adjust COLOR TEMP. COLOR TINT SHARPNESS ADVANCED MENU AUTO 0 0 STANDARD 0 0 0 OK opt. INSTALLATION WALL SCREEN BEIGE 4. A high input level causes projected images to appear solid white, and a low input level causes projected images to select AUTO POWER OFF. when WALL SCREEN is set to a setting other than OFF. (See page 21.) Adjusts the color tone of the video signal varies across devices to select INSTALLATION. Press the W or X button to which is connected. AUTO POWER ON AUTO POWER OFF OFF 30min 6. Makes projected images...
... adjust COLOR TEMP. COLOR TINT SHARPNESS ADVANCED MENU AUTO 0 0 STANDARD 0 0 0 OK opt. INSTALLATION WALL SCREEN BEIGE 4. A high input level causes projected images to appear solid white, and a low input level causes projected images to select AUTO POWER OFF. when WALL SCREEN is set to a setting other than OFF. (See page 21.) Adjusts the color tone of the video signal varies across devices to select INSTALLATION. Press the W or X button to which is connected. AUTO POWER ON AUTO POWER OFF OFF 30min 6. Makes projected images...

User Manual
Page 18
... the projector set on the floor. Select ON to display the splash screen when the projector is no signal input from behind the screen with the projector set to view images from behind the screen with BACK COLOR or AV MUTE MODE set at the ceiling. Select this setting when you set at the ceiling. INSTALLATION menu Menu option WALL SCREEN LAMP MODE AUTO POWER ON AUTO POWER OFF IMAGE CAPTURE SPLASH SCREEN BACK COLOR AV MUTE MODE IMAGE REVERSE Setting OFF/BEIGE / LIGHT BLUE / LIGHT GREEN / PINK / BLACK BOARD/WHITE...
... the projector set on the floor. Select ON to display the splash screen when the projector is no signal input from behind the screen with the projector set to view images from behind the screen with BACK COLOR or AV MUTE MODE set at the ceiling. Select this setting when you set at the ceiling. INSTALLATION menu Menu option WALL SCREEN LAMP MODE AUTO POWER ON AUTO POWER OFF IMAGE CAPTURE SPLASH SCREEN BACK COLOR AV MUTE MODE IMAGE REVERSE Setting OFF/BEIGE / LIGHT BLUE / LIGHT GREEN / PINK / BLACK BOARD/WHITE...

User Manual
Page 20
... LAMP MODE is being input. The image may appear. • The adjustable range of the vertical position varies depending on the screen. TYPE Feature description This menu shows a lamp operating time (hour) calculated assuming that appears in the left half of the sync signal for most cases. Indicates the horizontal frequency of the currently projected video signal. Use this setting to correct solid white or solid black that appears in projected images Use...
... LAMP MODE is being input. The image may appear. • The adjustable range of the vertical position varies depending on the screen. TYPE Feature description This menu shows a lamp operating time (hour) calculated assuming that appears in the left half of the sync signal for most cases. Indicates the horizontal frequency of the currently projected video signal. Use this setting to correct solid white or solid black that appears in projected images Use...
User Manual
Page 23
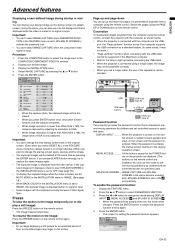
... factory default screen is no signal is input. If you select RESET ALL in the menu become unselectable. Press the ENTER button. • The screen for the POWER button on the projector are enabled.) You can go up before connecting the USB cable. • When the projector is connected using a longer cable, the image may not work.) • "Page up/down the pages of XGA is only captured. INSTALLATION WALL SCREEN BEIGE LAMP MODE AUTO POWER ON AUTO POWER OFF IMAGE...
... factory default screen is no signal is input. If you select RESET ALL in the menu become unselectable. Press the ENTER button. • The screen for the POWER button on the projector are enabled.) You can go up before connecting the USB cable. • When the projector is connected using a longer cable, the image may not work.) • "Page up/down the pages of XGA is only captured. INSTALLATION WALL SCREEN BEIGE LAMP MODE AUTO POWER ON AUTO POWER OFF IMAGE...
User Manual
Page 25
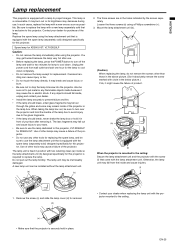
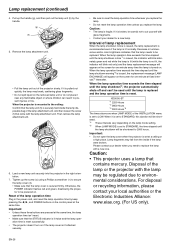
... of the projector. • Do not use the lamp attachment unit that is mounted to project images. Remove the screw (c) and slide the lamp cover (d) for XD500U-ST. The lass fragments may cause a failure of the lamp. In such cases, replace the lamp with the spare lamp (separately sold ) designed specifically for this projector is equipped with a lamp to the ceiling: Secure the lamp attachment unit and the projector with the screw (f) that is...
... of the projector. • Do not use the lamp attachment unit that is mounted to project images. Remove the screw (c) and slide the lamp cover (d) for XD500U-ST. The lass fragments may cause a failure of the lamp. In such cases, replace the lamp with the spare lamp (separately sold ) designed specifically for this projector is equipped with a lamp to the ceiling: Secure the lamp attachment unit and the projector with the screw (f) that is...
User Manual
Page 26
... lamp shutdown warning*2 is set to be careful not to 2000 hours. When the lamp operation time exceeds the time elapsed until the lamp is replaced and the lamp operation time is reset successfully. • The projector doesn't turn on the screen for a new lamp. Lamp replacement (continued) 4. Pull up the screw (c) using a Phillips screwdriver (+) to replace the lamp with the lamp attachment unit. And then loosen the screw (f) that the STATUS indicator is lit twice and the lamp operation time is reset. Then remove...
... lamp shutdown warning*2 is set to be careful not to 2000 hours. When the lamp operation time exceeds the time elapsed until the lamp is replaced and the lamp operation time is reset successfully. • The projector doesn't turn on the screen for a new lamp. Lamp replacement (continued) 4. Pull up the screw (c) using a Phillips screwdriver (+) to replace the lamp with the lamp attachment unit. And then loosen the screw (f) that the STATUS indicator is lit twice and the lamp operation time is reset. Then remove...

User Manual
Page 27
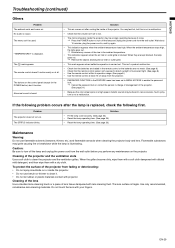
... for repair of the projector, check the following proce- Unplug the power cord from the wall outlet and contact your dealer. Blinking red / green Steady or Unplug the power cord from the wall outlet. 2. Power turns off before the lamp was cooled down sufficiently last time, the fan may not turn on the POWER indicator. • Set SCART INPUT in the FEATURE menu to light up on rare occasions. Press the POWER button. •...
... for repair of the projector, check the following proce- Unplug the power cord from the wall outlet and contact your dealer. Blinking red / green Steady or Unplug the power cord from the wall outlet. 2. Power turns off before the lamp was cooled down sufficiently last time, the fan may not turn on the POWER indicator. • Set SCART INPUT in the FEATURE menu to light up on rare occasions. Press the POWER button. •...

User Manual
Page 28
... the cable connected to eliminate flicker. • Adjust TRACKING and FINE SYNC. In such cases, use . Troubleshooting (continued) Images are shaking. Projected images are displaced. • Check that they are blurred. • Adjust the focus. (See page 13.) • Clean the lens. • Press the W or X button on the remote has been pressed, or the Lamp mode setting has changed, images may visibly or invisibly be different because of difference in the SIGNAL menu...
... the cable connected to eliminate flicker. • Adjust TRACKING and FINE SYNC. In such cases, use . Troubleshooting (continued) Images are shaking. Projected images are displaced. • Check that they are blurred. • Adjust the focus. (See page 13.) • Clean the lens. • Press the W or X button on the remote has been pressed, or the Lamp mode setting has changed, images may visibly or invisibly be different because of difference in the SIGNAL menu...
User Manual
Page 29
... temperature stays high, tJhe lamp goes out. When they are not weak. (See page 8.) • Check that the volume isn't set to MENU ACCESS to enable the password Jlock.Cancel the password lock or contact the person in rare occasions. The STATUS indicator blinks. The lens surface is output. No audio is fragile. The buttons on . Flammable substances may be used. Use only recommended, nonabrasive lens-cleaning materials. The remote control...
... temperature stays high, tJhe lamp goes out. When they are not weak. (See page 8.) • Check that the volume isn't set to MENU ACCESS to enable the password Jlock.Cancel the password lock or contact the person in rare occasions. The STATUS indicator blinks. The lens surface is output. No audio is fragile. The buttons on . Flammable substances may be used. Use only recommended, nonabrasive lens-cleaning materials. The remote control...

User Manual
Page 30
...) Steady green Steady green The power is on. (Normal condition) Abnormal condition POWER STATUS CONDITION NOTE The POWER button cannot be used to switch between on . (See page 26.) Blinking red The lamp operation time exceeds the time elapsed until the lamp shutdown notice while the power is high. • Clean the ventilation grilles. • Relocate the projector to possible problems. If these problem persist, turn the projector off and consult your dealer. Change with...
...) Steady green Steady green The power is on. (Normal condition) Abnormal condition POWER STATUS CONDITION NOTE The POWER button cannot be used to switch between on . (See page 26.) Blinking red The lamp operation time exceeds the time elapsed until the lamp shutdown notice while the power is high. • Clean the ventilation grilles. • Relocate the projector to possible problems. If these problem persist, turn the projector off and consult your dealer. Change with...
User Manual
Page 31
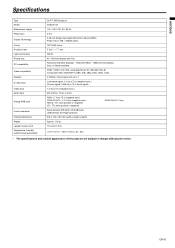
EN-31 ENGLISH Specifications Type Model Rated power supply Rated input Display Technology Colors Projection lens Light source lamp Picture size PC compatibility Video compatibility Speaker S-video input Video input Audio input Analog RGB input Control connector Outside dimensions Weight Length of power cord Temperature, humidity (performance guaranteed) DLP™ DATA projector XD500U-ST 100 - 240 V AC, 50 / 60 Hz 3.9 A 0.55-inch Single chip Digital Micromirror Device (DMD) Pixels 1024 x 768 = 786432 pixels 16770000 colors F 2.8, f = 7.7 mm 280 W 40 - 300 inch (aspect ratio 4:3)...
EN-31 ENGLISH Specifications Type Model Rated power supply Rated input Display Technology Colors Projection lens Light source lamp Picture size PC compatibility Video compatibility Speaker S-video input Video input Audio input Analog RGB input Control connector Outside dimensions Weight Length of power cord Temperature, humidity (performance guaranteed) DLP™ DATA projector XD500U-ST 100 - 240 V AC, 50 / 60 Hz 3.9 A 0.55-inch Single chip Digital Micromirror Device (DMD) Pixels 1024 x 768 = 786432 pixels 16770000 colors F 2.8, f = 7.7 mm 280 W 40 - 300 inch (aspect ratio 4:3)...

