
User Manual
Page 3
... of their respective holders. ENGLISH Contents Important safeguards...4 Overview ...6 Remote control ...8 Installation ...9 Basic connections...10 Preparation ...12 Basic operation ...13 Menu operation...16 Image adjustment ...21 Advanced features ...23 Lamp replacement ...25 Troubleshooting ...27 Indicators ...30 Specifications ...31 Declaration of Conformity Model Number : XD500U-ST Trade Name : MITSUBISHI ELECTRIC Responsible party : Mitsubishi Digital...
... of their respective holders. ENGLISH Contents Important safeguards...4 Overview ...6 Remote control ...8 Installation ...9 Basic connections...10 Preparation ...12 Basic operation ...13 Menu operation...16 Image adjustment ...21 Advanced features ...23 Lamp replacement ...25 Troubleshooting ...27 Indicators ...30 Specifications ...31 Declaration of Conformity Model Number : XD500U-ST Trade Name : MITSUBISHI ELECTRIC Responsible party : Mitsubishi Digital...

User Manual
Page 6
...VIDEO terminal 10 Lock bar 11 SERIAL (RS-232C) terminal (D-SUB 9-pin) 12 AUDIO L/R terminals 13 Kensington Lock Kensington Lock This projector has a Kensington Security Standard connector for use with Kensington MicroSaver Security System. Kensington Technology Group 2855 Campus Drive San Mateo, CA 94403...)572-9675 Please contact Kensington Technology Group below. Overview 13 21 3 5 49 12 1 FOCUS ring 2 Control panel 3 Air inlet grille 4 Remote control sensor (Front) 5 Air inlet grille 6 Air outlet grille 7 Terminal board 8 Speaker 9 Adjustment feet (front) 10 Adjustment feet (rear)...
...VIDEO terminal 10 Lock bar 11 SERIAL (RS-232C) terminal (D-SUB 9-pin) 12 AUDIO L/R terminals 13 Kensington Lock Kensington Lock This projector has a Kensington Security Standard connector for use with Kensington MicroSaver Security System. Kensington Technology Group 2855 Campus Drive San Mateo, CA 94403...)572-9675 Please contact Kensington Technology Group below. Overview 13 21 3 5 49 12 1 FOCUS ring 2 Control panel 3 Air inlet grille 4 Remote control sensor (Front) 5 Air inlet grille 6 Air outlet grille 7 Terminal board 8 Speaker 9 Adjustment feet (front) 10 Adjustment feet (rear)...

User Manual
Page 7
... used in the KEY- 15 STONE adjustment in addition to the volume control. EN-7 ENGLISH Overview (continued) Bottom side 2 1 Adjustment feet (rear) 2 Adjustment feet (front) 1 Remote control ON STANDBY 1 ON button 1 POWER 8 2 MAGNIFY button MAGNIFY ASPECT 3 VOLUME UP, DOWN buttons 2 9 4 KEYSTONE button UP 3 VOL PAGE KEYSTONE DOWN 4 5 MENU button 10 6 ENTER...
... used in the KEY- 15 STONE adjustment in addition to the volume control. EN-7 ENGLISH Overview (continued) Bottom side 2 1 Adjustment feet (rear) 2 Adjustment feet (front) 1 Remote control ON STANDBY 1 ON button 1 POWER 8 2 MAGNIFY button MAGNIFY ASPECT 3 VOLUME UP, DOWN buttons 2 9 4 KEYSTONE button UP 3 VOL PAGE KEYSTONE DOWN 4 5 MENU button 10 6 ENTER...

User Manual
Page 8
...batteries. 1. Replace the back cover. When the remote control is not used . Inverted fluorescent light, if located near the projector, may interfere the remote control. • When you use the remote control too close to the remote control sensor, the remote control may cause explosion. • Only Carbon-... with your doctor. However, the operation distance varies depending on the remote control. • Keep batteries out of reach of batteries comes in the direction of the projector. Keep a distance at the remote control sensor of the arrow. 2. Load the batteries making sure that...
...batteries. 1. Replace the back cover. When the remote control is not used . Inverted fluorescent light, if located near the projector, may interfere the remote control. • When you use the remote control too close to the remote control sensor, the remote control may cause explosion. • Only Carbon-... with your doctor. However, the operation distance varies depending on the remote control. • Keep batteries out of reach of batteries comes in the direction of the projector. Keep a distance at the remote control sensor of the arrow. 2. Load the batteries making sure that...
User Manual
Page 12
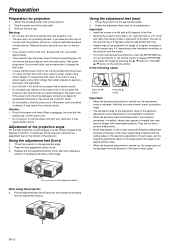
... or with its aspect ratio 4:3, depending on the installation conditions of the projector and the screen. • To correct vertical keystone distortion, press the KEYSTONE button on the projector or the remote control to the power cord. Foot adjustment button After using other voltages or...pin grounding type. Press the S button. Preparation Preparation for fine adjustment. Attach the provided power cord to the floor. Adjustment of the projector. In the following cases: Press the T button. Note that the power cord for the U.S., Europe and U.K. Important: • Install...
... or with its aspect ratio 4:3, depending on the installation conditions of the projector and the screen. • To correct vertical keystone distortion, press the KEYSTONE button on the projector or the remote control to the power cord. Foot adjustment button After using other voltages or...pin grounding type. Press the S button. Preparation Preparation for fine adjustment. Attach the provided power cord to the floor. Adjustment of the projector. In the following cases: Press the T button. Note that the power cord for the U.S., Europe and U.K. Important: • Install...

User Manual
Page 13
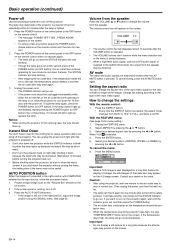
... POWER Red Green Important: • If the lamp exceptionally turned off due to ensure the safety in case of the VIDEO button on the remote control to interference with the screen surface and is not a product malfunction. • Regardless of the setting of the consent and put it ... leakage breaker to supply the power to install it again in the consent about 10 minutes later. • Do not cover the lens with the projector, use , the fans may start rotating when the power cord is pressed. ENGLISH Basic operation 4 FOCUS 5 3 5 3, 1, 2 ON STANDBY POWER MAGNIFY ASPECT 1, ...
... POWER Red Green Important: • If the lamp exceptionally turned off due to ensure the safety in case of the VIDEO button on the remote control to interference with the screen surface and is not a product malfunction. • Regardless of the setting of the consent and put it ... leakage breaker to supply the power to install it again in the consent about 10 minutes later. • Do not cover the lens with the projector, use , the fans may start rotating when the power cord is pressed. ENGLISH Basic operation 4 FOCUS 5 3 5 3, 1, 2 ON STANDBY POWER MAGNIFY ASPECT 1, ...
User Manual
Page 14
... the power cord. • The POWER indicator will go out and the STATUS indicator will appear on the remote control. • The message "POWER OFF? If you want to turn the projector back on right after shutting it down because the lamp's life may be shortened. (Wait about 10 seconds ... lamp will take another one minute to height of width to cool down the projector, be sure to the AUDIO IN terminal, the output from the wall outlet. • The lamp can change the settings: With the remote control: 1. Important: • Do not display a still picture for cancel.) 2. Press the...
... the power cord. • The POWER indicator will go out and the STATUS indicator will appear on the remote control. • The message "POWER OFF? If you want to turn the projector back on right after shutting it down because the lamp's life may be shortened. (Wait about 10 seconds ... lamp will take another one minute to height of width to cool down the projector, be sure to the AUDIO IN terminal, the output from the wall outlet. • The lamp can change the settings: With the remote control: 1. Important: • Do not display a still picture for cancel.) 2. Press the...

User Manual
Page 18
... when the power cord is displayed. When IMAGE is selected, the splash screen is powered on the floor. Select this mode is pressed. Use the remote control to turn on the 1 to view images in the FEATURE menu is set to SPLASH ID, as the password lock is no signal input... floor. The LAMP MODE is set to either STANDARD or LOW depending on the setting last selected, and you keep projecting images with the projector set the projector at the ceiling. Select ON when you want to capture the screen for an extended period of the screen or wall on which images...
... when the power cord is displayed. When IMAGE is selected, the splash screen is powered on the floor. Select this mode is pressed. Use the remote control to turn on the 1 to view images in the FEATURE menu is set to SPLASH ID, as the password lock is no signal input... floor. The LAMP MODE is set to either STANDARD or LOW depending on the setting last selected, and you keep projecting images with the projector set the projector at the ceiling. Select ON when you want to capture the screen for an extended period of the screen or wall on which images...
User Manual
Page 23
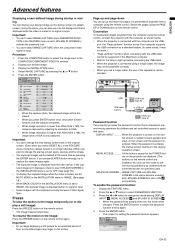
... temporarily (or to select PASSWORD FUNCTION. 3. Display your desired image as the background that is entered, the startup screen switches to XGA. • When image resolution is only captured. To resume the motion in the menu become unselectable. When the password is intended ...MENU ACCESS All the buttons except for an extended period of the repeater is connected using the remote control, connect the projector with the computer as shown below. • When the projector is connected with the USB cable cannot be displayed. • When you pressed ENTER button wrongly...
... temporarily (or to select PASSWORD FUNCTION. 3. Display your desired image as the background that is entered, the startup screen switches to XGA. • When image resolution is only captured. To resume the motion in the menu become unselectable. When the password is intended ...MENU ACCESS All the buttons except for an extended period of the repeater is connected using the remote control, connect the projector with the computer as shown below. • When the projector is connected with the USB cable cannot be displayed. • When you pressed ENTER button wrongly...

User Manual
Page 24
... To use the MAGNIFY mode: 1. EN-24 opt. Enter a 4 - 8 digit password using the S, T, W or X buttons on the remote control. • You can magnify the image to view the details. • The MAGNIFY mode doesn't function with video or S-video signal. Press... you can't adjust the volume. Press the MAGNIFY button. • You can select the area to be magnified by pressing the S, T, W or X button on the remote control as shown below . (S=1, X=2, T=3, W=4) 6. PASSWORD CONFIRM 1 4 2 3 O K : ENTER CANCEL : MENU 6. Enter a 4 - 8 digit password using the same steps. 9. Display the...
... To use the MAGNIFY mode: 1. EN-24 opt. Enter a 4 - 8 digit password using the S, T, W or X buttons on the remote control. • You can magnify the image to view the details. • The MAGNIFY mode doesn't function with video or S-video signal. Press... you can't adjust the volume. Press the MAGNIFY button. • You can select the area to be magnified by pressing the S, T, W or X button on the remote control as shown below . (S=1, X=2, T=3, W=4) 6. PASSWORD CONFIRM 1 4 2 3 O K : ENTER CANCEL : MENU 6. Enter a 4 - 8 digit password using the same steps. 9. Display the...

User Manual
Page 28
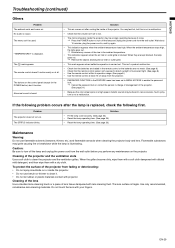
... SIGNAL menu. (See page 22.) • When the input signal is as small as possible. Projected images are seen on the remote control to change the output resolution of the computer, contact the manufacturer of your computer. In this case, readjust the keystone so that... (See page 25.) Projected images are not a sign of system malfunctions. This isn't a product malfunction. In such a case, you use the projector without applying the keystone adjustment. (See page 12.) Projected images are not broken. Projected images are displaced. • Check that the cable connected to ...
... SIGNAL menu. (See page 22.) • When the input signal is as small as possible. Projected images are seen on the remote control to change the output resolution of the computer, contact the manufacturer of your computer. In this case, readjust the keystone so that... (See page 25.) Projected images are not a sign of system malfunctions. This isn't a product malfunction. In such a case, you use the projector without applying the keystone adjustment. (See page 12.) Projected images are not broken. Projected images are displaced. • Check that the cable connected to ...
User Manual
Page 29
...When they are not weak. (See page 8.) • Check that the volume isn't set to MENU ACCESS to clean the projector and the ventilation grilles. The remote control doesn't function easily or at a high speed, metallic sounds may be used. Solution • This air comes out after ...the lamp is carried out. You may ignite causing fire or breakdown while the lamp is blocked. from the projector. • PASSWORD ...
...When they are not weak. (See page 8.) • Check that the volume isn't set to MENU ACCESS to clean the projector and the ventilation grilles. The remote control doesn't function easily or at a high speed, metallic sounds may be used. Solution • This air comes out after ...the lamp is carried out. You may ignite causing fire or breakdown while the lamp is blocked. from the projector. • PASSWORD ...
User Manual
Page 32
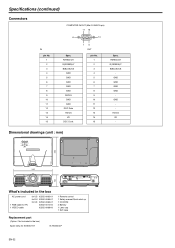
...-0066-01 for UK 02552-0065-01 02552-0072-00 02552-0068-00 1 Remote control 1 Safety manual/Quick start up 1 CD-ROM 2 Battery 1 Lens cap 1 Soft case Replacement part (Option / Not included in the box) Spare lamp for XD500U-ST VLT-XD520LP EN-32 Specifications (continued) Connectors IN pin No. 1 2 3 4 5 6 7 8 9 10 11 12...
...-0066-01 for UK 02552-0065-01 02552-0072-00 02552-0068-00 1 Remote control 1 Safety manual/Quick start up 1 CD-ROM 2 Battery 1 Lens cap 1 Soft case Replacement part (Option / Not included in the box) Spare lamp for XD500U-ST VLT-XD520LP EN-32 Specifications (continued) Connectors IN pin No. 1 2 3 4 5 6 7 8 9 10 11 12...