
User Manual
Page 3
DLP™, Digital Micromirror Device and DMD are trademarks or registered trademarks of Texas Instruments. Trademark, Registered trademark Macintosh is subject to the ......9 Basic connections...10 Preparation ...12 Basic operation ...13 Menu operation...15 Image adjustment ...18 Advanced feature...20 Lamp replacement ...22 Troubleshooting ...23 Indicators ...26 Specifications ...27 Declaration of Conformity Model Number : XD110U/XD110R/SD110U/SD110R Trade Name : MITSUBISHI ELECTRIC Responsible party : Mitsubishi Digital Electronics America, Inc. 9351 Jeronimo Road, Irvine, ...
DLP™, Digital Micromirror Device and DMD are trademarks or registered trademarks of Texas Instruments. Trademark, Registered trademark Macintosh is subject to the ......9 Basic connections...10 Preparation ...12 Basic operation ...13 Menu operation...15 Image adjustment ...18 Advanced feature...20 Lamp replacement ...22 Troubleshooting ...23 Indicators ...26 Specifications ...27 Declaration of Conformity Model Number : XD110U/XD110R/SD110U/SD110R Trade Name : MITSUBISHI ELECTRIC Responsible party : Mitsubishi Digital Electronics America, Inc. 9351 Jeronimo Road, Irvine, ...
User Manual
Page 7
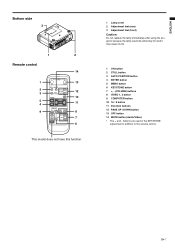
... Bottom side 3 1 2 Remote control 14 1 13 2 3 12 10 5 4 11 9 8 7 6 This model does not have this function. 1 Lamp cover 2 Adjustment feet (rear) 3 Adjustment feet (front) Caution: Do not replace the lamp immediately after using the projector because the lamp would be extremely hot and it may cause burns. 1 ON button 2 STILL button 3 AUTO POSITION button 4 ENTER...
... Bottom side 3 1 2 Remote control 14 1 13 2 3 12 10 5 4 11 9 8 7 6 This model does not have this function. 1 Lamp cover 2 Adjustment feet (rear) 3 Adjustment feet (front) Caution: Do not replace the lamp immediately after using the projector because the lamp would be extremely hot and it may cause burns. 1 ON button 2 STILL button 3 AUTO POSITION button 4 ENTER...
User Manual
Page 12
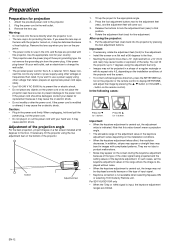
...feet (rear) to the floor. • Slanting the projector more than rated. Important: • If necessary, rotate the adjustment feet (front) for replacement because it may not be displayed correctly because of the... the power plug, not the power cord. • Do not plug in a shape of the lamp. It may not be projected in or out the power cord with this value doesn't mean a...to the projector. 2. button on . • The lens cap is carried out, the image may cause electric shock. Caution: • Plug in the wall outlet. 3. Note that position. 4. For SD110U/SD110R only ...
...feet (rear) to the floor. • Slanting the projector more than rated. Important: • If necessary, rotate the adjustment feet (front) for replacement because it may not be displayed correctly because of the... the power plug, not the power cord. • Do not plug in a shape of the lamp. It may not be projected in or out the power cord with this value doesn't mean a...to the projector. 2. button on . • The lens cap is carried out, the image may cause electric shock. Caution: • Plug in the wall outlet. 3. Note that position. 4. For SD110U/SD110R only ...
User Manual
Page 13
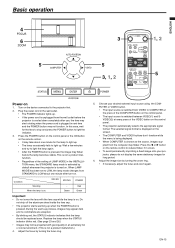
...long period. 6. Press the W or X button on the control panel. • The projector automatically selects the appropriate signal format. Turn on . Adjust the image size by turning the focus ring. 5. Replace the lamp when the STATUS indicator blinks red. (See page 23 and 26.) • Images may ...not be replaced soon. Green POWER Red Green Important: • Do not cover the lens with good quality in the INSTALLATION menu, the STANDARD lamp mode is activated by default whenever the projector is turned on the screen. • The COMPUTER ...
...long period. 6. Press the W or X button on the control panel. • The projector automatically selects the appropriate signal format. Turn on . Adjust the image size by turning the focus ring. 5. Replace the lamp when the STATUS indicator blinks red. (See page 23 and 26.) • Images may ...not be replaced soon. Green POWER Red Green Important: • Do not cover the lens with good quality in the INSTALLATION menu, the STANDARD lamp mode is activated by default whenever the projector is turned on the screen. • The COMPUTER ...
User Manual
Page 14
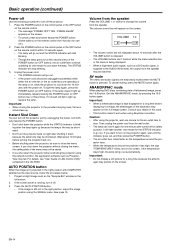
..."POWER OFF? EN-14 Basic operation (continued) Power-off Use the following procedure to turn it off. 3. If the lamp doesn't light up , replace the lamp. If it down because the lamp's life may be distorted. Project a bright image such as a DVD audio signal, is supplied to light up immediately, ..., follow the procedure below. 1. If the screen saver is still not in the CD-ROM. If you shut down the projector while controlling the projector using the projector, wait one minute for one minute for cancel.) 2. ing after shutting it should still fail to the AUDIO IN terminal, ...
..."POWER OFF? EN-14 Basic operation (continued) Power-off Use the following procedure to turn it off. 3. If the lamp doesn't light up , replace the lamp. If it down because the lamp's life may be distorted. Project a bright image such as a DVD audio signal, is supplied to light up immediately, ..., follow the procedure below. 1. If the screen saver is still not in the CD-ROM. If you shut down the projector while controlling the projector using the projector, wait one minute for one minute for cancel.) 2. ing after shutting it should still fail to the AUDIO IN terminal, ...
User Manual
Page 16
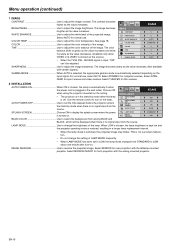
.... Select AUTO for film sources. 2 INSTALLATION AUTO POWER ON When ON is chosen, the lamp is automatically lit when the power cord is plugged in a longer lamp replacement interval. • When the lamp mode is reduced, resulting in the wall outlet. COLOR TEMP Use to adjust the image brightness... SHARPNESS Use to adjust the image contrast. For normal use . Select STAN- DARD for computer sources. Choose ON opt. XGA60 when using the projector mounted on . SPLASH SCREEN Choose ON to purple as the source.) GAMMA MODE AUTO • When the TV50 (PAL, SECAM) signal is ...
.... Select AUTO for film sources. 2 INSTALLATION AUTO POWER ON When ON is chosen, the lamp is automatically lit when the power cord is plugged in a longer lamp replacement interval. • When the lamp mode is reduced, resulting in the wall outlet. COLOR TEMP Use to adjust the image brightness... SHARPNESS Use to adjust the image contrast. For normal use . Select STAN- DARD for computer sources. Choose ON opt. XGA60 when using the projector mounted on . SPLASH SCREEN Choose ON to purple as the source.) GAMMA MODE AUTO • When the TV50 (PAL, SECAM) signal is ...

User Manual
Page 22
..., the indicator will blink red only) and the lamp replacement message will be sure to 2000 hours. Lamp replacement When the lamp no longer functions, replace it with it. 1. When taking the lamp box out, be shortened to turn over the projector and hold it . The lass fragments may fall ... that contains mercury. Put the handle back to cut yourself with the lamp may get burned because the lamp very hot after using the projector. Disposal of the INSTALLATION menu is broken, be replaced. XD110U/XD110R/SD110U/SD110R *1 3000 Hours *2 3800 Hours *3 4000 Hours*5 The times above ...
..., the indicator will blink red only) and the lamp replacement message will be sure to 2000 hours. Lamp replacement When the lamp no longer functions, replace it with it. 1. When taking the lamp box out, be shortened to turn over the projector and hold it . The lass fragments may fall ... that contains mercury. Put the handle back to cut yourself with the lamp may get burned because the lamp very hot after using the projector. Disposal of the INSTALLATION menu is broken, be replaced. XD110U/XD110R/SD110U/SD110R *1 3000 Hours *2 3800 Hours *3 4000 Hours*5 The times above ...
User Manual
Page 23
... disappear. Don't expose the air outlet grilles to light the lamp again. • If the projector was turned off . 3. In such cases, wait a few minutes and try to hot air emitted from the wall outlet and contact your dealer. EN-23 Replace the lamp in this case. • Turn on about 10 minutes. 4. Images...
... disappear. Don't expose the air outlet grilles to light the lamp again. • If the projector was turned off . 3. In such cases, wait a few minutes and try to hot air emitted from the wall outlet and contact your dealer. EN-23 Replace the lamp in this case. • Turn on about 10 minutes. 4. Images...
User Manual
Page 24
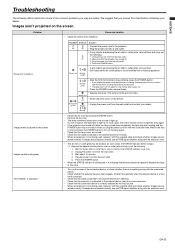
... (continued) Images aren't projected correctly. Black dots are seen on projected images. Rainbow blur appears in projected images. Only the motion areas in a DLP system and is carried out, the image may stay lit or out, but such symptom is correctly set. (See page 17.) • Check that....) • Replace the lamp. (See page 22.) • Remove the lens cap. • Adjust the focus. (See page 13.) • Clean the lens. • Remove the lens cap. • Press the W or X button on rare occasion. Adjust the SIGNAL menu. (See page 19.) • Adjust the projector and the screen...
... (continued) Images aren't projected correctly. Black dots are seen on projected images. Rainbow blur appears in projected images. Only the motion areas in a DLP system and is carried out, the image may stay lit or out, but such symptom is correctly set. (See page 17.) • Check that....) • Replace the lamp. (See page 22.) • Remove the lens cap. • Adjust the focus. (See page 13.) • Clean the lens. • Remove the lens cap. • Press the W or X button on rare occasion. Adjust the SIGNAL menu. (See page 19.) • Adjust the projector and the screen...
User Manual
Page 25
... and solution • This air comes out as a result of lens tissue dampened with your fingers. When they are kept blocked, the lamp gJoesRoeumt.ove the objects blocking the air inlet or outlet grille. • This mark appears when ineffective operation is not a malfunction. Such ...• This indication appears when the air inlet or outlet grille is output. The mark appears. Cleaning of the projector from the air outlet grilles. The lens surface is replaced, check the following. Problem The power isn't turned on the control panel (except for the POWER button) don't...
... and solution • This air comes out as a result of lens tissue dampened with your fingers. When they are kept blocked, the lamp gJoesRoeumt.ove the objects blocking the air inlet or outlet grille. • This mark appears when ineffective operation is not a malfunction. Such ...• This indication appears when the air inlet or outlet grille is output. The mark appears. Cleaning of the projector from the air outlet grilles. The lens surface is replaced, check the following. Problem The power isn't turned on the control panel (except for the POWER button) don't...

User Manual
Page 26
... cannot be used to possible problems. If these problem persist, turn the projector off . (See page 22.) Replace the lamp. The following offer solutions to switch between on . (See page 22.) Blinking red The lamp operation time exceeds the time elapsed until the lamp shutdown notice while the power is off and consult your dealer.
... cannot be used to possible problems. If these problem persist, turn the projector off . (See page 22.) Replace the lamp. The following offer solutions to switch between on . (See page 22.) Blinking red The lamp operation time exceeds the time elapsed until the lamp shutdown notice while the power is off and consult your dealer.
User Manual
Page 28
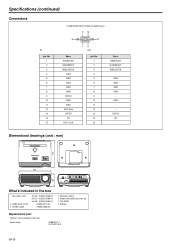
... for UK 02552-0065-01 02552-0072-00 02552-0068-00 1 Remote control 1 Safety manual/Quick start up 1 CD-ROM 2 Battery Replacement part (Option / Not included in the box) Spare lamp 499B045-10 VLT-XD110LP EN-28 R(RED)/CR G(GREEN)/Y B(BLUE)/CB GND GND GND GND GND DDC5V GND GND DDC Data...
... for UK 02552-0065-01 02552-0072-00 02552-0068-00 1 Remote control 1 Safety manual/Quick start up 1 CD-ROM 2 Battery Replacement part (Option / Not included in the box) Spare lamp 499B045-10 VLT-XD110LP EN-28 R(RED)/CR G(GREEN)/Y B(BLUE)/CB GND GND GND GND GND DDC5V GND GND DDC Data...
