User Manual
Page 2
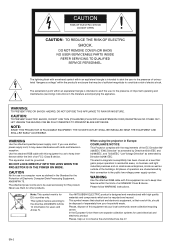
... operating and maintenance (servicing) instructions in the Standard for other products. When using the projector in ! WARNING Use the attached specified power supply cord. DO NOT LOOK DIRECTLY INTO THE LENS WHEN THE PROJECTOR IS IN THE POWER ON MODE. Please, dispose of an EN55022 Class B device. This symbol mark is for users and Annex IV. WARNING Use the attached RGB cable with the requirements of Electronic Computer/Data...
... operating and maintenance (servicing) instructions in the Standard for other products. When using the projector in ! WARNING Use the attached specified power supply cord. DO NOT LOOK DIRECTLY INTO THE LENS WHEN THE PROJECTOR IS IN THE POWER ON MODE. Please, dispose of an EN55022 Class B device. This symbol mark is for users and Annex IV. WARNING Use the attached RGB cable with the requirements of Electronic Computer/Data...
User Manual
Page 3
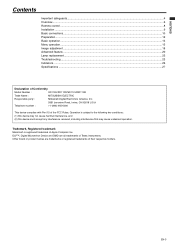
... safeguards...4 Overview ...6 Remote control ...8 Installation ...9 Basic connections...10 Preparation ...12 Basic operation ...13 Menu operation...15 Image adjustment ...18 Advanced feature...20 Lamp replacement ...22 Troubleshooting ...23 Indicators ...26 Specifications ...27 Declaration of Conformity Model Number : XD110U/XD110R/SD110U/SD110R Trade Name : MITSUBISHI ELECTRIC Responsible party : Mitsubishi Digital Electronics America, Inc. 9351 Jeronimo Road, Irvine, CA 92618 U.S.A Telephone number : +1-(949) 465-6000 This device complies with Part 15 of their...
... safeguards...4 Overview ...6 Remote control ...8 Installation ...9 Basic connections...10 Preparation ...12 Basic operation ...13 Menu operation...15 Image adjustment ...18 Advanced feature...20 Lamp replacement ...22 Troubleshooting ...23 Indicators ...26 Specifications ...27 Declaration of Conformity Model Number : XD110U/XD110R/SD110U/SD110R Trade Name : MITSUBISHI ELECTRIC Responsible party : Mitsubishi Digital Electronics America, Inc. 9351 Jeronimo Road, Irvine, CA 92618 U.S.A Telephone number : +1-(949) 465-6000 This device complies with Part 15 of their...

User Manual
Page 4
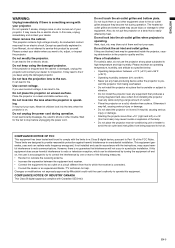
... projector. 14. Replacement parts When replacement parts are required, be followed. 5. Ventilation Slots and openings in the operating instructions should be moved with care. If you follow the manufacturer's instructions and should be retained for service. 16. Read instructions All the safety and operating instructions should be adhered to protect it . Power sources This projector should be routed so that the projector is operated. 2. Damage requiring service Unplug this projector...
... projector. 14. Replacement parts When replacement parts are required, be followed. 5. Ventilation Slots and openings in the operating instructions should be moved with care. If you follow the manufacturer's instructions and should be retained for service. 16. Read instructions All the safety and operating instructions should be adhered to protect it . Power sources This projector should be routed so that the projector is operated. 2. Damage requiring service Unplug this projector...
User Manual
Page 5
... inadvertent contact may cause fire or electric shock. It may be determined by turning the equipment off and on a solid, vibration-free surface. Please maintain an operating temperature, humidity, and altitude as specifically explained in a particular installation. vent the projector from installing the projector near any cable carrying a large amount of the FCC Rules. Please contact your dealer. If you...
... inadvertent contact may cause fire or electric shock. It may be determined by turning the equipment off and on a solid, vibration-free surface. Please maintain an operating temperature, humidity, and altitude as specifically explained in a particular installation. vent the projector from installing the projector near any cable carrying a large amount of the FCC Rules. Please contact your dealer. If you...

User Manual
Page 8
... the projector. Keep a distance at the remote control sensor of in fire. • Be sure to handle the battery according to the remote control sensor, the remote control may explode if misused. spring side, and make sure to +, and - Remote control Battery installation Use two AAA size batteries. 1. Load the batteries making sure that they are positioned correctly (+ to set them with water. Replace the back cover...
... the projector. Keep a distance at the remote control sensor of in fire. • Be sure to handle the battery according to the remote control sensor, the remote control may explode if misused. spring side, and make sure to +, and - Remote control Battery installation Use two AAA size batteries. 1. Load the batteries making sure that they are positioned correctly (+ to set them with water. Replace the back cover...
User Manual
Page 11
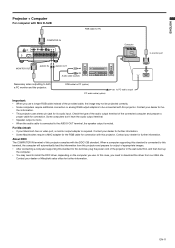
... cable for output of appropriate images. • After connecting a computer supporting this standard to install the DDC driver, depending on the computer you use . In this case, you need to be connected with Mini D-SUB COMPUTER IN RGB cable for its audio input. RGB cable for PC (option) PC audio cable (option) to PC audio output Important: • When you use a longer RGB cable instead of the projector...
... cable for output of appropriate images. • After connecting a computer supporting this standard to install the DDC driver, depending on the computer you use . In this case, you need to be connected with Mini D-SUB COMPUTER IN RGB cable for its audio input. RGB cable for PC (option) PC audio cable (option) to PC audio output Important: • When you use a longer RGB cable instead of the projector...
User Manual
Page 12
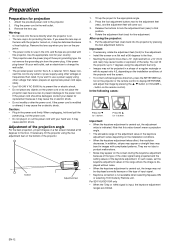
... screen installed at 120 V. Adjustment of the keystone adjustment. If necessary, tilt the projector using the two adjustment feet on the screen during the keystone adjustment because of the type of the video signal being projected and the setting values of the projection angle For the best projection, project images on the projector or the remote control to display KEYSTONE, and adjust the image by pressing the S, T button (or VOLUME +, - Release the buttons to lock the adjustment feet (rear) to change...
... screen installed at 120 V. Adjustment of the keystone adjustment. If necessary, tilt the projector using the two adjustment feet on the screen during the keystone adjustment because of the type of the video signal being projected and the setting values of the projection angle For the best projection, project images on the projector or the remote control to display KEYSTONE, and adjust the image by pressing the S, T button (or VOLUME +, - Release the buttons to lock the adjustment feet (rear) to change...
User Manual
Page 13
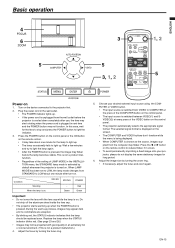
... VIDEO button on the control panel. • The input source is pressed, the image may start rotating when the power cord is turned on . Choose your projector, please do not display the same stationary images for long period. 6. Adjust the image size by turning the focus ring. 5. Wait a few minutes and try to LOW about one minute after use, the fans may flicker before the projector is cooled down completely after turn-on . Adjust the focus by turning...
... VIDEO button on the control panel. • The input source is pressed, the image may start rotating when the power cord is turned on . Choose your projector, please do not display the same stationary images for long period. 6. Adjust the image size by turning the focus ring. 5. Wait a few minutes and try to LOW about one minute after use, the fans may flicker before the projector is cooled down completely after turn-on . Adjust the focus by turning...
User Manual
Page 14
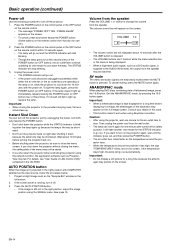
..., adjust the image position using Keystone correction. blinks red on the screen. The STATUS indicator will go out. Project a bright image such as the "Recycle Bin" window on the projector again, wait until the indicator goes out, and then press the POWER button. • The air outlet fans rotate faster as the input source, follow the procedure below. 1. Exit the ANAMORPHIC mode, by unplugging the power cord without pressing the POWER button. • Don't shut down the projector...
..., adjust the image position using Keystone correction. blinks red on the screen. The STATUS indicator will go out. Project a bright image such as the "Recycle Bin" window on the projector again, wait until the indicator goes out, and then press the POWER button. • The air outlet fans rotate faster as the input source, follow the procedure below. 1. Exit the ANAMORPHIC mode, by unplugging the power cord without pressing the POWER button. • Don't shut down the projector...

User Manual
Page 15
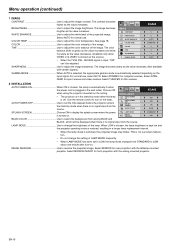
... SHARPNESS *1 ±5 GAMMA MODE AUTO, DYNAMIC, STANDARD, THEATER INSTALLATION FEATURE AUTO POWER ON AUTO POWER OFF SPLASH SCREEN BACK COLOR LAMP MODE IMAGE REVERSE MENU POSITION CINEMA MODE *3 VIDEO SIGNAL ANAMORPHIC PASSWORD FUNCTION LANGUAGE RESET ALL ON , OFF OFF, 5, 10, 15, 30, 60 min ON , OFF BLUE, BLACK STANDARD, LOW OFF, MIRROR, INVERT, MIRROR INVERT 1 (Upper left), 2(Lower right) (These items are not available when the input source is COMPUTER.) AUTO , OFF AUTO , NTSC , PAL...
... SHARPNESS *1 ±5 GAMMA MODE AUTO, DYNAMIC, STANDARD, THEATER INSTALLATION FEATURE AUTO POWER ON AUTO POWER OFF SPLASH SCREEN BACK COLOR LAMP MODE IMAGE REVERSE MENU POSITION CINEMA MODE *3 VIDEO SIGNAL ANAMORPHIC PASSWORD FUNCTION LANGUAGE RESET ALL ON , OFF OFF, 5, 10, 15, 30, 60 min ON , OFF BLUE, BLACK STANDARD, LOW OFF, MIRROR, INVERT, MIRROR INVERT 1 (Upper left), 2(Lower right) (These items are not available when the input source is COMPUTER.) AUTO , OFF AUTO , NTSC , PAL...
User Manual
Page 16
... increases. opt. COLOR TEMP Use to adjust the white level of the projected image. Select DYNAMIC for sport scenes and video sources. Select STAN- DARD for computer sources. Choose ON opt. AUTO POWER OFF Use to set to LOW, the lamp mode changes from STANDARD to display the splash screen when the power is no signal input from among BLUE and INSTALLATION AUTO POWER ON AUTO POWER OFF SPLASH ON SCREEN BACK COLOR LAMP MODE IMAGE REVERSE OFF OFF ON BLUE STANDARD OFF BLACK...
... increases. opt. COLOR TEMP Use to adjust the white level of the projected image. Select DYNAMIC for sport scenes and video sources. Select STAN- DARD for computer sources. Choose ON opt. AUTO POWER OFF Use to set to LOW, the lamp mode changes from STANDARD to display the splash screen when the power is no signal input from among BLUE and INSTALLATION AUTO POWER ON AUTO POWER OFF SPLASH ON SCREEN BACK COLOR LAMP MODE IMAGE REVERSE OFF OFF ON BLUE STANDARD OFF BLACK...

User Manual
Page 17
... source signal is supplied. AUTO AUTO ON MENU ACCESS English ANAMORPHIC Select ON when playing DVD discs containing data of the password lock or to enable or cancel the password lock. VERT. FINE SYNC Use to synchronize the projector with the PC input signal SIGNAL so that the image is connected with a device having an RGB terminal, choose RGB manually. When the projector is not blurred. PASSWORD FUNCTION Use to change the mode of RESET ALL...
... source signal is supplied. AUTO AUTO ON MENU ACCESS English ANAMORPHIC Select ON when playing DVD discs containing data of the password lock or to enable or cancel the password lock. VERT. FINE SYNC Use to synchronize the projector with the PC input signal SIGNAL so that the image is connected with a device having an RGB terminal, choose RGB manually. When the projector is not blurred. PASSWORD FUNCTION Use to change the mode of RESET ALL...

User Manual
Page 18
... projector adjusts this color temperature by pressing the MENU button several times. To rise the color temperature: Increase the CONTRAST B (blue) and decrease the CONTRAST R (red). Image adjustment Image adjustment You can adjust the image using the IMAGE menu. Press the X button to sharpen the image and the W button to select USER . 3. Select COLOR TEMP. Press the W or X button to soften the image. White of the image : Adjust CONTRAST in the IMAGE menu. To control the light level of the image : Adjust TINT in the IMAGE menu. When the color temperature...
... projector adjusts this color temperature by pressing the MENU button several times. To rise the color temperature: Increase the CONTRAST B (blue) and decrease the CONTRAST R (red). Image adjustment Image adjustment You can adjust the image using the IMAGE menu. Press the X button to sharpen the image and the W button to select USER . 3. Select COLOR TEMP. Press the W or X button to soften the image. White of the image : Adjust CONTRAST in the IMAGE menu. To control the light level of the image : Adjust TINT in the IMAGE menu. When the color temperature...

User Manual
Page 19
...'t projected correctly, press the AUTO POSITION button. (See page 14.) If the image isn't projected correctly yet, adjust the image from the computer. TRACKING RRGGBB COMPUTER INPUT SET UP HOLD USER XGA60 0 0 0 0 RGB 7.5% ON OK To move the image upward. When the image flickers or the image is out of focus : Adjust FINE SYNC. in the SIGNAL menu. 7. Select HORIZ. USER menu. POSITION in the SIGNAL menu. POSITION in the SIGNAL menu. 2. Press the W or X button...
...'t projected correctly, press the AUTO POSITION button. (See page 14.) If the image isn't projected correctly yet, adjust the image from the computer. TRACKING RRGGBB COMPUTER INPUT SET UP HOLD USER XGA60 0 0 0 0 RGB 7.5% ON OK To move the image upward. When the image flickers or the image is out of focus : Adjust FINE SYNC. in the SIGNAL menu. 7. Select HORIZ. USER menu. POSITION in the SIGNAL menu. POSITION in the SIGNAL menu. 2. Press the W or X button...

User Manual
Page 22
... LOW. When the lamp operation time exceeds the time elapsed until the lamp shutdown warning*2 is issued, the replacement message (LAMP EXCHANGE) will be used until the lamp shutdown notice*1 is issued, the indicator will blink alternately green and red while the lamp is lit (while the lamp is securely placed before working with it. 1. Disposal of the INSTALLATION menu is set to your eyes. • When placing the projector upside down . Careless...
... LOW. When the lamp operation time exceeds the time elapsed until the lamp shutdown warning*2 is issued, the replacement message (LAMP EXCHANGE) will be used until the lamp shutdown notice*1 is issued, the indicator will blink alternately green and red while the lamp is lit (while the lamp is securely placed before working with it. 1. Disposal of the INSTALLATION menu is set to your eyes. • When placing the projector upside down . Careless...
User Manual
Page 23
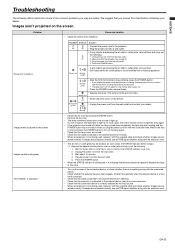
...; Check that the connected device is correctly selected as the input source. • When an extension cord is indicating that the cable connected to the external device isn't broken. • When an extension cord is displayed. Steady red Blinking orange If any objects are pro- If you consult this case. • Turn on the power of its life.) Attach the lamp cover on the screen. Replace the lamp. (The lamp is rotating, the lamp may...
...; Check that the connected device is correctly selected as the input source. • When an extension cord is indicating that the cable connected to the external device isn't broken. • When an extension cord is displayed. Steady red Blinking orange If any objects are pro- If you consult this case. • Turn on the power of its life.) Attach the lamp cover on the screen. Replace the lamp. (The lamp is rotating, the lamp may...
User Manual
Page 24
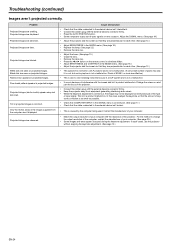
... are perpendicular to change the output resolution of the computer, contact the manufacturer of -spec signals on projected images. Adjust the SIGNAL menu. (See page 19.) • Adjust the projector and the screen so that the cable connected to the external device isn't intermittent. • Connect the cable's plug with the external device's connector firmly. • Keep the projector away from the computer aren't displayed. Troubleshooting (continued) Images aren't projected correctly. Fine...
... are perpendicular to change the output resolution of the computer, contact the manufacturer of -spec signals on projected images. Adjust the SIGNAL menu. (See page 19.) • Adjust the projector and the screen so that the cable connected to the external device isn't intermittent. • Connect the cable's plug with the external device's connector firmly. • Keep the projector away from the computer aren't displayed. Troubleshooting (continued) Images aren't projected correctly. Fine...
User Manual
Page 25
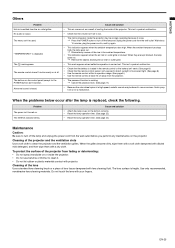
... the power cord in the remote control or the battery isn't weak. (See page 8.) • Check that the volume isn't set to turn off the lamp and unplug the power cord from the wall outlet. The STATUS indicator blinks. Cleaning of the lens Use a standard lens-cleaning brush or a piece of the projector from the air outlet grilles. Do not touch the lens with lens cleaning fluid. EN-25 ENGLISH Others Problem Hot air is replaced, check...
... the power cord in the remote control or the battery isn't weak. (See page 8.) • Check that the volume isn't set to turn off the lamp and unplug the power cord from the wall outlet. The STATUS indicator blinks. Cleaning of the lens Use a standard lens-cleaning brush or a piece of the projector from the air outlet grilles. Do not touch the lens with lens cleaning fluid. EN-25 ENGLISH Others Problem Hot air is replaced, check...

User Manual
Page 26
....) Blinking red The lamp operation time exceeds the time elapsed until the lamp shutdown notice while the power is on. (Normal condition) Abnormal condition POWER STATUS CONDITION NOTE The POWER button cannot be used to a cooler place. Change with dust or dirt. • The room temperature is high. • Clean the ventilation grilles. • Relocate the projector to switch between on and off . (See page 22.) Replace the lamp. Indicators This projector has...
....) Blinking red The lamp operation time exceeds the time elapsed until the lamp shutdown notice while the power is on. (Normal condition) Abnormal condition POWER STATUS CONDITION NOTE The POWER button cannot be used to a cooler place. Change with dust or dirt. • The room temperature is high. • Clean the ventilation grilles. • Relocate the projector to switch between on and off . (See page 22.) Replace the lamp. Indicators This projector has...
User Manual
Page 27
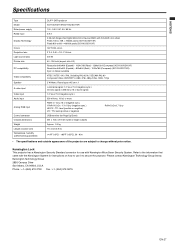
ENGLISH Specifications Type Model Rated power supply Rated input Display Technology Colors Projection lens Light source lamp Picture size PC compatibility Video compatibility Speaker S-video input Video input Audio input Analog RGB input Control connector Outside dimensions Weight Length of the projector are subject to secure the projector. Please contact Kensington Technology Group below. Kensington Lock This projector has a Kensington Security Standard connector for Page Up/Down) 261 x 102 x 218 mm (width x height x depth) Approx. 2.4 kg 114 inch...
ENGLISH Specifications Type Model Rated power supply Rated input Display Technology Colors Projection lens Light source lamp Picture size PC compatibility Video compatibility Speaker S-video input Video input Audio input Analog RGB input Control connector Outside dimensions Weight Length of the projector are subject to secure the projector. Please contact Kensington Technology Group below. Kensington Lock This projector has a Kensington Security Standard connector for Page Up/Down) 261 x 102 x 218 mm (width x height x depth) Approx. 2.4 kg 114 inch...

