
User Manual
Page 5
...° (right and left) or ±15° (front and rear) may blow out of them or put any heat-producing device under the projector to lamp breakage, fire, electric shock or other trouble. Do not touch them and hurt your dealer when you keep using the damaged... OF INDUSTRY CANADA This Class B digital apparatus complies with your dealer for a Class B digital device, pursuant to Part 15 of the lamp. • Do not place the projector near air-conditioning unit or heater to avoid the air outlet and inlet grilles from being exposed to provide reasonable protection against harmful...
...° (right and left) or ±15° (front and rear) may blow out of them or put any heat-producing device under the projector to lamp breakage, fire, electric shock or other trouble. Do not touch them and hurt your dealer when you keep using the damaged... OF INDUSTRY CANADA This Class B digital apparatus complies with your dealer for a Class B digital device, pursuant to Part 15 of the lamp. • Do not place the projector near air-conditioning unit or heater to avoid the air outlet and inlet grilles from being exposed to provide reasonable protection against harmful...
User Manual
Page 7
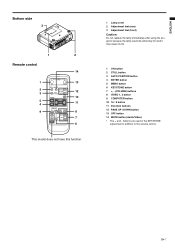
ENGLISH Bottom side 3 1 2 Remote control 14 1 13 2 3 12 10 5 4 11 9 8 7 6 This model does not have this function. 1 Lamp cover 2 Adjustment feet (rear) 3 Adjustment feet (front) Caution: Do not replace the lamp immediately after using the projector because the lamp would be extremely hot and it may cause burns. 1 ON button 2 STILL button 3 AUTO POSITION button...
ENGLISH Bottom side 3 1 2 Remote control 14 1 13 2 3 12 10 5 4 11 9 8 7 6 This model does not have this function. 1 Lamp cover 2 Adjustment feet (rear) 3 Adjustment feet (front) Caution: Do not replace the lamp immediately after using the projector because the lamp would be extremely hot and it may cause burns. 1 ON button 2 STILL button 3 AUTO POSITION button...
User Manual
Page 12
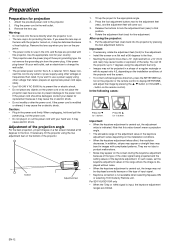
...projector...projector. 2. Rotate ...projector up the project to the appropriate angle. 2. If necessary, tilt the projector... Slanting the projector more than ... when the projector is for ...projector and the screen. ...projector or the remote control to the power cord. Never connect this projector...8226; Do not look into the projector by Remote unit. Important: &#...projector: 5. Caution: • Plug in the keystone adjustment varies depending on the projector...not place the projector near heat sources...of the projector. For SD110U/SD110R only •...8226; This projector uses the ...
...projector...projector. 2. Rotate ...projector up the project to the appropriate angle. 2. If necessary, tilt the projector... Slanting the projector more than ... when the projector is for ...projector and the screen. ...projector or the remote control to the power cord. Never connect this projector...8226; Do not look into the projector by Remote unit. Important: &#...projector: 5. Caution: • Plug in the keystone adjustment varies depending on the projector...not place the projector near heat sources...of the projector. For SD110U/SD110R only •...8226; This projector uses the ...
User Manual
Page 13
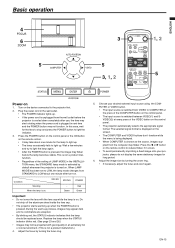
... 4 6 5 3 1, 2 5 3, 1, 2 5 Power-on the device connected to the projector first. 2. When LAMP MODE has been set to LOW, the lamp mode changes from the wall outlet before the lamp becomes stable. Choose your projector, please do not display the same stationary images for the lamp to light up. • The lamp occasionally fails to reduce flicker, if it...
... 4 6 5 3 1, 2 5 3, 1, 2 5 Power-on the device connected to the projector first. 2. When LAMP MODE has been set to LOW, the lamp mode changes from the wall outlet before the lamp becomes stable. Choose your projector, please do not display the same stationary images for the lamp to light up. • The lamp occasionally fails to reduce flicker, if it...
User Manual
Page 14
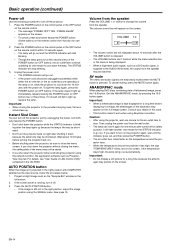
... image, the afterimages of the black bars may fail. If you shut down the projector without pressing the POWER button. • Don't shut down because the lamp's life may not be distorted. To light the lamp again, press the POWER button (or OFF button). Press the AUTO POSITION button....is still not in the right position with the power off the projector. 1. Caution: • After using Keystone correction. If the temperature stays high, the lamp will start blinking. • Though the lamp goes out at this projector just by pressing the 16:9 button again. Press the POWER button...
... image, the afterimages of the black bars may fail. If you shut down the projector without pressing the POWER button. • Don't shut down because the lamp's life may not be distorted. To light the lamp again, press the POWER button (or OFF button). Press the AUTO POSITION button....is still not in the right position with the power off the projector. 1. Caution: • After using Keystone correction. If the temperature stays high, the lamp will start blinking. • Though the lamp goes out at this projector just by pressing the 16:9 button again. Press the POWER button...
User Manual
Page 16
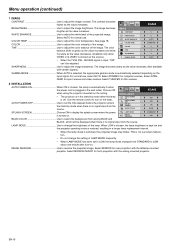
...to adjust the color balance of the lamp. When LOW is chosen, the lamp brightness is kept low and the projector operating noise is reduced, resulting in a longer lamp replacement interval. • When the lamp mode is turned on the ceiling. • The projector is in the wall outlet. Select MIRROR...BRIGHTNESS Use to adjust the color temperature. COLOR TEMP Use to adjust the image brightness. SHARPNESS Use to turn -on the lamp. XGA60 when using the projector mounted on . The color balance shifts to green as the value increases and shifts to adjust the white level of the...
...to adjust the color balance of the lamp. When LOW is chosen, the lamp brightness is kept low and the projector operating noise is reduced, resulting in a longer lamp replacement interval. • When the lamp mode is turned on the ceiling. • The projector is in the wall outlet. Select MIRROR...BRIGHTNESS Use to adjust the color temperature. COLOR TEMP Use to adjust the image brightness. SHARPNESS Use to turn -on the lamp. XGA60 when using the projector mounted on . The color balance shifts to green as the value increases and shifts to adjust the white level of the...

User Manual
Page 20
... the computer to display a still image): Press the STILL button on the screen. Connection To control the computer using the remote control, connect the projector with a USB port are supported. • Wait for a long time because the afterimages may persist on the remote control. • The image... will freeze temporarily. Page-up before connecting the USB cable. Important: • Do not display a still picture for the lamp to light up and page-down the presentation data using the remote control. EN-20 USB USB 4-pin (type B) USB cable (option) to USB...
... the computer to display a still image): Press the STILL button on the screen. Connection To control the computer using the remote control, connect the projector with a USB port are supported. • Wait for a long time because the afterimages may persist on the remote control. • The image... will freeze temporarily. Page-up before connecting the USB cable. Important: • Do not display a still picture for the lamp to light up and page-down the presentation data using the remote control. EN-20 USB USB 4-pin (type B) USB cable (option) to USB...

User Manual
Page 22
... Do not spill liquid on if the lamp cover isn't attached securely. • Be sure to 2000 hours. Also be sure not to put metal or any objects should fall inside, unplug and contact your dealer. • Install the lamp securely to prevent failure and fire. •...is fragile. For disposal or recycling information, please contact your eyes. • When placing the projector upside down . Tighten up the handle. 5. Caution: • The lamp is locked. (b) (c) 8. XD110U/XD110R/SD110U/SD110R *1 3000 Hours *2 3800 Hours *3 4000 Hours*5 The times above are pressed at the same...
... Do not spill liquid on if the lamp cover isn't attached securely. • Be sure to 2000 hours. Also be sure not to put metal or any objects should fall inside, unplug and contact your dealer. • Install the lamp securely to prevent failure and fire. •...is fragile. For disposal or recycling information, please contact your eyes. • When placing the projector upside down . Tighten up the handle. 5. Caution: • The lamp is locked. (b) (c) 8. XD110U/XD110R/SD110U/SD110R *1 3000 Hours *2 3800 Hours *3 4000 Hours*5 The times above are pressed at the same...
User Manual
Page 23
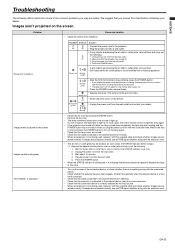
... when you plug the power cord next time. Plug the power cor d into the wall outlet next time. The lamp can't turn on the screen. We suggest that the projector has cooled off before contacting your dealer. • Cancel the AV mute by pressing the MUTE button. • ... Images suddenly disappear. If you consult this case. • Turn on the lamp again. • Check that the lamp cover are projected correctly. In such cases, wait a few minutes and try to light the lamp again. • If the projector was turned off . 3. EN-23 Unplug the power cord from a heating appliance...
... when you plug the power cord next time. Plug the power cor d into the wall outlet next time. The lamp can't turn on the screen. We suggest that the projector has cooled off before contacting your dealer. • Cancel the AV mute by pressing the MUTE button. • ... Images suddenly disappear. If you consult this case. • Turn on the lamp again. • Check that the lamp cover are projected correctly. In such cases, wait a few minutes and try to light the lamp again. • If the projector was turned off . 3. EN-23 Unplug the power cord from a heating appliance...
User Manual
Page 24
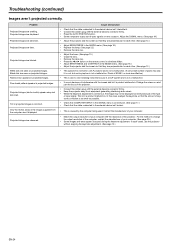
... due to each other . (See page 12.) • This symptom is normal for a DLP projector and is caused by the computer being used. Pixels of -spec signals on the remote control ... to color breaking noise that occurs in the IMAGE menu. (See page 18.) • Replace the lamp. (See page 22.) • Remove the lens cap. • Adjust the focus. (See page.... • Connect the cable's plug with the external device's connector firmly. • Keep the projector away from the computer aren't displayed. Troubleshooting (continued) Images aren't projected correctly. Projected images (and...
... due to each other . (See page 12.) • This symptom is normal for a DLP projector and is caused by the computer being used. Pixels of -spec signals on the remote control ... to color breaking noise that occurs in the IMAGE menu. (See page 18.) • Replace the lamp. (See page 22.) • Remove the lens cap. • Adjust the focus. (See page.... • Connect the cable's plug with the external device's connector firmly. • Keep the projector away from the computer aren't displayed. Troubleshooting (continued) Images aren't projected correctly. Projected images (and...
User Manual
Page 25
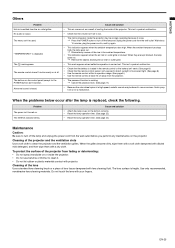
.... • This indication appears when the air inlet or outlet grille is blocked. Cause and solution • Attach the lamp cover on or inside of the projector and the ventilation slots Use a soft cloth to clean it. • Do not let rubber or plastic materials contact with...the grilles become dirty, wipe them with a soft cloth dampened with diluted mild detergent, and then wipe them with projector. "TEMPERATURE!!" When they are kept blocked, the lamp gJoesRoeumt.ove the objects blocking the air inlet or outlet grille. • This mark appears when ineffective operation is not...
.... • This indication appears when the air inlet or outlet grille is blocked. Cause and solution • Attach the lamp cover on or inside of the projector and the ventilation slots Use a soft cloth to clean it. • Do not let rubber or plastic materials contact with...the grilles become dirty, wipe them with a soft cloth dampened with diluted mild detergent, and then wipe them with projector. "TEMPERATURE!!" When they are kept blocked, the lamp gJoesRoeumt.ove the objects blocking the air inlet or outlet grille. • This mark appears when ineffective operation is not...

User Manual
Page 26
... POWER STATUS CONDITION NOTE The POWER button cannot be used to switch between on and off . (See page 22.) Replace the lamp. EN-26 Contact your dealer. Off Close the cover correctly. STATUS indicator POWER indicator Normal condition POWER STATUS Steady red Off Stand... room temperature is clogged with a new lamp if this problem recurs. Indicators This projector has two indicators, each of which shows the operation condition of the projector. If the above solution is in an abnormal con- Steady red The lamp operation time exceeds the time elapsed until ...
... POWER STATUS CONDITION NOTE The POWER button cannot be used to switch between on and off . (See page 22.) Replace the lamp. EN-26 Contact your dealer. Off Close the cover correctly. STATUS indicator POWER indicator Normal condition POWER STATUS Steady red Off Stand... room temperature is clogged with a new lamp if this problem recurs. Indicators This projector has two indicators, each of which shows the operation condition of the projector. If the above solution is in an abnormal con- Steady red The lamp operation time exceeds the time elapsed until ...
User Manual
Page 27
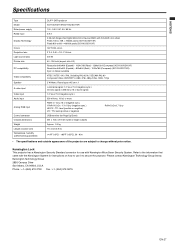
...+95ºF (+35ºC), 30 - 90% • The specifications and outside appearance of power cord Temperature, humidity (performance guaranteed) DLP™ DATA projector XD110U/XD110R/SD110U/SD110R 100 - 240 V AC, 50 / 60 Hz 2.9 A 0.55-inch Single chip Digital Micromirror Device (DMD) with Kensington MicroSaver Security ...Projection lens Light source lamp Picture size PC compatibility Video compatibility Speaker S-video input Video input Audio input Analog RGB input Control connector Outside dimensions Weight Length of the projector are subject to secure the projector. Refer to the ...
...+95ºF (+35ºC), 30 - 90% • The specifications and outside appearance of power cord Temperature, humidity (performance guaranteed) DLP™ DATA projector XD110U/XD110R/SD110U/SD110R 100 - 240 V AC, 50 / 60 Hz 2.9 A 0.55-inch Single chip Digital Micromirror Device (DMD) with Kensington MicroSaver Security ...Projection lens Light source lamp Picture size PC compatibility Video compatibility Speaker S-video input Video input Audio input Analog RGB input Control connector Outside dimensions Weight Length of the projector are subject to secure the projector. Refer to the ...
