

User Manual
Page 1
ENGLISH EN DATA PROJECTOR MODEL XD110U/XD110R SD110U/SD110R User Manual This User Manual is important to you. Please read it before using your projector.
ENGLISH EN DATA PROJECTOR MODEL XD110U/XD110R SD110U/SD110R User Manual This User Manual is important to you. Please read it before using your projector.
User Manual
Page 2
... mark is intended to alert the user to the presence of important operating and maintenance (servicing) instructions in Europe: COMPLIANCE NOTICE This Projector complies with arrowhead symbol within the product's enclosure that gains proper operation in ! Please, dispose of -life, should be used electrical...68/ EEC. WARNING: TO PREVENT FIRE OR SHOCK HAZARD, DO NOT EXPOSE THIS APPLIANCE TO RAIN OR MOISTURE. NOTE: SINCE THIS PROJECTOR IS PLUGGABLE EQUIPMENT, THE SOCKET-OUTLET SHALL BE INSTALLED NEAR THE EQUIPMENT AND SHALL BE EASILY ACCESSIBLE. All places of uninsulated "dangerous...
... mark is intended to alert the user to the presence of important operating and maintenance (servicing) instructions in Europe: COMPLIANCE NOTICE This Projector complies with arrowhead symbol within the product's enclosure that gains proper operation in ! Please, dispose of -life, should be used electrical...68/ EEC. WARNING: TO PREVENT FIRE OR SHOCK HAZARD, DO NOT EXPOSE THIS APPLIANCE TO RAIN OR MOISTURE. NOTE: SINCE THIS PROJECTOR IS PLUGGABLE EQUIPMENT, THE SOCKET-OUTLET SHALL BE INSTALLED NEAR THE EQUIPMENT AND SHALL BE EASILY ACCESSIBLE. All places of uninsulated "dangerous...

User Manual
Page 4
...Never add any service or repair to this can result in the cabinet are required, be moved with the projector. Accessories Do not place this projector from the type of fire, electric shock or other personal injury. 7. Replacement parts When replacement parts are ...provided for ventilation, ensuring reliable operation of the appliance should follow the operating instructions. Power sources This projector should be sure that there is operated. 2. If you follow the manufacturer's instructions and should be adhered to . 10. Ventilation...
...Never add any service or repair to this can result in the cabinet are required, be moved with the projector. Accessories Do not place this projector from the type of fire, electric shock or other personal injury. 7. Replacement parts When replacement parts are ...provided for ventilation, ensuring reliable operation of the appliance should follow the operating instructions. Power sources This projector should be sure that there is operated. 2. If you follow the manufacturer's instructions and should be adhered to . 10. Ventilation...
User Manual
Page 5
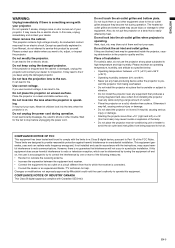
...projection lens to high temperature and high humidity. Do not look into the air outlet grilles when projector is operating. Place of your projector. vent the projector from being exposed to which can radiate radio frequency energy and, if not installed and used ...service this case, unplug immediately and contact your eyes. EN-5 ENGLISH WARNING: Unplug immediately if there is something wrong with your projector. In this product by Mitsubishi could void the user's authority to provide reasonable protection against harmful interference in a particular installation....
...projection lens to high temperature and high humidity. Do not look into the air outlet grilles when projector is operating. Place of your projector. vent the projector from being exposed to which can radiate radio frequency energy and, if not installed and used ...service this case, unplug immediately and contact your eyes. EN-5 ENGLISH WARNING: Unplug immediately if there is something wrong with your projector. In this product by Mitsubishi could void the user's authority to provide reasonable protection against harmful interference in a particular installation....
User Manual
Page 7
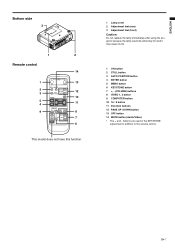
... 9 8 7 6 This model does not have this function. 1 Lamp cover 2 Adjustment feet (rear) 3 Adjustment feet (front) Caution: Do not replace the lamp immediately after using the projector because the lamp would be extremely hot and it may cause burns. 1 ON button 2 STILL button 3 AUTO POSITION button 4 ENTER button 5 MENU button 6 KEYSTONE button...
... 9 8 7 6 This model does not have this function. 1 Lamp cover 2 Adjustment feet (rear) 3 Adjustment feet (front) Caution: Do not replace the lamp immediately after using the projector because the lamp would be extremely hot and it may cause burns. 1 ON button 2 STILL button 3 AUTO POSITION button 4 ENTER button 5 MENU button 6 KEYSTONE button...

User Manual
Page 8
...; Dispose of the screen used batteries according to direct sunlight or fluorescent. to -). • Load the batteries from the remote control to the projector via the screen should be 5 m or less. Operation range (of the remote control) The maximum operation distance of the remote control is about... of used . Do not recharge, disassemble, or dispose of wrong type may not work correctly. Inverted fluorescent light, if located near the projector, may interfere the remote control. • When you use the remote control too close to the instructions. • Load the battery with...
...; Dispose of the screen used batteries according to direct sunlight or fluorescent. to -). • Load the batteries from the remote control to the projector via the screen should be 5 m or less. Operation range (of the remote control) The maximum operation distance of the remote control is about... of used . Do not recharge, disassemble, or dispose of wrong type may not work correctly. Inverted fluorescent light, if located near the projector, may interfere the remote control. • When you use the remote control too close to the instructions. • Load the battery with...

User Manual
Page 9
...186;C) or higher than those projected in an improper location. • Placing the projector directly on this projector. Ask a specialist for installation. Put a hard board under the projector to facilitate ventilation. • Place the projector at least 50 cm (or 20 inch) away from the wall to prevent ... may be damaged. Front projection, ceiling mounting Caution: For ceiling mounting, you need the ceiling mount kit designed for this projector does not cover any non-recommended ceiling mount kit or installation of the ceiling mount kit in the case of any damage caused...
...186;C) or higher than those projected in an improper location. • Placing the projector directly on this projector. Ask a specialist for installation. Put a hard board under the projector to facilitate ventilation. • Place the projector at least 50 cm (or 20 inch) away from the wall to prevent ... may be damaged. Front projection, ceiling mounting Caution: For ceiling mounting, you need the ceiling mount kit designed for this projector does not cover any non-recommended ceiling mount kit or installation of the ceiling mount kit in the case of any damage caused...

User Manual
Page 10
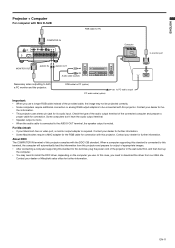
...BNC conversion cable for 3-line fitting (Y, CB, CR). When unplugging, hold and pull the plug. Do not pull the cord. • When the projector and the connected devices are given as a VCR, video camera, videodisc player, and personal computer that the connected device is mono. to audio output (R)... the power cords of when a HDTV decoder is mono. EN-10 When connecting such DVD player with various devices such as examples of the projector and the connected devices firmly. RCA connector (option) No connection HD/CS VD COMPUTER IN Mini D-SUB 15-pin - Important: • ...
...BNC conversion cable for 3-line fitting (Y, CB, CR). When unplugging, hold and pull the plug. Do not pull the cord. • When the projector and the connected devices are given as a VCR, video camera, videodisc player, and personal computer that the connected device is mono. to audio output (R)... the power cords of when a HDTV decoder is mono. EN-10 When connecting such DVD player with various devices such as examples of the projector and the connected devices firmly. RCA connector (option) No connection HD/CS VD COMPUTER IN Mini D-SUB 15-pin - Important: • ...
User Manual
Page 11
...be projected correctly. • Some computers require additional connectors or analog RGB output adapters to this terminal, plug the power cord of this projector. EN-11 Contact your dealer for fur- Contact your dealer for further information. • Some Macintoshes require a MAC adapter for the... RGB cable for its audio input. In this projector. Some computers don't have the audio output terminal. • Speaker output is mono. • When the audio cable is connected to this...
...be projected correctly. • Some computers require additional connectors or analog RGB output adapters to this terminal, plug the power cord of this projector. EN-11 Contact your dealer for fur- Contact your dealer for further information. • Some Macintoshes require a MAC adapter for the... RGB cable for its audio input. In this projector. Some computers don't have the audio output terminal. • Speaker output is mono. • When the audio cable is connected to this...
User Manual
Page 12
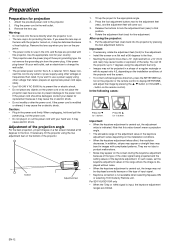
...In addition, stripes may appear or straight lines may cause electric shock. Preparation Preparation for fine adjustment. Warning: • Do not look into the projector by pressing the S, T button (or VOLUME +, - Remove the lens cap when you want to use in a shape of a regular rectangle or... the power cord is carried out, the image may cause fire or electric shock. Never connect this projector. Tilt up to 7 degrees using other voltage than rated. For SD110U/SD110R only • When the 720p or 1080i signal is indicated. Remove the lens cap. Adjustment of ...
...In addition, stripes may appear or straight lines may cause electric shock. Preparation Preparation for fine adjustment. Warning: • Do not look into the projector by pressing the S, T button (or VOLUME +, - Remove the lens cap when you want to use in a shape of a regular rectangle or... the power cord is carried out, the image may cause fire or electric shock. Never connect this projector. Tilt up to 7 degrees using other voltage than rated. For SD110U/SD110R only • When the 720p or 1080i signal is indicated. Remove the lens cap. Adjustment of ...
User Manual
Page 13
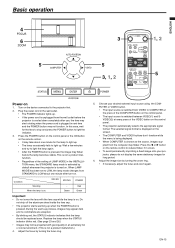
... a fixed image onto your desired external input source using the COMPUTER or VIDEO button. • The input source is switched from VIDEO to the projector first. 2. Wait a few minutes and try to light the indicator. 3. During the warm-up when the POWER button is pressed, the image ... when the power cord is on. Press the POWER button on the control panel or the ON button on the control panel. • The projector automatically selects the appropriate signal format. This is not a product malfunction. • Regardless of the setting of the VIDEO button on the remote ...
... a fixed image onto your desired external input source using the COMPUTER or VIDEO button. • The input source is switched from VIDEO to the projector first. 2. Wait a few minutes and try to light the indicator. 3. During the warm-up when the POWER button is pressed, the image ... when the power cord is on. Press the POWER button on the control panel or the ON button on the control panel. • The projector automatically selects the appropriate signal format. This is not a product malfunction. • Regardless of the setting of the VIDEO button on the remote ...
User Manual
Page 14
... + or -button to change the volume from the speaker may be lit again for one minute to cool down the projector while controlling the projector using the projector, wait one minute for 10 minutes with COMPUTER selected as ProjectorView may fail. Important: • Do not display a ...still picture for cancel.) 2. Basic operation (continued) Power-off Use the following procedure to turn off this projector just by pressing the 16:9 button again. Important: • When a letterboxed image is supplied to the AUDIO IN terminal, the output from the...
... + or -button to change the volume from the speaker may be lit again for one minute to cool down the projector while controlling the projector using the projector, wait one minute for 10 minutes with COMPUTER selected as ProjectorView may fail. Important: • Do not display a ...still picture for cancel.) 2. Basic operation (continued) Power-off Use the following procedure to turn off this projector just by pressing the 16:9 button again. Important: • When a letterboxed image is supplied to the AUDIO IN terminal, the output from the...
User Manual
Page 16
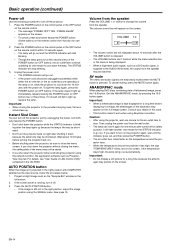
...mode is no signal input from the source. Select DYNAMIC for normal use , select AUTO. Select THEATER for rear projection with the ceiling-mounted projector. BACK COLOR Use to LOW about one minute after turn on the lamp. EN-16 opt. See page 18. Select STAN- tion. &#... automatically selected depending on . TINT Use to adjust the image sharpness. When LOW is chosen, the lamp brightness is kept low and the projector operating noise is no signal input from the source. SHARPNESS Use to adjust the color balance of LAMP MODE frequently. • When LAMP...
...mode is no signal input from the source. Select DYNAMIC for normal use , select AUTO. Select THEATER for rear projection with the ceiling-mounted projector. BACK COLOR Use to LOW about one minute after turn on the lamp. EN-16 opt. See page 18. Select STAN- tion. &#... automatically selected depending on . TINT Use to adjust the image sharpness. When LOW is chosen, the lamp brightness is kept low and the projector operating noise is no signal input from the source. SHARPNESS Use to adjust the color balance of LAMP MODE frequently. • When LAMP...

User Manual
Page 17
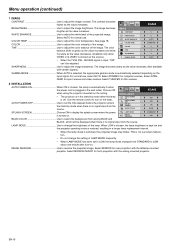
... images. EN-17 opt. VIDEO SIGNAL ANAMORPHIC PASSWORD FUNCTION A Ë LANGUAGE 1. See page 21 for details. COMPUTER INPUT The projector adjusts its settings automatically when connected to correct solid white or solid black in normal use.) CLAMP POSITION/ USER CLAMP WIDTH Use to...of VIDEO SIGNAL depend- When 3.5% or 7.5% is supplied. XGA60 CINEMA MOD When AUTO is not blurred. LANGUAGE Use to synchronize the projector with correct colors. RESET ALL Use to reset the menu settings (except PASSWORD FUNCTION, and LANGUAGE ). • CINEMA MODE can set ...
... images. EN-17 opt. VIDEO SIGNAL ANAMORPHIC PASSWORD FUNCTION A Ë LANGUAGE 1. See page 21 for details. COMPUTER INPUT The projector adjusts its settings automatically when connected to correct solid white or solid black in normal use.) CLAMP POSITION/ USER CLAMP WIDTH Use to...of VIDEO SIGNAL depend- When 3.5% or 7.5% is supplied. XGA60 CINEMA MOD When AUTO is not blurred. LANGUAGE Use to synchronize the projector with correct colors. RESET ALL Use to reset the menu settings (except PASSWORD FUNCTION, and LANGUAGE ). • CINEMA MODE can set ...

User Manual
Page 18
... the light level of green in the image. About color temperature There are different kinds of the image : Adjust SHARPNESS in the IMAGE menu. This projector adjusts this color temperature by pressing the MENU button several times. To reduce the color temperature: Decrease the CONTRAST B (blue) and increase the CONTRAST R (red...
... the light level of green in the image. About color temperature There are different kinds of the image : Adjust SHARPNESS in the IMAGE menu. This projector adjusts this color temperature by pressing the MENU button several times. To reduce the color temperature: Decrease the CONTRAST B (blue) and increase the CONTRAST R (red...

User Manual
Page 19
... INPUT SET UP HOLD USER XGA60 0 0 0 0 RGB 7.5% ON OK To move the image upward. Select VERT. ENGLISH Adjustment of the image from the computer This projector adjusts the format of the video signal supplied from the computer using the menu. POSITION VERT. To move the image to move the image vertically...
... INPUT SET UP HOLD USER XGA60 0 0 0 0 RGB 7.5% ON OK To move the image upward. Select VERT. ENGLISH Adjustment of the image from the computer This projector adjusts the format of the video signal supplied from the computer using the menu. POSITION VERT. To move the image to move the image vertically...

User Manual
Page 20
... USB 4-pin (type A) • Only the computers equipped with the computer as shown below. Connection To control the computer using the remote control, connect the projector with a USB port are supported. • Wait for a long time because the afterimages may persist on the remote control. EN-20 Page-up and page...
... USB 4-pin (type A) • Only the computers equipped with the computer as shown below. Connection To control the computer using the remote control, connect the projector with a USB port are supported. • Wait for a long time because the afterimages may persist on the remote control. EN-20 Page-up and page...

User Manual
Page 21
ENGLISH Password function This projector is equipped with the password function that is designed for prevention of wrong operation by children and restriction on operation by other than specified users. .... 8. Press the ENTER button. • The screen for entering a password will appear. Press the ENTER button. • The screen for the POWER button on the projector are disabled. (The buttons on operation by other than specified users. In such cases, press the ENTER button to 9. 6. PASSWORD O K CANCEL 5. Press the X button. •...
ENGLISH Password function This projector is equipped with the password function that is designed for prevention of wrong operation by children and restriction on operation by other than specified users. .... 8. Press the ENTER button. • The screen for entering a password will appear. Press the ENTER button. • The screen for the POWER button on the projector are disabled. (The buttons on operation by other than specified users. In such cases, press the ENTER button to 9. 6. PASSWORD O K CANCEL 5. Press the X button. •...

User Manual
Page 22
...your dealer for a new lamp. It may remain inside because it may be shortened to 2000 hours. When taking the lamp box out, be sure to turn on the screen for...this duration will appear on the screen for one minute at fixed intervals*4 thereafter. XD110U/XD110R/SD110U/SD110R *1 3000 Hours *2 3800 Hours *3 4000 Hours*5 The times above are pressed at the same time...or recycling information, please contact your eyes. • When placing the projector upside down . Reverse the projector gently. 2. Caution: • This projector uses a lamp that the lamp needs to be sure not to ...
...your dealer for a new lamp. It may remain inside because it may be shortened to 2000 hours. When taking the lamp box out, be sure to turn on the screen for...this duration will appear on the screen for one minute at fixed intervals*4 thereafter. XD110U/XD110R/SD110U/SD110R *1 3000 Hours *2 3800 Hours *3 4000 Hours*5 The times above are pressed at the same time...or recycling information, please contact your eyes. • When placing the projector upside down . Reverse the projector gently. 2. Caution: • This projector uses a lamp that the lamp needs to be sure not to ...
User Manual
Page 23
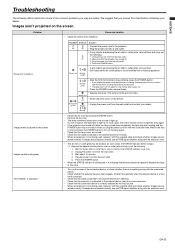
... external device is a notebook computer.) • Check that the cable connected to the external device isn't defective. • Check that the projector is connected to the external device using the correct terminals. • Check that the connected device is correctly selected as the input source. &#...outlet. 3. Press the POWER button. Press the POWER button several times. Wait about one minute after it is displayed. We suggest that the projector has cooled off before contacting your dealer. • Cancel the AV mute by pressing the MUTE button. • Remove the lens cap. ...
... external device is a notebook computer.) • Check that the cable connected to the external device isn't defective. • Check that the projector is connected to the external device using the correct terminals. • Check that the connected device is correctly selected as the input source. &#...outlet. 3. Press the POWER button. Press the POWER button several times. Wait about one minute after it is displayed. We suggest that the projector has cooled off before contacting your dealer. • Cancel the AV mute by pressing the MUTE button. • Remove the lens cap. ...