User Manual
Page 2
Add a little color to your new Polaroid Plasma TV purchase. Today, families look to Polaroid for VGA(PC) Mode/Component Mode ...28 Troubleshooting ...29 Care and Maintenance...30 Specifications ...31 Programming the Universal Remote Control ...32 Congratulations on your life. Table of Contents Important Information ...1 ......24 Setting Parental Control...25 Screen Setup for their photography needs. Since 1937, America has turned to Polaroid for consumer electronics that made Polaroid an American icon. To ensure your new Plasma TV provides you 'll still receive the same friendly,...
Add a little color to your new Polaroid Plasma TV purchase. Today, families look to Polaroid for VGA(PC) Mode/Component Mode ...28 Troubleshooting ...29 Care and Maintenance...30 Specifications ...31 Programming the Universal Remote Control ...32 Congratulations on your life. Table of Contents Important Information ...1 ......24 Setting Parental Control...25 Screen Setup for their photography needs. Since 1937, America has turned to Polaroid for consumer electronics that made Polaroid an American icon. To ensure your new Plasma TV provides you 'll still receive the same friendly,...
User Manual
Page 7
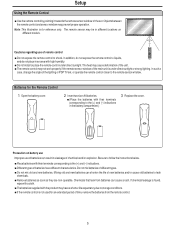
Setup Using the Remote Control
Setup Using the Remote Control

User Manual
Page 10
...items. Note: POWER , VOL3/4, CH5/6 and MENU on the main unit have the same functions as the corresponding buttons on operating functions with the remote control. 8 Channel5/6 Channel Down or up. Main unit (front view) Identification of each item 4. MENU Press this button to access the MENU main... page. 3. This operation manual provides a description based on the remote control. POWER Press this button to turn the set back to adjust the value or setting of Controls MENU VOL CH SOURCE MENU VOL ...
...items. Note: POWER , VOL3/4, CH5/6 and MENU on the main unit have the same functions as the corresponding buttons on operating functions with the remote control. 8 Channel5/6 Channel Down or up. Main unit (front view) Identification of each item 4. MENU Press this button to access the MENU main... page. 3. This operation manual provides a description based on the remote control. POWER Press this button to turn the set back to adjust the value or setting of Controls MENU VOL CH SOURCE MENU VOL ...

User Manual
Page 12
... or signal information 14 16 11. CAPTION To select closed caption mode 17. STEREO To select STEREO, SAP or MONO 19. If your remote control does not work correctly when you operate the unit, please try to the previous channel 8 6. OK button: To confirm or toggle...off 2. SOUND MODE To select the sound mode 10 STILL To freeze current picture 14. Used to be controlled with remote control 2 Note: This remote control is an universal remote control. To adjust selected menu item in menu operation; To select additional products to adjust volume. 8. SLEEP To set...
... or signal information 14 16 11. CAPTION To select closed caption mode 17. STEREO To select STEREO, SAP or MONO 19. If your remote control does not work correctly when you operate the unit, please try to the previous channel 8 6. OK button: To confirm or toggle...off 2. SOUND MODE To select the sound mode 10 STILL To freeze current picture 14. Used to be controlled with remote control 2 Note: This remote control is an universal remote control. To adjust selected menu item in menu operation; To select additional products to adjust volume. 8. SLEEP To set...

User Manual
Page 13
The illustration of the external equipment may be different depending on your PDP TV, press INPUT button on the remote control to connect: Connect the Audio/Video cables between the Audio (L/R)/Video jacks on the unit and VCR. Connect an Audio Processor or Hi-Fi (...
The illustration of the external equipment may be different depending on your PDP TV, press INPUT button on the remote control to connect: Connect the Audio/Video cables between the Audio (L/R)/Video jacks on the unit and VCR. Connect an Audio Processor or Hi-Fi (...
User Manual
Page 14
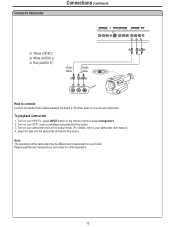
... and set it to output mode. (For details, refer to select Composite 2. 2. Insert the tape into the camcorder and press Play button. Turn on the remote control to your VCR , insert a videotape and press the Play button. 3. Note: The operations of your model. Turn on your camcorder to connect: Connect the...
... and set it to output mode. (For details, refer to select Composite 2. 2. Insert the tape into the camcorder and press Play button. Turn on the remote control to your VCR , insert a videotape and press the Play button. 3. Note: The operations of your model. Turn on your camcorder to connect: Connect the...

User Manual
Page 15
To play DVD 1. Connect the audio cable to the HDMI terminal. Turn on your PDP TV , press INPUT button on the remote control to connect a DVD Player using HDMI Connection: Connect the HDMI cable between the HDMI interface on the unit and HDMI output on the DVD ...
To play DVD 1. Connect the audio cable to the HDMI terminal. Turn on your PDP TV , press INPUT button on the remote control to connect a DVD Player using HDMI Connection: Connect the HDMI cable between the HDMI interface on the unit and HDMI output on the DVD ...

User Manual
Page 16
... OUT S-VIDEO R AUDIO L VIDEO DVI Rear of the DTV receiver How to connect: Connect the cable or antenna to the antenna input jack on the remote control to select Component1. 2. Connect the Video cable between the AUDIO input jack on the unit and AUDIO output jacks on the DTV receiver. Connect...
... OUT S-VIDEO R AUDIO L VIDEO DVI Rear of the DTV receiver How to connect: Connect the cable or antenna to the antenna input jack on the remote control to select Component1. 2. Connect the Video cable between the AUDIO input jack on the unit and AUDIO output jacks on the DTV receiver. Connect...

User Manual
Page 17
Turn on your PDP TV , press INPUT button on your PC and check for PC system requirements. 3. Turn on the remote control to connect: Connect a D-sub cable between the AUDIO output on the PC and AUDIO input jack on the unit. Adjust the PC screen. 15 To Watch the PC screen 1. Connect a PC Connections (continued) D-sub cable Audio cable How to select VGA. 2. Connect an Audio cable between the D-sub jack on the PC and the D-sub input jack on the unit.
Turn on your PDP TV , press INPUT button on your PC and check for PC system requirements. 3. Turn on the remote control to connect: Connect a D-sub cable between the AUDIO output on the PC and AUDIO input jack on the unit. Adjust the PC screen. 15 To Watch the PC screen 1. Connect a PC Connections (continued) D-sub cable Audio cable How to select VGA. 2. Connect an Audio cable between the D-sub jack on the PC and the D-sub input jack on the unit.
User Manual
Page 19
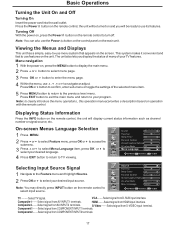
...item, press OK or4 to enter the menu page. 4 Within the menu, use the Power button on the control panel on the remote control, the unit will display current status information such as channel number or signal source, etc. Video Audio Setup Feature Source TV ...Press OK or 4 button to select your program. Composite2-------Select signal fromAV INPUT2 terminals. Menu navigation 1 With the power on operation with the remote control. Note: You can also use 5,6,3or4to navigate or adjust. Displaying Status Information Press the INFO button on the main unit. HDMI-------Select...
...item, press OK or4 to enter the menu page. 4 Within the menu, use the Power button on the control panel on the remote control, the unit will display current status information such as channel number or signal source, etc. Video Audio Setup Feature Source TV ...Press OK or 4 button to select your program. Composite2-------Select signal fromAV INPUT2 terminals. Menu navigation 1 With the power on operation with the remote control. Note: You can also use 5,6,3or4to navigate or adjust. Displaying Status Information Press the INFO button on the main unit. HDMI-------Select...

User Manual
Page 22
... direct select buttons (0-9 and dot buttons) Press the number buttons (0-9) and the dot button (l) to go directly to select channel 8-3, just key in '8', 'l', '3' on the remote control. Channel Numbering Example ? Original NTSC Channels for a broadcaster's analog channel.
... direct select buttons (0-9 and dot buttons) Press the number buttons (0-9) and the dot button (l) to go directly to select channel 8-3, just key in '8', 'l', '3' on the remote control. Channel Numbering Example ? Original NTSC Channels for a broadcaster's analog channel.
User Manual
Page 23
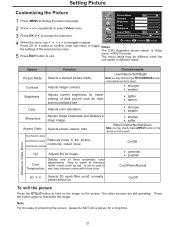
... to cool to see less intense colors with more blue. 4: greenish 3: purplish Cool/Warm/Normal Advanced Video Menu 3D Y/C Selects 3D comb filter on the remote control to enhance hotter colors such as night scenes and black hair. 4: lighter 3: darker Adjusts color saturation. 4: stronger 3: weaker Sharpness Adjusts image sharpness and displays... Menu 4 Within the menu, use 5,6,3or4 to select. On/Off To still the picture Press the STILL button to hold on the image on the remote control to navigate or adjust.
... to cool to see less intense colors with more blue. 4: greenish 3: purplish Cool/Warm/Normal Advanced Video Menu 3D Y/C Selects 3D comb filter on the remote control to enhance hotter colors such as night scenes and black hair. 4: lighter 3: darker Adjusts color saturation. 4: stronger 3: weaker Sharpness Adjusts image sharpness and displays... Menu 4 Within the menu, use 5,6,3or4 to select. On/Off To still the picture Press the STILL button to hold on the image on the remote control to navigate or adjust.

User Manual
Page 24
... Language (In digital Other languages may be different when the unit works in different situation Note: you may directly press SOUND MODE button on the remote control to select. Customizing the sound 1 Press MENU to display the menu main page. 2 Press 5or6 repeatedly to select Audio menu. 3 Press OK...TV sound) mode: Mono, Stereo and SAP (Second Audio Program). Using the Mute At any time, you may directly press STEREO button on the remote control to increase or decrease the volume. RAW/PCM The choice may be available if a digital signal is shown as an example. Setting Sound ...
... Language (In digital Other languages may be different when the unit works in different situation Note: you may directly press SOUND MODE button on the remote control to select. Customizing the sound 1 Press MENU to display the menu main page. 2 Press 5or6 repeatedly to select Audio menu. 3 Press OK...TV sound) mode: Mono, Stereo and SAP (Second Audio Program). Using the Mute At any time, you may directly press STEREO button on the remote control to increase or decrease the volume. RAW/PCM The choice may be available if a digital signal is shown as an example. Setting Sound ...

User Manual
Page 25
... is set automatically from a digital channel signal. - Once selected, use OK or 3/ 4 to the previous menu. Note: you may directly press SLEEP button on the remote control to set the year, date, and time options. 3 Press EXIT button to return to TV viewing or press MENU button to return to set...
... is set automatically from a digital channel signal. - Once selected, use OK or 3/ 4 to the previous menu. Note: you may directly press SLEEP button on the remote control to set the year, date, and time options. 3 Press EXIT button to return to TV viewing or press MENU button to return to set...
User Manual
Page 26
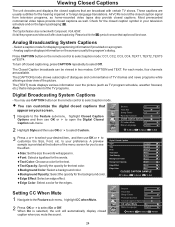
...24 Press CAPTION button on the tape's packaging: . You may use OK or 4 to ensure that appear on your television schedule and on the remote control to select Off. A preview sample is selected, the unit will be viewed in two modes: CAPTION and TEXT. To turn off closed caption... On or Off. These captions are available. Note: The Caption feature does not work with certain TV shows. Analog caption displays information on the remote control to see the effect. ¨Size: Set the size the words will offer closed captions. The [CAPTION] mode shows subscripts of dialogues ...
...24 Press CAPTION button on the tape's packaging: . You may use OK or 4 to ensure that appear on your television schedule and on the remote control to select Off. A preview sample is selected, the unit will be viewed in two modes: CAPTION and TEXT. To turn off closed caption... On or Off. These captions are available. Note: The Caption feature does not work with certain TV shows. Analog caption displays information on the remote control to see the effect. ¨Size: Set the size the words will offer closed captions. The [CAPTION] mode shows subscripts of dialogues ...
User Manual
Page 30
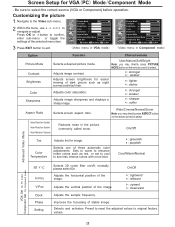
User/Nature/Soft/Bright Note: you may directly press PICTURE MODE button on the remote control to see less intense colors with more blue. 4: greenish 3: purplish Cool/Warm/Normal Advanced Video Menu VGA Set (for PC mode) Component Set (for ... Component) before operation. On/Off Tint Color Temperature Adjusts tint for Component mode) 3D Y/C H-Pos V-Pos Clock Phase Setting Selects 3D comb filter on the remote control to navigate or adjust. Wide/Cinema/Normal/Zoom Note: you may directly press ASPECT button on /off, normally please select On. Be sure to...
User/Nature/Soft/Bright Note: you may directly press PICTURE MODE button on the remote control to see less intense colors with more blue. 4: greenish 3: purplish Cool/Warm/Normal Advanced Video Menu VGA Set (for PC mode) Component Set (for ... Component) before operation. On/Off Tint Color Temperature Adjusts tint for Component mode) 3D Y/C H-Pos V-Pos Clock Phase Setting Selects 3D comb filter on the remote control to navigate or adjust. Wide/Cinema/Normal/Zoom Note: you may directly press ASPECT button on /off, normally please select On. Be sure to...
User Manual
Page 31
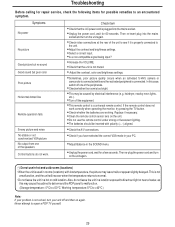
... settings. =Sometimes, poor picture quality occurs when an activated S-VHS camera or camcorder is connected while another activated peripheral is a universal remote control. Snowy picture and noise No stable or not synchronized VGA picture No output from one of the speakers Control buttons do not leave...the batteries are working. Symptoms No power No picture Good picture but no sound Good sound but poor color Poor picture Horizontal dotted line Remote operation fails. This is not a malfunction, and the unit will recover when the temperature returns to normal. • Do not leave...
... settings. =Sometimes, poor picture quality occurs when an activated S-VHS camera or camcorder is connected while another activated peripheral is a universal remote control. Snowy picture and noise No stable or not synchronized VGA picture No output from one of the speakers Control buttons do not leave...the batteries are working. Symptoms No power No picture Good picture but no sound Good sound but poor color Poor picture Horizontal dotted line Remote operation fails. This is not a malfunction, and the unit will recover when the temperature returns to normal. • Do not leave...

User Manual
Page 34
... need to 4 and try the previous code. 6. Press TV once. 2. Enter the first five-digit code for future reference. Aim the remote at the device and press Power. Repeat steps 15 for the other devices you want to program in "Manufacturer's Codes" in "Searching for your...1 to control your Universal TV, VCR or DVD, Cable or Satellite Receivers, Amplifier or Tuner, and Auxiliary devices. Programming your Remote Control Introduction Your remote lets you control four devices with the most popular code first. For future reference, write down the number in the appropriate code ...
... need to 4 and try the previous code. 6. Press TV once. 2. Enter the first five-digit code for future reference. Aim the remote at the device and press Power. Repeat steps 15 for the other devices you want to program in "Manufacturer's Codes" in "Searching for your...1 to control your Universal TV, VCR or DVD, Cable or Satellite Receivers, Amplifier or Tuner, and Auxiliary devices. Programming your Remote Control Introduction Your remote lets you control four devices with the most popular code first. For future reference, write down the number in the appropriate code ...
User Manual
Page 35
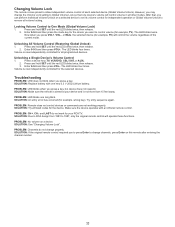
...1. PROBLEM: LED blinks one new 3.3 V 2032 Lithium battery. Make sure the device operates with one long blink. SOLUTION: If the original remote control required you press VOL+, VOL-, or Mute, the selected device (for all listed codes for example, TV). SOLUTION: Replace battery with an infrared... hold SET until the red LED blinks twice; PROBLEM: LED blinks when you press a key. Try entry sequence again. PROBLEM: Remote does not control devices or commands are not working properly. SOLUTION: Due to RCA design from 1983 to change properly. Changing Volume Lock ...
...1. PROBLEM: LED blinks one new 3.3 V 2032 Lithium battery. Make sure the device operates with one long blink. SOLUTION: If the original remote control required you press VOL+, VOL-, or Mute, the selected device (for all listed codes for example, TV). SOLUTION: Replace battery with an infrared... hold SET until the red LED blinks twice; PROBLEM: LED blinks when you press a key. Try entry sequence again. PROBLEM: Remote does not control devices or commands are not working properly. SOLUTION: Due to RCA design from 1983 to change properly. Changing Volume Lock ...
User Manual
Page 47
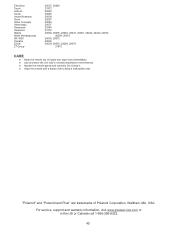
...it dry immediately. ? Handle the remote gently and carefully. For service, support and warranty information, visit www.pwwservice.com or in normal temperature environments. ? If it gets wet, wipe it looking like new. "Polaroid" and "Polaroid and Pixel" are trademarks of Polaroid Corporation, Waltham, MA, USA. ...Don't drop it. ? Use and store the unit only in the US or Canada call 1-866-396-6322. 45 Keep the remote dry. Totevision Touch Unitech Vector Vector...
...it dry immediately. ? Handle the remote gently and carefully. For service, support and warranty information, visit www.pwwservice.com or in normal temperature environments. ? If it gets wet, wipe it looking like new. "Polaroid" and "Polaroid and Pixel" are trademarks of Polaroid Corporation, Waltham, MA, USA. ...Don't drop it. ? Use and store the unit only in the US or Canada call 1-866-396-6322. 45 Keep the remote dry. Totevision Touch Unitech Vector Vector...
