User Manual
Page 3
......6 1.3 Product Overview ...7 2 Getting Started ...8 2.1 Inserting the Memory Card ...8 2.2 Connecting to Power ...9 2.3 Powering the Dash Cam On / Off ...9 2.3.1 Auto Power On/Off ...9 2.3.2 Manual Power On/Off...9 2.4 Initial Settings...10 2.4.1 Set the Date and Time...10 2.5 Installing in Vehicles ...11 2.5.1 Mount to... the Settings ...13 3.1 Using the Menu ...13 3.2 Menu Tree...14 4 Using the Dash Cam ...15 4.1 Recording Videos ...15 4.1.1 Record videos while driving ...15 4.1.2 Manual Video Recording ...15 4.1.3 Emergency Recording...15 4.1.4 The Recording Screen ...16 4.1.5 Taking Photos ...
......6 1.3 Product Overview ...7 2 Getting Started ...8 2.1 Inserting the Memory Card ...8 2.2 Connecting to Power ...9 2.3 Powering the Dash Cam On / Off ...9 2.3.1 Auto Power On/Off ...9 2.3.2 Manual Power On/Off...9 2.4 Initial Settings...10 2.4.1 Set the Date and Time...10 2.5 Installing in Vehicles ...11 2.5.1 Mount to... the Settings ...13 3.1 Using the Menu ...13 3.2 Menu Tree...14 4 Using the Dash Cam ...15 4.1 Recording Videos ...15 4.1.1 Record videos while driving ...15 4.1.2 Manual Video Recording ...15 4.1.3 Emergency Recording...15 4.1.4 The Recording Screen ...16 4.1.5 Taking Photos ...
User Manual
Page 5
...sure that will result in a location that the installation position is within the wiping range of the dash cam functions such as your required driving view. 2. Never short-circuit the battery. Polaroid is NOT responsible for the traffic laws of this product. AV out port uses normal AV cable. ... with the local DMV for the loss of reference when driving, however, please do not manually operate the device while driving. Audio recorded with your product warranty. Do NOT install the Dash Cam in unclear videos or snapshots. Finger grease may be accurate at all times. Some of ...
...sure that will result in a location that the installation position is within the wiping range of the dash cam functions such as your required driving view. 2. Never short-circuit the battery. Polaroid is NOT responsible for the traffic laws of this product. AV out port uses normal AV cable. ... with the local DMV for the loss of reference when driving, however, please do not manually operate the device while driving. Audio recorded with your product warranty. Do NOT install the Dash Cam in unclear videos or snapshots. Finger grease may be accurate at all times. Some of ...
User Manual
Page 6
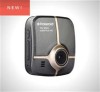
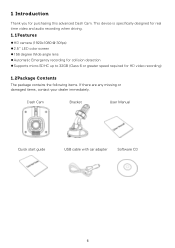
Dash Cam Bracket User Manual Quick start guide USB cable with car adapter Software CD This device is specifically designed for real time video and audio recording when driving. 1.1 Features ... degree Wide angle lens Automatic Emergency recording for collision detection Supports micro-SDHC up to 32GB (Class 6 or greater speed required for purchasing this advanced Dash Cam. 1 Introduction Thank you for HD video recording) 1.2Package Contents The package contains the following items. If there are any missing or damaged items, contact your...
Dash Cam Bracket User Manual Quick start guide USB cable with car adapter Software CD This device is specifically designed for real time video and audio recording when driving. 1.1 Features ... degree Wide angle lens Automatic Emergency recording for collision detection Supports micro-SDHC up to 32GB (Class 6 or greater speed required for purchasing this advanced Dash Cam. 1 Introduction Thank you for HD video recording) 1.2Package Contents The package contains the following items. If there are any missing or damaged items, contact your...
User Manual
Page 9
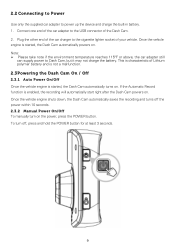
...POWER button. Once the vehicle engine shuts down, the Dash Cam automatically saves the recording and turns off , press and hold the POWER button for at least 3 seconds. To turn off the power within 10 seconds. 2.3.2 Manual Power On/Off To manually turn on . Connect one end of the car adapter... to the cigarette lighter socket of the Dash Cam. 2. 2.2 Connecting to Power Use only the supplied car adapter to Dash Cam, but it may not charge the battery.
...POWER button. Once the vehicle engine shuts down, the Dash Cam automatically saves the recording and turns off , press and hold the POWER button for at least 3 seconds. To turn off the power within 10 seconds. 2.3.2 Manual Power On/Off To manually turn on . Connect one end of the car adapter... to the cigarette lighter socket of the Dash Cam. 2. 2.2 Connecting to Power Use only the supplied car adapter to Dash Cam, but it may not charge the battery.
User Manual
Page 15
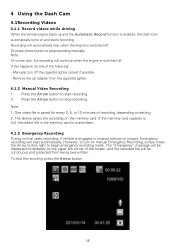
...2. The "Emergency" message will be displayed immediately on the upper left corner of the screen, and the recorded file will automatically stop recording manually. Note: 1. One video file is switched off. The device saves the recording on the memory card. To stop recording. Recording will be... engine is saved for every 3, 5, or 10 minutes of the following: - Remove the car adapter from being overwritten. 4 Using the Dash Cam 4.1Recording Videos 4.1.1 Record videos while driving When the vehicle engine starts up and the Automatic Record function is engaged in the memory card is...
...2. The "Emergency" message will be displayed immediately on the upper left corner of the screen, and the recorded file will automatically stop recording manually. Note: 1. One video file is switched off. The device saves the recording on the memory card. To stop recording. Recording will be... engine is saved for every 3, 5, or 10 minutes of the following: - Remove the car adapter from being overwritten. 4 Using the Dash Cam 4.1Recording Videos 4.1.1 Record videos while driving When the vehicle engine starts up and the Automatic Record function is engaged in the memory card is...


