User Manual
Page 5
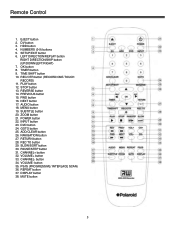
TIME SHIFT button 10. REC/OTR button (RECORD/ONE-TOUCH RECORD) 11. POWER button 22. DVD button 24. REC TO button 29. CHANNEL+ button 32. VOLUME- button 35. Remote Control 1. HDD button 4. LEFT DIRECTION/REPLAY button RIGHT DIRECTION/SKIP button (UP/DOWN/LEFT/RIGHT) 7. PLAY button 12. MENU button 19. INPUT button 23. NAVIGATION button...
TIME SHIFT button 10. REC/OTR button (RECORD/ONE-TOUCH RECORD) 11. POWER button 22. DVD button 24. REC TO button 29. CHANNEL+ button 32. VOLUME- button 35. Remote Control 1. HDD button 4. LEFT DIRECTION/REPLAY button RIGHT DIRECTION/SKIP button (UP/DOWN/LEFT/RIGHT) 7. PLAY button 12. MENU button 19. INPUT button 23. NAVIGATION button...
User Manual
Page 20
.... • Press the "REC TO" button to record for reference. 3. For details about timer recording, see "Timer Recording" for 30 minutes only, press the "RECORD" button after recording has started. In the Recording Mode, press the "DISPLAY" button to finish recording. Recording to DVD or HDD Select to record to DVD. 3. Entering the recoding mode and menu description: To enter the...
.... • Press the "REC TO" button to record for reference. 3. For details about timer recording, see "Timer Recording" for 30 minutes only, press the "RECORD" button after recording has started. In the Recording Mode, press the "DISPLAY" button to finish recording. Recording to DVD or HDD Select to record to DVD. 3. Entering the recoding mode and menu description: To enter the...
User Manual
Page 21
...): This function enables you want to suspend the DV. Once the scheduled time is paused or stopped, the system will cancel the timer recording process. Switch on the DVD/HDD. The connection method is the same as in the first 3 steps of space you to set it reports Pause status to stop... not move the unit or switch off the power of the DV, set up to six record quality settings to define the picture quality of the recordings and the amount of 1. 2. Switch on the DVD/HDD. Press the "REC/OTR" button and then press the "PLAY" button to the "CAMERA" mode, and...
...): This function enables you want to suspend the DV. Once the scheduled time is paused or stopped, the system will cancel the timer recording process. Switch on the DVD/HDD. The connection method is the same as in the first 3 steps of space you to set it reports Pause status to stop... not move the unit or switch off the power of the DV, set up to six record quality settings to define the picture quality of the recordings and the amount of 1. 2. Switch on the DVD/HDD. Press the "REC/OTR" button and then press the "PLAY" button to the "CAMERA" mode, and...

User Manual
Page 22
Recording Mode Record from HDD to an optical disc, there will be a flashing icon on the upper left corner of the screen to optical disc Press the "HDD" button and enter into the HDD display state. Notes: • In DVD tray, there should be a blank re-writable DVD disc, or the disc was previously used for archiving from HDD only. • When recording from hard drive to indicate the recording process. 22 Press the "ADD/CLEAR" button to select the five titles you desire to copy to DVD. Press the "REC" key to copy selected file to DVD.
Recording Mode Record from HDD to an optical disc, there will be a flashing icon on the upper left corner of the screen to optical disc Press the "HDD" button and enter into the HDD display state. Notes: • In DVD tray, there should be a blank re-writable DVD disc, or the disc was previously used for archiving from HDD only. • When recording from hard drive to indicate the recording process. 22 Press the "ADD/CLEAR" button to select the five titles you desire to copy to DVD. Press the "REC" key to copy selected file to DVD.
User Manual
Page 33
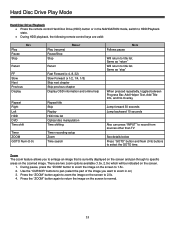
...Right Left HDD DVD Time shift Timer ZOOM GOTO Num (0-9) Play (resume) Pause/Stop Stop RESULT Return Fast Forward (x 4, 8, 32) Slow Forward (x 1/2, 1/4, 1/8) Skip next chapter Skip previous chapter Display OSD information and online help Repeat title Skip Replay HDD title list Optical disc manipulation Time shifting Timer recording setup ...Helper Text, Add Title Info, and No Overlay Jump forward 30 seconds Jump backward 10 seconds Also can press "INPUT" to record from sources other than TV See details below Press "GOTO" button and Num (0-9) buttons to zoom in the NAVIGATION mode, switch to...
...Right Left HDD DVD Time shift Timer ZOOM GOTO Num (0-9) Play (resume) Pause/Stop Stop RESULT Return Fast Forward (x 4, 8, 32) Slow Forward (x 1/2, 1/4, 1/8) Skip next chapter Skip previous chapter Display OSD information and online help Repeat title Skip Replay HDD title list Optical disc manipulation Time shifting Timer recording setup ...Helper Text, Add Title Info, and No Overlay Jump forward 30 seconds Jump backward 10 seconds Also can press "INPUT" to record from sources other than TV See details below Press "GOTO" button and Num (0-9) buttons to zoom in the NAVIGATION mode, switch to...
User Manual
Page 36
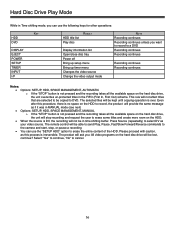
.../close disc tray Power off Bring up setup menu Bring up timer menu Changes the video source Change the video output mode NOTE Recording continues Recording continues unless you want to record to a DVD Recording continues Recording continues Recording continues Recording continues Notes: • Options: SETUP, HDD, SPACE MANAGEMENT, AUTOMATIC o If the "STOP" button is not pressed and the...
.../close disc tray Power off Bring up setup menu Bring up timer menu Changes the video source Change the video output mode NOTE Recording continues Recording continues unless you want to record to a DVD Recording continues Recording continues Recording continues Recording continues Notes: • Options: SETUP, HDD, SPACE MANAGEMENT, AUTOMATIC o If the "STOP" button is not pressed and the...
User Manual
Page 46
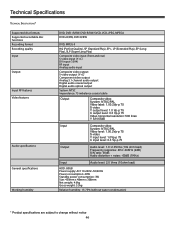
...cations TECHNICAL SPECIFICATIONS* Supported disc formats Supported recordable disc functions Recording format Recording quality Input Output Input RF features Video features Audio specifications General specifications Working humidity DVD, DVD+R/RW, DVD-R/RW, SVCD, VCD, JPEG, MPEG4 DVD+R/RW, DVD-R/RW DVD, MPEG-II HQ (Perfect Quality), ...response: 4Hz~44KHz (2dB) S/N ratio: 90dB Audio distortion + noise: -65dB (1KHz) Input Audio level: 2.0 Vrms (10ohm load) HDD: 80GB Power supply: AC110-240V~50/60Hz Power consumption: 40W Standby power consumption: 3W Size: 430mm x 48mm x 308mm Net weight:...
...cations TECHNICAL SPECIFICATIONS* Supported disc formats Supported recordable disc functions Recording format Recording quality Input Output Input RF features Video features Audio specifications General specifications Working humidity DVD, DVD+R/RW, DVD-R/RW, SVCD, VCD, JPEG, MPEG4 DVD+R/RW, DVD-R/RW DVD, MPEG-II HQ (Perfect Quality), ...response: 4Hz~44KHz (2dB) S/N ratio: 90dB Audio distortion + noise: -65dB (1KHz) Input Audio level: 2.0 Vrms (10ohm load) HDD: 80GB Power supply: AC110-240V~50/60Hz Power consumption: 40W Standby power consumption: 3W Size: 430mm x 48mm x 308mm Net weight:...
User Manual
Page 47
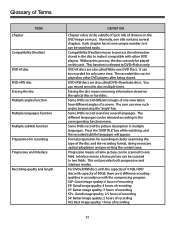
... disc or hard disc. This function is relevant to the corresponding function menu. Some DVDs record sound ins several chapters. Erasing the disc means removing information stored on the DVD image or music. For DVD±R/RW discs with the capacity of 4.7GB, HDD disc with the compressing program. SLP: Good image quality; 6 hours of...
... disc or hard disc. This function is relevant to the corresponding function menu. Some DVDs record sound ins several chapters. Erasing the disc means removing information stored on the DVD image or music. For DVD±R/RW discs with the capacity of 4.7GB, HDD disc with the compressing program. SLP: Good image quality; 6 hours of...


