User Manual
Page 11
... at the TV Signal Input. 11 Press the "SETUP" button to the system memory. The tuner will not be lost. 1. Notes: • If you must conduct a channel scan to enable the unit to the upper level menu and set the DVD recorder to channel 3 or 4 (depending on the remote ...unit. • Before the tuning, you are using a set-top box (cable TV receiver or satellite broadcast receiver), set up other items. • For the differences of channels that have been stored to highlight "APS". 3. System Setup Recording Quality 1. Use the ▲ or ▼ buttons to memory. 5. This ...
... at the TV Signal Input. 11 Press the "SETUP" button to the system memory. The tuner will not be lost. 1. Notes: • If you must conduct a channel scan to enable the unit to the upper level menu and set the DVD recorder to channel 3 or 4 (depending on the remote ...unit. • Before the tuning, you are using a set-top box (cable TV receiver or satellite broadcast receiver), set up other items. • For the differences of channels that have been stored to highlight "APS". 3. System Setup Recording Quality 1. Use the ▲ or ▼ buttons to memory. 5. This ...
User Manual
Page 13
... recorded as 4:3, no matter how the screen format is Letter Box. 3. When a wide screen picture is uses for video scan output mode, and press the "OK" button to confirm. Some pictures might not be played under the screen format you play a DVD disc or receive a TV signal with the TV ...screen. System Setup TV Display 1. In the General Settings menu, use the ▲ or ▼ button to move the cursor, select the "Video ...
... recorded as 4:3, no matter how the screen format is Letter Box. 3. When a wide screen picture is uses for video scan output mode, and press the "OK" button to confirm. Some pictures might not be played under the screen format you play a DVD disc or receive a TV signal with the TV ...screen. System Setup TV Display 1. In the General Settings menu, use the ▲ or ▼ button to move the cursor, select the "Video ...
User Manual
Page 20
...8226; The unit has a function of the Recording Mode. 2. If you have a recordable media in the tray, you are recording from . Recording will continue until the disc is full. • To set up a recording schedule in the unit, including S-Video, composite video, TV tuning, DV input and stereo audio input....REC" button to switch between the HDD or DVD record sources. 20 The Monitoring Mode can press "REC" and start recording (OTR) to turn on Time Shift mode. Note: If you select automatically. Recording to DVD or HDD Select to record to the rear audio inputs. You can ...
...8226; The unit has a function of the Recording Mode. 2. If you have a recordable media in the tray, you are recording from . Recording will continue until the disc is full. • To set up a recording schedule in the unit, including S-Video, composite video, TV tuning, DV input and stereo audio input....REC" button to switch between the HDD or DVD record sources. 20 The Monitoring Mode can press "REC" and start recording (OTR) to turn on Time Shift mode. Note: If you select automatically. Recording to DVD or HDD Select to record to the rear audio inputs. You can ...
User Manual
Page 23
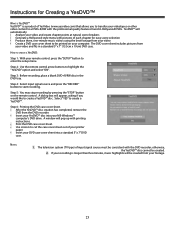
..."SETUP" button to enter the setup menu. A window will pop up with the DVD recorder; HOW TO CREATE A YesDVD: Step 1: With your MS-Windows™ computer's DVD drive. The television system (TV type) of input signal source must be consistent with printing instructions. • Print...highlight the "YesDVD" option and select "ON". Step 3: Before recording, place a blank DVD+R/RW disc in a standard 5" x 7" (13.5cm x 19cm) DVD case. The DVD cover sheet includes pictures from your video and fits in the DVD tray. NOTES: 1. Instructions for easy scene selection • Produce ...
..."SETUP" button to enter the setup menu. A window will pop up with the DVD recorder; HOW TO CREATE A YesDVD: Step 1: With your MS-Windows™ computer's DVD drive. The television system (TV type) of input signal source must be consistent with printing instructions. • Print...highlight the "YesDVD" option and select "ON". Step 3: Before recording, place a blank DVD+R/RW disc in a standard 5" x 7" (13.5cm x 19cm) DVD case. The DVD cover sheet includes pictures from your video and fits in the DVD tray. NOTES: 1. Instructions for easy scene selection • Produce ...
User Manual
Page 27
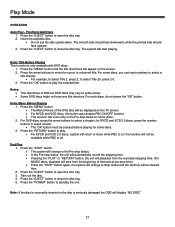
... the "MENU" button and the title directories will start from the recorded stopping time. (For MUSIC discs, playback will start playing. Press the arrow buttons to move the cursor to select Title 20, press 2-0. 3. Notes: • Title directories of the DVD disc will be cleared then. 2. Take out the disc. 4. to a ..., press the arrow buttons to select a track. • The "OK" button must be available while PBC is on the TV screen. • For SVCD and VCD discs, this button auto detects PBC ON/OFF function. • This function will not be pressed before playing for...
... the "MENU" button and the title directories will start from the recorded stopping time. (For MUSIC discs, playback will start playing. Press the arrow buttons to move the cursor to select Title 20, press 2-0. 3. Notes: • Title directories of the DVD disc will be cleared then. 2. Take out the disc. 4. to a ..., press the arrow buttons to select a track. • The "OK" button must be available while PBC is on the TV screen. • For SVCD and VCD discs, this button auto detects PBC ON/OFF function. • This function will not be pressed before playing for...
User Manual
Page 33
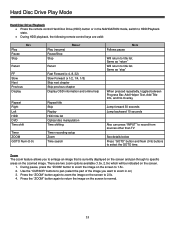
...Add Helper Text, Add Title Info, and No Overlay Jump forward 30 seconds Jump backward 10 seconds Also can press "INPUT" to record from sources other than TV See details below Press "GOTO" button and Num (0-9) buttons to 2.0x. 4. There are valid: KEY Play Pause Stop Return... DVD Time shift Timer ZOOM GOTO Num (0-9) Play (resume) Pause/Stop Stop RESULT Return Fast Forward (x 4, 8, 32) Slow Forward (x 1/2, 1/4, 1/8) Skip next chapter Skip previous chapter Display OSD information and online help Repeat title Skip Replay HDD title list Optical disc manipulation Time shifting Timer recording ...
...Add Helper Text, Add Title Info, and No Overlay Jump forward 30 seconds Jump backward 10 seconds Also can press "INPUT" to record from sources other than TV See details below Press "GOTO" button and Num (0-9) buttons to 2.0x. 4. There are valid: KEY Play Pause Stop Return... DVD Time shift Timer ZOOM GOTO Num (0-9) Play (resume) Pause/Stop Stop RESULT Return Fast Forward (x 4, 8, 32) Slow Forward (x 1/2, 1/4, 1/8) Skip next chapter Skip previous chapter Display OSD information and online help Repeat title Skip Replay HDD title list Optical disc manipulation Time shifting Timer recording ...
User Manual
Page 38
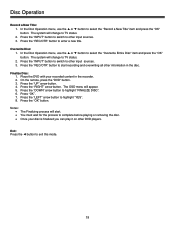
... "FINALIZE DISC". 6. Press the "UP" arrow button. 4. The OSD menu will start recording and overwriting all other input sources. 3. Press the "DOWN" arrow button to TV status. 2. Exit: Press the ◄ button to TV status. 2. The system will change to exit this mode. 38 In the Disc Operation menu...complete before playing or removing the disc. • Once your recorded content in the disc. Finalize Disc: 1. Press the "LEFT" arrow button to select the "Overwrite Entire Disc" item and press the "OK" button. Place the DVD with your disc is finalized you can play it on ...
... "FINALIZE DISC". 6. Press the "UP" arrow button. 4. The OSD menu will start recording and overwriting all other input sources. 3. Press the "DOWN" arrow button to TV status. 2. Exit: Press the ◄ button to TV status. 2. The system will change to exit this mode. 38 In the Disc Operation menu...complete before playing or removing the disc. • Once your recorded content in the disc. Finalize Disc: 1. Press the "LEFT" arrow button to select the "Overwrite Entire Disc" item and press the "OK" button. Place the DVD with your disc is finalized you can play it on ...


