
User Manual
Page 2
... energy and, if not installed and used in accordance with the instructions, may not cause harmful interference. (2) This device must accept any changes or modifications to stop operation of the equipment. Do not make any interference received, including interference that interference will not occur in a particular installation. Polaroid a544 Digital Camera User Guide www.polaroid.com EN-1 If such changes or modifications should be...
... energy and, if not installed and used in accordance with the instructions, may not cause harmful interference. (2) This device must accept any changes or modifications to stop operation of the equipment. Do not make any interference received, including interference that interference will not occur in a particular installation. Polaroid a544 Digital Camera User Guide www.polaroid.com EN-1 If such changes or modifications should be...
User Manual
Page 3
As a consumer, you are responsible for your country listed in the instruction manual. EN-2 Polaroid a544 Digital Camera User Guide www.polaroid.com The presence of these materials may, if not disposed of properly, have potential adverse effects on...product, please go to discontinue midway (fail), restart the application or disconnect and connect the communication cable (USB, etc.) Again. Notice If static electricity or electromagnetism causes data transfer to www.polaroid.com and click on "Company" or call the customer service number for ensuring that this label on the environment and...
As a consumer, you are responsible for your country listed in the instruction manual. EN-2 Polaroid a544 Digital Camera User Guide www.polaroid.com The presence of these materials may, if not disposed of properly, have potential adverse effects on...product, please go to discontinue midway (fail), restart the application or disconnect and connect the communication cable (USB, etc.) Again. Notice If static electricity or electromagnetism causes data transfer to www.polaroid.com and click on "Company" or call the customer service number for ensuring that this label on the environment and...
User Manual
Page 7
... type of the batteries properly. Insert the batteries in use of the flash Remove batteries from the camera immediately. Please dispose of batteries only. Call our toll-free customer service number. Using Your Batteries Our laboratory testing has shown that our digital camera models comply with this icon: Or visit www.polaroid.com. These instructions should be retained for the insert with industry standard battery consumption levels (Camera & Imaging Products Association commonly...
... type of the batteries properly. Insert the batteries in use of the flash Remove batteries from the camera immediately. Please dispose of batteries only. Call our toll-free customer service number. Using Your Batteries Our laboratory testing has shown that our digital camera models comply with this icon: Or visit www.polaroid.com. These instructions should be retained for the insert with industry standard battery consumption levels (Camera & Imaging Products Association commonly...
User Manual
Page 8
... Language 15 Formatting the Memory Card or Internal Memory 16 CAPTURE MODE 16 Capturing Images 16 Using the Flash 17 Using the Zoom Function 18 Setting Focus 19 Setting the Scene Mode 20 Adjusting the Exposure (EV Compensation) 21 VIDEO MODE 21 Recording Video Clips 22 Playing Back Video Clips 23 PLAYBACK MODE 23 Playing Back Still Images 24 Thumbnail Display 24 Slideshow Display 25 Protecting Images 26 Erasing Images 27 MENU OPTIONS 27 Capture Menu 29 Video Menu 30 Playback Menu 31 Setup Menu 33 TRANSFERRING FILES TO YOUR COMPUTER 33 Downloading Your Files 34 EDITING SOFTWARE INSTALLATION...
... Language 15 Formatting the Memory Card or Internal Memory 16 CAPTURE MODE 16 Capturing Images 16 Using the Flash 17 Using the Zoom Function 18 Setting Focus 19 Setting the Scene Mode 20 Adjusting the Exposure (EV Compensation) 21 VIDEO MODE 21 Recording Video Clips 22 Playing Back Video Clips 23 PLAYBACK MODE 23 Playing Back Still Images 24 Thumbnail Display 24 Slideshow Display 25 Protecting Images 26 Erasing Images 27 MENU OPTIONS 27 Capture Menu 29 Video Menu 30 Playback Menu 31 Setup Menu 33 TRANSFERRING FILES TO YOUR COMPUTER 33 Downloading Your Files 34 EDITING SOFTWARE INSTALLATION...

User Manual
Page 12
...] Off 12. Photo / Video counter Polaroid a544 Digital Camera User Guide www.polaroid.com EN-11 Storage media [ SD ] Internal memory (no card) [ ] SD/SDHC memory card 9. [ -+ ] Exposure compensation 12 34 9 -+ -1/3 2009/03/26 A 5 6 1.6 10 5M 7 11 2S 00017 8 12 13 14 15 16 10. Zoom indicator 15. Image quality [ ] Fine [ ] Standard [ ] Economy 16. Mode indicator [ ] Auto [ ] Sport [ ] Night Screen [ ] Portrait [ ] Landscape [ ] Backlight 5. Focus setting [ ] Normal [ ] Macro 6. Main focus area 14. LCD Display Icons 1. Brightness Alert 3. Self-timer icon [ 10s...
...] Off 12. Photo / Video counter Polaroid a544 Digital Camera User Guide www.polaroid.com EN-11 Storage media [ SD ] Internal memory (no card) [ ] SD/SDHC memory card 9. [ -+ ] Exposure compensation 12 34 9 -+ -1/3 2009/03/26 A 5 6 1.6 10 5M 7 11 2S 00017 8 12 13 14 15 16 10. Zoom indicator 15. Image quality [ ] Fine [ ] Standard [ ] Economy 16. Mode indicator [ ] Auto [ ] Sport [ ] Night Screen [ ] Portrait [ ] Landscape [ ] Backlight 5. Focus setting [ ] Normal [ ] Macro 6. Main focus area 14. LCD Display Icons 1. Brightness Alert 3. Self-timer icon [ 10s...
User Manual
Page 15
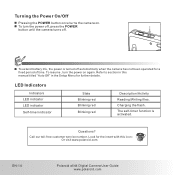
... Polaroid a544 Digital Camera User Guide www.polaroid.com Refer to section in this manual titled "Auto Off" in the Setup Menu for the insert with this icon: Or visit www.polaroid.com. LED Indicators Indicators LED indicator LED indicator Self-timer indicator State Blinking red Blinking red Blinking red Description/Activity Reading/Writing files. To extend battery life, the power is activated. Questions? Turning the Power On/Off Pressing the POWER button once turns the camera on again. Call our toll-free customer service number. The self-timer function is turned...
... Polaroid a544 Digital Camera User Guide www.polaroid.com Refer to section in this manual titled "Auto Off" in the Setup Menu for the insert with this icon: Or visit www.polaroid.com. LED Indicators Indicators LED indicator LED indicator Self-timer indicator State Blinking red Blinking red Blinking red Description/Activity Reading/Writing files. To extend battery life, the power is activated. Questions? Turning the Power On/Off Pressing the POWER button once turns the camera on again. Call our toll-free customer service number. The self-timer function is turned...
User Manual
Page 16
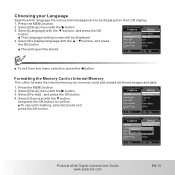
... the LCD display. 1. Formatting the Memory Card or Internal Memory This utility formats the internal memory (or memory card) and erases all stored images and data. 1. Select [Format] , and press the OK button. 4. Capture Format Language Auto Off Sys. Exit Setup Next Menu English Off Next Menu 60Hz OK Set Capture Setup Format Next Menu Language Cancel English Auto Off Execute Off Sys. Capture Format Language Auto Off Sys. Select [ Execute] with the button. 3. Reset Light Freq. Reset Next Menu Light Freq. 60Hz Exit OK Set Polaroid a544 Digital Camera User Guide...
... the LCD display. 1. Formatting the Memory Card or Internal Memory This utility formats the internal memory (or memory card) and erases all stored images and data. 1. Select [Format] , and press the OK button. 4. Capture Format Language Auto Off Sys. Exit Setup Next Menu English Off Next Menu 60Hz OK Set Capture Setup Format Next Menu Language Cancel English Auto Off Execute Off Sys. Capture Format Language Auto Off Sys. Select [ Execute] with the button. 3. Reset Light Freq. Reset Next Menu Light Freq. 60Hz Exit OK Set Polaroid a544 Digital Camera User Guide...

User Manual
Page 17
... the SHUTTER button to help you compose images, playback recorded images/video clips or adjust menu settings. 1. You can take an image using a desired flash mode to Macro mode. The flash is disabled if the camera is set to suit your circumstances. MODE 1. EN-16 Polaroid a544 Digital Camera User Guide www.polaroid.com Press the Power button to have any effect. Toggle until your image on the LCD display so that the main subject is designed to function automatically when lighting conditions permit the use is...
... the SHUTTER button to help you compose images, playback recorded images/video clips or adjust menu settings. 1. You can take an image using a desired flash mode to Macro mode. The flash is disabled if the camera is set to suit your circumstances. MODE 1. EN-16 Polaroid a544 Digital Camera User Guide www.polaroid.com Press the Power button to have any effect. Toggle until your image on the LCD display so that the main subject is designed to function automatically when lighting conditions permit the use is...

User Manual
Page 18
... the Power button to turn the power on the LCD display. 3. To activate the digital zoom, press the▲ / ▼ button. ■ The status of digital magnification is shown on . 2. Compose your scene and press the SHUTTER button to 8.0x. ■ Image noise (grain) may become. Polaroid a544 Digital Camera User Guide www.polaroid.com EN-17 You can enlarge the subjects by pressing the ▲ / ▼ button.It is a useful...
... the Power button to turn the power on the LCD display. 3. To activate the digital zoom, press the▲ / ▼ button. ■ The status of digital magnification is shown on . 2. Compose your scene and press the SHUTTER button to 8.0x. ■ Image noise (grain) may become. Polaroid a544 Digital Camera User Guide www.polaroid.com EN-17 You can enlarge the subjects by pressing the ▲ / ▼ button.It is a useful...
User Manual
Page 20
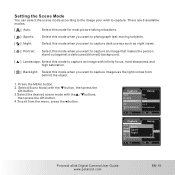
... most picture taking situations. Landscape: Select this mode when you want to capture an image that makes the person stand out against a defocused (blurred) background. Capture Size Quality Scene Mode EV White Balance Setup 5M Fine Auto +0.0 Fluorescent Exit OK Set Capture Size Auto Quality Sport Scene Mode Night EV White Balance Setup 5M Fine Auto +0.0 Fluorescent Exit OK Set Polaroid a544 Digital Camera User Guide www.polaroid.com EN-19 Select [Scene Mode] with the ▼ button...
... most picture taking situations. Landscape: Select this mode when you want to capture an image that makes the person stand out against a defocused (blurred) background. Capture Size Quality Scene Mode EV White Balance Setup 5M Fine Auto +0.0 Fluorescent Exit OK Set Capture Size Auto Quality Sport Scene Mode Night EV White Balance Setup 5M Fine Auto +0.0 Fluorescent Exit OK Set Polaroid a544 Digital Camera User Guide www.polaroid.com EN-19 Select [Scene Mode] with the ▼ button...

User Manual
Page 22
... flash cannot be used. ■ If the write speed of VGA (640 x 480) / QVGA (320 x 240) pixels. 1. VIDEO MODE Recording Video Clips This mode allows you to record video clips at a resolution of your SD/SDHC memory card is not fast enough for recording video clips in the currently selected size, the video recording will start. ■ Pressing the shutter button one continuous video clip is 00:59:59. Press the MODE button to set the camera mode...
... flash cannot be used. ■ If the write speed of VGA (640 x 480) / QVGA (320 x 240) pixels. 1. VIDEO MODE Recording Video Clips This mode allows you to record video clips at a resolution of your SD/SDHC memory card is not fast enough for recording video clips in the currently selected size, the video recording will start. ■ Pressing the shutter button one continuous video clip is 00:59:59. Press the MODE button to set the camera mode...

User Manual
Page 23
... our toll-free customer service number. To pause video playback, press the OK button. The sound recorded with this icon: Or visit www.polaroid.com. Press the OK button to the QuickTime on computers. ■ QuickTime basic player is available free of the video clip. This stops playback and returns to the start of charge, compatible with Mac and Windows-computers and can be played back on -line help using QuickTime Player...
... our toll-free customer service number. To pause video playback, press the OK button. The sound recorded with this icon: Or visit www.polaroid.com. Press the OK button to the QuickTime on computers. ■ QuickTime basic player is available free of the video clip. This stops playback and returns to the start of charge, compatible with Mac and Windows-computers and can be played back on -line help using QuickTime Player...

User Manual
Page 25
... played back. ■ Video files are displayed first frame image, and they are displayed simultaneously. 1 2 3 ■ For recorded video clips, the video playback mode icon [ ] will be displayed at a time. 1. Press the OK button to display the selected image on full screen. 7 8 9 100-0008 Slideshow Display The slideshow function enables you to view 9 thumbnail images on the LCD display simultaneously so you may search for a particular image. 1. Press the[ ] button. 2. Play Delete Copy To Card Slide Show DPOF Protect Exit Setup Next Menu...
... played back. ■ Video files are displayed first frame image, and they are displayed simultaneously. 1 2 3 ■ For recorded video clips, the video playback mode icon [ ] will be displayed at a time. 1. Press the OK button to display the selected image on full screen. 7 8 9 100-0008 Slideshow Display The slideshow function enables you to view 9 thumbnail images on the LCD display simultaneously so you may search for a particular image. 1. Press the[ ] button. 2. Play Delete Copy To Card Slide Show DPOF Protect Exit Setup Next Menu...

User Manual
Page 28
... used when capturing still images. Select the desired setting with the / buttons, and press the OK button to enter its respective menu. 4. Capture Size Quality Scene Mode EV White Balance Setup 5M Fine Auto +0.0 Fluorescent Exit OK Set Capture ISO Color Saturation Sharpness SelfTimer Exit Setup Auto Standard Normal Normal Off OK Set Capture Date Input Time Stamp Burst Mode Setup Next Menu Off Off Exit OK Set 1. MENU OPTIONS Capture Menu This menu is for the basic camera settings...
... used when capturing still images. Select the desired setting with the / buttons, and press the OK button to enter its respective menu. 4. Capture Size Quality Scene Mode EV White Balance Setup 5M Fine Auto +0.0 Fluorescent Exit OK Set Capture ISO Color Saturation Sharpness SelfTimer Exit Setup Auto Standard Normal Normal Off OK Set Capture Date Input Time Stamp Burst Mode Setup Next Menu Off Off Exit OK Set 1. MENU OPTIONS Capture Menu This menu is for the basic camera settings...
User Manual
Page 31
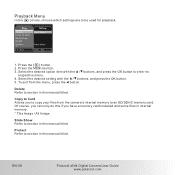
... this manual titled. Play Delete Copy To Card Slide Show DPOF Protect Exit Setup Next Menu Next Menu OK Set 1. Delete Refer to an SD/SDHC memory card. Copy to Card Allows you have a memory card installed and some files in internal memory. * This Image / All Image Slide Show Refer to section in this manual titled. Press the [ ] button. 2. Select the desired setting with the / buttons, and press the OK button to be used for playback. Playback Menu In the [ ] mode, choose which settings...
... this manual titled. Play Delete Copy To Card Slide Show DPOF Protect Exit Setup Next Menu Next Menu OK Set 1. Delete Refer to an SD/SDHC memory card. Copy to Card Allows you have a memory card installed and some files in internal memory. * This Image / All Image Slide Show Refer to section in this manual titled. Press the [ ] button. 2. Select the desired setting with the / buttons, and press the OK button to be used for playback. Playback Menu In the [ ] mode, choose which settings...

User Manual
Page 32
... useful for a specific period of time, the power to the camera is not used for extending battery life. * 1 Minute / 3Minutes / 5Minutes / Off Polaroid a544 Digital Camera User Guide www.polaroid.com EN-31 Select the [Setup] menu with the / buttons, and press the OK button. 5. Language Refer to enter its respective menu. 4. Format Refer to work: Capture Format Language Auto Off Sys. Setup Menu Choose how you want your camera to section in this manual titled "Formatting the Memory Card or Internal Memory...
... useful for a specific period of time, the power to the camera is not used for extending battery life. * 1 Minute / 3Minutes / 5Minutes / Off Polaroid a544 Digital Camera User Guide www.polaroid.com EN-31 Select the [Setup] menu with the / buttons, and press the OK button. 5. Language Refer to enter its respective menu. 4. Format Refer to work: Capture Format Language Auto Off Sys. Setup Menu Choose how you want your camera to section in this manual titled "Formatting the Memory Card or Internal Memory...

User Manual
Page 34
... the Windows desktop, double click on your desktop. Your recorded images and video clips will be inside these folders. 8. Polaroid a544 Digital Camera User Guide www.polaroid.com EN-33 Look for a new "removable disk" icon. ■ This "removable disk" is actually the memory (or memory card) in your computer. 2. Mac users: Double-click the "untitled" or "unlabeled" disk drive icon on the DCIM folder to open it to an available USB port on your camera. TRANSFERRING FILES TO...
... the Windows desktop, double click on your desktop. Your recorded images and video clips will be inside these folders. 8. Polaroid a544 Digital Camera User Guide www.polaroid.com EN-33 Look for a new "removable disk" icon. ■ This "removable disk" is actually the memory (or memory card) in your computer. 2. Mac users: Double-click the "untitled" or "unlabeled" disk drive icon on the DCIM folder to open it to an available USB port on your camera. TRANSFERRING FILES TO...

User Manual
Page 37
... camera) Focus range Macro: 4.3"~7.0"(11cm ~ 18cm) Normal:20" ~ infinity (0.5m ~ infinity) Shutter speed LCD monitor Self-timer Exposure compensation 1 - 1/1000 sec. 2.4" full color LTPS-TFT LCD (153.6K pixels) 10 sec delay, 2 sec delay -2.0EV~ +2.0EV (in 0.3EV increments) White balance Interface Power Dimensions Weight Auto, Daylight, Cloudy, Tungsten, Fluorescent Auto, 100, 200 USB connector 2 x AAA size batteries Approx. 90 x 55 x 18 mm (without protruding parts) Approx. 82g (without batteries and memory card...
... camera) Focus range Macro: 4.3"~7.0"(11cm ~ 18cm) Normal:20" ~ infinity (0.5m ~ infinity) Shutter speed LCD monitor Self-timer Exposure compensation 1 - 1/1000 sec. 2.4" full color LTPS-TFT LCD (153.6K pixels) 10 sec delay, 2 sec delay -2.0EV~ +2.0EV (in 0.3EV increments) White balance Interface Power Dimensions Weight Auto, Daylight, Cloudy, Tungsten, Fluorescent Auto, 100, 200 USB connector 2 x AAA size batteries Approx. 90 x 55 x 18 mm (without protruding parts) Approx. 82g (without batteries and memory card...
User Manual
Page 39
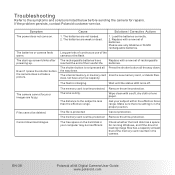
... the hard disk has a space for running Windows, and if the drive for repairs. The memory card is protected Cancel protection. Load the batteries correctly. 2. Replace with a soft, dry cloth or lens paper. Even if I press the shutter button, the camera does not take a picture. The internal memory or memory card does not have powering up screen blinks after The rechargeable batteries have any free capacity. Insert a new memory card, or delete files. The camera cannot focus or images are fuzzy...
... the hard disk has a space for running Windows, and if the drive for repairs. The memory card is protected Cancel protection. Load the batteries correctly. 2. Replace with a soft, dry cloth or lens paper. Even if I press the shutter button, the camera does not take a picture. The internal memory or memory card does not have powering up screen blinks after The rechargeable batteries have any free capacity. Insert a new memory card, or delete files. The camera cannot focus or images are fuzzy...
User Manual
Page 40
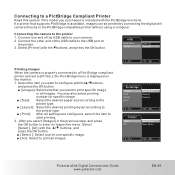
... to start printing. 2. Exit OK Set Pictbridge Images Size layout print Next Menu Default Default Exit OK Set Images Select All Next Menu Next Menu Exit OK Set Polaroid a544 Digital Camera User Guide www.polaroid.com EN-39 If a printer that supports PictBridge is included with the buttons, and press the OK button. Connect the other end of the USB cable to [Printer], the Pict-Bridge menu is displayed on the printer. 3. Connecting the camera to enter its respective menu. USB Disk Drive Printer Execute Execute Printing images...
... to start printing. 2. Exit OK Set Pictbridge Images Size layout print Next Menu Default Default Exit OK Set Images Select All Next Menu Next Menu Exit OK Set Polaroid a544 Digital Camera User Guide www.polaroid.com EN-39 If a printer that supports PictBridge is included with the buttons, and press the OK button. Connect the other end of the USB cable to [Printer], the Pict-Bridge menu is displayed on the printer. 3. Connecting the camera to enter its respective menu. USB Disk Drive Printer Execute Execute Printing images...


