
User Guide
Page 2
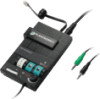
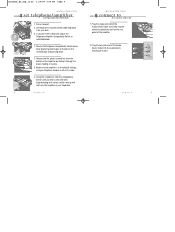
... switch. Step 1: Plug into power source. Step 5: Connect to phone and headset. PART II PART III PART IV Make a test call. The Switcher amplifier is not designed to a Plantronics headset and provides control of its more advanced features. ii Amplifier Features • Compatible... the sound through your telephone and computer or external audio device to work on cordless telephones. The Headset Switcher Multimedia Amplifier adapts your headset. This User Guide will help you from Plantronics®. P A R T I Install in the handset or on telephones that have the dial ...
... switch. Step 1: Plug into power source. Step 5: Connect to phone and headset. PART II PART III PART IV Make a test call. The Switcher amplifier is not designed to a Plantronics headset and provides control of its more advanced features. ii Amplifier Features • Compatible... the sound through your telephone and computer or external audio device to work on cordless telephones. The Headset Switcher Multimedia Amplifier adapts your headset. This User Guide will help you from Plantronics®. P A R T I Install in the handset or on telephones that have the dial ...
User Guide
Page 3
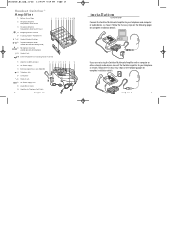
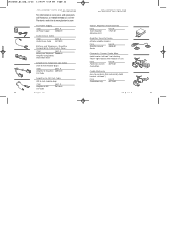
... Amplifier with a computer or other external audio device, connect the Switcher amplifier to your telephone as shown. Follow the five easy steps on the following pages for complete installation details. Switcher.biling.ii-25 11/4/98 7:58 PM Page iv Headset Switcher™ Amplifier 1 Battery Access Door 1 2 Telephone/Amplifier Compatibility Slide Switch 3 Telephone/Amplifier...
... Amplifier with a computer or other external audio device, connect the Switcher amplifier to your telephone as shown. Follow the five easy steps on the following pages for complete installation details. Switcher.biling.ii-25 11/4/98 7:58 PM Page iv Headset Switcher™ Amplifier 1 Battery Access Door 1 2 Telephone/Amplifier Compatibility Slide Switch 3 Telephone/Amplifier...
User Guide
Page 4
... batteries and replace the door. 3. You will need to be used, but batteries will hear three "beeps" through the head- The Switcher amplifier requires power to a standard wall socket on the door and pushing down. 2. Remove the Battery Access Door located on the side of... install in to work with most phones. Power is shown installed and plugged in 5 easy steps Switcher.biling.ii-25 11/4/98 7:58 PM Page vi I PLUG INTO POWER SOURCE CONNECT TO PHONE AND HEADSET SET DEFAULT SETTINGS SET TELEPHONE/AMPLIFIER COMPATIBILITY SWITCH CONNECT TO AN AUDIO DEVICE vi INSTALLATION STEPS 1 S...
... batteries and replace the door. 3. You will need to be used, but batteries will hear three "beeps" through the head- The Switcher amplifier requires power to a standard wall socket on the door and pushing down. 2. Remove the Battery Access Door located on the side of... install in to work with most phones. Power is shown installed and plugged in 5 easy steps Switcher.biling.ii-25 11/4/98 7:58 PM Page vi I PLUG INTO POWER SOURCE CONNECT TO PHONE AND HEADSET SET DEFAULT SETTINGS SET TELEPHONE/AMPLIFIER COMPATIBILITY SWITCH CONNECT TO AN AUDIO DEVICE vi INSTALLATION STEPS 1 S...
User Guide
Page 5
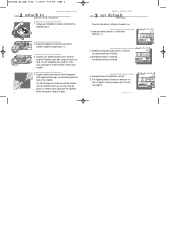
... (QD) module on the long curly cord coming from the amplifier, 2 while leaving your telephone base to Headset ( ). 2 3 4 5 6 2. Telephone/Computer Audio Switch is switched to the Switcher amplifier telephone jack ( ) using the short curly cord. Incoming Volume Thumbwheel is released 6 (no colored indicator... are the default settings for your telephone's handset cord into the outlet normally used for headset use. 1. On your telephone base, plug the short curly cord into the Switcher amplifier handset jack ( ). 3. INSTALLATION STEPS 3 S T E P set default settings...
... (QD) module on the long curly cord coming from the amplifier, 2 while leaving your telephone base to Headset ( ). 2 3 4 5 6 2. Telephone/Computer Audio Switch is switched to the Switcher amplifier telephone jack ( ) using the short curly cord. Incoming Volume Thumbwheel is released 6 (no colored indicator... are the default settings for your telephone's handset cord into the outlet normally used for headset use. 1. On your telephone base, plug the short curly cord into the Switcher amplifier handset jack ( ). 3. INSTALLATION STEPS 3 S T E P set default settings...
User Guide
Page 6
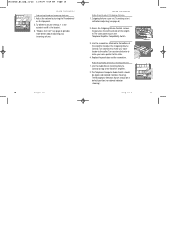
...Telephone/Amplifier Compatibility Switch as indicated below: 1. Plug the single-jack end of the amplifier by placing two fingers or thumbs on headset. 2. Plug the twin jack end of the Audio Device Cable into the external audio device jack on your desk. 3. Make...the default settings, and your telephone. 4 english INSTALLATION STEPS 5 S T E P connect to an audio device 1. Lift the phone's handset off of the amplifier. 2. Switcher.biling.ii-25 11/4/98 7:58 PM Page 4 INSTALLATION STEPS 4 S T E P set telephone/amplifier Compatibility Switch 34 5 6 12 3 4 5 6 -+ 34 5 6 ...
...Telephone/Amplifier Compatibility Switch as indicated below: 1. Plug the single-jack end of the amplifier by placing two fingers or thumbs on headset. 2. Plug the twin jack end of the Audio Device Cable into the external audio device jack on your desk. 3. Make...the default settings, and your telephone. 4 english INSTALLATION STEPS 5 S T E P connect to an audio device 1. Lift the phone's handset off of the amplifier. 2. Switcher.biling.ii-25 11/4/98 7:58 PM Page 4 INSTALLATION STEPS 4 S T E P set telephone/amplifier Compatibility Switch 34 5 6 12 3 4 5 6 -+ 34 5 6 ...
User Guide
Page 7
...appropriate level. Release the Microphone Selection Switch (no colored indicator showing) to your Switcher amplifier settings are in default. If you hear a buzz or hum, try unplugging the Power Supply. Make sure your headset's User Guide to page 10 for more details. 6. See page 4 for... your Switcher amplifier into the AC power source again. See page 12 for more details. 9. If you plugged your Switcher amplifier. Call a friend or colleague. 5. See page...
...appropriate level. Release the Microphone Selection Switch (no colored indicator showing) to your Switcher amplifier settings are in default. If you hear a buzz or hum, try unplugging the Power Supply. Make sure your headset's User Guide to page 10 for more details. 6. See page 4 for... your Switcher amplifier into the AC power source again. See page 12 for more details. 9. If you plugged your Switcher amplifier. Call a friend or colleague. 5. See page...
User Guide
Page 8
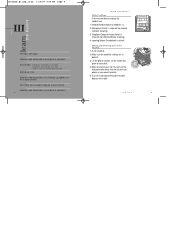
...Thumbwheel is set to 4. Lift the phone handset off the cradle and place on headset. 2. To finish a call . Making and Receiving Calls with a Headset 1. english 9 PA R T learn the basics Switcher.biling.ii-25 11/4/98 7:58 PM Page 8 III DEFAULT SETTINGS MAKING AND ...RECEIVING CALLS WITH A HEADSET ADJUSTING •HEADSET INCOMING VOLUME •HEADSET OUTGOING VOLUME •AUDIO DEVICE LISTENING ...
...Thumbwheel is set to 4. Lift the phone handset off the cradle and place on headset. 2. To finish a call . Making and Receiving Calls with a Headset 1. english 9 PA R T learn the basics Switcher.biling.ii-25 11/4/98 7:58 PM Page 8 III DEFAULT SETTINGS MAKING AND ...RECEIVING CALLS WITH A HEADSET ADJUSTING •HEADSET INCOMING VOLUME •HEADSET OUTGOING VOLUME •AUDIO DEVICE LISTENING ...
User Guide
Page 9
... 2. The same panel houses the Telephone/Amplifier Compatibility Switch. 3. Turn counter-clockwise to make your voice quieter to the bottom of the Switcher amplifier. 2. Use the Audio Device Incoming Volume Control on top of the amplifier to the caller. The Microphone Selection Switch should be in... Volume 1. Turn clockwise to make your voice louder to adjust the Outgoing Volume Control. Switcher.biling.ii-25 11/4/98 7:58 PM Page 10 LEARN THE BASICS Adjusting Headset Incoming Volume 1. Adjust the volume by turning the Thumbwheel 2 on the left-hand side of the amplifier. ...
... 2. The same panel houses the Telephone/Amplifier Compatibility Switch. 3. Turn counter-clockwise to make your voice quieter to the bottom of the Switcher amplifier. 2. Use the Audio Device Incoming Volume Control on top of the amplifier to the caller. The Microphone Selection Switch should be in... Volume 1. Turn clockwise to make your voice louder to adjust the Outgoing Volume Control. Switcher.biling.ii-25 11/4/98 7:58 PM Page 10 LEARN THE BASICS Adjusting Headset Incoming Volume 1. Adjust the volume by turning the Thumbwheel 2 on the left-hand side of the amplifier. ...

User Guide
Page 10
... base cradle. Lift handset off your soundcard. Try a test call first and check this feature with a Handset 1. Switch the Headset/Handset Selector to an Audio Device 1. Shutting Out Sound from an Audio Device 1. Switcher.biling.ii-25 11/4/98 7:58 PM Page 12 2 3 4 5 6 2 3 4 5 6 2 3 4 5 6 12 LEARN THE BASICS Muting a Call 1. Making and Receiving...
... base cradle. Lift handset off your soundcard. Try a test call first and check this feature with a Handset 1. Switch the Headset/Handset Selector to an Audio Device 1. Shutting Out Sound from an Audio Device 1. Switcher.biling.ii-25 11/4/98 7:58 PM Page 12 2 3 4 5 6 2 3 4 5 6 2 3 4 5 6 12 LEARN THE BASICS Muting a Call 1. Making and Receiving...

User Guide
Page 12
...Switch 5 6 (colored indicator showing), and the Microphone Selection Switch (colored indicator showing). 2 Use your external audio device. Switch the Headset/Handset selector to control recording, playback and volume. Do not assume that your caller can hear what you . Depress the Telephone/Computer...in default. 2. Note: Some computer soundcards have "local loop back," which means your audio device user manual. 16 english 17 Switcher.biling.ii-25 11/4/98 7:58 PM Page 16 SECTION maintenance and troubleshooting USE ADVANCED FEATURES Recording and Playing Outgoing Messages and Music...
...Switch 5 6 (colored indicator showing), and the Microphone Selection Switch (colored indicator showing). 2 Use your external audio device. Switch the Headset/Handset selector to control recording, playback and volume. Do not assume that your caller can hear what you . Depress the Telephone/Computer...in default. 2. Note: Some computer soundcards have "local loop back," which means your audio device user manual. 16 english 17 Switcher.biling.ii-25 11/4/98 7:58 PM Page 16 SECTION maintenance and troubleshooting USE ADVANCED FEATURES Recording and Playing Outgoing Messages and Music...
User Guide
Page 13
...the cradle. Confirm that the Telephone/Amplifier Compatibility Switch is routed away from your telephone. I TRY TO MAKE OR RECEIVE A PHONE CALL. Switcher.biling.ii-25 11/4/98 7:58 PM Page 18 Maintenance Hints MAINTENANCE AND TROUBLESHOOTING Trouble Shooting Guide PROBLEM ITEMS TO CHECK I DO NOT HEAR... A DIAL TONE WHEN I GET A LOW PITCH HUM IN MY HEADSET SPEAKER AND/OR MY CALLERS COMPLAIN THEY CAN HEAR HUM. See "Adjusting Outgoing Volume" on page 4). Experimenting with no hum. Ensure the...
...the cradle. Confirm that the Telephone/Amplifier Compatibility Switch is routed away from your telephone. I TRY TO MAKE OR RECEIVE A PHONE CALL. Switcher.biling.ii-25 11/4/98 7:58 PM Page 18 Maintenance Hints MAINTENANCE AND TROUBLESHOOTING Trouble Shooting Guide PROBLEM ITEMS TO CHECK I DO NOT HEAR... A DIAL TONE WHEN I GET A LOW PITCH HUM IN MY HEADSET SPEAKER AND/OR MY CALLERS COMPLAIN THEY CAN HEAR HUM. See "Adjusting Outgoing Volume" on page 4). Experimenting with no hum. Ensure the...
User Guide
Page 14
... In" jack on the computer to be replaced. THE SOUND FROM MY COMPUTER IS DISTORTED. The Plantronics Help Desk is plugged into the "Line Out" jack and adjust the Audio Device Listening Volume (... Depress the Microphone Selection Switch (colored indicator showing). If you are using batteries to power the Switcher Amplifier, the three 'beeps' are low and need to adjust the microphone volume. Move the ...PM PST 800 544-4660 20 english 21 I AM USING MY SWITCHER AMPLIFIER WITH AN AUDIO DEVICE AND NO TELEPHONE. Switcher.biling.ii-25 11/4/98 7:58 PM Page 20 Maintenance Hints ...
... In" jack on the computer to be replaced. THE SOUND FROM MY COMPUTER IS DISTORTED. The Plantronics Help Desk is plugged into the "Line Out" jack and adjust the Audio Device Listening Volume (... Depress the Microphone Selection Switch (colored indicator showing). If you are using batteries to power the Switcher Amplifier, the three 'beeps' are low and need to adjust the microphone volume. Move the ...PM PST 800 544-4660 20 english 21 I AM USING MY SWITCHER AMPLIFIER WITH AN AUDIO DEVICE AND NO TELEPHONE. Switcher.biling.ii-25 11/4/98 7:58 PM Page 20 Maintenance Hints ...
User Guide
Page 15
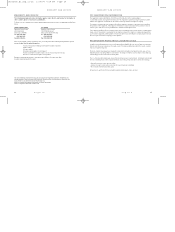
...58 PM Page 22 REPLACEMENT PARTS AND ACCESSORIES FOR SWITCHER For information on accessories and spare parts, call Plantronics at 1-800-544-4660, or visit the Plantronics web site at www.plantronics.com REPLACEMENT PARTS AND ACCESSORIES FOR SWITCHER AC Power Supply ITEM AC Power Supply PART # ... Device (attaches amplifier to desk.) ITEM Amplifier Security Device PART # 40696-01 Plantronics Custom Cradle Mate (holds handset "off-hook" and a flashing "BUSY" light indicates when headset is in use) ITEM Plantronics Custom Cradle Mate PART # 40715-01 Cradle Mate only (easy-to-use device...
...58 PM Page 22 REPLACEMENT PARTS AND ACCESSORIES FOR SWITCHER For information on accessories and spare parts, call Plantronics at 1-800-544-4660, or visit the Plantronics web site at www.plantronics.com REPLACEMENT PARTS AND ACCESSORIES FOR SWITCHER AC Power Supply ITEM AC Power Supply PART # ... Device (attaches amplifier to desk.) ITEM Amplifier Security Device PART # 40696-01 Plantronics Custom Cradle Mate (holds handset "off-hook" and a flashing "BUSY" light indicates when headset is in use) ITEM Plantronics Custom Cradle Mate PART # 40715-01 Cradle Mate only (easy-to-use device...
User Guide
Page 16
... and repair service. AN IMPORTANT WORD ABOUT LISTENING LEVELS In addition to providing telephone access, your Headset Switcher Amplifier lets you advance notice in a sturdy carton with your hearing. If this equipment. Number and description of Plantronics, Inc. and Canada. On the bottom of the modular adapter is a label that infrequently occur during...
... and repair service. AN IMPORTANT WORD ABOUT LISTENING LEVELS In addition to providing telephone access, your Headset Switcher Amplifier lets you advance notice in a sturdy carton with your hearing. If this equipment. Number and description of Plantronics, Inc. and Canada. On the bottom of the modular adapter is a label that infrequently occur during...

